
Anybody Have Ideas?
 03-26-2017, 04:30 PM
#1
Drifting

Thread Starter

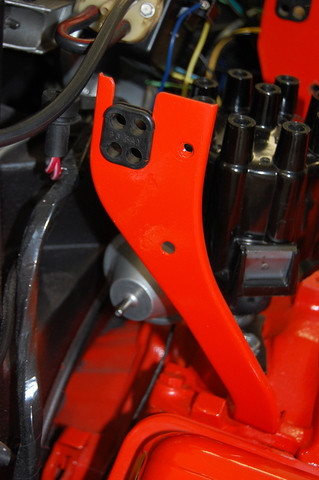
Just finished my winter project today (Edelbrock E-Street Cylinder Heads). Just finished timing the engine and I discovered a minor issue with distributor vacuum canister and the right hand ignition shield bracket. Only thing I can come up with is buying a new bracket and drilling a hole or reclock the distributor. I'd rather not reclock the distributor if I can do something else. Anyone have any ideas?
 03-26-2017, 04:34 PM
#2
Drifting
Looks to me like you could grind off the lip of the bracket so you have a straight shot on the hose

 03-26-2017, 05:15 PM
#4
Team Owner

Member Since: Sep 2006
Location: Westminster Maryland
Posts: 30,173
Likes: 0
Received 2,878 Likes
on
2,515 Posts

Hi s,
I believe typically the distributor is clocked so the advance can and it's vacuum hose come around the rear of the bracket for the shielding.
Regards,
Alan
I believe typically the distributor is clocked so the advance can and it's vacuum hose come around the rear of the bracket for the shielding.
Regards,
Alan
03-26-2017, 05:19 PM
#5
Burning Brakes


Hey Sunflower,
To me it doesn't look like you have the correct right side shield bracket. Even though I have a 73' I'm pretty sure the 72' bracket was the same. It's curved to let the vacuum hose clear. Is that an edelbrock intake?
Just a thought. Here's a pic of mine?
Tooch
To me it doesn't look like you have the correct right side shield bracket. Even though I have a 73' I'm pretty sure the 72' bracket was the same. It's curved to let the vacuum hose clear. Is that an edelbrock intake?
Just a thought. Here's a pic of mine?
Tooch
Last edited by Tooch1; 03-26-2017 at 05:30 PM. Reason: Corrected info!
03-26-2017, 05:24 PM
#6
Team Owner
Member Since: Sep 2006
Location: Westminster Maryland
Posts: 30,173
Likes: 0
Received 2,878 Likes
on
2,515 Posts
Hi Tooch,
I agree that the bracket is typically mounted under the second from the rear manifold bolt?�.look closely at s's photo.
Regards,
Alan
I agree that the bracket is typically mounted under the second from the rear manifold bolt?�.look closely at s's photo.
Regards,
Alan
03-26-2017, 05:28 PM
#7
Burning Brakes
Yes, I see it now. He's using the correct bolt. Maybe the bracket change will work for him. Made the correction above.....I'm slipping Alan

Last edited by Tooch1; 03-26-2017 at 05:31 PM.
03-26-2017, 05:39 PM
#8
Team Owner
Member Since: Sep 2006
Location: Westminster Maryland
Posts: 30,173
Likes: 0
Received 2,878 Likes
on
2,515 Posts
Hi Tooch,
I hope s turns the distributor.
There's no real reason to cut the bracket.
Regards,
Alan
It'll be a little easier to set the dwell too.
I hope s turns the distributor.
There's no real reason to cut the bracket.
Regards,
Alan
It'll be a little easier to set the dwell too.
03-26-2017, 05:45 PM
#9
Burning Brakes
His is facing more forward than ours, using the end of the valve cover as a guide..
I just sent you a PM!
Tooch
Last edited by Tooch1; 03-26-2017 at 05:45 PM.
03-26-2017, 07:14 PM
#11


No, of course not. Lifting the dizzy to re clock it 1 or 2 teeth doesn't change anything, just have to re set the timing. Keep in mind the oil shaft WILL NOT BE LINED UP so it won't drop back in. Stick a long screwdriver down there and move the shaft a little.
 03-27-2017, 09:34 AM
#14
Drifting
Thread Starter
I just had a lightbulb moment. So, if I move all the wires at the distributor cap 1 tower counter clockwise, mark the side of the distributor housing with the new location of #1 tower, pull dizzy and turn rotor 1 or 2 teeth clockwise, drop the dizzy so rotor lines up with the new #1 tower, I should be good to go. Correct?
03-27-2017, 11:33 AM
#15
Drifting
I am wondering what the tach cable looks like is it in a sharp angle. He may have to reclock the distributor so the tach cable is not in a bind and that may solve the vacuum line.
03-27-2017, 09:39 PM
#17
Race Director

I just had a lightbulb moment. So, if I move all the wires at the distributor cap 1 tower counter clockwise, mark the side of the distributor housing with the new location of #1 tower, pull dizzy and turn rotor 1 or 2 teeth clockwise, drop the dizzy so rotor lines up with the new #1 tower, I should be good to go. Correct?
Doesn't matter where the rotor actually is... for illustration..
looking at a clock - if the rotor pointed to 6 oclock, rotate the distributor so 6 goes to 7's (o'clock) position. now move the wire at # 7 position to #6 and the rotor still points to #6. follow all the way around wire by wire and you are good to go. #8 (o'clock) wire position to #7 (o'clock) ..... last will be 6 to 5.
Last edited by BLUE1972; 03-27-2017 at 09:57 PM.

The following users liked this post:
sunflower 1972 (04-08-2017)
03-28-2017, 06:06 PM
#19
Drifting
Member Since: Aug 2015
Location: NSW, Australia
Posts: 1,939
Received 472 Likes
on
344 Posts
C3 of Year Finalist (track prepared) 2019
NO - you don't have to pull the distributor, just turn / move it 1 plug wire clockwise and move the wires I wire counterclockwise. The rotor will be on the same wire as before the move.
Doesn't matter where the rotor actually is... for illustration..
looking at a clock - if the rotor pointed to 6 oclock, rotate the distributor so 6 goes to 7's (o'clock) position. now move the wire at # 7 position to #6 and the rotor still points to #6. follow all the way around wire by wire and you are good to go. #8 (o'clock) wire position to #7 (o'clock) ..... last will be 6 to 5.
03-30-2017, 12:19 PM
#20
Safety Car

the right way would be pull dist. advance 1 tooth and retime.
the easy way, leave dist. seated then rotate all plug wires, 1 plug over.
loosen dist. and rotate 1 plug over.
con's : your plug wires will not be in the expected place for next mechanic.
Pro : easy way you do not have to pull the Dist.
the easy way, leave dist. seated then rotate all plug wires, 1 plug over.
loosen dist. and rotate 1 plug over.
con's : your plug wires will not be in the expected place for next mechanic.
Pro : easy way you do not have to pull the Dist.
The following users liked this post:
sunflower 1972 (04-08-2017)