Pic of door panel fix
 04-16-2009, 12:08 PM
#41
Team Owner

Member Since: Oct 2000
Location: Fort Knox, KY
Posts: 96,443
Likes: 0
Received 8 Likes
on
8 Posts
Cruise-In IV Veteran
Cruise-In VI Veteran
Cruise-In VII Veteran
Cruise-In VIII Veteran


 04-16-2009, 07:58 PM
#43
Advanced


Member Since: Feb 2009
Location: West Chester Pa.
Posts: 62
Likes: 0
Received 0 Likes
on
0 Posts
I epoxied small metal plates to the top of my door frame last night then installed screws down thru the weatherstrip into the plates and all is well and I know it will stay forever. I beleive this is the best and easiest fix to date the I have read on the forumn.
Hope this helps some people out
Hope this helps some people out
05-20-2009, 10:08 AM
#45
Instructor
Member Since: Aug 2001
Location: brighton mi
Posts: 214
Likes: 0
Received 0 Likes
on
0 Posts
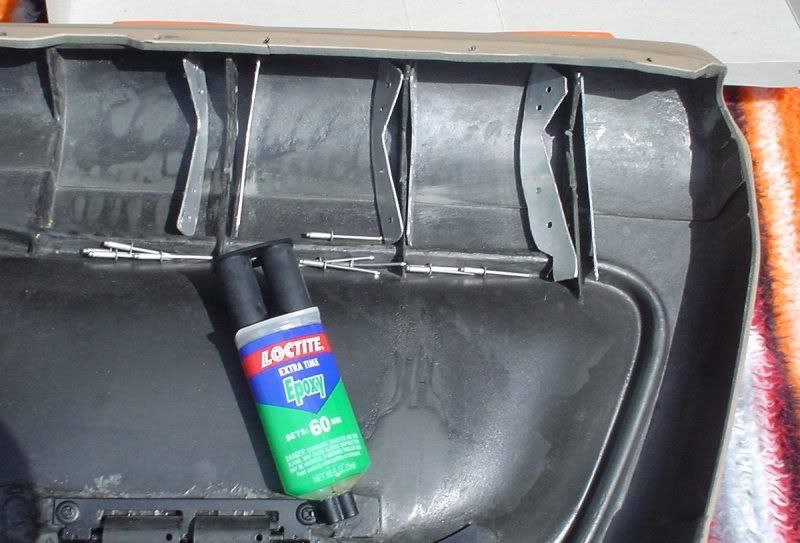
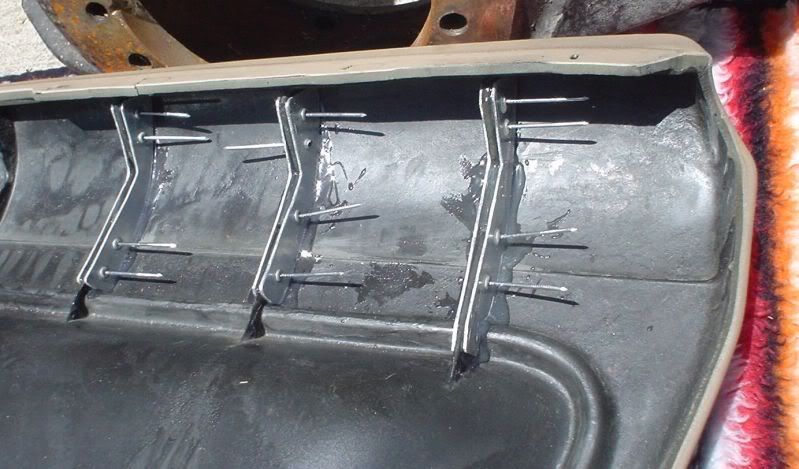
I used aluminum plates, rivets and 2 part epoxy. That should hold it for a very long time.
Here�s pics.
Thanks for sharing this idea with us.
Here�s pics.
Thanks for sharing this idea with us.
 Any questions
 06-24-2009, 06:20 PM
#47
Advanced

Member Since: Mar 2009
Location: New Orleans LA
Posts: 54
Likes: 0
Received 0 Likes
on
0 Posts
where the hell do you guys get these materials ie, the rivets, the thing that turns what appears to be a nail into a rivet, the pattern to make the rib etc.
Can you get more elementary for someone who doesn't know beans?
Thanks.
This is a wonderful fix but I would love more info.
I can't make words until I learn the alphabet. Know what I mean?
Can you get more elementary for someone who doesn't know beans?
Thanks.
This is a wonderful fix but I would love more info.
I can't make words until I learn the alphabet. Know what I mean?
06-24-2009, 09:14 PM
#48
Burning Brakes

Member Since: Sep 2004
Location: Texarkana TX
Posts: 1,011
Likes: 0
Received 0 Likes
on
0 Posts
hey jgclark, can i buy some of those brackets from you for the ribs? for both sides? i dont have a clue or would want to make those. they are a work of art. please.
 08-02-2009, 03:13 PM
#52
Instructor
Excellent! Thx for sharing!
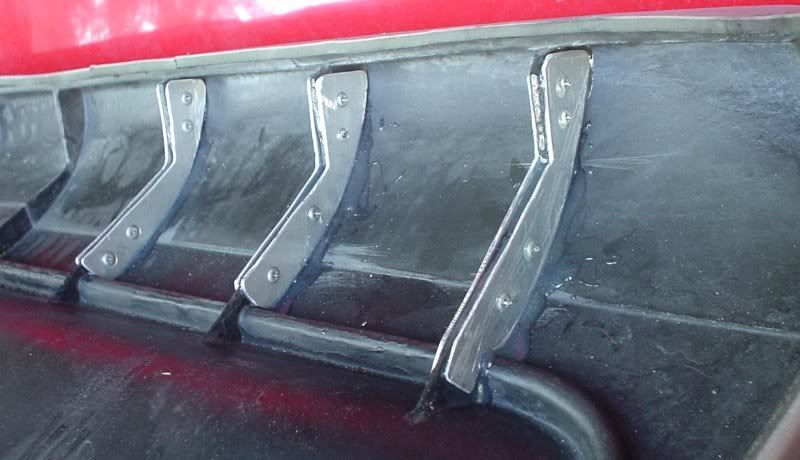
Just my opinion, but I think jgclark put the finishing touches on this; gussets on both sides of the ribs.
Rivets have a tendency to sometimes cause "spidering" in plastics (cracks that radiate out from the hole.) By putting gussets on both sides you are much less likely to see future failures.
For those of you attempting this at home, I would recommend using aluminum rivets with aluminum mandrels (nails) so you don't put too much squeeze on that plastic.
Last edited by basselope; 08-02-2009 at 03:17 PM.


 08-04-2009, 03:33 PM
#58
Le Mans Master

It's a great idea i think you can do it
1.make a template out of cardboard
2.trace it onto aluminum
3.cut out with jig saw
4.drill holes in pairs so they match
5.rivet together
Good luck
1.make a template out of cardboard
2.trace it onto aluminum
3.cut out with jig saw
4.drill holes in pairs so they match
5.rivet together
Good luck
Last edited by ch@0s; 08-04-2009 at 03:48 PM.
08-05-2009, 01:47 AM
#59
Burning Brakes
Member Since: Sep 2004
Location: Texarkana TX
Posts: 1,011
Likes: 0
Received 0 Likes
on
0 Posts
Sounds easy enough, but I suck at fabrication. Hmmm. I still wanna just buy a set. But thanks for the information. Surely one of these guys will be willin to hook a vette brother up!!