When you click on links to various merchants on this site and make a purchase, this can result in this site earning a commission. Affiliate programs and affiliations include, but are not limited to, the eBay Partner Network.
The front of the Kwik-lift is sliding when I pull up on it what kind of padding should I put under the front to ramps. Front ramps only. Second question is will a lowered 1991 Corvette bottom out going up the ramps or do I need to put two by fours or something under the front in addition to the non-slip pad.
Like QCVette, my Kwik-Lift is on smooth concrete. I marked the placement of the two front stands and the beginning of the ramps with 2 inch tape. If I have any movement, I just nudge them back in alignment with the tape. I only ever see about 1/4 inch of movement from my tape markings. Just a quick nudge after the car is backed down puts things where they were. When the shift occurs, it is always after backing down the ramps. The movement is negligible. Sure do love my Kwik-Lift and its simplicity. No muss, no fuss, no hydraulics to worry about. Bought mine new about 8 months ago.
Like QCVette, my Kwik-Lift is on smooth concrete. I marked the placement of the two front stands and the beginning of the ramps with 2 inch tape. If I have any movement, I just nudge them back in alignment with the tape. I only ever see about 1/4 inch of movement from my tape markings. Just a quick nudge after the car is backed down puts things where they were. When the shift occurs, it is always after backing down the ramps. The movement is negligible. Sure do love my Kwik-Lift and its simplicity. No muss, no fuss, no hydraulics to worry about. Bought mine new about 8 months ago.
B17Crew
I am having some slight sliding when I pull up says an observer. Also right rear passenger tire ends up almost at edge of ramp not centered so I''m going to try moving start of the ramps a couple of inches right to see if that helps
I am having some slight sliding when I pull up says an observer. Also right rear passenger tire ends up almost at edge of ramp not centered so I''m going to try moving start of the ramps a couple of inches right to see if that helps
I've wound up with a tire not centered before as well. It can happen if your ramps are not equally spaced apart. I took a tape measure and measured the distance between the front of the ramp beams and rear ramp beams to make the sure I had equal spacing. This worked out well. After measuring distance between front and rear beams and driving the car up the ramps is when I marked the garage floor with tape. I hope this helps!
lead up. It will depend on the length of the 2X4s. Once you align your car to go on ramp you will know what you have to do. Sometimes it's coming off as the lip wants to drag. I lowered mine after getting lift.
I've wound up with a tire not centered before as well. It can happen if your ramps are not equally spaced apart. I took a tape measure and measured the distance between the front of the ramp beams and rear ramp beams to make the sure I had equal spacing. This worked out well. After measuring distance between front and rear beams and driving the car up the ramps is when I marked the garage floor with tape. I hope this helps!
B17Crew
As soon as I can get over to the house that has my car in its garage; we're remodeling a house that we bought before we move in;, I think that's a good idea. I'll measure between the ramps on the lower end to make sure they're equal to the upper end where I put the bridge or I could just slide the bridge all the way down and see if it bottle necks going down. But once I get both the upper and lower ramps equal in width then I should put some tape down to make sure that I can always keep them aligned because I sure would hate to drive the rear passenger wheel off of the ramp; that would not be a good thing
As soon as I can get over to the house that has my car in its garage; we're remodeling a house that we bought before we move in;, I think that's a good idea. I'll measure between the ramps on the lower end to make sure they're equal to the upper end where I put the bridge or I could just slide the bridge all the way down and see if it bottle necks going down. But once I get both the upper and lower ramps equal in width then I should put some tape down to make sure that I can always keep them aligned because I sure would hate to drive the rear passenger wheel off of the ramp; that would not be a good thing
I got over to the new house today where the Kwik-lift is and took the right rear ramp and moved it over about 2 or 3 inches and it actually was narrower than the upper two ramps before I moved it, but when I moved it over two or three inches it was actually wider than the upper ramps and the right rear passenger tire now fits perfectly on that ramp as does the driver's rear tire so that seemed to solve the problem. I'll put some tape on the ground and we'll be good to go thank you all.
Now what I need are some preramps to just butt up to the start of the Kwik-lift something about a foot long I didn't get those with a Kwik-lift I bought on Craigslist. Because an observer noticed that when I hit the Ramps Head On Without a preramp it causes them to slide and I also need some rubber mats to go under the front to cut down on sliding.
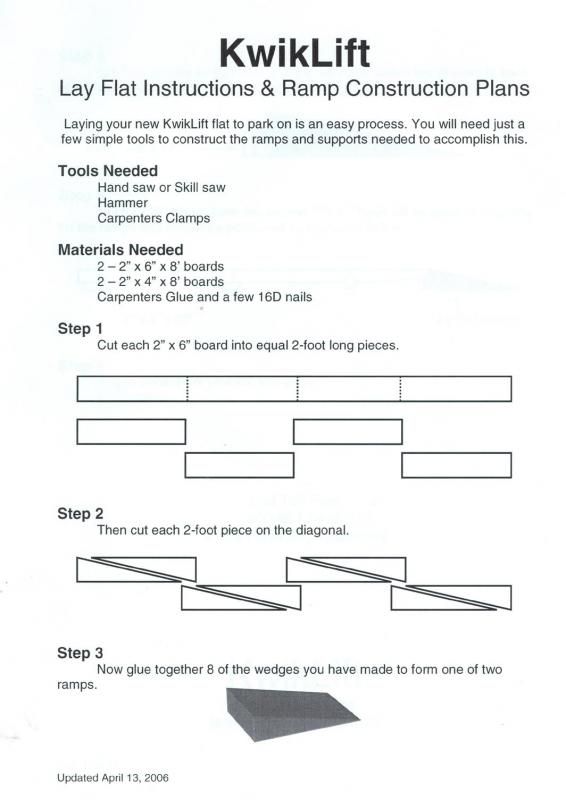
Attached are plans for homemade wooden approach ramps. They are very easy to build and work well. They plans came with my ramps when I purchased them and were also posted on the Kwik-Lift website.
Attached are plans for homemade wooden approach ramps. They are very easy to build and work well. They plans came with my ramps when I purchased them and were also posted on the Kwik-Lift website.....
That is what I based my ramps on too.
I made a few changes also.
I am not a fan of gluing it together so I used some all thread and some nuts and washers to tighten it up.
I also didn't want as much weight, so I used sections as spacers instead of a solid ramp.
Mine is one 2x section wider than the plan and it still is not as wide as the Kwik-lift. I would even make it one wider.
A picture of mine for comparison, but you can get creative or not how you build or modify it.
For when the kwik lift is in the up position, I don't use a ramp before the kwik lift ramps, but I just use a 1 x 6 about a foot long in front of the kwik lift ramp so the tire hit that 1" wood and then about another 1" at the front of the Kwik lift ramp. The smaller step might be why mine doesn't move on a smooth concrete floor.
Man... I sold my red Kwik Lift just a few months back... I didnt think I was going to have the opportunity to use it again.... now I am regretting it! Well, the good thing is, if I truly need to use it, I sold it to a friend who says I can come by & use it any time....
Attached are plans for homemade wooden approach ramps. They are very easy to build and work well. They plans came with my ramps when I purchased them and were also posted on the Kwik-Lift website.
I am not a fan of gluing it together so I used some all thread and some nuts and washers to tighten it up.
I also didn't want as much weight, so I used sections as spacers instead of a solid ramp.
Mine is one 2x section wider than the plan and it still is not as wide as the Kwik-lift. I would even make it one wider.
A picture of mine for comparison, but you can get creative or not how you build or modify it.
For when the kwik lift is in the up position, I don't use a ramp before the kwik lift ramps, but I just use a 1 x 6 about a foot long in front of the kwik lift ramp so the tire hit that 1" wood and then about another 1" at the front of the Kwik lift ramp. The smaller step might be why mine doesn't move on a smooth concrete floor.
 03-26-2017, 04:19 PM