What Makes a C4 Overheat...See Pics
 02-13-2007, 09:39 PM
#1
Melting Slicks

Thread Starter
Member Since: Oct 2004
Location: Knoxville Tennessee
Posts: 2,662
Likes: 0
Received 6 Likes
on
5 Posts
My 92 doesn't really overheat but the temp will creep up in stop and go traffic so I decided to do a little preventative maintenance and upgrade my radiator to a DeWitt aluminum one. After getting the upper shroud off it was clear that our Vettes are good vaccuum cleaners!

The left side has a lot of leaves and other trash.

You can see how much of the radiator is clogged with trash. I would guess about 25 to 30 percent of it is blocked.

This shows the DeWitt radiator beside the original one.

I don't believe you can find a radiator with any better fit and finish than Tom DeWitt's radiator!

I have owned this car for only 4 months, It has 71,000 miles on it. I don't know if the radiator has ever been cleaned.

This shows how much thicker the DeWitt core is compared to the stock core.

This shows the rubber I trimmed from the upper radiator cushions per the directions furnished with the new radiator. The bottom ones don't need trimming.
I will trim 3/4's of an inch from the fan shroud tomorrow night and begin cleaning the A/C condensor and the radiator area. This should provide my 92 with greater cooling capacity. I am also replacing the hoses, clamps and t-stat as well. I am going with a hypertech 160 t-stat and the hypertech cool fan switch to lower the temp just a little. I am also thinking about making a screen for the air inlet to catch the trash before it gets to the radiator.
Bernie
The left side has a lot of leaves and other trash.
You can see how much of the radiator is clogged with trash. I would guess about 25 to 30 percent of it is blocked.
This shows the DeWitt radiator beside the original one.
I don't believe you can find a radiator with any better fit and finish than Tom DeWitt's radiator!
I have owned this car for only 4 months, It has 71,000 miles on it. I don't know if the radiator has ever been cleaned.
This shows how much thicker the DeWitt core is compared to the stock core.
This shows the rubber I trimmed from the upper radiator cushions per the directions furnished with the new radiator. The bottom ones don't need trimming.
I will trim 3/4's of an inch from the fan shroud tomorrow night and begin cleaning the A/C condensor and the radiator area. This should provide my 92 with greater cooling capacity. I am also replacing the hoses, clamps and t-stat as well. I am going with a hypertech 160 t-stat and the hypertech cool fan switch to lower the temp just a little. I am also thinking about making a screen for the air inlet to catch the trash before it gets to the radiator.
Bernie
 02-13-2007, 09:57 PM
#3
Race Director


I use a snow brush. From the passenger side of the car, I carefully stick the brush between the radiator and the AC heat exchanger and brush both sides. Generally I can push the debris to the center bottom, where it falls out. I finish up by squirting water from the fans toward the front of the car, being very careful to avoid the opti. Usually I wrap the opti in a couple of towels first and then remove them immediately. This procedure usually leaves the radiator free of the large accumulations of road trash such as shown in the photos above.
02-13-2007, 09:58 PM
#4
Melting Slicks
Thread Starter
Member Since: Oct 2004
Location: Knoxville Tennessee
Posts: 2,662
Likes: 0
Received 6 Likes
on
5 Posts
You would need to blow air thru the radiator from the fan side forward. It would be very difficult without removing the fans and radiator.
Bernie
Bernie
02-13-2007, 10:47 PM
#5
Team Owner


Member Since: Oct 2004
Location: altered state
Posts: 81,242
Received 3,043 Likes
on
2,602 Posts
St. Jude Donor '05

Pull your fans off and use a garden hose with a high pressure nozzle and slowly blast the radiator clean. Aim from behind the radiator towards the front of the car. Even if it looks good, youd be amazed at how much small stuff gets lodged in there. you will definitely notice a difference.
02-14-2007, 02:11 AM
#7
 02-14-2007, 02:15 AM
#8
Race Director
C4 Corvette.....AKA Bottom Feeder....AKA road vacuum.
I removed and cleaned the rad on my 84 about 5 years ago...looked even worse than yours. Had a Walgreens bag, a couple of cigarette butts, and a nice desecated grasshopper.
Cleaning the front of the rad made it run about 12-15 degrees cooler.
I removed and cleaned the rad on my 84 about 5 years ago...looked even worse than yours. Had a Walgreens bag, a couple of cigarette butts, and a nice desecated grasshopper.
Cleaning the front of the rad made it run about 12-15 degrees cooler.
02-14-2007, 07:35 AM
#9
Melting Slicks
Thread Starter
Member Since: Oct 2004
Location: Knoxville Tennessee
Posts: 2,662
Likes: 0
Received 6 Likes
on
5 Posts
I will post pics of the amount of material I cut from the fan shroud tonight. I believe 3/4's of an inch needs to be trimmed. I dread putting the six screws back in the sides of the shroud. I had to buy a
7MM ratcheting wrench to get a couple of them. My set only went to
8MM. I hate to cover the DeWitt radiator with the shroud. It is really a finely finished product.
Bernie
7MM ratcheting wrench to get a couple of them. My set only went to
8MM. I hate to cover the DeWitt radiator with the shroud. It is really a finely finished product.
Bernie
02-14-2007, 08:27 AM
#11
Racer

Member Since: Jan 2005
Location: Lenexa Kansas
Posts: 373
Likes: 0
Received 0 Likes
on
0 Posts
Pull your fans off and use a garden hose with a high pressure nozzle and slowly blast the radiator clean. Aim from behind the radiator towards the front of the car. Even if it looks good, youd be amazed at how much small stuff gets lodged in there. you will definitely notice a difference.
I had the same problem with my 92 & 93. If you have a C 4, you have trash blocking your air flow. You can use a flashlight and look to the front of the rad through the freon access holes, which are on the passenger side of the rad. If you have not done this, you will be surprised at the accumulation of trash. I took the easy way. I covered the opti, but had the cars on a lift. I didn't remove the fans, but I still had pretty good access from the bottom. Blow air from rear to front, and then high pressure water.
Several of the parts houses sell a rad opening screen made of hardware cloth. I'm sure they would help. But I believe they charge $39.00 ea. Of course, the best cleaning will take place when you remove your radiator.
02-14-2007, 09:57 AM
#12
Melting Slicks
Thread Starter
Member Since: Oct 2004
Location: Knoxville Tennessee
Posts: 2,662
Likes: 0
Received 6 Likes
on
5 Posts
Enventr,
I am going to install the 160 t-stat which should drop the operating temp to the mid 180 degree range. If the temp goes too low I may go with a 170 0r 180 stat ; but my goal is to have it max at or below 195 degrees. I will probably have to play with this to fine tune where I want the operating temp to be. I did the same thing with my 79 which is now rock solid and the temp never fluctuates.
Bernie
02-14-2007, 01:52 PM
#13
Le Mans Master

Member Since: Aug 2004
Location: Metairie Louisiana
Posts: 5,141
Likes: 0
Received 4 Likes
on
4 Posts
02-14-2007, 01:56 PM
#14
Le Mans Master
Member Since: Aug 2004
Location: Metairie Louisiana
Posts: 5,141
Likes: 0
Received 4 Likes
on
4 Posts
I will post pics of the amount of material I cut from the fan shroud tonight. I believe 3/4's of an inch needs to be trimmed. I dread putting the six screws back in the sides of the shroud. I had to buy a
7MM ratcheting wrench to get a couple of them. My set only went to
8MM. I hate to cover the DeWitt radiator with the shroud. It is really a finely finished product.
Bernie
7MM ratcheting wrench to get a couple of them. My set only went to
8MM. I hate to cover the DeWitt radiator with the shroud. It is really a finely finished product.
Bernie

Last edited by rickneworleansla; 02-14-2007 at 03:27 PM.
02-14-2007, 03:09 PM
#15
Le Mans Master
Primary on/off: 190/180
Secondary on/off: 195/185
This, in combination with a 160*F thermostat keeps the car running much cooler.
Note: If you do this, be sure to keep your fan-off settings at least 20* above the thermostat temp so that your fans won't run continuously at idle & low-speed.
The best way to clean out the debris that may have collected is to remove the radiator (I yanked mine and installed a brand new OEM unit that I got for around $160 from Chris May at Superior - I just couldn't see spending hours cleaning the old core, then reinstalling a 12-year-old radiator). Trying to blow or flush the stuff out from behind with the radiator in-car just results in having most of it pushed into the rear of the A/C condenser.
And this is how I keep all but the smallest of debris from getting to my radiator:
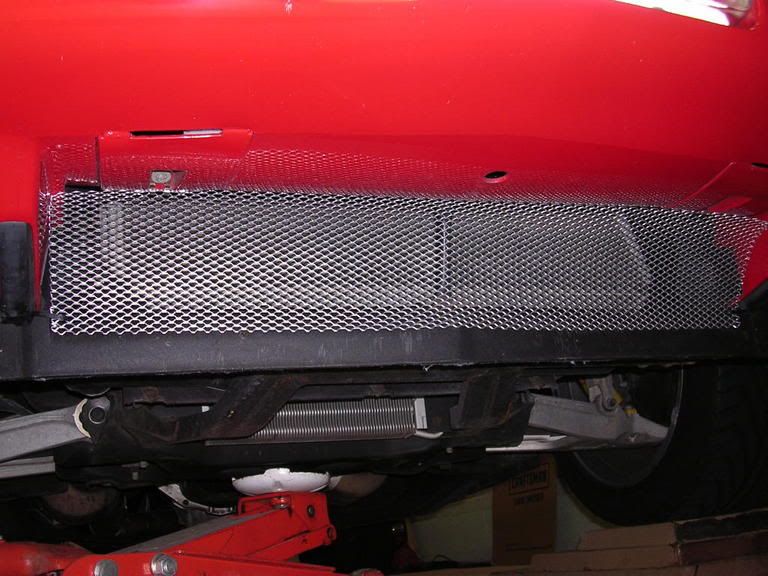
Cost to fabricate this screen was less than $10.
Be well,
SJW
Last edited by SJW; 02-14-2007 at 03:21 PM.
02-14-2007, 04:46 PM
#16
Melting Slicks
Thread Starter
Member Since: Oct 2004
Location: Knoxville Tennessee
Posts: 2,662
Likes: 0
Received 6 Likes
on
5 Posts
Rick,
I will use a cut off tool to trim off the excess material on the shroud tonight. I will mark it off with masking tape and cut along it. Your pics of your work looks good. I will check the screws to see if it will be easier to reverse them when putting it back together.
SJW,
Thanks for the tip on reprogramming the ECM. So far I haven't found anyone that can do it for me and I don't want to spend $300 plus to buy a unit to do it. I was thinking about taking the plug out of the side of the block tonight to drain coolant from the engine so I could install the new fan switch but might wait to see if I can get the ECM reprogrammed.
I appreciate everyone's input!
Bernie
02-14-2007, 04:50 PM
#17
Melting Slicks
Thread Starter
Member Since: Oct 2004
Location: Knoxville Tennessee
Posts: 2,662
Likes: 0
Received 6 Likes
on
5 Posts
SJW,
Looks like you have a Bigmouth air dam on your car. I have one as well. I had to cut it drastically to make it work and fit properly and still doesn't lower temps. How did you mount the screen to your car? This is something I have been considering doing.
Bernie
Looks like you have a Bigmouth air dam on your car. I have one as well. I had to cut it drastically to make it work and fit properly and still doesn't lower temps. How did you mount the screen to your car? This is something I have been considering doing.
Bernie
02-14-2007, 05:04 PM
#18
Le Mans Master
SJW,
Looks like you have a Bigmouth air dam on your car. I have one as well. I had to cut it drastically to make it work and fit properly and still doesn't lower temps. How did you mount the screen to your car? This is something I have been considering doing.
Bernie
Looks like you have a Bigmouth air dam on your car. I have one as well. I had to cut it drastically to make it work and fit properly and still doesn't lower temps. How did you mount the screen to your car? This is something I have been considering doing.
Bernie
Re: Attaching the screen:
I bought some galvanized expanded-metal gutter guard material (available at Lowe's, Home Depot, etc). Its intended use is to keep leaves out of the rain gutters on your house. The package comes with something like six or eight lengths of material. I cut a piece of this material lengthwise to fit the opening of the air intake -- width was fine as-is.
To mount it, I removed the two stainless steel mounting clips that were provided with each length of screen, then "re-engineered" them (straightened out the U-bend) and drilled a hole in each one. I re-attached the clips (although slightly differently) to the screen material so that they would line up with the two fog-lamp cover screws on the underside of the bumper. I then removed the fog lamp cover screws, and secured the clips under these two screws. That took care of attaching the upper side of the screen.
To attach the lower side, I drilled a 1/4" hole in the black plastic air dam, just inside of the mouth of the air intake, then ran a black zip-tie through the screen and these new holes.
These two photos should provide the detail you need:
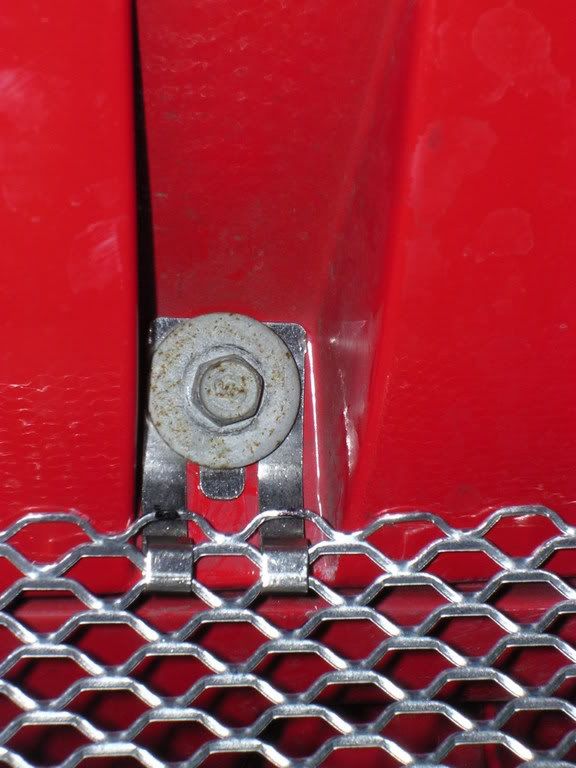
.
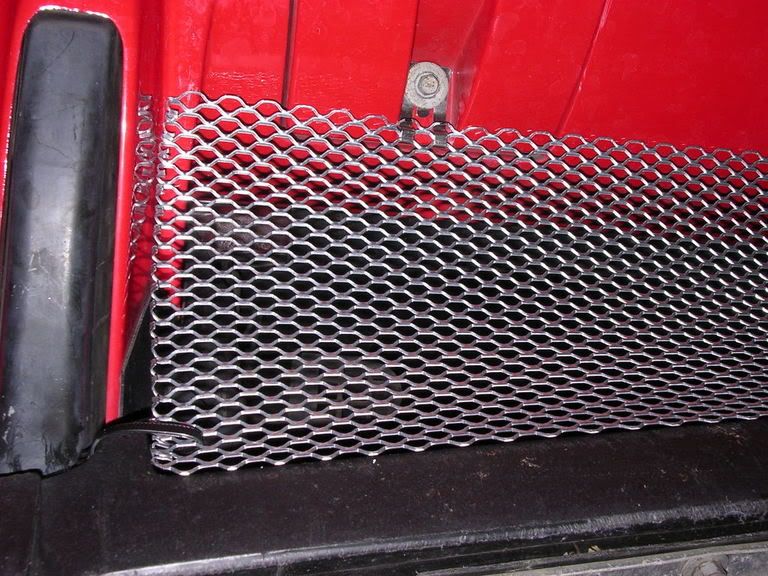
The screen pictured is a working prototype. It functions quite well, but I'm a bit of a perfectionist, so I'll eventually fabricate another one that looks better, and I'll probably coat it with black Plasti-Dip to rubberize it, protect it, and darken it so that it's not as visible.
Hope this helps.
Be well,
SJW
Last edited by SJW; 02-14-2007 at 05:10 PM.
02-14-2007, 06:04 PM
#19
Le Mans Master
SJW,
Thanks for the tip on reprogramming the ECM. So far I haven't found anyone that can do it for me and I don't want to spend $300 plus to buy a unit to do it. I was thinking about taking the plug out of the side of the block tonight to drain coolant from the engine so I could install the new fan switch but might wait to see if I can get the ECM reprogrammed.
I appreciate everyone's input!
Bernie
Your '92 should have a removable EEPROM chip in the ECM. Contact CF member tjwong about this. He can make you a chip that'll do anything you like.
Be well,
SJW
02-14-2007, 08:40 PM
#20
Race Director
Remember what the purpose of a t-stat is. I'd stay with a 180 instead. I have a 92 with an OEM radiator and a Mezier electric pump and my normal operating range is 185.