Starter Replacement How To With Pics
 06-23-2008, 12:13 PM
#1
Le Mans Master

Thread Starter
Member Since: Aug 2004
Location: Metairie Louisiana
Posts: 5,141
Likes: 0
Received 4 Likes
on
4 Posts

For the past couple of weeks my car started to have the symptoms of a bad starter. On occasion it would not start but just give the single click noise. It seemed to be harder to start after sitting for hours. I also had the high pitch screech on three starts from the starter being stuck while engaging. I ordered a starter rebuild kit from ebay for $30 shipped. As an alternative I could have purchased a new starter from NAPA for $166 with a lifetime warranty. I did not learn this until after I ordered the rebuild kit. From jacking the car up to letting it down it took just under 4 hours to complete the job. I could probably complete this closer to two hours the second time around. Something to take note of is that I have EM long tube headers so the cat converter being in the way was not an issue for me. Those without header may have a bit more trouble squeezing the starter out.
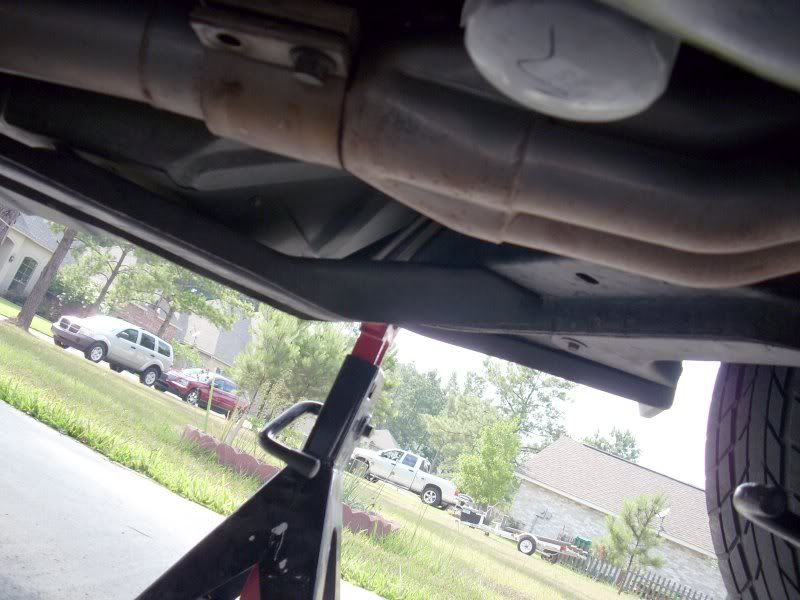
The first thing I did was to disconnect the positive and negative wires from the battery. Next I jacked the car up at the front frame / cross member after blocking the back wheels and applying the emergency brake. After it was up I slipped the jack stands in at the side jacking locations and lowered it onto them. Be carefull not to crush the fuel lines. I was at first considering lifting the whole car in the air but I saw that I would have enough room after lifting just the front. Someone a little bigger may want to get it higher. I also put the jack back under, just barely touching, the front frame for extra safety. I know I'm missing an exhaust clamp bolt.

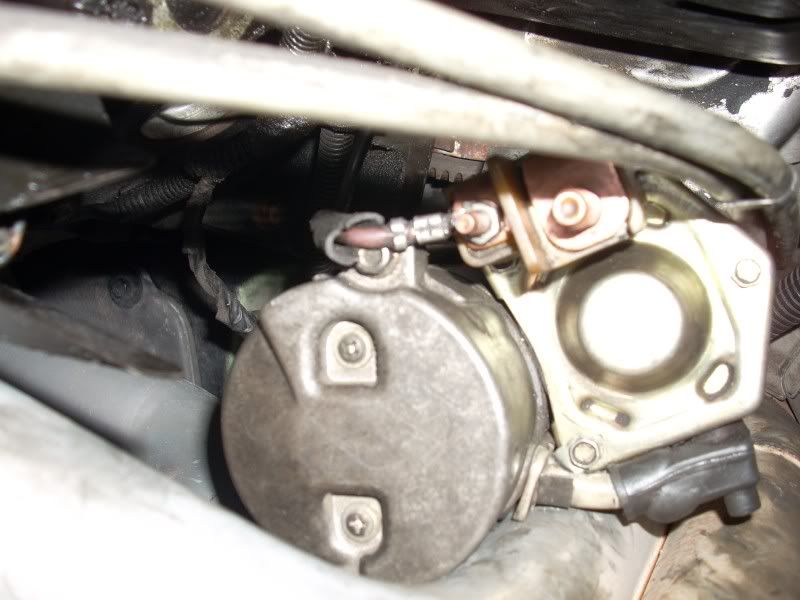
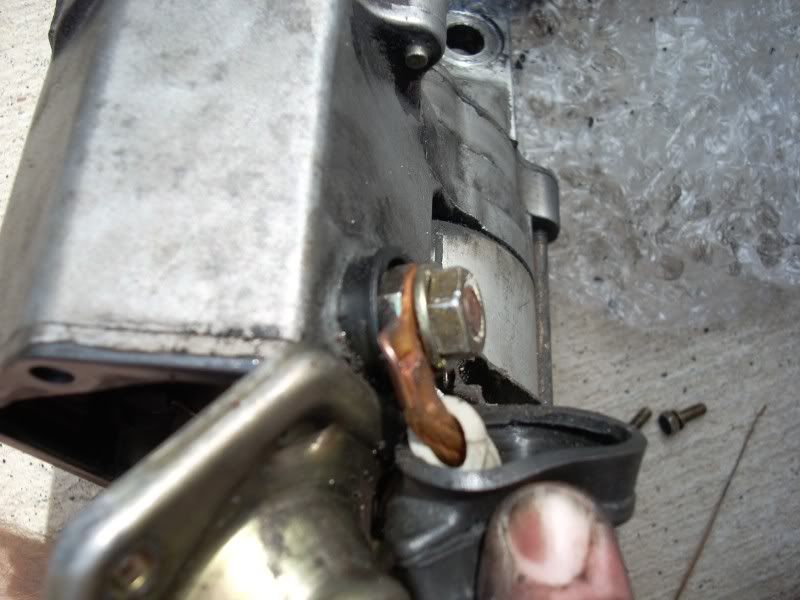
Here you can see the two wire posts that have to have the wires unbolted. In the picture the positive has already been removed. I unbolted the positive and ground before I dropped the starter to avoid breaking the wires. I took these pictures while putting the starter back in which is why the starter is loose.
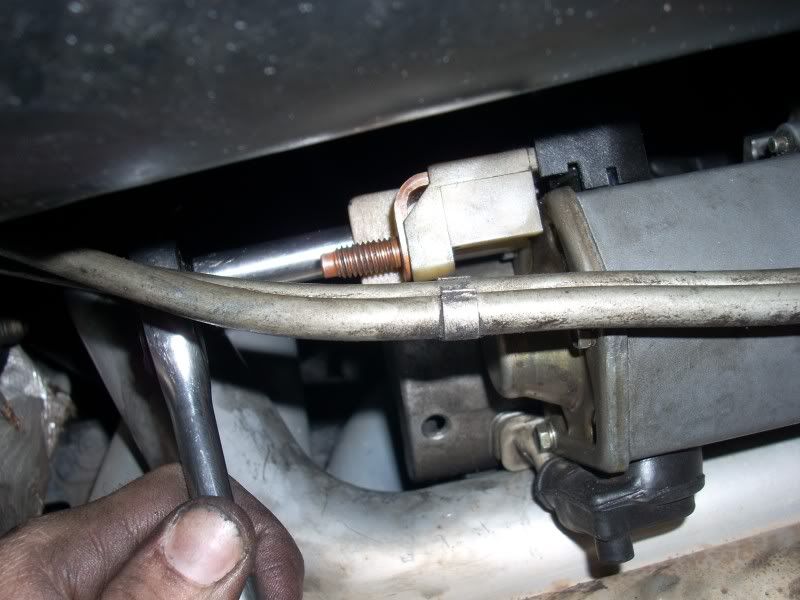
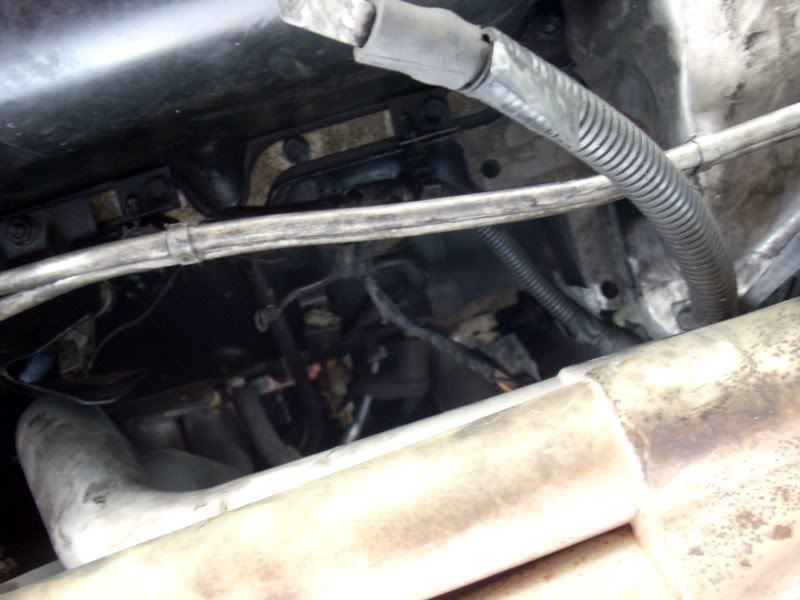
There are two large bolts at the front of the starter holding it up. These bolts come straight down when loose. Be careful when unbolting the starter it is a bit heavy. The larger bolt dropped straight down on me and liked to bust my lip. Here are pictures of the cavity where the starter was located. Those with the cat converter around this area may have a harder time. I removed one screw from a brace holding down the trans coolant lines. It is located on top the front cross member, 10mm. This allowed me to push the trans lines aside and squeeze the starter in and out. Some people may have to remove the shield from the knock sensor. I did not have to do this. I could probably have also removed the O2 sensor and slid it out on the other side.
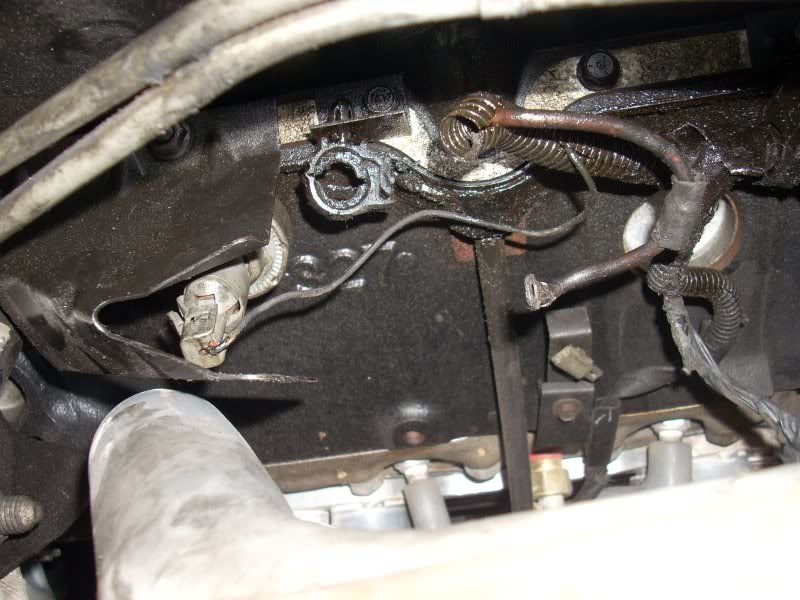
You can see the bolt holes on the car where the starter was near the right center of the picture.
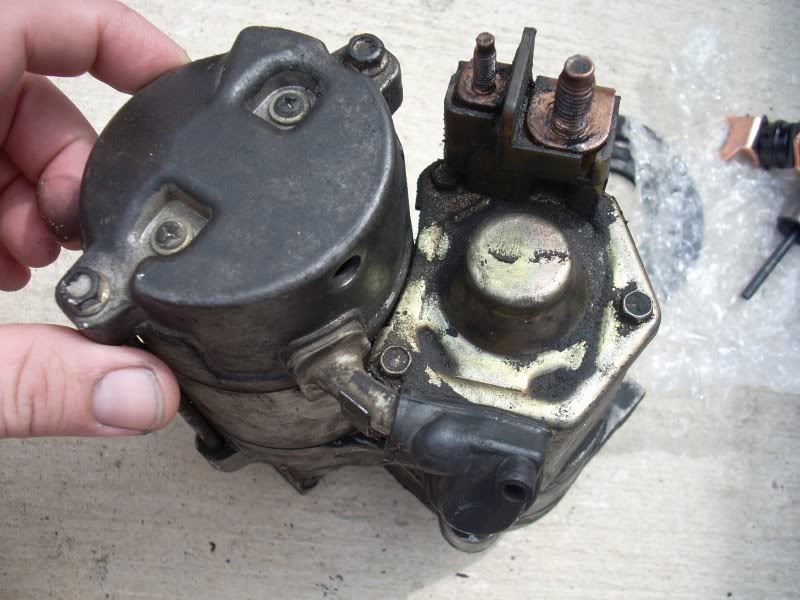
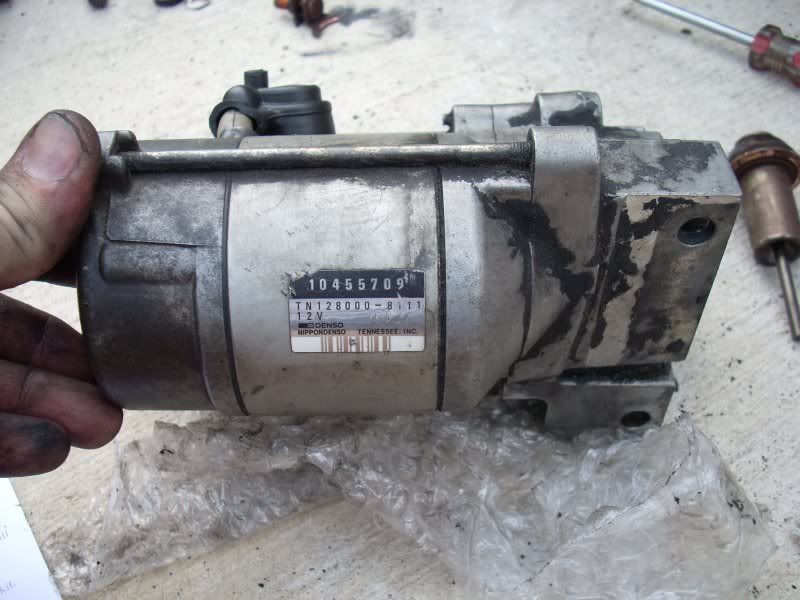
Here is the starter removed from the car. You can see the holes here on the starter where the bolts were. You can also see a rubber washer on the side this was around the gear of the starter. I saved it and reused it later on. I put a dab of super glue on it and stuck it into position on the starter for easier re-installation. If yours is torn you may be able to cut one out of gasket material from the local auto store.

There are three bolts here that have to be removed to get the cover off if you decided to rebuild your starter. You first need to remove the positive and negative wire posts to get to one of the bolts.
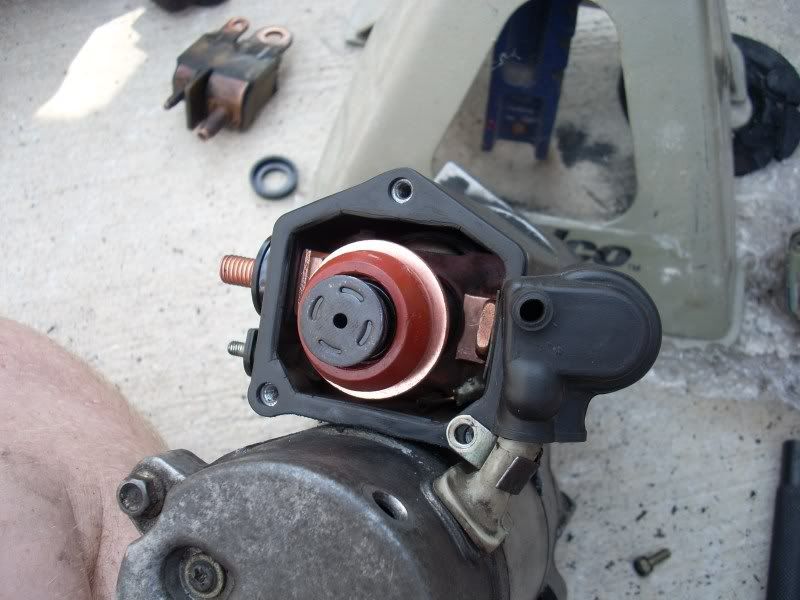
Here is a picture of the cover removed with the old plunger exposed. At this point try not to turn the starter upside down. I was told there is a bearing that could fall out and get lost.
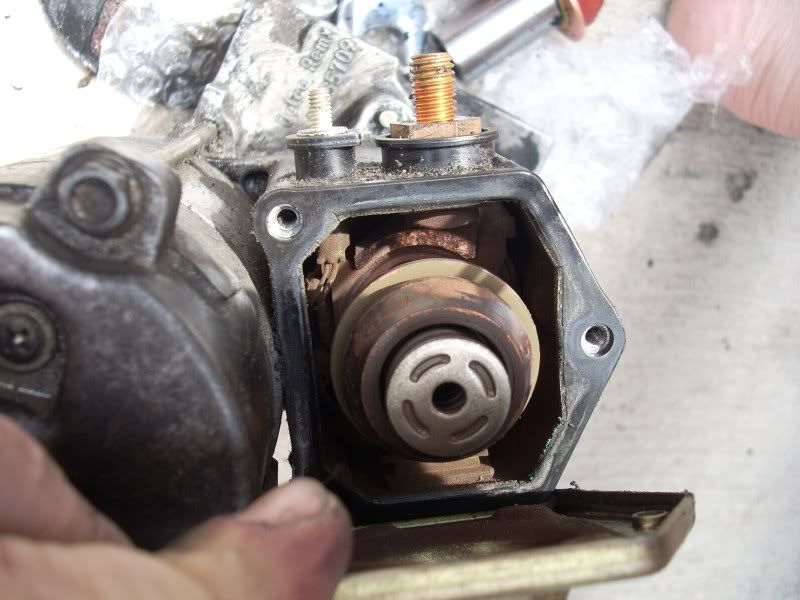
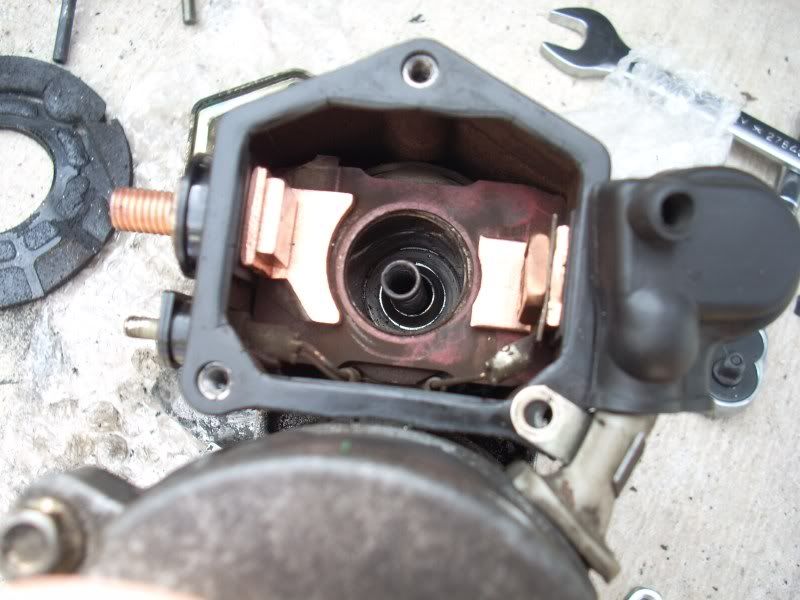
This picture shows the corroded and worn contacts. There was a groove worn into the contact surface. The kit I ordered replaces these contacts so that the plunger can once again complete the circuit when it is moved into position.
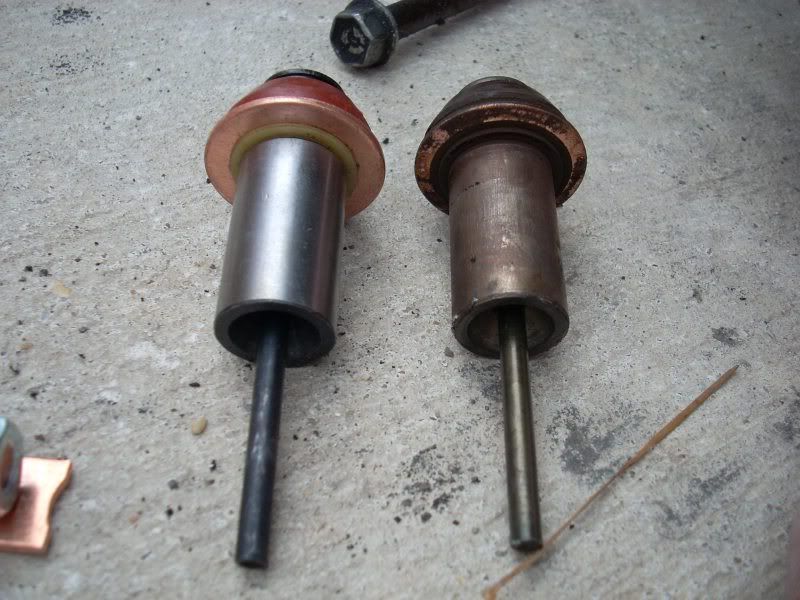
If you are going to rebuild I would also highly recommend replacing the plunger. Here is the old plunger next to the new plunger. You can see some corrosion on the old one.
This wire nut has to come off to get to the contact on this side. I would leave the the nuts, washer, o-ring, and plastic shields in order so you don't get confused when reinstalling. Just use a new piece as you pull the old one off. The kit comes with a few replacement pieces. Be careful not too over tighten the bolt when tightening it could turn the wire too much.
You will need to pull the contact and hardware off the other side as well. Here is a picture of both shiny new contacts installed. I hit the contacts down a bit with a flat punch and hammer. I was told this would help assure a good contact is made. Be careful not to mess up the gear on the opposite side. Use a vise if possible or brace the front edge on something.
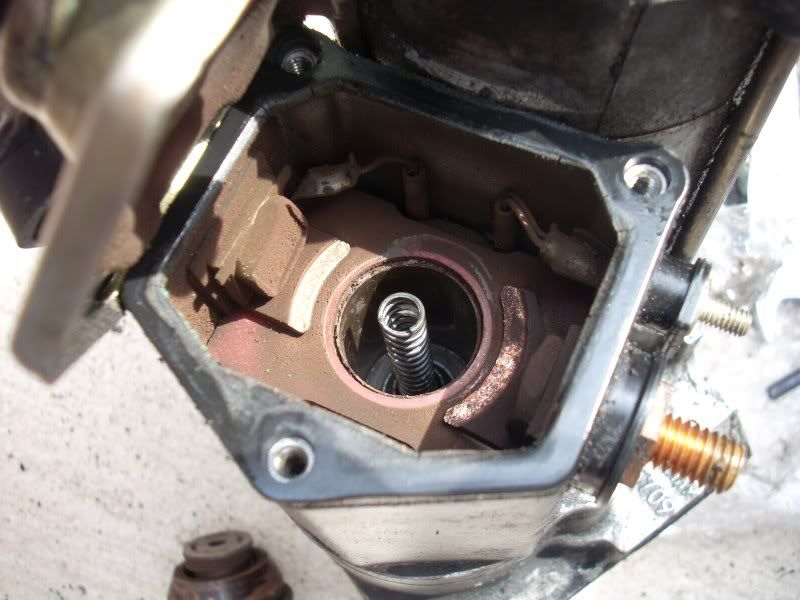
Next I slipped in the new plunger.
Here is the starter bolted back together and ready to go back in. Everything goes back in the reverse of how it was removed.
The car turned over and is working fine now. Hopefully the starter will last several more years. If I remember anything else I will add to this later on. I hope this helps some people out.

The first thing I did was to disconnect the positive and negative wires from the battery. Next I jacked the car up at the front frame / cross member after blocking the back wheels and applying the emergency brake. After it was up I slipped the jack stands in at the side jacking locations and lowered it onto them. Be carefull not to crush the fuel lines. I was at first considering lifting the whole car in the air but I saw that I would have enough room after lifting just the front. Someone a little bigger may want to get it higher. I also put the jack back under, just barely touching, the front frame for extra safety. I know I'm missing an exhaust clamp bolt.
Here you can see the two wire posts that have to have the wires unbolted. In the picture the positive has already been removed. I unbolted the positive and ground before I dropped the starter to avoid breaking the wires. I took these pictures while putting the starter back in which is why the starter is loose.
There are two large bolts at the front of the starter holding it up. These bolts come straight down when loose. Be careful when unbolting the starter it is a bit heavy. The larger bolt dropped straight down on me and liked to bust my lip. Here are pictures of the cavity where the starter was located. Those with the cat converter around this area may have a harder time. I removed one screw from a brace holding down the trans coolant lines. It is located on top the front cross member, 10mm. This allowed me to push the trans lines aside and squeeze the starter in and out. Some people may have to remove the shield from the knock sensor. I did not have to do this. I could probably have also removed the O2 sensor and slid it out on the other side.
You can see the bolt holes on the car where the starter was near the right center of the picture.
Here is the starter removed from the car. You can see the holes here on the starter where the bolts were. You can also see a rubber washer on the side this was around the gear of the starter. I saved it and reused it later on. I put a dab of super glue on it and stuck it into position on the starter for easier re-installation. If yours is torn you may be able to cut one out of gasket material from the local auto store.
There are three bolts here that have to be removed to get the cover off if you decided to rebuild your starter. You first need to remove the positive and negative wire posts to get to one of the bolts.
Here is a picture of the cover removed with the old plunger exposed. At this point try not to turn the starter upside down. I was told there is a bearing that could fall out and get lost.
This picture shows the corroded and worn contacts. There was a groove worn into the contact surface. The kit I ordered replaces these contacts so that the plunger can once again complete the circuit when it is moved into position.
If you are going to rebuild I would also highly recommend replacing the plunger. Here is the old plunger next to the new plunger. You can see some corrosion on the old one.
This wire nut has to come off to get to the contact on this side. I would leave the the nuts, washer, o-ring, and plastic shields in order so you don't get confused when reinstalling. Just use a new piece as you pull the old one off. The kit comes with a few replacement pieces. Be careful not too over tighten the bolt when tightening it could turn the wire too much.
You will need to pull the contact and hardware off the other side as well. Here is a picture of both shiny new contacts installed. I hit the contacts down a bit with a flat punch and hammer. I was told this would help assure a good contact is made. Be careful not to mess up the gear on the opposite side. Use a vise if possible or brace the front edge on something.
Next I slipped in the new plunger.
Here is the starter bolted back together and ready to go back in. Everything goes back in the reverse of how it was removed.
The car turned over and is working fine now. Hopefully the starter will last several more years. If I remember anything else I will add to this later on. I hope this helps some people out.
Last edited by rickneworleansla; 06-08-2010 at 09:23 PM.


 06-23-2008, 02:03 PM
#3
Le Mans Master
Member Since: Sep 2003
Location: Littleton CO
Posts: 5,874
Likes: 0
Received 0 Likes
on
0 Posts
Original style seals seem to be unavailable and, according to a local dealer, no longer seen as necessary. I didn't buy into that, though... leaving a ~1/8" gap between the starter and flywheel cover (I think?) doesn't make sense. Seems like plenty of room for crud to get up in there.
06-24-2008, 10:39 AM
#5
Le Mans Master
Thread Starter
Member Since: Aug 2004
Location: Metairie Louisiana
Posts: 5,141
Likes: 0
Received 4 Likes
on
4 Posts
Thanks! 
Does anyone know if the tech tips section is working again? The last entry appears to be 2004. I have done several how-to threads like this that could be helpfull to others. Instead they just get lost.
Does anyone know if the tech tips section is working again? The last entry appears to be 2004.
I have done several how-to threads like this that could be helpfull to others. Instead they just get lost.
Last edited by rickneworleansla; 06-24-2008 at 02:39 PM.

 06-25-2008, 09:39 AM
#7
Burning Brakes


 06-25-2008, 09:51 AM
#8
Le Mans Master
Thread Starter
Member Since: Aug 2004
Location: Metairie Louisiana
Posts: 5,141
Likes: 0
Received 4 Likes
on
4 Posts
 06-26-2008, 01:26 AM
#10
Le Mans Master
Nice job, Rick.
I don't think that the purple wire on the starter is a ground. It is the wire that comes from the ignition switch to energize the plunger and the big one is the positive from the battery. (Carries the power to spin the starter).
The starter is grounded through the case.
So, both of those wires are positive (hot).
Someone please correct me if I am wrong.
06-26-2008, 10:32 AM
#11
Burning Brakes
Last year I had to replace the starter on my '94. I looked and looked all over Ebay for a rebuild kit, but could not find one so I bought a new starter. When I installed it and fired her up, it was binding, so I took both starters apart and mated the gear reduction half (from my old starter) to the motor/solenoid half (from the new one). It's been working fine ever since, but I really would have preferred to rebuild my starter and keep the car as original as possible. With this kit now available, I can rebuild the old one and have a spare unit laying around.
Steve
07-06-2008, 02:30 PM
#12
1st Gear


Member Since: Jul 2008
Posts: 1
Likes: 0
Received 0 Likes
on
0 Posts
Wanted to say thanks for the pictures and experience. I replaced my starter on my 1996 collector's edition yesterday based on this post (and registered here just to say thanks).
I had to make a "dent" in the heat shield of the catalytic converter so my socket would reach, but otherwise a flawless replacement, completed in about an hour and a half.
Stephen
I had to make a "dent" in the heat shield of the catalytic converter so my socket would reach, but otherwise a flawless replacement, completed in about an hour and a half.
Stephen
08-09-2008, 05:52 PM
#14
7th Gear

Member Since: May 2008
Posts: 7
Likes: 0
Received 0 Likes
on
0 Posts
I just did this to my starter today and ran into a strange issue. When I installed the starter and started the car, the car makes a tick tick tick noise like the flywheel is hitting the starter. Currently there are no shims on the starter so I thought I would try and bring it down some. Any suggestions would be appreciated. Thanks
08-09-2008, 06:06 PM
#15
Burning Brakes
I just did this to my starter today and ran into a strange issue. When I installed the starter and started the car, the car makes a tick tick tick noise like the flywheel is hitting the starter. Currently there are no shims on the starter so I thought I would try and bring it down some. Any suggestions would be appreciated. Thanks
Jonathan
08-09-2008, 06:29 PM
#16
7th Gear
Member Since: May 2008
Posts: 7
Likes: 0
Received 0 Likes
on
0 Posts
Thanks for the quick response, I just have a Chilton's manual, but in that, it says 0.5 mm. It does not specify a year. My issue is that with the 6-speed, there is a bell housing with just a piece of sheet metal at the end of the transmission. In other words, there is no real cover to provide access to the flywheel and starter installed to make the measurement. I thought about just putting the smallest shim in and trying it, and going bigger from there. By the way, it is a 95. Thanks.
08-09-2008, 07:13 PM
#17
Burning Brakes
Thanks for the quick response, I just have a Chilton's manual, but in that, it says 0.5 mm. It does not specify a year. My issue is that with the 6-speed, there is a bell housing with just a piece of sheet metal at the end of the transmission. In other words, there is no real cover to provide access to the flywheel and starter installed to make the measurement. I thought about just putting the smallest shim in and trying it, and going bigger from there. By the way, it is a 95. Thanks.
Jonathan
08-09-2008, 07:36 PM
#18
Team Owner


Member Since: May 2000
Location: Plantation Florida USAF(Retired) 1966-1990
Posts: 47,893
Received 4,504 Likes
on
3,589 Posts
U.S. Air Force
St. Jude Donor '05-'06-'07-'08-'09-'10-'11-'12-'13-'14-'15-'16-'17-'18-'19-'20-'21-'22-'23-'24
NCM Sinkhole Donor

 Thanks!
 08-09-2008, 08:26 PM
#19
7th Gear
Member Since: May 2008
Posts: 7
Likes: 0
Received 0 Likes
on
0 Posts
Allright then, It sounds like the thing to do is to drop the starter then the cover, then reinstall the starter and check clearances and shim if necessary, then remove the starter, reinstall the cover and then the starter with the correct amount of shims.
08-09-2008, 09:13 PM
#20
Burning Brakes
Hopefully the cover is not difficult to remove - on my auto trans it is just four 10mm head hex bolts. Good luck and I hope you don't do all that work to discover it was perfect to begin with and the problem is elsewhere!

Thanks again to the OP for sharing with us the original posting!
I would have rebuilt mine also after learning it had seized up while I rebuilt the tranny, but rebuild kits were extremely difficult to find for my starter.  I went with a lifetime warranty Duralast reman'ed starter and kept the core in case I ever decided to take apart the starter for fun or if I find a rebuild kit.
 Jonathan