Spin Rod Bearing/Spun Main Bearing
 06-02-2009, 12:42 AM
#1
Heel & Toe

Thread Starter

Member Since: Jul 2007
Posts: 16
Likes: 0
Received 0 Likes
on
0 Posts
My vehicle is showing low oil pressure, and the symptoms are spin rod bearing, spun main bearing. Can I fix this problem from underneath the vehicle by removing the oil pan, or should I remove the engine off of the vehicle, and is it cheaper fix the problem or replace it with a different used engine which only cost me around $800? Thank you very much
 06-02-2009, 01:00 AM
#2
Burning Brakes


If you spun a main the engine is going to have to be align honed. The crank needs to be turned, rods reconditioned, might as well hone the cylinders and install new rings. Gaskets and seals. It's up to you.
06-02-2009, 01:01 AM
#3
Team Owner

Usually a spun bearing will make a lot of noise that will increase with rpm. If that is indeed the problem, yes you can fix it with the engine in the car but its probably a wise idea to pull it and rebuild the whole bottom end. No sense in fixing one only to have another go out not long after ya know? It would be cheaper than the $800 engine but would require more down time.
06-02-2009, 11:48 AM
#4
Heel & Toe
Thread Starter
Member Since: Jul 2007
Posts: 16
Likes: 0
Received 0 Likes
on
0 Posts
Usually a spun bearing will make a lot of noise that will increase with rpm. If that is indeed the problem, yes you can fix it with the engine in the car but its probably a wise idea to pull it and rebuild the whole bottom end. No sense in fixing one only to have another go out not long after ya know? It would be cheaper than the $800 engine but would require more down time.
06-02-2009, 12:44 PM
#5
Team Owner

Member Since: Oct 2004
Location: altered state
Posts: 81,242
Received 3,043 Likes
on
2,602 Posts
St. Jude Donor '05

You need to pull it out, cant fix a spun bearing by dropping the pan.
Is this an LTx motor by chance?
Is this an LTx motor by chance?
06-02-2009, 12:48 PM
#6
Team Owner
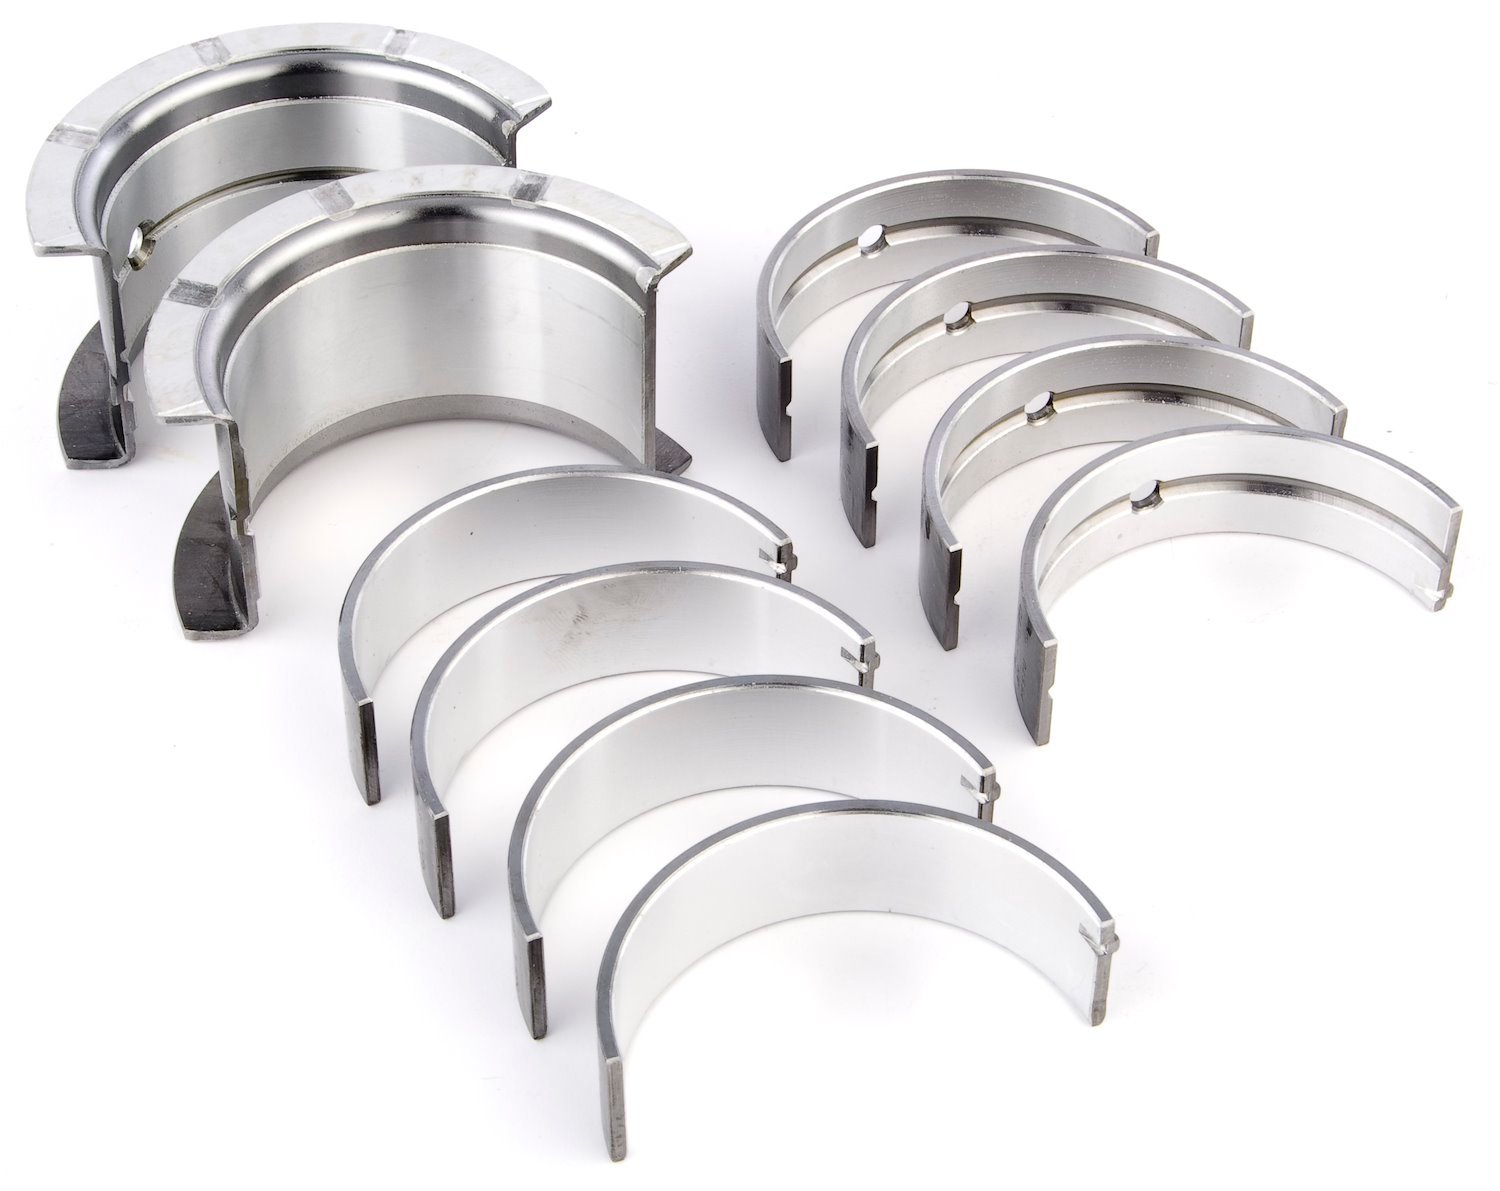
You're right about losing oil pressure and the increase rpm! That is exactly what's happening to my car. I don't know much about the mechanical part. Would you mind showing me what the bearing is and what do I need to do to fix the problem? I really appreciate your inputs.
There are what crank bearings look like...and they sit between the crank and the bearing cap which bolts to the block.
 06-02-2009, 04:36 PM
#8
Heel & Toe
Thread Starter
Member Since: Jul 2007
Posts: 16
Likes: 0
Received 0 Likes
on
0 Posts
It a Lt1 engine...I have some mechanic tell me it a failure oil pump, and other tell me it a spun main bearing. Beside check gauge light for "Low oil pressure", the check engine light also shows code P0507 "Idle Control System RPM Higher Than Expected". To be honest I really don't know what wrong with it yet, it just happened to in the last couple week. Please help me to find out what wrong and how to fix it. Thank you very much!
06-02-2009, 10:26 PM
#9


It a Lt1 engine...I have some mechanic tell me it a failure oil pump, and other tell me it a spun main bearing. Beside check gauge light for "Low oil pressure", the check engine light also shows code P0507 "Idle Control System RPM Higher Than Expected". To be honest I really don't know what wrong with it yet, it just happened to in the last couple week. Please help me to find out what wrong and how to fix it. Thank you very much!
I decided to get the entire bottom end rebuild to a 396.
This is a big job and it's not a quick fix.
If you can, you should remove the oil pan and take a look if it's a rod bearing failure. Avoid running the engine, they'll be metal fragments spreading throughout your oil system.
I suggest you get someone who really knows how to work on LT1 engines. This type of work will require machine shop services. You just can't swap out bearings. I'm sure they'll be some slight damage. There are tolerances that need to be accounted for and the crank (journal?) will need to be polished, etc.
I suggest you think this through, if you have the funds, re-do the
bottom end with forged reciprocating parts and turn it into a 383 or 396.
My .02
06-02-2009, 11:38 PM
#10
Le Mans Master

It a Lt1 engine...I have some mechanic tell me it a failure oil pump, and other tell me it a spun main bearing. Beside check gauge light for "Low oil pressure", the check engine light also shows code P0507 "Idle Control System RPM Higher Than Expected". To be honest I really don't know what wrong with it yet, it just happened to in the last couple week. Please help me to find out what wrong and how to fix it. Thank you very much!
Now, about your oil pressure. Low oil pressure can be, but not always, a result of a spun bearing,(my oil pressure was fine) but definitely will cause a spun bearing. Which came first, the gawd awful noise, or the low oil pressure? If the oil pressure dropped first, then the oil pump was probably your culprit. If the noise came first, then you may have more than one bearing spun, and or a significant amount of damage.
It will be expensive to fix, the question is how expensive. The labor will be the lion's share of it. The total of parts depends on the parts you buy. The parts list should also include some of the "while it's apart stuff" i.e. opti spark, water pump, clutch(if it's a stick), timing gears, maybe even lifters, and why not upgrade to 1.6:1 rockers while you're at it? The labor will still be about the same as they're just putting on new parts instead of putting the old ones back on.
The $800 engine? Well first, what shape is this motor? You might find yourself in the same spot in a short time. And while you see $800 for the motor, the cost of the swap will eclipse the repair of a spun bearing. Unless, it's virtually the same motor. If it's not you will need the proper ECM and wiring. Then getting all of that to work is another story.
If it were me, and the car was not my primary or only transportation, as mine is now, I would take the suggestion of some others. I would do what I could as I could afford it. Collect the parts, get block machined and the bottom end done, etc. etc. In my case, I had to go the least expensive route of a reman crank replaced the warped rod, and all the bearings. It's doing okay right now, but I'm trying to squirrel away the money to do a stroker build, cause I have a feeling that the current crank is a temporary fix.
Last edited by lt4obsesses; 06-02-2009 at 11:41 PM.
06-03-2009, 10:12 AM
#11
Team Owner
Member Since: Oct 2004
Location: altered state
Posts: 81,242
Received 3,043 Likes
on
2,602 Posts
St. Jude Donor '05
Id sure like to know why these LTx motors are so notorious for spinning bearings, never seen anything like it. 
06-03-2009, 10:19 AM
#12
Team Owner
I know the bottom end is similar to earlier small blocks but maybe GM used a new design that they felt would work better and in the long run its turning up some failures. Or it could be that unlike earlier engines they can spool up to higher rpms, thus increased wear on the bearings. Just a guess.
The following users liked this post:
Father of Seven (03-04-2024)
06-03-2009, 10:19 AM
#13
Le Mans Master
Or, perhaps the oil pumps tend to, if not fail, not provide enough protection under high revs, especially with the above conditions?
06-05-2009, 11:52 PM
#14
Melting Slicks


recently replaced rod and main bearings in my LT4 with engine in car; very similiar to any of a number of traditional small blocks that I've done in the past.
undo the two nuts holding the motor mount.
place a large piece of wood between the bellhousing and extending forward the length of the pan.
place a floor jack under the board and jack engine up one to one and a half inches. place a small piece of wood in the gap between the bottom of the motor mounts and the cross member. remove the jack.
this will allow plenty of room to remove the oil pan.
remove bellhousing dust cover, starter, oil filter and oil filter mount; disconnect and remove oil level sensor from pan.
drop pan.
remove oil windage tray; remove the oil pump.
loosen but do not remove main bearing caps.
Remove a cap, inspect bearing bottom half; on the back side of the bearing shell there should be a three digit number (.001, .010 etc) or "std" indicating bearing size. If they're original factory bearings there may be an letter code instead; you can almost be certain that an original bearing is either standard or .0005" under size. On a high mileage engine a set of .001 inch undersize (that is the crank is .001 inch undersize through normal use and wear) should be sufficient.
Never take more than one cap off at a time; if you do make sure they are clearly, and permanently marked; you do not want to mix up caps.
Buy a new set of bearings. DO NOT go to the dealer.; for the cost of set of bearings the dealer will sell you one bearing. High performance bearings are available at a greatly reduced price from any of a number of high performance parts dealers.
getting the top half of the old bearing out requires some finesse. Rotate the crankshaft backwards so that the tab on the bearing shell does not hold the bearing in the block; often the bearing will come out on its own; if not take a short piece of a brass cotter key, bend it into an "L" insert it in to the oil hole in the crank journal, rotate the crank shaft and the bearing will rotate out.
The number five main bearing {at the rear of the crank) is a little harder since it is also the thrust bearing; use a large flat screw driver to pry the crankshaft ever so slightly fore and aft. The top half of the bearing will then rotate into place.
use plastigage to check bearing clearances. If clearances are less than the minimum, you will want to put a standard bearing on that journal. If good the crank should rotate freely without any binding.
The rod bearings are much easier; again only do one at a time.
The only odd thing about the rods is that instead of torque values for the rod bolts and nuts, on LT engines they give a convuluted procedure of measuring wrench head angle form start to finish. Its okay, but 5 million small blocks, using the same size and type fasteners, were tightened using a conventional torque wrench set at 45 lbs.
Replace the oil pump; upgrade the intermediate shaft with its nylon collar to an aftermarket shaft with an metal collar.
If you upgrade to a high pressure or high volume pump you may want to upgrade the oil pump drive ssembly; this will require removing the intake manifold. evidently reliability the stock nylon oil pump drive housing is problematic at best when using an upgraded pump;
for a billet aluminum oil pump drive see: http://www.herronperformance.com/htm...oil_drive.html
lube everything before reassembly; don 't be afraid to use a little loctite on anything you dont want to come loose.
if you have to install an oil pump pickup onto your new oil pump, verify the clearance 1/4 to 3/8 inch between the bottom of the pickup and the bottom of the pan; this can be easily done with a lump of modelling clay.
once your sure of the clearance, have the oil pump pick up tack welded to the pump body. You do not have to remove the relief spring; tack welding will not impart enough heat for this to be an issue.
I'd heard of oil pump pickups vibrating loose and falling off the pump, with resultant disaster, but I'd always considered it to be a bit of an urban legend, after all its a pretty tight fit; and the factory doesn't do it, etc. Well guess what, when I opened up the bottom end of my LT4, the pick up hadn't fallen out but it was definitely loose enough to.
good luck; and as they say, assembly is just the reverse.
The following users liked this post:
Father of Seven (03-04-2024)
06-06-2009, 12:11 AM
#15
Burning Brakes
recently replaced rod and main bearings in my LT4 with engine in car; very similiar to any of a number of traditional small blocks that I've done in the past.
undo the two nuts holding the motor mount.
place a large piece of wood between the bellhousing and extending forward the length of the pan.
place a floor jack under the board and jack engine up one to one and a half inches. place a small piece of wood in the gap between the bottom of the motor mounts and the cross member. remove the jack.
this will allow plenty of room to remove the oil pan.
remove bellhousing dust cover, starter, oil filter and oil filter mount; disconnect and remove oil level sensor from pan.
drop pan.
remove oil windage tray; remove the oil pump.
loosen but do not remove main bearing caps.
Remove a cap, inspect bearing bottom half; on the back side of the bearing shell there should be a three digit number (.001, .010 etc) or "std" indicating bearing size. If they're original factory bearings there may be an letter code instead; you can almost be certain that an original bearing is either standard or .0005" under size. On a high mileage engine a set of .001 inch undersize (that is the crank is .001 inch undersize through normal use and wear) should be sufficient.
Never take more than one cap off at a time; if you do make sure they are clearly, and permanently marked; you do not want to mix up caps.
Buy a new set of bearings. DO NOT go to the dealer.; for the cost of set of bearings the dealer will sell you one bearing. High performance bearings are available at a greatly reduced price from any of a number of high performance parts dealers.
getting the top half of the old bearing out requires some finesse. Rotate the crankshaft backwards so that the tab on the bearing shell does not hold the bearing in the block; often the bearing will come out on its own; if not take a short piece of a brass cotter key, bend it into an "L" insert it in to the oil hole in the crank journal, rotate the crank shaft and the bearing will rotate out.
The number five main bearing {at the rear of the crank) is a little harder since it is also the thrust bearing; use a large flat screw driver to pry the crankshaft ever so slightly fore and aft. The top half of the bearing will then rotate into place.
use plastigage to check bearing clearances. If clearances are less than the minimum, you will want to put a standard bearing on that journal. If good the crank should rotate freely without any binding.
The rod bearings are much easier; again only do one at a time.
The only odd thing about the rods is that instead of torque values for the rod bolts and nuts, on LT engines they give a convuluted procedure of measuring wrench head angle form start to finish. Its okay, but 5 million small blocks, using the same size and type fasteners, were tightened using a conventional torque wrench set at 45 lbs.
Replace the oil pump; upgrade the intermediate shaft with its nylon collar to an aftermarket shaft with an metal collar.
If you upgrade to a high pressure or high volume pump you may want to upgrade the oil pump drive ssembly; this will require removing the intake manifold. evidently reliability the stock nylon oil pump drive housing is problematic at best when using an upgraded pump;
for a billet aluminum oil pump drive see: http://www.herronperformance.com/htm...oil_drive.html
lube everything before reassembly; don 't be afraid to use a little loctite on anything you dont want to come loose.
if you have to install an oil pump pickup onto your new oil pump, verify the clearance 1/4 to 3/8 inch between the bottom of the pickup and the bottom of the pan; this can be easily done with a lump of modelling clay.
once your sure of the clearance, have the oil pump pick up tack welded to the pump body. You do not have to remove the relief spring; tack welding will not impart enough heat for this to be an issue.
I'd heard of oil pump pickups vibrating loose and falling off the pump, with resultant disaster, but I'd always considered it to be a bit of an urban legend, after all its a pretty tight fit; and the factory doesn't do it, etc. Well guess what, when I opened up the bottom end of my LT4, the pick up hadn't fallen out but it was definitely loose enough to.
good luck; and as they say, assembly is just the reverse.
undo the two nuts holding the motor mount.
place a large piece of wood between the bellhousing and extending forward the length of the pan.
place a floor jack under the board and jack engine up one to one and a half inches. place a small piece of wood in the gap between the bottom of the motor mounts and the cross member. remove the jack.
this will allow plenty of room to remove the oil pan.
remove bellhousing dust cover, starter, oil filter and oil filter mount; disconnect and remove oil level sensor from pan.
drop pan.
remove oil windage tray; remove the oil pump.
loosen but do not remove main bearing caps.
Remove a cap, inspect bearing bottom half; on the back side of the bearing shell there should be a three digit number (.001, .010 etc) or "std" indicating bearing size. If they're original factory bearings there may be an letter code instead; you can almost be certain that an original bearing is either standard or .0005" under size. On a high mileage engine a set of .001 inch undersize (that is the crank is .001 inch undersize through normal use and wear) should be sufficient.
Never take more than one cap off at a time; if you do make sure they are clearly, and permanently marked; you do not want to mix up caps.
Buy a new set of bearings. DO NOT go to the dealer.; for the cost of set of bearings the dealer will sell you one bearing. High performance bearings are available at a greatly reduced price from any of a number of high performance parts dealers.
getting the top half of the old bearing out requires some finesse. Rotate the crankshaft backwards so that the tab on the bearing shell does not hold the bearing in the block; often the bearing will come out on its own; if not take a short piece of a brass cotter key, bend it into an "L" insert it in to the oil hole in the crank journal, rotate the crank shaft and the bearing will rotate out.
The number five main bearing {at the rear of the crank) is a little harder since it is also the thrust bearing; use a large flat screw driver to pry the crankshaft ever so slightly fore and aft. The top half of the bearing will then rotate into place.
use plastigage to check bearing clearances. If clearances are less than the minimum, you will want to put a standard bearing on that journal. If good the crank should rotate freely without any binding.
The rod bearings are much easier; again only do one at a time.
The only odd thing about the rods is that instead of torque values for the rod bolts and nuts, on LT engines they give a convuluted procedure of measuring wrench head angle form start to finish. Its okay, but 5 million small blocks, using the same size and type fasteners, were tightened using a conventional torque wrench set at 45 lbs.
Replace the oil pump; upgrade the intermediate shaft with its nylon collar to an aftermarket shaft with an metal collar.
If you upgrade to a high pressure or high volume pump you may want to upgrade the oil pump drive ssembly; this will require removing the intake manifold. evidently reliability the stock nylon oil pump drive housing is problematic at best when using an upgraded pump;
for a billet aluminum oil pump drive see: http://www.herronperformance.com/htm...oil_drive.html
lube everything before reassembly; don 't be afraid to use a little loctite on anything you dont want to come loose.
if you have to install an oil pump pickup onto your new oil pump, verify the clearance 1/4 to 3/8 inch between the bottom of the pickup and the bottom of the pan; this can be easily done with a lump of modelling clay.
once your sure of the clearance, have the oil pump pick up tack welded to the pump body. You do not have to remove the relief spring; tack welding will not impart enough heat for this to be an issue.
I'd heard of oil pump pickups vibrating loose and falling off the pump, with resultant disaster, but I'd always considered it to be a bit of an urban legend, after all its a pretty tight fit; and the factory doesn't do it, etc. Well guess what, when I opened up the bottom end of my LT4, the pick up hadn't fallen out but it was definitely loose enough to.
good luck; and as they say, assembly is just the reverse.
06-06-2009, 12:27 AM
#16
Safety Car

06-06-2009, 10:35 AM
#17
Team Owner
Member Since: Oct 2004
Location: altered state
Posts: 81,242
Received 3,043 Likes
on
2,602 Posts
St. Jude Donor '05
the hot running condition, combined with light weight oil and tight clearances?
Woolford, the bearings can be changed in the car, say if they are worn but once you spin them there is usually rod/crank damage that goes along with it, tossing bearings in it at that point is fruitless; parts need to be replaced/machined
The bearing is held in place with a tang. If that gets fubarred and spins around how is the new bearing going to stay in place without machine work, that is the point I think a few are getting at.
 06-06-2009, 12:23 PM
#18
Le Mans Master
Member Since: Aug 2004
Location: Metairie Louisiana
Posts: 5,141
Likes: 0
Received 4 Likes
on
4 Posts
That would be my guess...
Woolford, the bearings can be changed in the car, say if they are worn but once you spin them there is usually rod/crank damage that goes along with it, tossing bearings in it at that point is fruitless; parts need to be replaced/machined
The bearing is held in place with a tang. If that gets fubarred and spins around how is the new bearing going to stay in place without machine work, that is the point I think a few are getting at.
Some pics for the thread, oil pump and baffel removed..


Last edited by rickneworleansla; 06-06-2009 at 12:26 PM.
06-06-2009, 07:02 PM
#19
Melting Slicks
behind every story...is another story;
here's mine:
I bought a 1996 LT4 coupe; for the price of a used Toyota, how could I resist?
Granted, it had 120,000 miles on it, but it belonged to an RV salesman in California's Central Valley where all miles are freeway miles. I have a long weekly commute and I thought the car would be a fun commuter car; when I started getting up to 28 miles per gallon (at legal freeway speeds) I knew I made a good choice.
Still 120,000 miles are 120,000 miles, so I planned a "major" tune up: new plugs, new wires, new distributor, new timing chain, new water pump, new LT4 hot cam, springs, and lifter set. And a whole lot of other "new" stuff.
the timing chain replacement required removal of the oil pan; anytime I take the pan off an engine I consider replacing the lower end bearings; on a high mileage chevy small block I consider it routine maintenance (and damn good insurance).
Although I never would have expected it from the great way the engine ran, the last three lobes on the camshaft were deeply grooved by the roller in the lifter and the next three others were beginning to show signs of wear.
To make a long story short, the lower end bearings, besides showing signs of normal wear, showed damage from the metal coming off the cam lobes; fortunately the damage was confined to the bearings (thank you bearing babbit "embedibility") and the hard surface of the LT4 crank was spared damage.
Replacing the number five main bearing also renews the thrust surfaces; while an automatic transmission places little or no thrust load on the crank shaft, a manual transmission and clutch places a large load on the thrust surfaces; additionally excessive thrust clearances degrade smooth clutch engagement and release.
So replacing the lower end bearings was a win win situation.
A final thought, the oil pressure always was within limits, if you believe the theory of "ten pounds per every thosand rpm". In my case there was 20 psi plus at idle and 40 psi at cruise (1,800 rpm). Good by current standards maybe, but since I believe the camshaft lobes' failures were precipitated by lube oil failures, and being "old school", I replaced the stock oil pump with a high volume oil pump upgraded with a high pressure relief spring; this necessitated an upgraded oil pump drive, but that, as they say is another story.