I replaced my valve seals on my 88 finally
 05-08-2010, 10:31 PM
#1
Racer

Thread Starter

I finished replacing my valve seals on my 88 today finally. It's been one of those "round to its" as in "some day I'll get around to it". I actually started last weekend and decided I didn't like the valve spring compressor I was using. So it took me a couple of days to have one I liked shipped in and then I finally got back to it today.
I tried to take pictures as I went along in case somebody like me wants to do this later and have an idea what they are getting into. It was my first time doing this and I learned some things along the way. I screwed up a few times along the way which I wasn't going to show you, but decided somebody else may want to learn from my mistakes.
The first step was removing the valve covers, which is much easier said than done. I had to move the air pump bracket and remove the wiper motor cover and move all the hoses and wires out of the way on the drivers side. The passenger side wasn't much better because I had to loosen the A/C bracket and move it far enough forward to make enough clearance. I wish I had taken pictures of that because I also have the plenum runners and fuel rail off for the other part of my project and I'm not entirely sure where everything goes now.
Once I had the valve covers off here's what I was facing.

Since I was completely paranoid about dropping a valve I started with the number one cylinder at top dead center. I also took someone else's advice and used some vice grips with rubber hose over the ends and clamped onto the pulley in the mistaken notion that if the piston moved this would prevent it from moving too far when I compressed the cylinder. This turned out to be a bad idea because one time the piston did move and the vice grips got jammed alright. The rubber ripped (I hate it when that happens) and the vice grips nicked the pulley. I'll have to file out the nick later to make sure it doesn't chafe the belt. I actually made it through 4 of the valves before this happened, after that I said screw it and just let the piston move.

Once I had the cylinder at TDC and the vice grips pretending to help I used compressed air to hold the valves in place. I used 40 psi which held quite well. I used the hose from my leak down tester. It has a quick connect on one end and threads on the other for the spark plug hole.

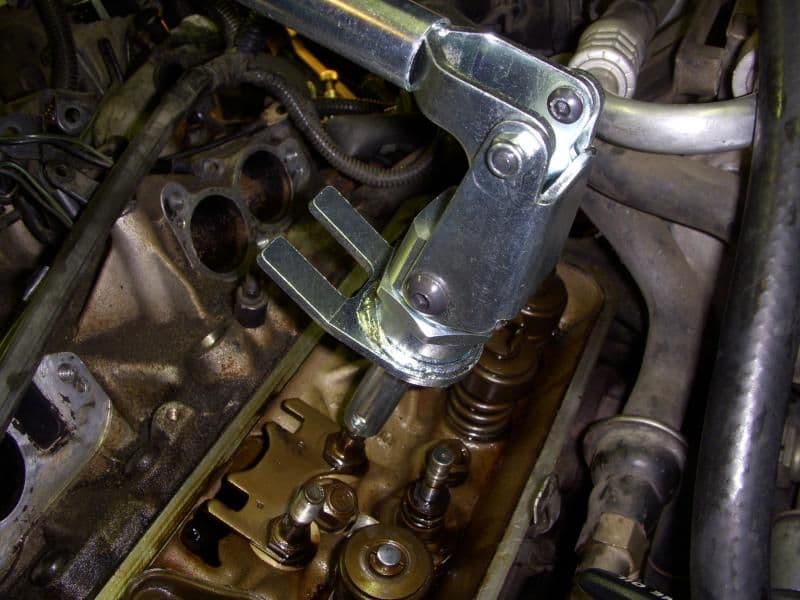
With things hissing away I removed the rockers with a 16mm socket and compressed the spring. I started with the kind of spring compressor that has the crank handle on top and claws that grip the spring. It was a pain and would slip off the spring and it also didn't compress quite far enough to allow the o-ring to be installed with the spring in place. Here's a picture of the spring compressor:

Maybe I just need more practice, but I ended up getting a different one that screws onto the stud and presses down on the spring.
As you can see the spring can be compressed quite a ways to reveal the second groove in the valve. One problem I had though was trying to keep the spring centered around the valve. Notice the spring is pushed to one side which makes getting the o-ring on difficult.

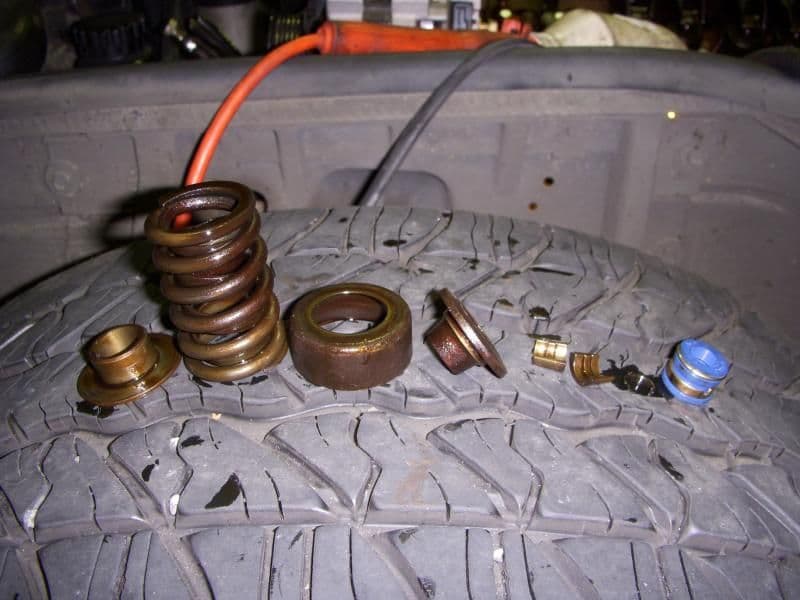
Once the spring is compressed the keepers can be removed using a magnet. Here's what they look like (a little blurry):

Remove the spring:
Remove the old o-ring and seal. My exhaust valves did not have umbrella seals. Removing the o-ring was a piece of cake because it was brittle and came apart in a bunch of pieces. Here's the biggest piece I got all day:

Next I followed the directions and trimmed the plastic sleeve that came with the new seals so it was 1/16th of an inch past the second groove on the valve. I also trimmed another one that went just past the first groove. This is to prevent damage to the seals and o-rings when they slide over the grooves. Here's the first sleeve on:

Here's what the new exhaust seals look like:

And here's the new intake seals:

Here's the exhaust seal slid in place. Notice I also have the o-ring on there. This was the first valve I did and no matter what I tried with the first valve spring compressor I couldn't get the spring compressed enough to put the o-ring on with the spring in place like the fel-pro instructions said. After I got my new spring compressor I could compress it as far as I dared to go as you can see in one of the earlier pictures.

Here's an intake seal in place with the sleeve still on.

Next I put the spring on and compressed it. I put the shorter sleeve on then slid the o-ring on over the sleeve to the second groove.
I put the keepers on using a dab of grease to hold them in place and released the tension on the spring.
OK, here's the part I was going to leave out. I didn't pay attention a couple of times and put the spring back on incorrectly. I had to go back and do them again. This pictures highlights my goof pretty well:
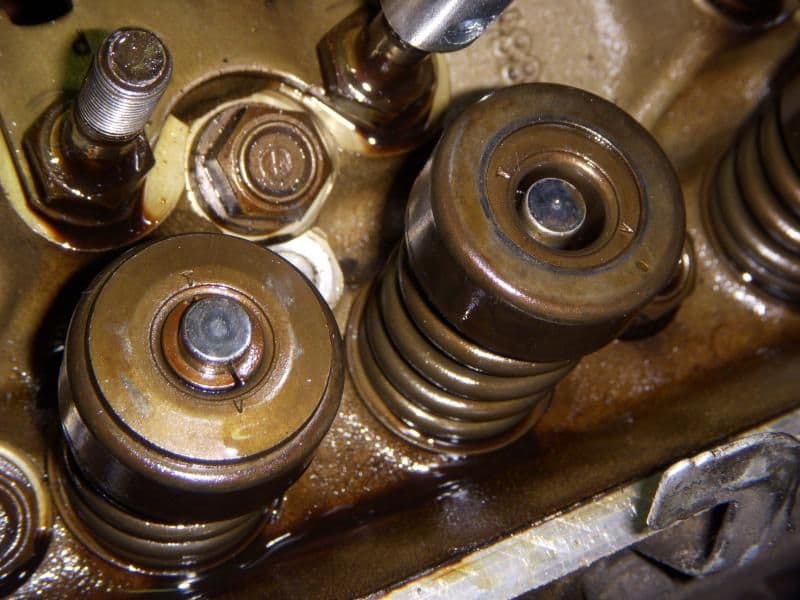
The valve on the left is on correctly while the one on the right had the top two cap pieces (whatever they are called) on in the wrong sequence.
Now repeat this 16 times then adjust the rockers.
My back is killing me from bending over the car all day so I think I'll go take some Tylenol and cry a while.
I hope this helps someone in the future.
I tried to take pictures as I went along in case somebody like me wants to do this later and have an idea what they are getting into. It was my first time doing this and I learned some things along the way. I screwed up a few times along the way which I wasn't going to show you, but decided somebody else may want to learn from my mistakes.
The first step was removing the valve covers, which is much easier said than done. I had to move the air pump bracket and remove the wiper motor cover and move all the hoses and wires out of the way on the drivers side. The passenger side wasn't much better because I had to loosen the A/C bracket and move it far enough forward to make enough clearance. I wish I had taken pictures of that because I also have the plenum runners and fuel rail off for the other part of my project and I'm not entirely sure where everything goes now.
Once I had the valve covers off here's what I was facing.
Since I was completely paranoid about dropping a valve I started with the number one cylinder at top dead center. I also took someone else's advice and used some vice grips with rubber hose over the ends and clamped onto the pulley in the mistaken notion that if the piston moved this would prevent it from moving too far when I compressed the cylinder. This turned out to be a bad idea because one time the piston did move and the vice grips got jammed alright. The rubber ripped (I hate it when that happens) and the vice grips nicked the pulley. I'll have to file out the nick later to make sure it doesn't chafe the belt. I actually made it through 4 of the valves before this happened, after that I said screw it and just let the piston move.
Once I had the cylinder at TDC and the vice grips pretending to help I used compressed air to hold the valves in place. I used 40 psi which held quite well. I used the hose from my leak down tester. It has a quick connect on one end and threads on the other for the spark plug hole.
With things hissing away I removed the rockers with a 16mm socket and compressed the spring. I started with the kind of spring compressor that has the crank handle on top and claws that grip the spring. It was a pain and would slip off the spring and it also didn't compress quite far enough to allow the o-ring to be installed with the spring in place. Here's a picture of the spring compressor:
Maybe I just need more practice, but I ended up getting a different one that screws onto the stud and presses down on the spring.
As you can see the spring can be compressed quite a ways to reveal the second groove in the valve. One problem I had though was trying to keep the spring centered around the valve. Notice the spring is pushed to one side which makes getting the o-ring on difficult.
Once the spring is compressed the keepers can be removed using a magnet. Here's what they look like (a little blurry):
Remove the spring:
Remove the old o-ring and seal. My exhaust valves did not have umbrella seals. Removing the o-ring was a piece of cake because it was brittle and came apart in a bunch of pieces. Here's the biggest piece I got all day:
Next I followed the directions and trimmed the plastic sleeve that came with the new seals so it was 1/16th of an inch past the second groove on the valve. I also trimmed another one that went just past the first groove. This is to prevent damage to the seals and o-rings when they slide over the grooves. Here's the first sleeve on:
Here's what the new exhaust seals look like:
And here's the new intake seals:
Here's the exhaust seal slid in place. Notice I also have the o-ring on there. This was the first valve I did and no matter what I tried with the first valve spring compressor I couldn't get the spring compressed enough to put the o-ring on with the spring in place like the fel-pro instructions said. After I got my new spring compressor I could compress it as far as I dared to go as you can see in one of the earlier pictures.
Here's an intake seal in place with the sleeve still on.
Next I put the spring on and compressed it. I put the shorter sleeve on then slid the o-ring on over the sleeve to the second groove.
I put the keepers on using a dab of grease to hold them in place and released the tension on the spring.
OK, here's the part I was going to leave out. I didn't pay attention a couple of times and put the spring back on incorrectly. I had to go back and do them again. This pictures highlights my goof pretty well:
The valve on the left is on correctly while the one on the right had the top two cap pieces (whatever they are called) on in the wrong sequence.
Now repeat this 16 times then adjust the rockers.
My back is killing me from bending over the car all day so I think I'll go take some Tylenol and cry a while.
I hope this helps someone in the future.


 05-09-2010, 03:30 AM
#4
Slingshot

Okay, here is a dumb question for you - how do you know which valve is the exhaust and which is the intake valve?
Also, can you post a photo copy of the Fel-Pro instructions that you used along with a parts list complete with part #s? Finally, what did the good valve spring compressor cost and where did you get it?
Again, great job - thank you
Also, can you post a photo copy of the Fel-Pro instructions that you used along with a parts list complete with part #s? Finally, what did the good valve spring compressor cost and where did you get it?
Again, great job - thank you
05-09-2010, 09:16 AM
#6
Drifting

Member Since: Aug 2004
Location: 2010 C6 Grand Sport Convertible
Posts: 1,321
Likes: 0
Received 4 Likes
on
4 Posts

Hey, good job! Altho the seals are a PITA to do, it's a great learning experience. I did that job on my pacer a few years ago and the toughest part was adjusting the rockers. I did the static adjustment to get in the ballpark, then the final one while the engine was idling and spewing oil all over the heads. 
Mike
Altho the seals are a PITA to do, it's a great learning experience. I did that job on my pacer a few years ago and the toughest part was adjusting the rockers. I did the static adjustment to get in the ballpark, then the final one while the engine was idling and spewing oil all over the heads. Mike
05-09-2010, 10:45 AM
#7
Advanced

Member Since: Jan 2010
Location: Richardson Texas
Posts: 82
Likes: 0
Received 0 Likes
on
0 Posts
I'm going to be replacing mine this week and the rebuild guy at City Motor Supply sold me all positive lock seals not the umbrella ones like you have. Do you know if he sold me the right ones or can somebody chime in before I get started. These are what I have for both intake and exhaust.
05-09-2010, 11:27 AM
#8
Pro


Member Since: Nov 2005
Location: North Bay Ontario
Posts: 602
Likes: 0
Received 0 Likes
on
0 Posts

With fresh o-rings on the valve stems, you really don't need positive seals on the exhaust valve, just the intake. It's the failing intake seal that usually lets a little oil into the combustion process, not the exhaust side.
05-09-2010, 11:32 AM
#9
Pro
Member Since: Nov 2005
Location: North Bay Ontario
Posts: 602
Likes: 0
Received 0 Likes
on
0 Posts
05-09-2010, 01:01 PM
#10
Le Mans Master

 The exhaust valves line up with the exhaust manifolds....really easy to see once you have the VC off.
I used Fel-Pro intake seals all the way around. Nitestalker, you will be okay with what you have.
05-09-2010, 01:43 PM
#12
Racer
Thread Starter
Here are the answer to some of the questions.
How do you tell which are exhaust/intake? I had the same question, then I realized the exhaust valves line up with the exhaust manifold.
Why didn't I replace the springs? I'm not that smart.
What are the part numbers? Intake = SS 72527, Exhaust = SS 72877
A lot of forum members use the intake seals all around. I figured Fel-pro might know what they are doing. I didn't even have seals on the exhaust other than the o-rings, so it probably doesn't matter.
Where did I get the valve spring compressor and what did it cost? The first one I got from harbor freight for cheap, the second one I got from autozone for $60. They had to order it. They can be had for cheaper from Summit, but I wanted it now and after the expedite shipping it came to the same price.
Can you post the fel-pro instructions? You bet:
05-09-2010, 02:15 PM
#13
Le Mans Master
I made my own spring compressor patterned after one my son had. I used 1" channel that I cut, bent and welded. Drilled the hole to bolt to the stud and another hole for the valve stem. I made this about 20" long (about twice as long as the professional one my son bought) to give that extra leverage. Manual...but worked well. The extra length made things much easier.
The little "O" rings on my valves were toast, all I had to do to remove them was to wipe a cloth over them. Disintegrated when wiped!
The little "O" rings on my valves were toast, all I had to do to remove them was to wipe a cloth over them. Disintegrated when wiped!
 07-14-2010, 02:33 AM
#16
Drifting
Member Since: Apr 2008
Location: New York New York
Posts: 1,815
Likes: 0
Received 10 Likes
on
10 Posts
Do you guys recommend this job for someone who has not really worked on cars. I want to save some money and I want to learn how to repair things myself but don't want to screw anything up. Also, once you do the 2 or 3 valve seals does it get easier as you go along? How long does a job like this take for first timers? and lastly, how do you adjust the rockers and is that another mission to do? Thanks
07-15-2010, 12:38 AM
#17
Safety Car

I think I can do this with your great write up. My car burns about a qt every 500 miles and I think this will help out tremendously with that problem. I see someone suggested new valve springs and its only about another $35-40 so I guess I will do them too. Should I go ahead and get new valve keeps as well? Another $16 but if its something like the springs in the "while I am in there" department....... Geez I went from $20 to $75 in a hurry, lol.
