84 Valve seal Replacement w/Pics
 07-18-2010, 03:36 PM
#1
Instructor

Thread Starter
Had blue smoke on startup, 119,000 miles on the engine, typical valve seals symptom. Once when I had just started it up and the initial blue cloud was gone, I was backing out of a parking space with the wheels cut hard and had to stop suddenly so the engine was sort of travelling sideways as it stopped. Boy what an embarrassing cloud of blue that was!
The jobs been done for 2 months and it worked. I just wanted to share what I learned here, as I am so grateful for all the posts here that have helped me so much since I bought this car.
Jack the front of the car up on jack stands to save your back.
Remove the front wheels for more room.
Drain the radiator down below the level of the top hose so you can remove the top hose - the way you have to manhandle that hose to get the left valve cover off may cause a leak at the radiator (did for me - fixed it by cutting the last 1/2" or so off the hose, cleaning it good and re-installing it.
I removed the windshield wiper motor to get the left valve cover off. Having that motor gone provides good access to lots of stuff down near and behind the distributor, too.
Clean out good above the valve covers before you take them out. Any leaves or junk between there & the intake manifold will wind up in the pushrod passages later. I used a big rubber fuel line hose taped to a vacuum to clean mine.
If you had anything on the crank to turn the engine take it off because each cylinder pressurized rotates the crank.
I used about a 12" long flexible rubber air hose threaded to fit the spark plug hole with an air hose fitting at the other end to pressurize the cylinders. It came with either my compression tester or leakdown kit. The flexible rubber part enables you to turn it from one end while you adjust the angle of the threaded part with the other hand - sort of like using a piece of vacuum hose stuck on the end of a spark plug to thread the plug in - a poor man's universal drive! Lube the threads frequently. I used ablout 50 psi to pressurize the cylinders, you might be able to use less. My regulator hose was shot so I used the main compressor hose and just turned the pressure switch on the compressor down to 50 psi or so. The lower the pressure the less the compressor will run and the less potential water in the cylinders - unless you are using a refrigerated air dryer you will get some water in the hose with the large quantity of air used. If you start to get water up at the line going into the cylinder blow the hose out. I couldn't finish mine in one weekend so I sprayed WD-40 into all the cylinders then cranked the engine a little just in case there was water inside.
I used to use a lever type valve spring compressor which you bolt down over the rocker arm stud for this job 20 years ago - the type shown in the GM shop manual. They are not easy to find now but KD tools makes one which I bought online. It turned out to be unusable because there is a rubber o-ring on the valve stem which seals against the spring cap or rotator. When you compress the spring the inteference of the o-ring forces the valve off of its seat. There was no way I could get that thing to work. I ran to Sears and got a $17 screw type compressor which worked fine.
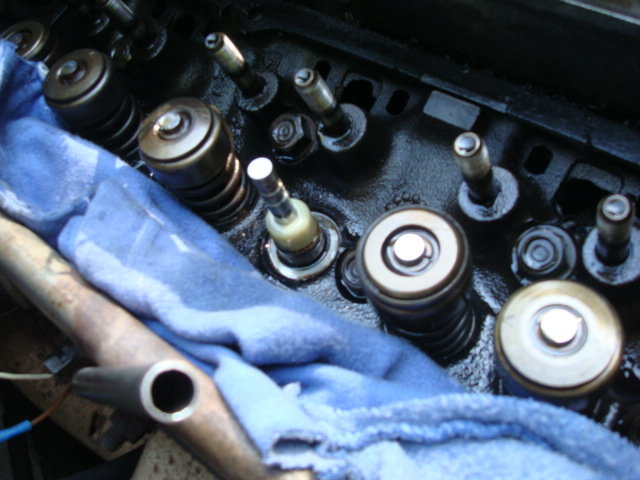
When you compress the spring the compressor pulls the bottom of the spring up towards you since the top is stuck by the o-ring. Once the spring is fully (really - a lot) compressed you can push down on the compressor & spring to get the spring cap off of the o-ring & get the keepers out. Sometimes you'll have to tap the top of the spring compressor quite a bit to break that o-ring loose! You'll want a small magnet to pick up the keepers.
This picture shows one ready to break loose:

Here's one either just off or ready to go back on - they have to be very compressed to make room to get the keepers out and the o-ring & keepers back in:

The old seals twist & crumble off pretty easily although some I had to use my Channel Lock pliars on. Just clean it all up good afterwards. I liberally lubed everything with motor oil from a squirt can after it was clean.
The exhaust & intake seals are different, the intakes are rubbery soft (they have to keep engine vacuum from sucking oil into the intake path) and there's a clear plastic sleeve in the kit which you fit over the end of the valve stem to protect them on the way on. The exhaust seals are very hard, you don't need the sleeve for them. The exhaust seals have to deal with higher temps. I lubed the seals & valve stems good with motor oil. They slide on easy but when they get to the valve guide you have to tap them over it. I used an appropriately sized 3/8" drive deep socket and a plastic hammer - you can tell when they are home. I used Fel-Pro.
Here's an exhaust seal just installed:
Once the seals are on you can install the springs w dampeners, valve caps/rotators, o-rings & keepers. I lubed the rotators (rotators for intake valves only if I remember right, it's like a 2 piece cap w/ bearing) good with motor oil. You compress the spring & cap or rotator good to provide working room to get the o-ring in. In the above pic there's 2 grooves on the valve stem. The top groove is for the keepers the bottom for the o-ring.
I put the compressed spring on over the valve stem then lubed the stem & o-ring well and pushed the o-ring down and into the bottom groove with a little screw driver. Then I put the keepers in place and, with the help of the liberal motor oil, pulled the valve spring cap up while rotating slightly to get the o-ring inside as the cap sits into the keepers.
Then while pulling that all up towards me I decompressed the spring. I had lubed the springs & dampers up in a sandwich bag with motor oil as shown here :

I stuck with stock parts since the car has a lot of other problems right now and the engine was working well. I replaced all the valve springs because they are springs and only last so long - cheap insurance - Sealed Power, like 80 bucks or less.
When I inspected my parts I found the top of the pushrod on the right (pass) side rear was losing its shiny steel and cracking. The ones immediately forward of it were,too, probably at the end of the oiling system. I bought all new pushrods, like 80 bucks, and rocker arms & nuts & pivots, like 80bucks, all Sealed Power.
Funny thing with the rocker arms. I got a bunch of opened, mixed boxes from my parts guy - old stuff. If I turned them upside down with the bearing side up some of them were not level and I thought they were bad. I had the parts guy get more & I went back and took the pick of the litter but came to the realization that since they are stamped the walls of the stamping may not be level but as long as the 2 bearing points and pivot point are properly related (they should be as those are probably the 3 hard points of the stamper) it's probably OK.
Once all the springs are on I would put the pushrods into #1 (with liberal assembly lube - it's really sticky and when you see how long the engine takes to get oil up the pushrods and onto the rockers later you'll know why). Still without spark plugs, rotate the engine clockwise (the way it would if it was running so the cam chain slop is the right way) untill #1 comes up on Top Dead Center. You can rotate the crank carefully with a socket in the harmonic balanced bolt (careful) or a special tool on the flywheel teeth or end of the balancer. I have always carefully used the bolt & been OK. I used a 3/8" swivel ratchet with a socket. You can find TDC because you put a bright paint, grease or chalk mark on the timing mark of the harmonic balancer. Both #1's valves are closed on the compression stroke so while you rotate the engine have your wife or son watch the pushrods. When they both go down, then stop moving as you continue to turn the last 180 degrees, that's the compression stroke - when the white balancer mark lines up with 0 on the timing pointer you are there. At this point you can adjust half of the engine's valves!
With #1 at TDC you can adjust the following valves: Exhaust 1,3,4,8; Intake 1,2,5,7. Oh yeah, #1 is the left (driver's) front, #2 is the right front cylinder and so on. Now put the pushrods in and the rockers loose on JUST THESE 8 VALVES - that way it's easy to know who to adjust. Lots of assembly lube on everything - there's gonna be a long wait for natural oil on startup.
Next tighten each rocker just (barely) until the pushrod becomes hard to turn, right at that point all the slop is out of the valve train. Then tighten 1 turn more - this compresses the lifter's spring slightly and gives it some room so as the valve train wears the hydraulic lifter can take up the slack. I got this adjustment out of the Chevy shop manual and it really worked fine - I ran the engine with the valve covers off at first just in case because older methods did the final adjustment with the engine running but the adjustment was fine.
Now rotate the engine 360 degrees (watch it, I went too far) and do the other 8 valves: Exhaust 2,5,6,7; Intake 3,4,6,8. It would be good to mark the first 8 somehow so it's easy to tell whose in the second 8.
Now put the valve covers on. Back when I was a working mechanic I did a lot of valve cover gaskets and gaskets in general. Most of the time no sealant is needed but the big problem is keeping the gasket in place as you wrestle the part into place. So I usually use yellow weatherstrip adhesive for valve cover gaskets. Why not black? At Kreb's Exxon where I learned how in 1977 we used yellow. Black might be better but I have to respect my own history! Anyway, get the valve cover clean, put glue on cover & gasket, put them together & let it dry (follow the instructions on the tube). Letting it dry good is a big deal and is the absolute key to valve cover happiness - don't rush it! You will need that thing good and firm in place as you struggle the valve cover on. The biggest problem with valve cover gaskets is they sneak out of place, even as you tighten them, and you don't know it. GET THEM GLUED IN GOOD AND BE HAPPY!!! They have to be re-tightened after the engine has heated up and cooled down a few times, maybe even 2 re-tightenings. Don't kill them, just good & snug with a 1/4" drive universal socket.
I also replaced both valve cover grommets, Corvette Central #153037 left - squarish one for PCV valve & 153038 right. The left one leaked, it wasn't molded quite right - they sent me another free no questions. Don't have it on yet as the car's BEING PAINTED right now, Soon it will be Magnetic Red!!
That's about it - hope this helps somebody.
The jobs been done for 2 months and it worked. I just wanted to share what I learned here, as I am so grateful for all the posts here that have helped me so much since I bought this car.
Jack the front of the car up on jack stands to save your back.
Remove the front wheels for more room.
Drain the radiator down below the level of the top hose so you can remove the top hose - the way you have to manhandle that hose to get the left valve cover off may cause a leak at the radiator (did for me - fixed it by cutting the last 1/2" or so off the hose, cleaning it good and re-installing it.
I removed the windshield wiper motor to get the left valve cover off. Having that motor gone provides good access to lots of stuff down near and behind the distributor, too.
Clean out good above the valve covers before you take them out. Any leaves or junk between there & the intake manifold will wind up in the pushrod passages later. I used a big rubber fuel line hose taped to a vacuum to clean mine.
If you had anything on the crank to turn the engine take it off because each cylinder pressurized rotates the crank.
I used about a 12" long flexible rubber air hose threaded to fit the spark plug hole with an air hose fitting at the other end to pressurize the cylinders. It came with either my compression tester or leakdown kit. The flexible rubber part enables you to turn it from one end while you adjust the angle of the threaded part with the other hand - sort of like using a piece of vacuum hose stuck on the end of a spark plug to thread the plug in - a poor man's universal drive! Lube the threads frequently. I used ablout 50 psi to pressurize the cylinders, you might be able to use less. My regulator hose was shot so I used the main compressor hose and just turned the pressure switch on the compressor down to 50 psi or so. The lower the pressure the less the compressor will run and the less potential water in the cylinders - unless you are using a refrigerated air dryer you will get some water in the hose with the large quantity of air used. If you start to get water up at the line going into the cylinder blow the hose out. I couldn't finish mine in one weekend so I sprayed WD-40 into all the cylinders then cranked the engine a little just in case there was water inside.
I used to use a lever type valve spring compressor which you bolt down over the rocker arm stud for this job 20 years ago - the type shown in the GM shop manual. They are not easy to find now but KD tools makes one which I bought online. It turned out to be unusable because there is a rubber o-ring on the valve stem which seals against the spring cap or rotator. When you compress the spring the inteference of the o-ring forces the valve off of its seat. There was no way I could get that thing to work. I ran to Sears and got a $17 screw type compressor which worked fine.
When you compress the spring the compressor pulls the bottom of the spring up towards you since the top is stuck by the o-ring. Once the spring is fully (really - a lot) compressed you can push down on the compressor & spring to get the spring cap off of the o-ring & get the keepers out. Sometimes you'll have to tap the top of the spring compressor quite a bit to break that o-ring loose! You'll want a small magnet to pick up the keepers.
This picture shows one ready to break loose:
Here's one either just off or ready to go back on - they have to be very compressed to make room to get the keepers out and the o-ring & keepers back in:
The old seals twist & crumble off pretty easily although some I had to use my Channel Lock pliars on. Just clean it all up good afterwards. I liberally lubed everything with motor oil from a squirt can after it was clean.
The exhaust & intake seals are different, the intakes are rubbery soft (they have to keep engine vacuum from sucking oil into the intake path) and there's a clear plastic sleeve in the kit which you fit over the end of the valve stem to protect them on the way on. The exhaust seals are very hard, you don't need the sleeve for them. The exhaust seals have to deal with higher temps. I lubed the seals & valve stems good with motor oil. They slide on easy but when they get to the valve guide you have to tap them over it. I used an appropriately sized 3/8" drive deep socket and a plastic hammer - you can tell when they are home. I used Fel-Pro.
Here's an exhaust seal just installed:
Once the seals are on you can install the springs w dampeners, valve caps/rotators, o-rings & keepers. I lubed the rotators (rotators for intake valves only if I remember right, it's like a 2 piece cap w/ bearing) good with motor oil. You compress the spring & cap or rotator good to provide working room to get the o-ring in. In the above pic there's 2 grooves on the valve stem. The top groove is for the keepers the bottom for the o-ring.
I put the compressed spring on over the valve stem then lubed the stem & o-ring well and pushed the o-ring down and into the bottom groove with a little screw driver. Then I put the keepers in place and, with the help of the liberal motor oil, pulled the valve spring cap up while rotating slightly to get the o-ring inside as the cap sits into the keepers.
Then while pulling that all up towards me I decompressed the spring. I had lubed the springs & dampers up in a sandwich bag with motor oil as shown here :
I stuck with stock parts since the car has a lot of other problems right now and the engine was working well. I replaced all the valve springs because they are springs and only last so long - cheap insurance - Sealed Power, like 80 bucks or less.
When I inspected my parts I found the top of the pushrod on the right (pass) side rear was losing its shiny steel and cracking. The ones immediately forward of it were,too, probably at the end of the oiling system. I bought all new pushrods, like 80 bucks, and rocker arms & nuts & pivots, like 80bucks, all Sealed Power.
Funny thing with the rocker arms. I got a bunch of opened, mixed boxes from my parts guy - old stuff. If I turned them upside down with the bearing side up some of them were not level and I thought they were bad. I had the parts guy get more & I went back and took the pick of the litter but came to the realization that since they are stamped the walls of the stamping may not be level but as long as the 2 bearing points and pivot point are properly related (they should be as those are probably the 3 hard points of the stamper) it's probably OK.
Once all the springs are on I would put the pushrods into #1 (with liberal assembly lube - it's really sticky and when you see how long the engine takes to get oil up the pushrods and onto the rockers later you'll know why). Still without spark plugs, rotate the engine clockwise (the way it would if it was running so the cam chain slop is the right way) untill #1 comes up on Top Dead Center. You can rotate the crank carefully with a socket in the harmonic balanced bolt (careful) or a special tool on the flywheel teeth or end of the balancer. I have always carefully used the bolt & been OK. I used a 3/8" swivel ratchet with a socket. You can find TDC because you put a bright paint, grease or chalk mark on the timing mark of the harmonic balancer. Both #1's valves are closed on the compression stroke so while you rotate the engine have your wife or son watch the pushrods. When they both go down, then stop moving as you continue to turn the last 180 degrees, that's the compression stroke - when the white balancer mark lines up with 0 on the timing pointer you are there. At this point you can adjust half of the engine's valves!
With #1 at TDC you can adjust the following valves: Exhaust 1,3,4,8; Intake 1,2,5,7. Oh yeah, #1 is the left (driver's) front, #2 is the right front cylinder and so on. Now put the pushrods in and the rockers loose on JUST THESE 8 VALVES - that way it's easy to know who to adjust. Lots of assembly lube on everything - there's gonna be a long wait for natural oil on startup.
Next tighten each rocker just (barely) until the pushrod becomes hard to turn, right at that point all the slop is out of the valve train. Then tighten 1 turn more - this compresses the lifter's spring slightly and gives it some room so as the valve train wears the hydraulic lifter can take up the slack. I got this adjustment out of the Chevy shop manual and it really worked fine - I ran the engine with the valve covers off at first just in case because older methods did the final adjustment with the engine running but the adjustment was fine.
Now rotate the engine 360 degrees (watch it, I went too far) and do the other 8 valves: Exhaust 2,5,6,7; Intake 3,4,6,8. It would be good to mark the first 8 somehow so it's easy to tell whose in the second 8.
Now put the valve covers on. Back when I was a working mechanic I did a lot of valve cover gaskets and gaskets in general. Most of the time no sealant is needed but the big problem is keeping the gasket in place as you wrestle the part into place. So I usually use yellow weatherstrip adhesive for valve cover gaskets. Why not black? At Kreb's Exxon where I learned how in 1977 we used yellow. Black might be better but I have to respect my own history! Anyway, get the valve cover clean, put glue on cover & gasket, put them together & let it dry (follow the instructions on the tube). Letting it dry good is a big deal and is the absolute key to valve cover happiness - don't rush it! You will need that thing good and firm in place as you struggle the valve cover on. The biggest problem with valve cover gaskets is they sneak out of place, even as you tighten them, and you don't know it. GET THEM GLUED IN GOOD AND BE HAPPY!!! They have to be re-tightened after the engine has heated up and cooled down a few times, maybe even 2 re-tightenings. Don't kill them, just good & snug with a 1/4" drive universal socket.
I also replaced both valve cover grommets, Corvette Central #153037 left - squarish one for PCV valve & 153038 right. The left one leaked, it wasn't molded quite right - they sent me another free no questions. Don't have it on yet as the car's BEING PAINTED right now, Soon it will be Magnetic Red!!
That's about it - hope this helps somebody.
Last edited by ProjectC4; 07-19-2010 at 03:31 PM.

The following users liked this post:
bnnnboy (04-30-2018)

 07-18-2010, 04:00 PM
#3
Instructor
Thread Starter
Pictures look good, like this but with brackets at the end, not (), (IMG]http://forums.corvetteforum.com/album.php?albumid=10987&pictureid=58090[/IMG)
but don't show up
but don't show up
07-18-2010, 08:11 PM
#6
Le Mans Master


Pictures aren't working for me.
One note - for those who don't have a compressor handy, you can use 5/16" nylon rope and stuff it into the chamber. That will hold the valves in place and you also don't run the risk of the compressed air cranking the engine around. If that happens, the sudden pressure loss allows the valves to drop. Don't ask how I know.
One note - for those who don't have a compressor handy, you can use 5/16" nylon rope and stuff it into the chamber. That will hold the valves in place and you also don't run the risk of the compressed air cranking the engine around. If that happens, the sudden pressure loss allows the valves to drop. Don't ask how I know.
07-18-2010, 09:32 PM
#7
Team Owner


Member Since: Aug 2005
Location: Riverside County Southern California
Posts: 34,988
Received 501 Likes
on
342 Posts
Co-winner 2020 C4 of the Year - Modified
2018 Corvette of Year Finalist
2017 C4 of Year
2016 C7 of Year Finalist
St. Jude Donor '09-'10-'11-'12-'13-'14-'15-'16-'17-'18-'19-'20


Pictures aren't working for me.
One note - for those who don't have a compressor handy, you can use 5/16" nylon rope and stuff it into the chamber. That will hold the valves in place and you also don't run the risk of the compressed air cranking the engine around. If that happens, the sudden pressure loss allows the valves to drop. Don't ask how I know.
One note - for those who don't have a compressor handy, you can use 5/16" nylon rope and stuff it into the chamber. That will hold the valves in place and you also don't run the risk of the compressed air cranking the engine around. If that happens, the sudden pressure loss allows the valves to drop. Don't ask how I know.
We would love to know. Have you been working on your Yellow 84?
Unless, you have been a Corvette owner all along.
07-18-2010, 09:51 PM
#8
Tech Contributor

Pictures aren't working for me.
One note - for those who don't have a compressor handy, you can use 5/16" nylon rope and stuff it into the chamber. That will hold the valves in place and you also don't run the risk of the compressed air cranking the engine around. If that happens, the sudden pressure loss allows the valves to drop. Don't ask how I know.
One note - for those who don't have a compressor handy, you can use 5/16" nylon rope and stuff it into the chamber. That will hold the valves in place and you also don't run the risk of the compressed air cranking the engine around. If that happens, the sudden pressure loss allows the valves to drop. Don't ask how I know.
Then you don't have to mess with a compressor or trying to stuff rope in thru the plug hole.
07-18-2010, 09:51 PM
#9
Le Mans Master

Member Since: Feb 1999
Location: levittown pa. usa Even a bad day with my `Vette, is better than a good day at work
Posts: 6,470
Likes: 0
Received 2 Likes
on
2 Posts
St. Jude Donor '10
Pictures aren't working for me.
One note - for those who don't have a compressor handy, you can use 5/16" nylon rope and stuff it into the chamber. That will hold the valves in place and you also don't run the risk of the compressed air cranking the engine around. If that happens, the sudden pressure loss allows the valves to drop. Don't ask how I know.
One note - for those who don't have a compressor handy, you can use 5/16" nylon rope and stuff it into the chamber. That will hold the valves in place and you also don't run the risk of the compressed air cranking the engine around. If that happens, the sudden pressure loss allows the valves to drop. Don't ask how I know.
 Thats called "The rope trick". I used it when I did my `87. Worked fine.
  07-18-2010, 10:12 PM
#10
I finished up the driver's side of our 86 this afternoon. The actual job of compressing the spring, changing out the seal then putting the spring back in and locking it was easy.
The pita was removing the valve cover then trying to get it back on when I was finished while keeping the gasket in place. I was scared to death once I was finished that I would hear clacking when I cranked it up and have to take it apart again. I was so relieved to hear nothing besides a nice running engine.
The pita was removing the valve cover then trying to get it back on when I was finished while keeping the gasket in place. I was scared to death once I was finished that I would hear clacking when I cranked it up and have to take it apart again. I was so relieved to hear nothing besides a nice running engine.
07-18-2010, 11:18 PM
#11
Le Mans Master
Just 'cause I'm new here doesn't mean I'm a total noob.
Yes, I'm been working on the 84 in between working both my jobs 65+ hours a week too. Not much so far, mostly fixing damage/problems due to neglect and the "ASE certified" guy who didn't get 5 plug boots snapped on when he did the tune-up before I bought it - stuff like that. I've also been wrestling the ignition noise issue after upgrading the coil and replacing the cap, rotor and wires with MSD parts. I finally found the OE tach filter, so at least I know it's there. I'll try to talk to MSD tomorrow to see if they have any ideas on why their coil is making the dash flash randomly.
Oh, and I got the cheap (and stuck open) 160 degree t-stat replaced this evening too. The new mufflers should be here in the next day or so, and the new Edelbrock rear shocks should be drop-shipping to me this week as well.
And, I need to get a set of freshly serviced injectors in there too.....
After that I need to chill out for a little bit since I have to file for the removal of cindition for my wifes visa - and of course there is a $545 filling fee to go with the paperwork. Oh, and I still need to pick up those ZR-1 saw blades I want for the next set of tires. Yep, I've already spent more on parts for the car than I paid for it 9 days ago. But it's
 'cause I'm loving the 84!!!
Last edited by mcm95403; 07-18-2010 at 11:20 PM.
07-19-2010, 01:15 AM
#12
Drifting

Member Since: Apr 2008
Location: New York New York
Posts: 1,815
Likes: 0
Received 10 Likes
on
10 Posts

Hey man nice write up. I just made another thread cause I think I might have a valve seal leak. Can you take a look at my thread and see if this is what you were experiencing? I appreciate it. Here is the link.
http://forums.corvetteforum.com/c4-t...t-problem.html
http://forums.corvetteforum.com/c4-t...t-problem.html
07-19-2010, 12:48 PM
#13
Instructor
Thread Starter
Yes, Uptown, what's on your thread looks like valve seals to me. Embarassing at any time but in a Corvette its worse! Sarted mine up at the grocery store with my wife, top off, wind blowing from the rear of the car - she gave me the look alright!!Try backing up, wheels cut hard right and suddenly stop - mine looked like chitty chitty bang bang when I did that once!
The rule of thumb was blue smoke means oil, black smoke fuel, white smoke coolant. In the '80's we still had a lot of carburator cars around and sometimes the float bowl fuel would leak out into the intake manifold after shutdown so there would be black smoke on startup.
The rule of thumb was blue smoke means oil, black smoke fuel, white smoke coolant. In the '80's we still had a lot of carburator cars around and sometimes the float bowl fuel would leak out into the intake manifold after shutdown so there would be black smoke on startup.
07-19-2010, 12:54 PM
#14
Instructor
Thread Starter
MCM, is your wife from the Philippines by any chance? Mine is from Manilla - that's our son standing next to me in my Avatar - he's 16 now and taller than me, just broke 6' 2".
07-19-2010, 01:17 PM
#15
Drifting
Member Since: Apr 2008
Location: New York New York
Posts: 1,815
Likes: 0
Received 10 Likes
on
10 Posts
Yes, Uptown, what's on your thread looks like valve seals to me. Embarassing at any time but in a Corvette its worse! Sarted mine up at the grocery store with my wife, top off, wind blowing from the rear of the car - she gave me the look alright!!Try backing up, wheels cut hard right and suddenly stop - mine looked like chitty chitty bang bang when I did that once!
The rule of thumb was blue smoke means oil, black smoke fuel, white smoke coolant. In the '80's we still had a lot of carburator cars around and sometimes the float bowl fuel would leak out into the intake manifold after shutdown so there would be black smoke on startup.
The rule of thumb was blue smoke means oil, black smoke fuel, white smoke coolant. In the '80's we still had a lot of carburator cars around and sometimes the float bowl fuel would leak out into the intake manifold after shutdown so there would be black smoke on startup.
07-19-2010, 03:38 PM
#16
Instructor
Thread Starter
Actually the zero lash part is fairly easy. Once you get the rocker arm in place and get the nut on the stud run down to where the rocker will not move much side to side the pushrod will be well placed inside its pocket in the rocker. At that point the pushrod will be really easy to rotate, like a bearing. Just tighten the rocker nut like 1/8 turn or so at a time and suddenly (like a light switch) that pushrod won't turn. That's zero lash.
If you loosen and tighten one a couple of times you will get a good feel for it.
If you loosen and tighten one a couple of times you will get a good feel for it.
07-19-2010, 04:22 PM
#17
Le Mans Master
07-19-2010, 04:49 PM
#19
Drifting
Member Since: Apr 2008
Location: New York New York
Posts: 1,815
Likes: 0
Received 10 Likes
on
10 Posts
Actually the zero lash part is fairly easy. Once you get the rocker arm in place and get the nut on the stud run down to where the rocker will not move much side to side the pushrod will be well placed inside its pocket in the rocker. At that point the pushrod will be really easy to rotate, like a bearing. Just tighten the rocker nut like 1/8 turn or so at a time and suddenly (like a light switch) that pushrod won't turn. That's zero lash.
If you loosen and tighten one a couple of times you will get a good feel for it.
If you loosen and tighten one a couple of times you will get a good feel for it.
11-13-2016, 10:51 PM
#20
Intermediate
Member Since: Jul 2013
Location: Phoenix Arizona
Posts: 38
Likes: 0
Received 0 Likes
on
0 Posts
Default
I need help. I have a 1984 crossfire with 54000 miles. I was at a show and when I started it up a few seconds of slightly blue smoke came out but quickly burnt off. I've had the 84 3 months and it runs great (leaks a little bit of oil but I don't care about that) I had all the corvette seniors tell me it's the valve guide seals. They told me eventually it will hurt the spark plugs that they might have to be filed eventually. I live in north phoenix I have not much mechanic experience but I researched this job. Can anyone tell me how much it might cost or give me instructions using the amazing redneck rope technique in the spark plugs hole without having to get the positions top dead center. Please help folks
I need help. I have a 1984 crossfire with 54000 miles. I was at a show and when I started it up a few seconds of slightly blue smoke came out but quickly burnt off. I've had the 84 3 months and it runs great (leaks a little bit of oil but I don't care about that) I had all the corvette seniors tell me it's the valve guide seals. They told me eventually it will hurt the spark plugs that they might have to be filed eventually. I live in north phoenix I have not much mechanic experience but I researched this job. Can anyone tell me how much it might cost or give me instructions using the amazing redneck rope technique in the spark plugs hole without having to get the positions top dead center. Please help folks