Pwnage's 383 Build (Pics!!)
 10-08-2010, 04:37 AM
#21
Le Mans Master

Nice, you are really hogging those runners out too. This should be a great build.
As for clearancing for the rotating assembly, are you taking the parts to the same machinest as the block? ) Checking rod ends, turning down the crank etc? You might just have him take a look at it and he should be able to do the right clearancing before cleaning up the block and also let you know if you need a small base circle camshaft as well.
Keep up with the updates!
 10-08-2010, 08:34 AM
#22
Racer


I think the pics of the oil drain-back show it all - just clean them up and smooth them out like you did the porting - all that casting flash needs to go! You're not trying to super hog them out and enlarge them - just open them up to where they looked like they should have been without the casting flash and remove a little material to smooth/radius the flow... No need to clean up the block yet - you're going to make a mess grinding and the oil film is keeping it from flash rusting so leave it on there until the machine shop can clean it thoroughly....
10-08-2010, 01:00 PM
#23
Burning Brakes

Member Since: Jun 2008
Location: New Smyrna Beach Florida
Posts: 892
Likes: 0
Received 1 Like
on
1 Post

From what I've read in the past, a lot of guys tend to go too far, and the car is no longer "streetable". If you are just going to run it at the strip, that's one thing, but if you want to enjoy it joyriding around town or on a trip, keep it a little "milder". Don't go hog wild with the compression. Sometimes, you might have trouble finding high enough octane pump gas and so on. Best of luck, and keep us posted, Jim
10-08-2010, 01:17 PM
#24
Tech Contributor
Thread Starter
Nice, you are really hogging those runners out too. This should be a great build.
As for clearancing for the rotating assembly, are you taking the parts to the same machinest as the block? ) Checking rod ends, turning down the crank etc? You might just have him take a look at it and he should be able to do the right clearancing before cleaning up the block and also let you know if you need a small base circle camshaft as well.
Keep up with the updates!

I want them to check over everything, because I don't want all of these parts to go to waste. I thought about assembling it myself but then I thought it would be a way better idea to let them do it.
You'll want .050-.080 clearance between rod bolts and pan rail and the bottom of the cylinder bore. This doesn't have to be measured exact but is a good minimum when you're going through grinding it. Find a piece of solid copper 14 gauge wire and then use that as a feeler gauge to check your progress (14ga = 0.0641 inch, 12 ga = 0.0808 - both are common household wire) you can bend it to reach and 'feel around' where you can't really see well...
I think the pics of the oil drain-back show it all - just clean them up and smooth them out like you did the porting - all that casting flash needs to go! You're not trying to super hog them out and enlarge them - just open them up to where they looked like they should have been without the casting flash and remove a little material to smooth/radius the flow... No need to clean up the block yet - you're going to make a mess grinding and the oil film is keeping it from flash rusting so leave it on there until the machine shop can clean it thoroughly....
I think the pics of the oil drain-back show it all - just clean them up and smooth them out like you did the porting - all that casting flash needs to go! You're not trying to super hog them out and enlarge them - just open them up to where they looked like they should have been without the casting flash and remove a little material to smooth/radius the flow... No need to clean up the block yet - you're going to make a mess grinding and the oil film is keeping it from flash rusting so leave it on there until the machine shop can clean it thoroughly....
I was pretty amazed at how crappy the casting was for the oil drain backs too. It was in a truck before and with those swirlports it probably never went over 4000 rpm

From what I've read in the past, a lot of guys tend to go too far, and the car is no longer "streetable". If you are just going to run it at the strip, that's one thing, but if you want to enjoy it joyriding around town or on a trip, keep it a little "milder". Don't go hog wild with the compression. Sometimes, you might have trouble finding high enough octane pump gas and so on. Best of luck, and keep us posted, Jim
10-08-2010, 01:33 PM
#25
Team Owner


Member Since: Oct 2004
Location: altered state
Posts: 81,242
Received 3,043 Likes
on
2,602 Posts
St. Jude Donor '05

Clearancing doesnt weaken anything do they do strokers on a regular basis?
10-08-2010, 02:10 PM
#26
Tech Contributor
Thread Starter
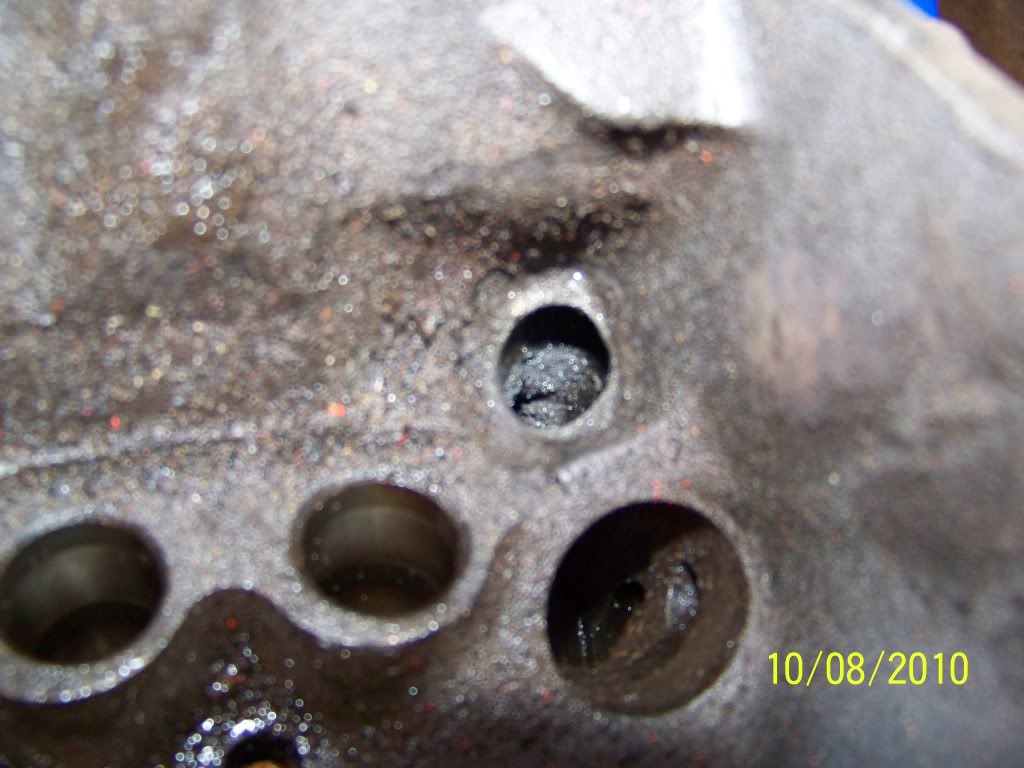
More pics!
I went out to the garage on a mission to open up these oil drain backs. It took me 40 minutes to find my carbide burr...anyways I only had time to do one, and I am not totally finished with it yet
Before:
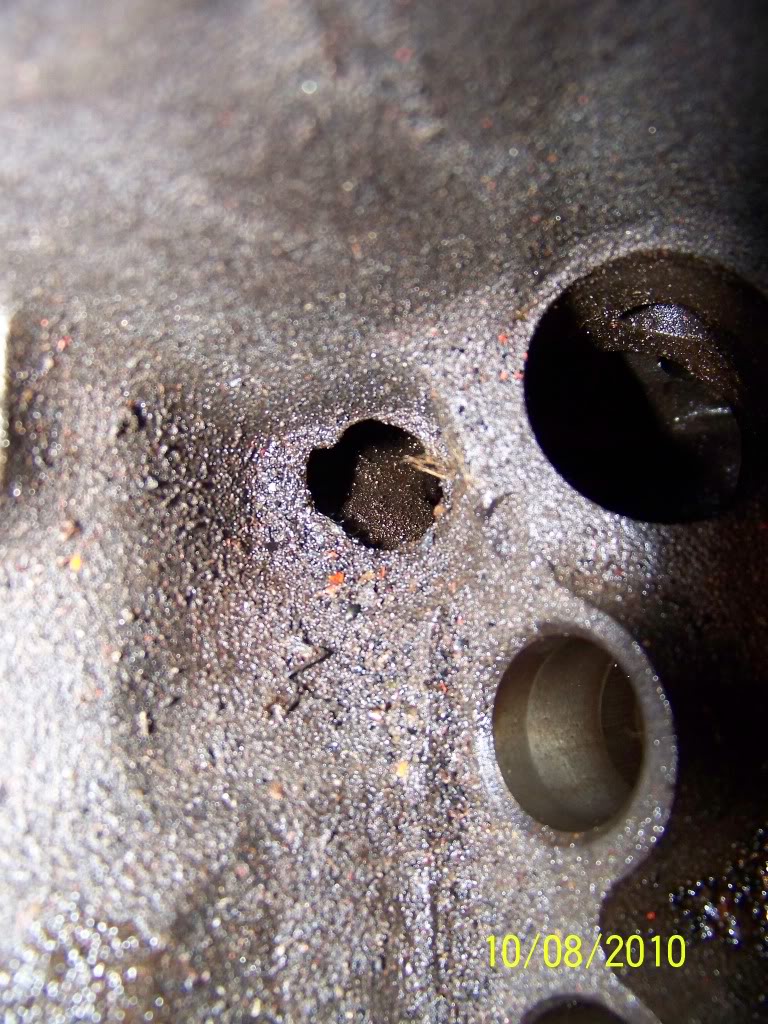
After:
Off to work! I will post more updates tomorrow. I have the whole day off.
Last edited by Pwnage1337; 10-08-2010 at 02:13 PM.
10-09-2010, 10:26 PM
#27
Racer
RUN from that machine shop - they're not the guys I would want to be doing my machine work - If they tell you they "don't clearance the block" because it would weaken it then they've never put together a stroker whose rod bolts hit the pan rails or the cylinder liner...
*IF* you use cap screws with good rods and get REAL lucky on some blocks just a tiny shave is all that's required but it's needed none the less...
I'd talk with the local circle track and drag racers about the machinists in the area - you'll quickly get an idea of who is good and who just isn't recommended - the guys that can put engines together and make them live on a circle track under sustained high RPM's will certainly be able to put together a good street engine...
10-09-2010, 11:40 PM
#28
Le Mans Master
Yeah, I would stay away from the machine shop also. It may be a toy, but it's still an investment. Take the time and get around and get to know your local engine shops. You'll be glad you did. You can also go to the regional section I suppose and ask the guys that hang out there for good shops in your area.
In the case of putting together your own engines, you can never take too much time, do too much homework, and research.
In the case of putting together your own engines, you can never take too much time, do too much homework, and research.
10-10-2010, 03:21 AM
#29
Tech Contributor
Thread Starter
Thanks for the advice guys, I am planning on "running" from this shop. They aren't really interested in what I want from the motor, they just want my money. I know a few people around here that race at the local 1/3 mile oval track, they should know some shops.
The guy i talked on the phone with seemed extremely impatient. I'll take my money elsewhere I suppose.
The guy i talked on the phone with seemed extremely impatient. I'll take my money elsewhere I suppose.
10-10-2010, 03:28 AM
#30
Safety Car


Very cool ! thats mighty impressive for the budget too. those heads look great and the car looks really good too in the pics. Glad you are open to input thoughts/comments. It's what makes it fun on the forums isnt it !!
Glad you are open to input thoughts/comments. It's what makes it fun on the forums isnt it !!
10-10-2010, 03:57 AM
#31
Melting Slicks

Very exciting project! It's a lot more fun (and rewarding) when you do the research, bargain shop, and find the deals! It sounds like you do a great job of working the interest as a resource (with a relatively diverse range of websites) to find the parts you've collected!
Good luck dude, I'll be following this thread!
Good luck dude, I'll be following this thread!
10-10-2010, 05:23 AM
#32
Drifting

Member Since: Nov 2009
Location: Perth Western Australia
Posts: 1,340
Likes: 0
Received 2 Likes
on
2 Posts
St. Jude Donor '10
BTW well done for staying away from the drinks and cigarettes. You will get much more of a high from the Vette thats for sure.
Last edited by Lemme; 10-10-2010 at 05:45 AM.
10-10-2010, 02:38 PM
#33
Tech Contributor
Thread Starter

Very exciting project! It's a lot more fun (and rewarding) when you do the research, bargain shop, and find the deals! It sounds like you do a great job of working the interest as a resource (with a relatively diverse range of websites) to find the parts you've collected!
Good luck dude, I'll be following this thread!
Good luck dude, I'll be following this thread!
Even though I managed to stay away from drinks (which is pretty damn hard here in WI)/cigarettes I think my hobby is more expensive.
 At least I have something to show for it besides emphysema or a failing liver
Last edited by Pwnage1337; 10-11-2010 at 12:49 AM.
10-10-2010, 08:40 PM
#34
Melting Slicks
If it weren't for these forums I would probably be like "I WANNA PUT NOS ON MY CAR!!!!!!!!!!111"
Definitely, its been in the making a long time but now its coming together slowly. Thanks!
I did some reading here and found out that blocks after 87 that were 1 piece rear mains have capability to run a roller cam, even if they weren't equipped with one from the factory. So I went on craigslist, searched "350 block" and found it. Saw pictures, it was a 1 piece RMS so I bought it. The heads are totally garbage and so is pretty much everything else in the motor (minus the crank)
you know you just called and asked me and i told you what to buy. haha. get your butt in gear and get that thing running.

 10-10-2010, 11:04 PM
#35
Tech Contributor
Thread Starter
10-11-2010, 09:52 PM
#36
Tech Contributor
Thread Starter
Update...
haven't got as much done as I wanted to. Cleaned out the garage instead of working on engine. Which in turn will make it easier to work on engine.
Just finished cleaning up the other oil drain back
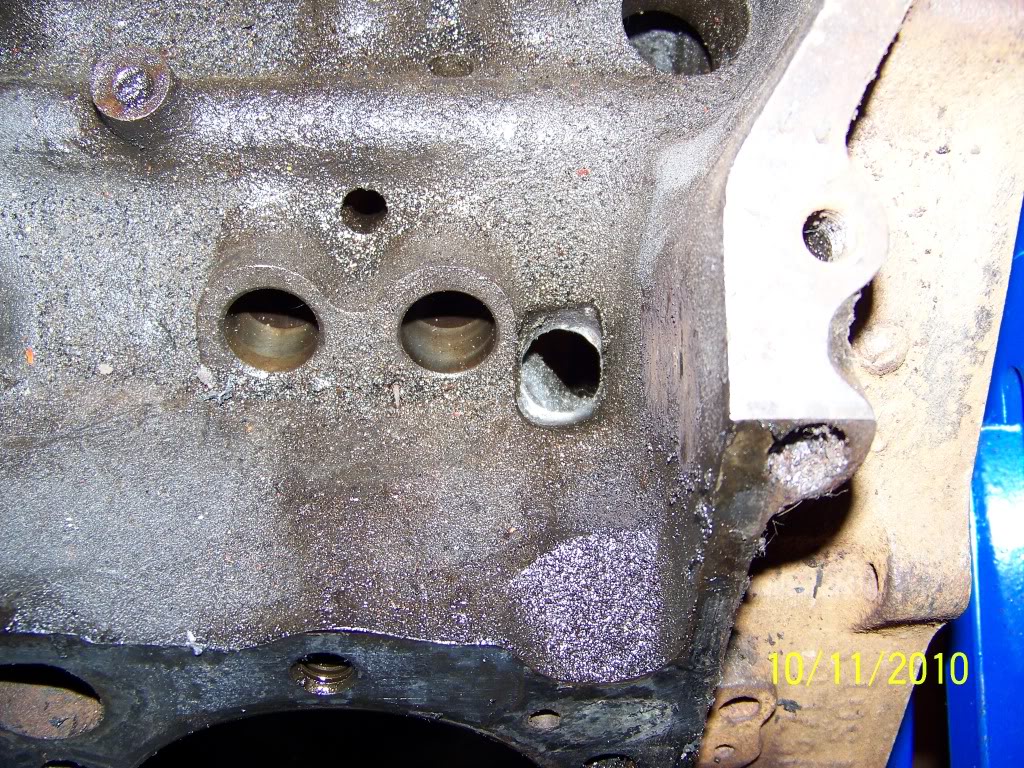
Does this look good? I cleaned up the rough casting.
haven't got as much done as I wanted to. Cleaned out the garage instead of working on engine. Which in turn will make it easier to work on engine.
Just finished cleaning up the other oil drain back
Does this look good? I cleaned up the rough casting.
 10-12-2010, 10:13 AM
#38
Racer
 10-12-2010, 08:54 PM
#39
Safety Car
Your doing good work on the oil drain backs but you can grind a bunch more casting flash out of them (and should).
The rear should look like these when your done. I did these on an LT4 383 I built for a forum member here a few yrs ago. You don't have to do as much polishing/blending as I did up above the oil return but you can see how big and what shape the returns should be when your finished.
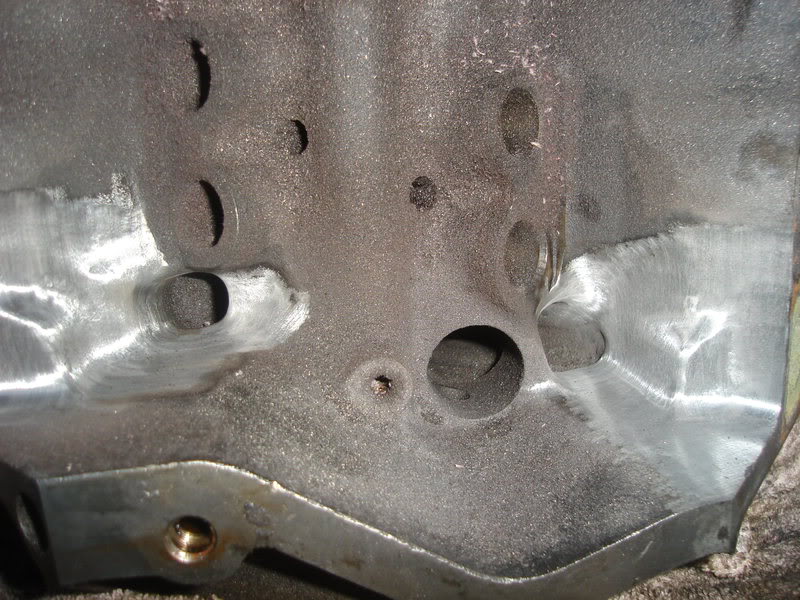
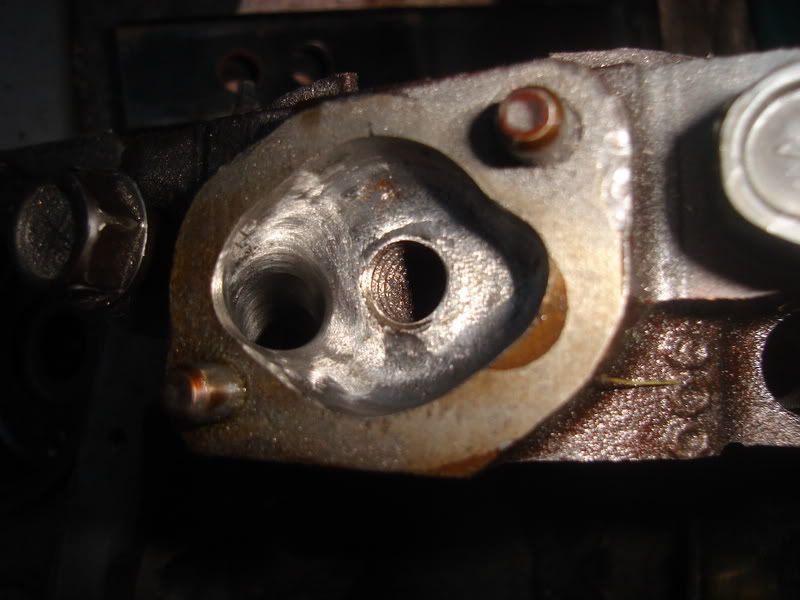
The clearancing for the 3.75 stroke crank and rods will look something like this. Bottom of the cyls and the pan rail (on some rod combos) needs to be cut. How much you have to cut all depends on the rods and how the bolts/cap screws are placed on the big end.

One last thing. The rear main cap oil pump feed should be deburred. This is an old oval track engine trick to help reduce strain on the oil pump. It does not take a lot of grinding to accomplish this.... Just blend the entry port. If you look at your stock cap you'll see the big sharp edge you'll need to blend in.

Good to see you taking this on by yourself. Your making a much better investment in that Corvette than your buddies are in smoking and drinking.
Will
The rear should look like these when your done. I did these on an LT4 383 I built for a forum member here a few yrs ago. You don't have to do as much polishing/blending as I did up above the oil return but you can see how big and what shape the returns should be when your finished.
The clearancing for the 3.75 stroke crank and rods will look something like this. Bottom of the cyls and the pan rail (on some rod combos) needs to be cut. How much you have to cut all depends on the rods and how the bolts/cap screws are placed on the big end.
One last thing. The rear main cap oil pump feed should be deburred. This is an old oval track engine trick to help reduce strain on the oil pump. It does not take a lot of grinding to accomplish this.... Just blend the entry port. If you look at your stock cap you'll see the big sharp edge you'll need to blend in.
Good to see you taking this on by yourself. Your making a much better investment in that Corvette than your buddies are in smoking and drinking.
Will
Last edited by rklessdriver; 10-12-2010 at 08:56 PM.
10-12-2010, 09:18 PM
#40
Tech Contributor
Thread Starter
Your doing good work on the oil drain backs but you can grind a bunch more casting flash out of them (and should).
The rear should look like these when your done. I did these on an LT4 383 I built for a forum member here a few yrs ago. You don't have to do as much polishing/blending as I did up above the oil return but you can see how big and what shape the returns should be when your finished.

The clearancing for the 3.75 stroke crank and rods will look something like this. Bottom of the cyls and the pan rail (on some rod combos) needs to be cut. How much you have to cut all depends on the rods and how the bolts/cap screws are placed on the big end.
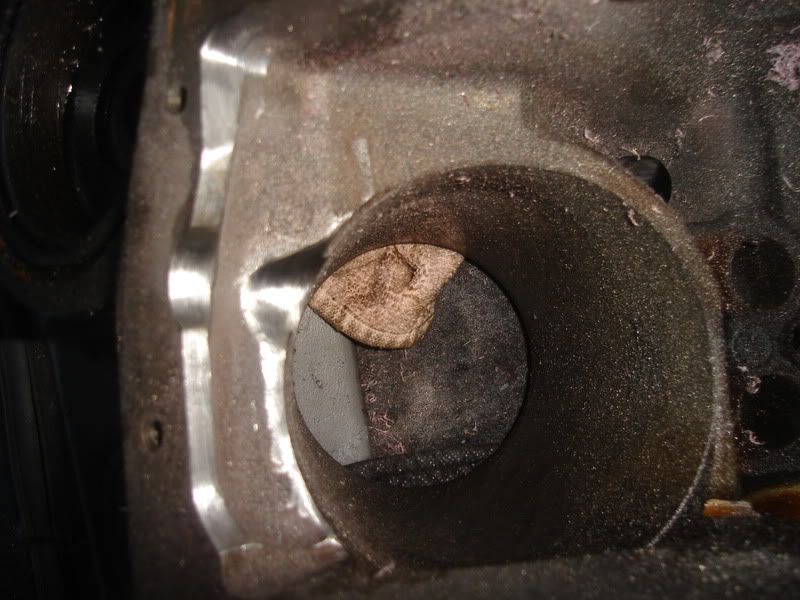
One last thing. The rear main cap oil pump feed should be deburred. This is an old oval track engine trick to help reduce strain on the oil pump. It does not take a lot of grinding to accomplish this.... Just blend the entry port. If you look at your stock cap you'll see the big sharp edge you'll need to blend in.
Good to see you taking this on by yourself. Your making a much better investment in that Corvette than your buddies are in smoking and drinking.
Will
The rear should look like these when your done. I did these on an LT4 383 I built for a forum member here a few yrs ago. You don't have to do as much polishing/blending as I did up above the oil return but you can see how big and what shape the returns should be when your finished.
The clearancing for the 3.75 stroke crank and rods will look something like this. Bottom of the cyls and the pan rail (on some rod combos) needs to be cut. How much you have to cut all depends on the rods and how the bolts/cap screws are placed on the big end.
One last thing. The rear main cap oil pump feed should be deburred. This is an old oval track engine trick to help reduce strain on the oil pump. It does not take a lot of grinding to accomplish this.... Just blend the entry port. If you look at your stock cap you'll see the big sharp edge you'll need to blend in.
Good to see you taking this on by yourself. Your making a much better investment in that Corvette than your buddies are in smoking and drinking.
Will
You do nice work with a grinder btw, holy ****.
Edit: Another thing,
how am I going to be able to tell how much to clearance? If i set the crank in, I can't really mock up the rods because the rods are connected to the pistons and the pistons are .030 over. Would I have to have the pistons removed? A lot of the shops I've called around here don't know about clearancing the oil pan rails or the cylinders so it is something I am going to have to do myself
Last edited by Pwnage1337; 10-12-2010 at 09:38 PM.