LT1 Headgasket Replacement, a few questions
 06-10-2011, 09:58 AM
#1
Drifting

Thread Starter


I'm in the process of headgasket replacement on my 1994 LT1.
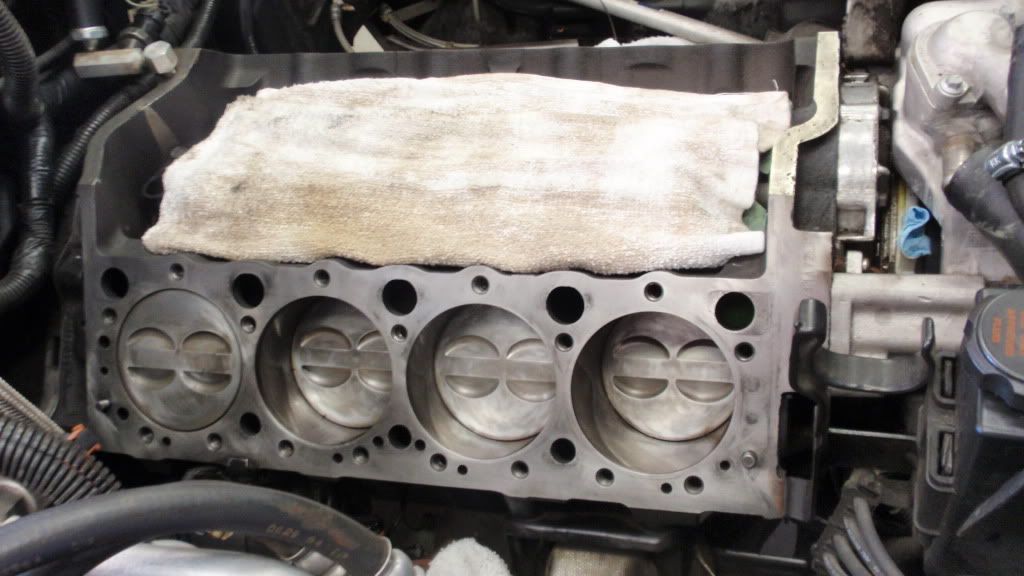
I've removed the drivers side head last night and I have a few questions.
First, if I remove the lower head bolts first (the ones down by the spark plugs) will that drain all the coolant from the heads? Last night I removed the topside bolts first and that meant that coolant flowed out of one of the head bolts and into the lifter valley. Side note, I did drain the radiator, thinking that would be good enough but looks like the heads held quite a bit more water. In retrospect I should have pulled the knock sensors.
Which brings me to question #2. I have now have some coolant in the lifter valley. I plan on changing the oil regardless but is this a larger problem now? When it is all buttoned back up should I change the oil, run for a few minutes and change it again to ensure that I get all the water out? Or will 1 oil drain and fill be sufficeint?
Questions 3, it appears that all the head bolts in the LT1 use sealant, so I want to use a chase to clean the threads in the block. Do all head bolts use the same thread pitch/size? In which case I could bring 1 bolt to the store and have the guy at the counter match it to the correct chase.
Question 4, the head is off on the drivers side but I haven't pulled the gasket off the block yet. I'm assuming it will leave a lot of residue. I've struggled with this before on different motors. What is your method to clean the block but not allow any particulates into the cylinder bores, water/oil passages etc? I've used a single edge razor before with a shop vac in the other hand to suck up gunk as I go, but man is it tedious. I'm not too worried about the heads since a clean different set are going back on.
I think that will do it for now but I'm sure I'll have more questions later. I've done head gaskets a few times before so its not all new to me, but this is the first time on a pushrod motor. I gotta say, it is nice not having to deal with a timing belt assembly.
thanks,
John
 06-10-2011, 11:58 AM
#2
Pro

Member Since: Dec 2009
Posts: 502
Likes: 0
Received 0 Likes
on
0 Posts
This is what I did to remove coolant.
removed the coolant sensor on the Pass. side head and jacked up the drivers side. Make sure and remove the cap off the resevoir.
2)Would not run the car with coolant in the oil and what little bit there is after draining will burn off quickly.
3)I did not clean mine out, just used RTV black and I have had no issues.
4) I cleaned mine off with a razor and then used 400 grit SP to make I got it all off and then cleaned with a degreaser.
06-10-2011, 12:02 PM
#3
Intermediate


Member Since: Aug 2008
Location: Hagerstown Indiana
Posts: 36
Likes: 0
Received 0 Likes
on
0 Posts
I've replaced head gaskets on my 95 Camaro and 96 Corvette. I can't say for sure on your first question since I drained the block before starting the job. I would go ahead and drain it now unless you can't get the knock sensors loose or something. On question 2, I would drain and refill twice to make sure. Why take the risk? For question 3, yes I remember all of the threads being the same size (with 3 different bolt lengths). I would also buy all new bolts. You can get at Autozone or wearever. For question 4, I used gasket remover and a razor blade scraper, then I just cleaned and cleaned some more inside the bores to remove all the junk. Seems like I also may have stuffed some paper towels down in each bore to catch the big pieces, but you still have to clean. I also took a small steel rule and scraped the area from the top of the piston down to the first piston ring to get some more junk out of there. I used WD40 to help with the cleaning. Hope that helps!
06-10-2011, 01:47 PM
#4
Drifting
Thread Starter
Thanks for the advice guys - it does help.
I never planned on running it with the current oil/water mix. I'll drain, fill with regular cheapo oil, run for a few minutes, drain again then fill with Mobil 1. Should ensure that the vast majority of the water is cleared out and whatever tiny bit is left should burn off. Just like you said, not worth the risk, a flush/fill with oil is a heck of a lot cheaper than ruining the bottom end.
You are correct there are 3 different length of headbolts. Thanks for confirming they are all the same thread. I'll take one to the store and get a chase. I already have a set of new headbolts.
I'm probably going to stuff some soft rags in the bores, and revert to my method of a single edge blade while sucking up any gunk with a shop vac as I go. Then I'll be sure to reclean the bores before popping the heads back on. And, as far as what surfer93 mentioned, the sanding sounds like a good idea if this was a rebuild, but with the rotating assembly still in place I would be far too scared to risk sanding the surface.
06-10-2011, 06:23 PM
#6
Le Mans Master


The first time I just used something to suck the coolant out of the passages, cleaned everything up and them put it back together.
The next time I pulled the knock sensors and no coolant was left in the heads.
Pull the knock sensors
The next time I pulled the knock sensors and no coolant was left in the heads.
Pull the knock sensors
06-10-2011, 06:57 PM
#7
Melting Slicks


Thanks for the advice guys - it does help.
I never planned on running it with the current oil/water mix. I'll drain, fill with regular cheapo oil, run for a few minutes, drain again then fill with Mobil 1. Should ensure that the vast majority of the water is cleared out and whatever tiny bit is left should burn off. Just like you said, not worth the risk, a flush/fill with oil is a heck of a lot cheaper than ruining the bottom end.
You are correct there are 3 different length of headbolts. Thanks for confirming they are all the same thread. I'll take one to the store and get a chase. I already have a set of new headbolts.
I'm probably going to stuff some soft rags in the bores, and revert to my method of a single edge blade while sucking up any gunk with a shop vac as I go. Then I'll be sure to reclean the bores before popping the heads back on. And, as far as what surfer93 mentioned, the sanding sounds like a good idea if this was a rebuild, but with the rotating assembly still in place I would be far too scared to risk sanding the surface.
I never planned on running it with the current oil/water mix. I'll drain, fill with regular cheapo oil, run for a few minutes, drain again then fill with Mobil 1. Should ensure that the vast majority of the water is cleared out and whatever tiny bit is left should burn off. Just like you said, not worth the risk, a flush/fill with oil is a heck of a lot cheaper than ruining the bottom end.
You are correct there are 3 different length of headbolts. Thanks for confirming they are all the same thread. I'll take one to the store and get a chase. I already have a set of new headbolts.
I'm probably going to stuff some soft rags in the bores, and revert to my method of a single edge blade while sucking up any gunk with a shop vac as I go. Then I'll be sure to reclean the bores before popping the heads back on. And, as far as what surfer93 mentioned, the sanding sounds like a good idea if this was a rebuild, but with the rotating assembly still in place I would be far too scared to risk sanding the surface.
10-29-2011, 10:49 AM
#8
Intermediate

Member Since: Sep 2009
Location: Slinger WI
Posts: 32
Likes: 0
Received 0 Likes
on
0 Posts
after the deck surface is scrapped to your satisfaction, use a SOFT steel wire wheel or brass / copper wire wheel chucked up in a 1/4 electric hand drill for a final cleaning...you'll be suprised. use copious amounts of PB Blast or Liquid Wrench; especially in the bores. What kills rings and pistons is a build up of carbon that freezes the rings in the ring gland. NOW is the chance to soak, soften, and loosen that carbon and free up those rings. As you rotate the crankshaft, as the pistons move down you'll notice fine residue of carbon left behind on the cylinder walls, Guess where that came from ?
10-29-2011, 03:16 PM
#9
Melting Slicks

Just did mine 11 months ago, yes...pull the knock sensors, this will drain about 98% of your coolent, and it will allow you to blow out several head bolt /coolent Passages while you clean and prep.
I used a mcmaster carr 46325A663 and 46925A42 cleaning disc/wheel for the deck/piston cleaning.
http://www.mcmaster.com/#nylon-mesh-...-discs/=epddq1
pack the cylinders with rags, cover the valley, and vacuum as you go.
I used a bottoming tap to clean out the head bolt threads in the block, I dont know the size off hand, it was like 3/8 or 7/16? you can match up with a head bolt.
The second thing I want to mention is, my intake guides were just below maximum bore...I had these replaced, and to my delight, ALL valve clatter went away when I got her running.