Budget 2-row radiator comparison
 08-14-2011, 12:32 AM
#1
Race Director

Thread Starter
I finally decided I couldn't postpone a new radiator any longer. With the 100-deg temps, my 383 wanted to run up too high [temps] with the A/C on. So, I started looking around at the radiator options.
After calling all the [two 1" row] budget radiator options I found three options out there: Silla, ECP, and Champion.
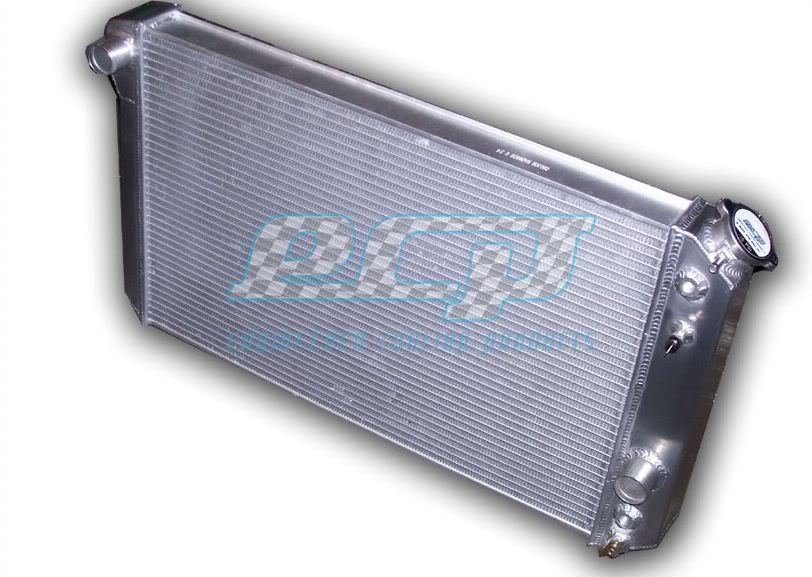
The Silla option is sold through several retailers with various badging. More importantly, is the thinnest of the 2-row cores. It's too thin to have two 1" rows like I was considering. From most retailers, this radiator typically sells in the $140-$150 range. (The Silla might also be marketed as "Muscle Road" and "Genesis". Pics make them look the same to me.)
Silla-Muscle Road
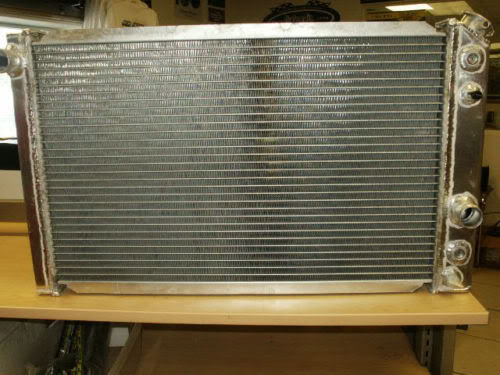
Champion just came out with a new option, the EC829. However, it's badged with the "American Eagle" brand. Maybe there's a separate arm of the company that deals with Chinese manufacturing. According to Champion, this radiator is designed in the US and made in China. It's a 2-row double-1" core radiator that's currently selling in the $170-$180 range. (This is the one I bought and installed.)
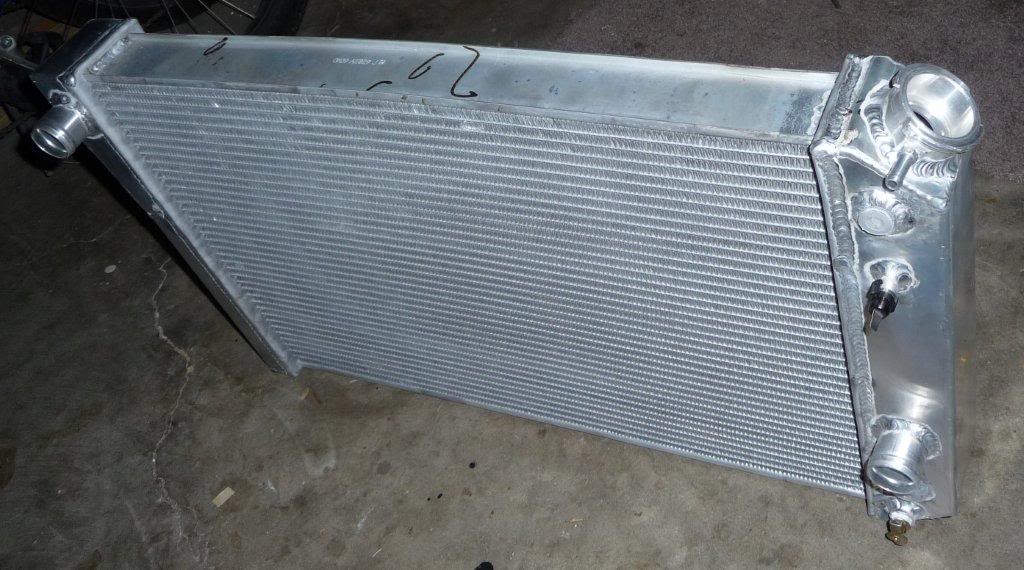
EngineeringCoolingProducts also sells a double 1" row radiator under the model number ECP829. The owner of this company would not provide phone contact information and mis-represented the differences between his radiator and the Champion line. Plus, he charges about $40 more for his radiators. ($209 + s/h) And, he adds shipping. He said the Champion radiators were painted silver as a sealing step for their cheap welds. Because I ended up with the Champion (AE) unit, I know this isn't true. He also said his hose necks were longer. When you compare the pics, you'll see it's either not true or insignificant. Between the higher cost and unwillingness to provide phone contact info, I decided against this option. I couldn't identify a single advantage for the higher price/risk.
With the exception of the American Eagle, I am reposting radiator pics from web pages.
So, again, I purchased the American Eagle. It's cost was in the middle, but it was the least expensive two 1" row radiator out there. Champion appears to be a very large, well-known radiator company. That helped in my decision making process. BTW...I also asked them about their 3-row radiator -- which has the same physical dimensions as the two row unit. Because of space limitation in the front of our Corvettes, their 3-row model could not be expanded beyond the 2-row dimensions. As such, Champion recommended I save my money and purchase the 2-row unit as it's cooling would likely equal the 3-row unit.
So...first things first:
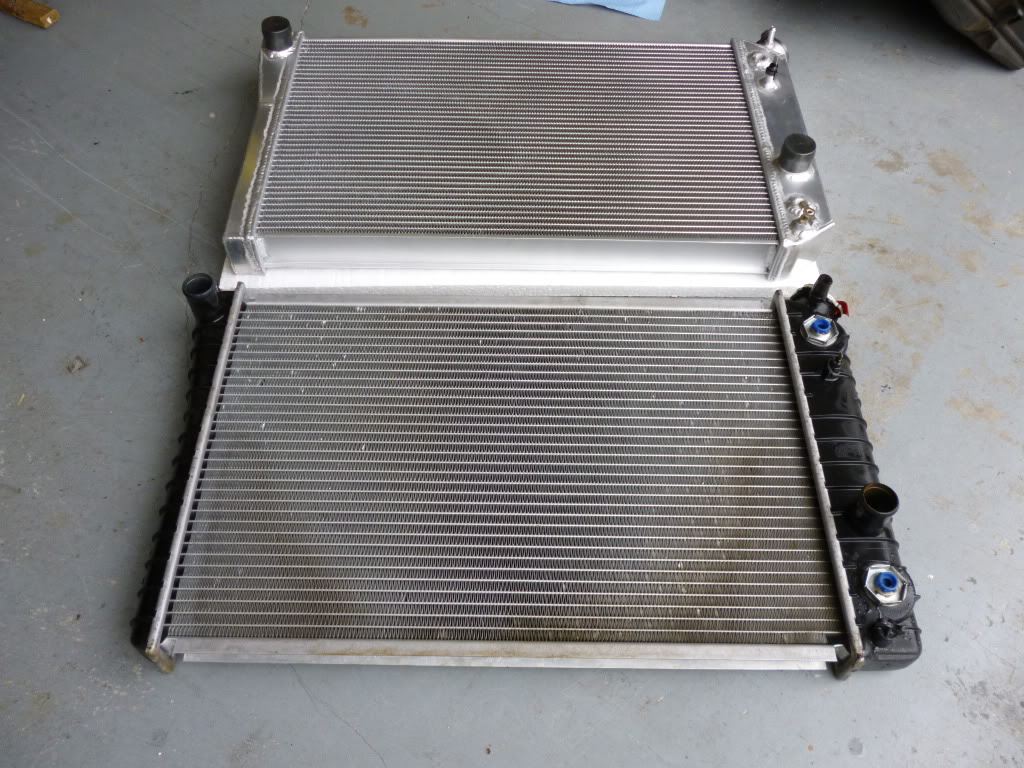
Here's a comparison of stock vs American Eagle (Champion) EC829:
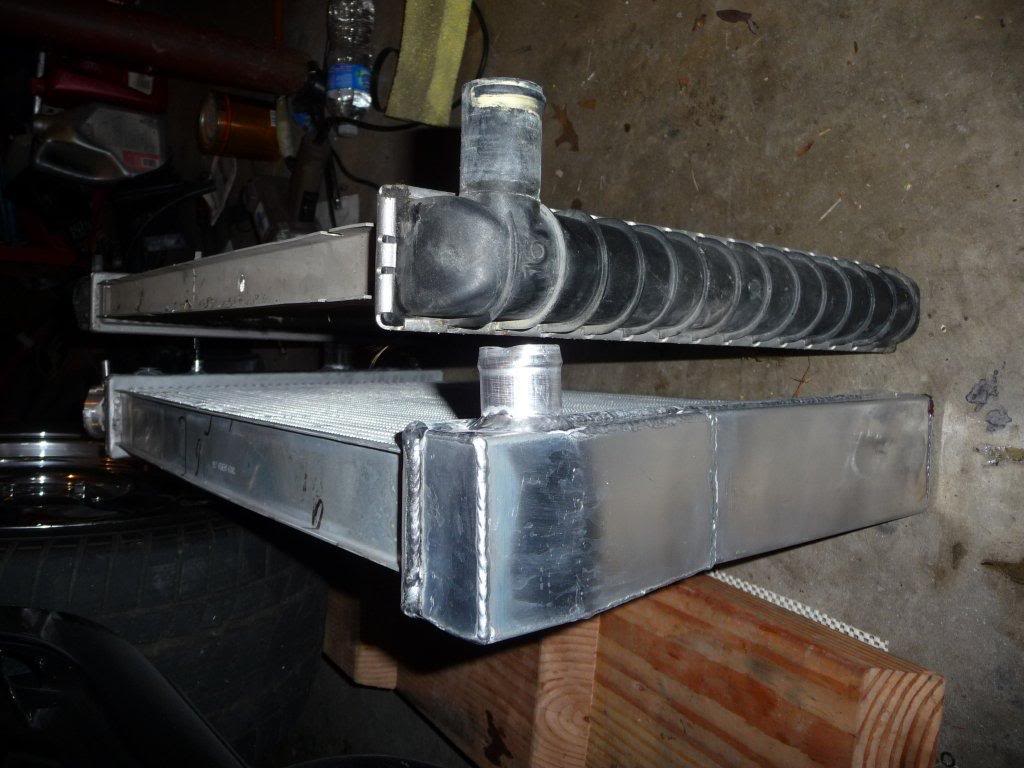
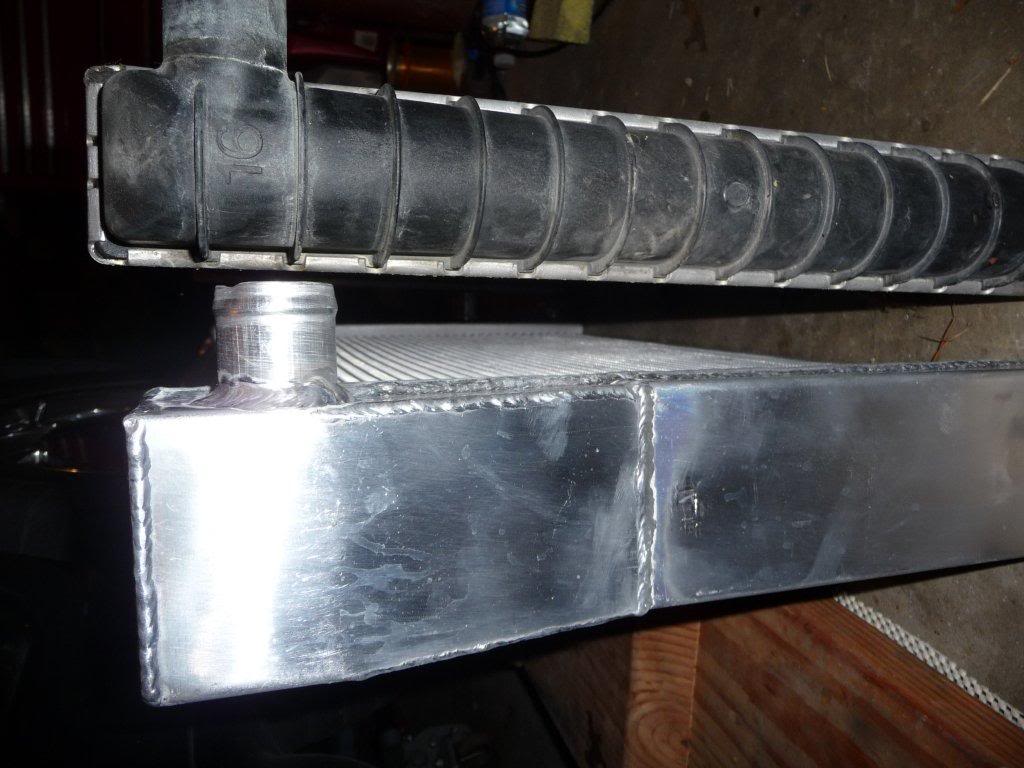
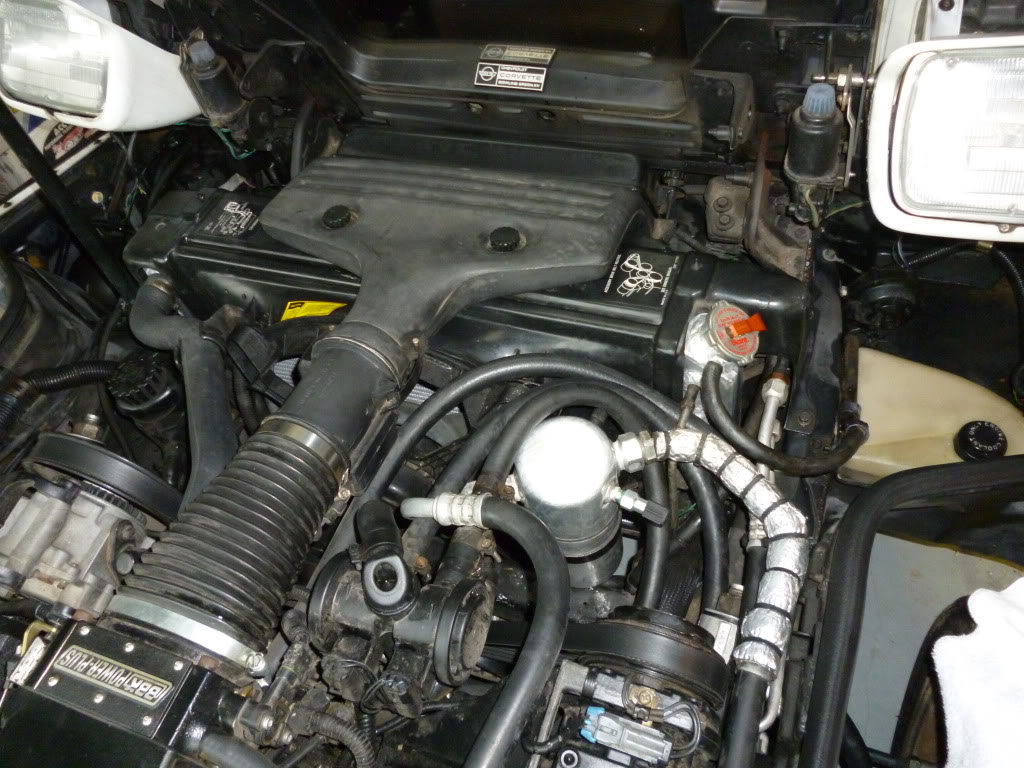
In the pics above, you can see a 2-row radiator is much wider than stock. You can also see it's a bit shorter. Neither difference inhibits installation. But, you must make some minor alterations.
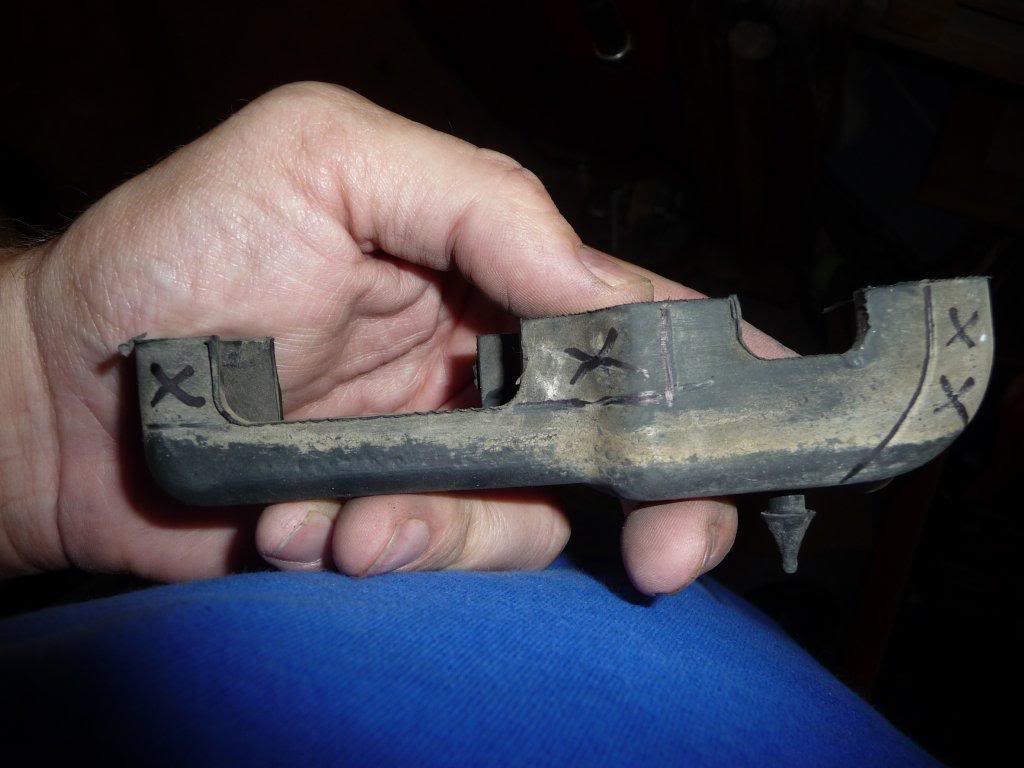
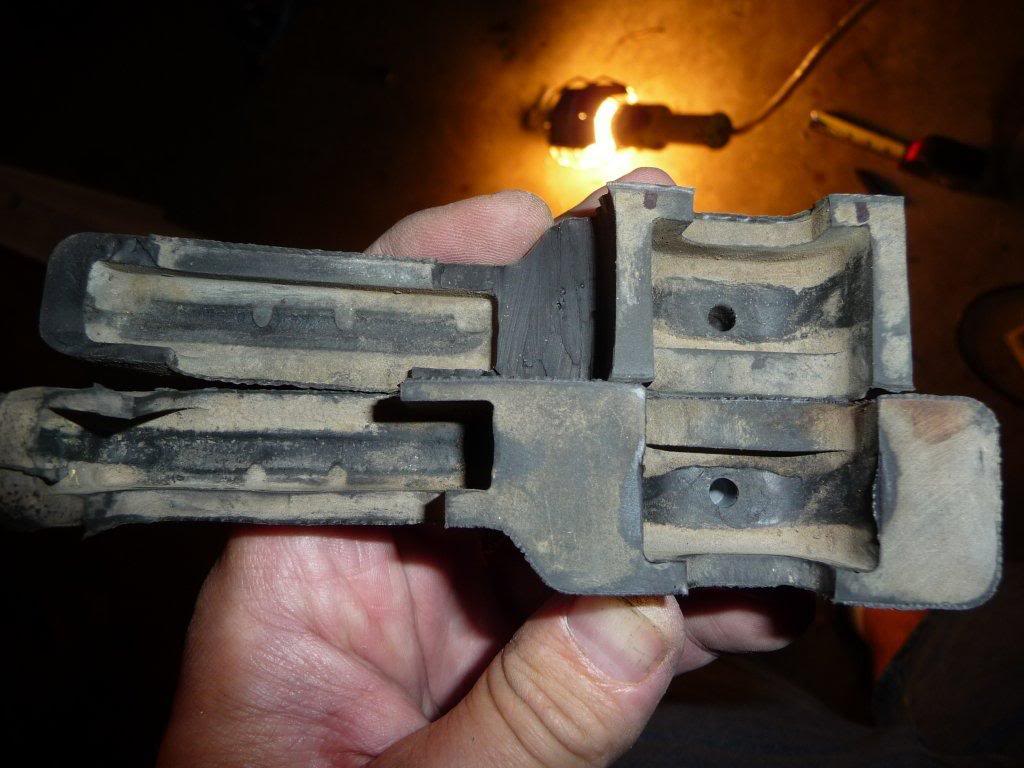
There are four mounting "feet" that look like this. Two sit underneath and two sit on top. (Notice the magic marker for later reference)
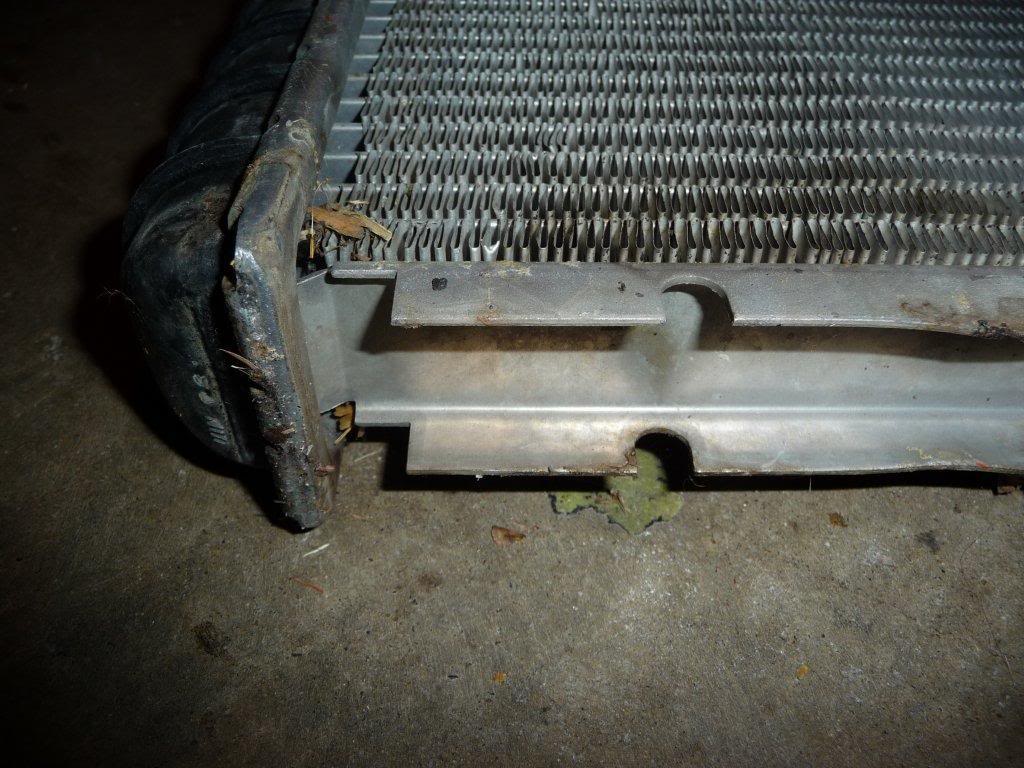
With the OEM radiator, there are rails that sit in these rubber feet:
With the aftermarket radiator there are no rails...
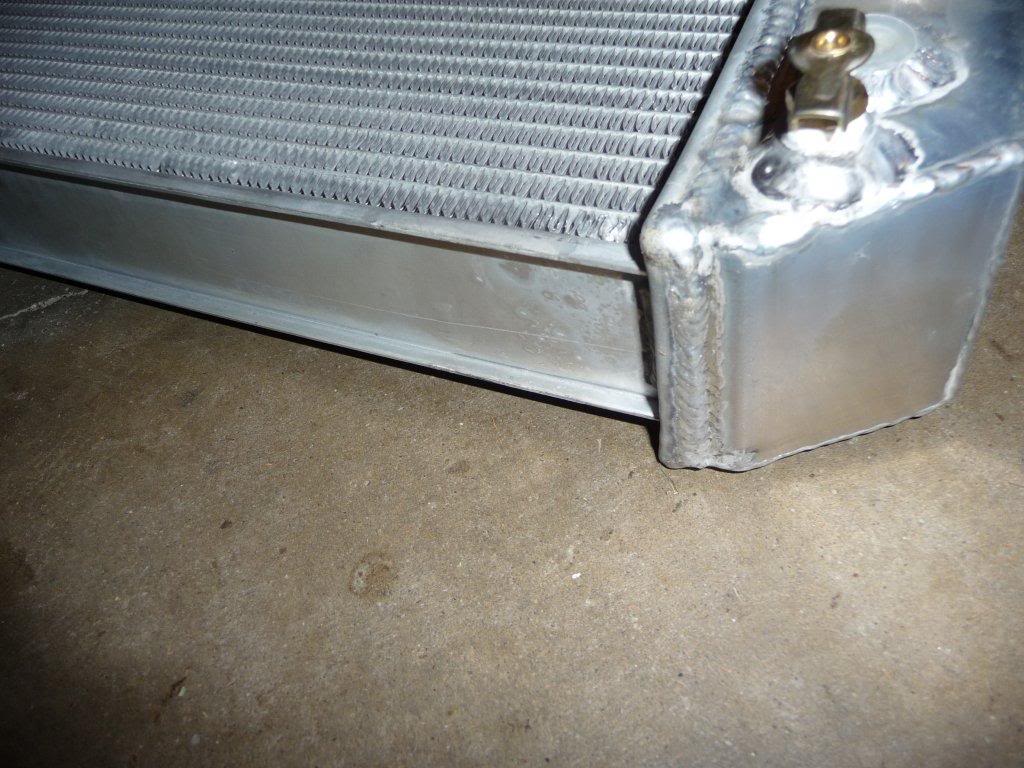
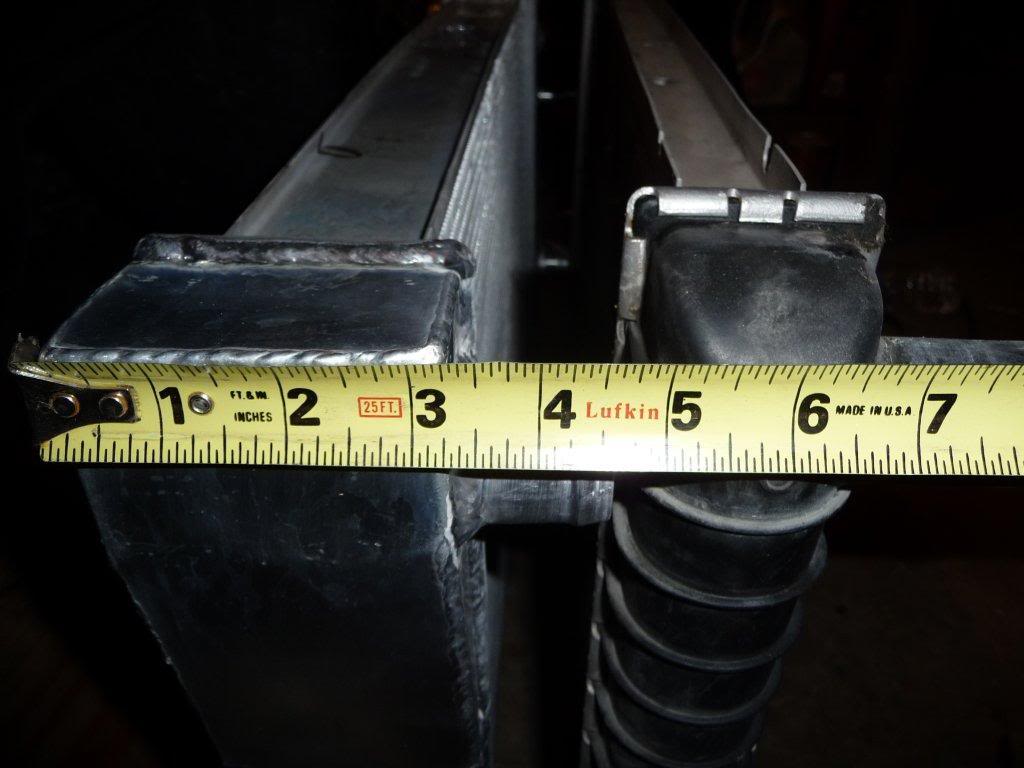
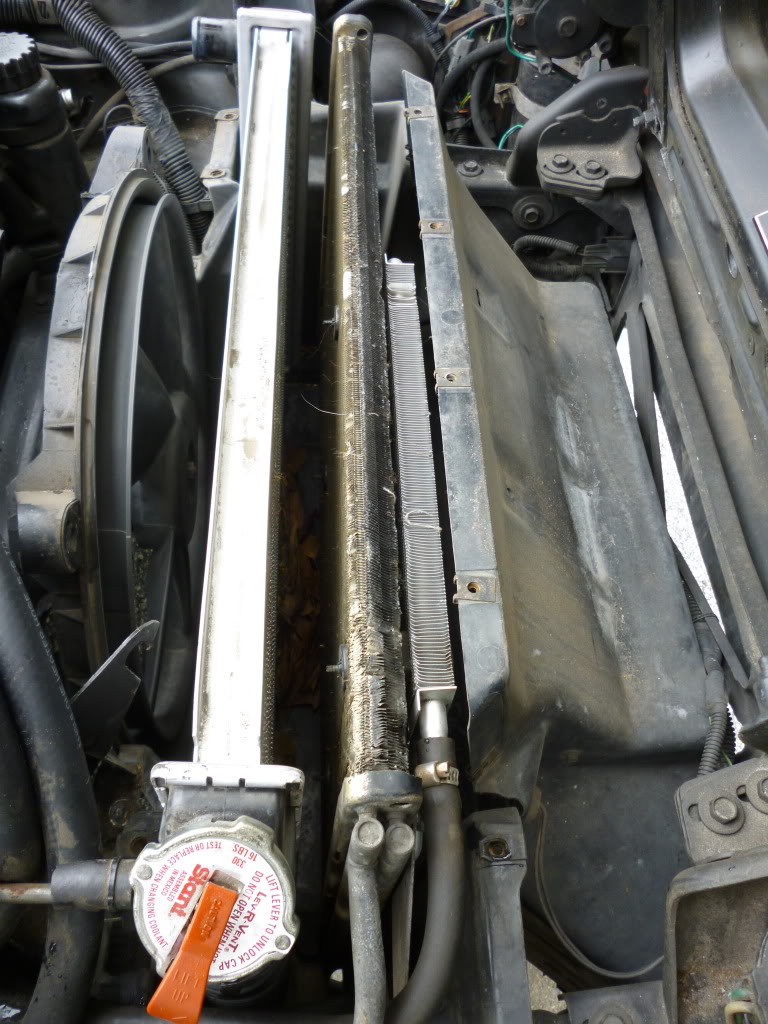
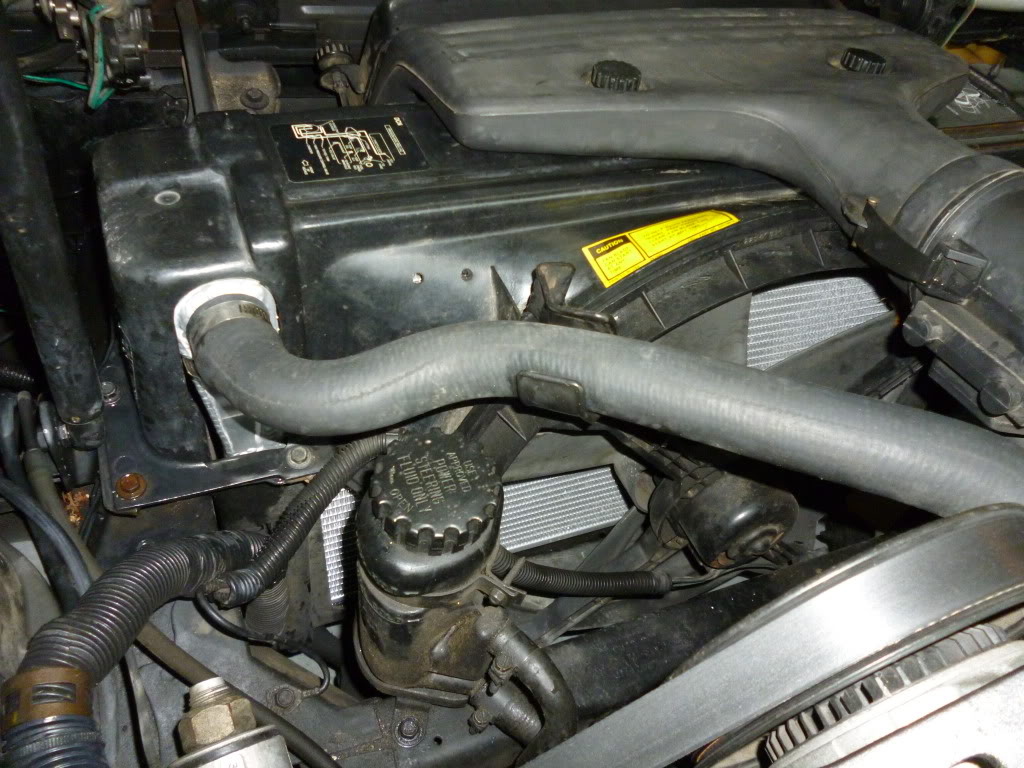
Also, because of the extra thickness of the aftermarket radiator, the A/C condensor must move forward a bit. Overall, there is a 5.5" front-to-read space for the radiator and condenser to sit. The combined thickness of the radiator and condensor are about 4.5".
For reasons you'd see when installing this unit, you want the radiator as far back as possible. This provides best access to the petcock and hose tubes. I did not mind letting the radiator sit against the radiator "cabinet". However, I wanted space between the radiator and condensor plus space between the condenser and front of "cabinet". By trimming the feet as marked, rubber separates the radiator and condenser. Rubber also separates the condenser with the front of the "cabinet". Modification of the rubber mounting feet provide sole control over desired mounting positions. (If you refer back to the pic of the feet, I cut out the areas marked with an "X" to alter where the radiator and condenser sit.) After cutting those areas out, you end up with this...
The cuts were designed so the condenser gets moved forward from stock location. The amount removed from the curved end of the feet is the amount moved forward. You'll also see a small "rib" used to separate the condenser and radiator. That's to prevent them from vibrating/banging against each other.
With the bottom feet in position, I set the radiator and condensor in place...

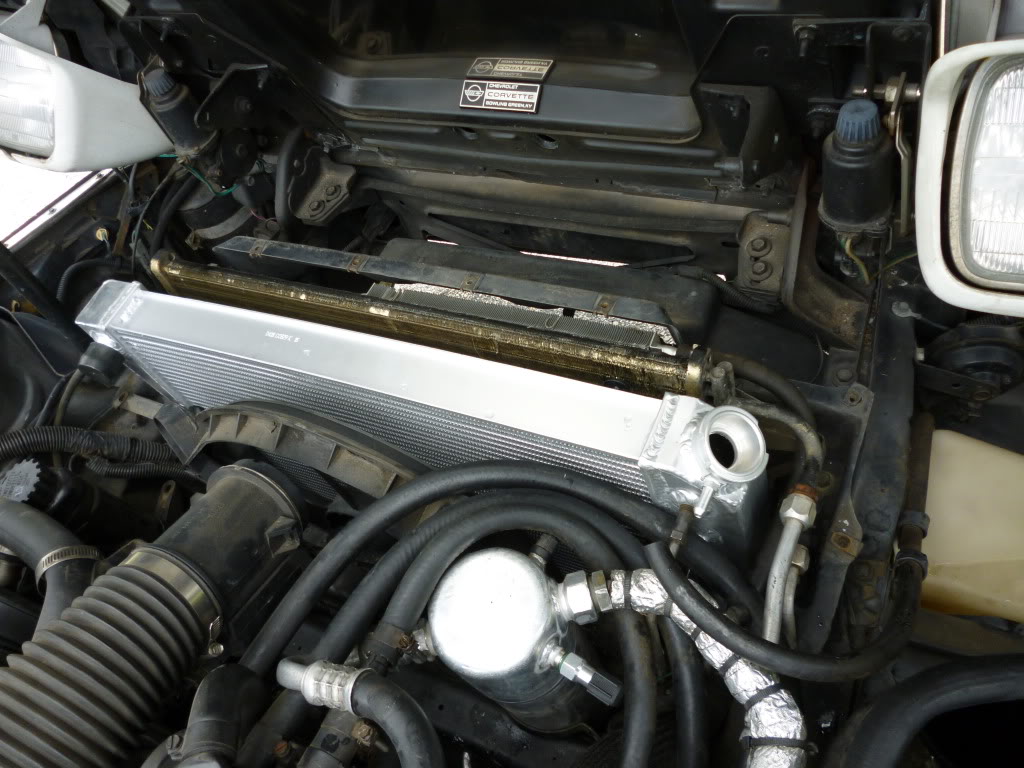
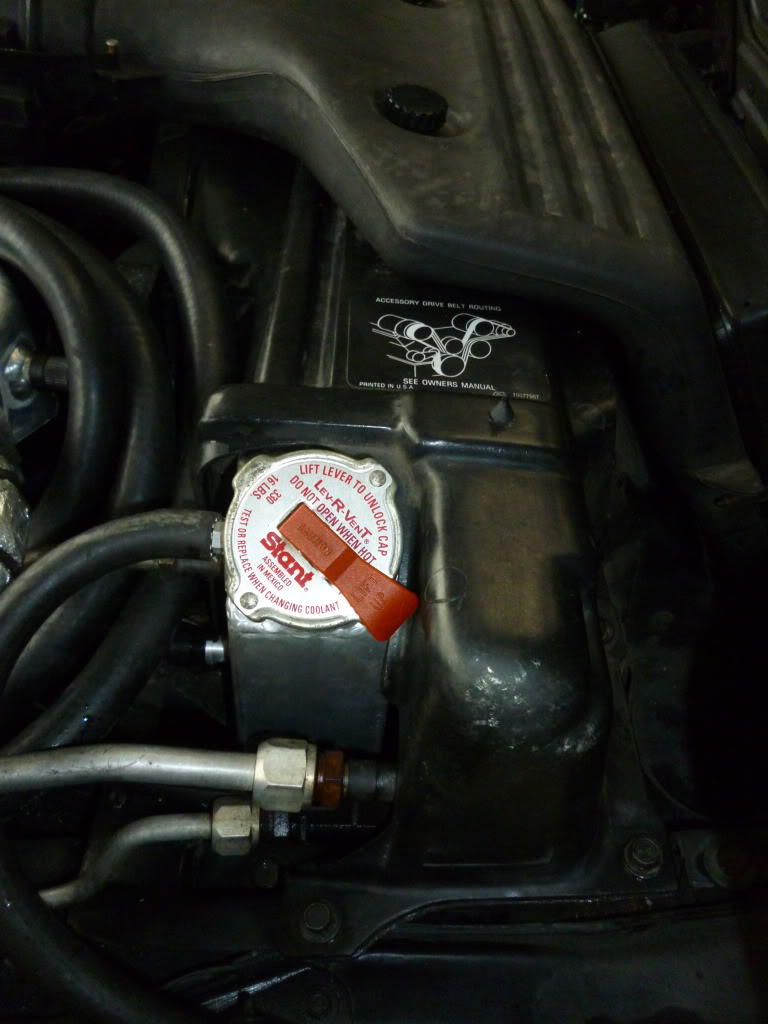
Finally, I set the top rubber feet in position, I test fitted the shroud. I soon discovered the cap would not turn correctly due to interference with the shroud. I used a saber saw and file to modify the shroud and allow the cap to turn....
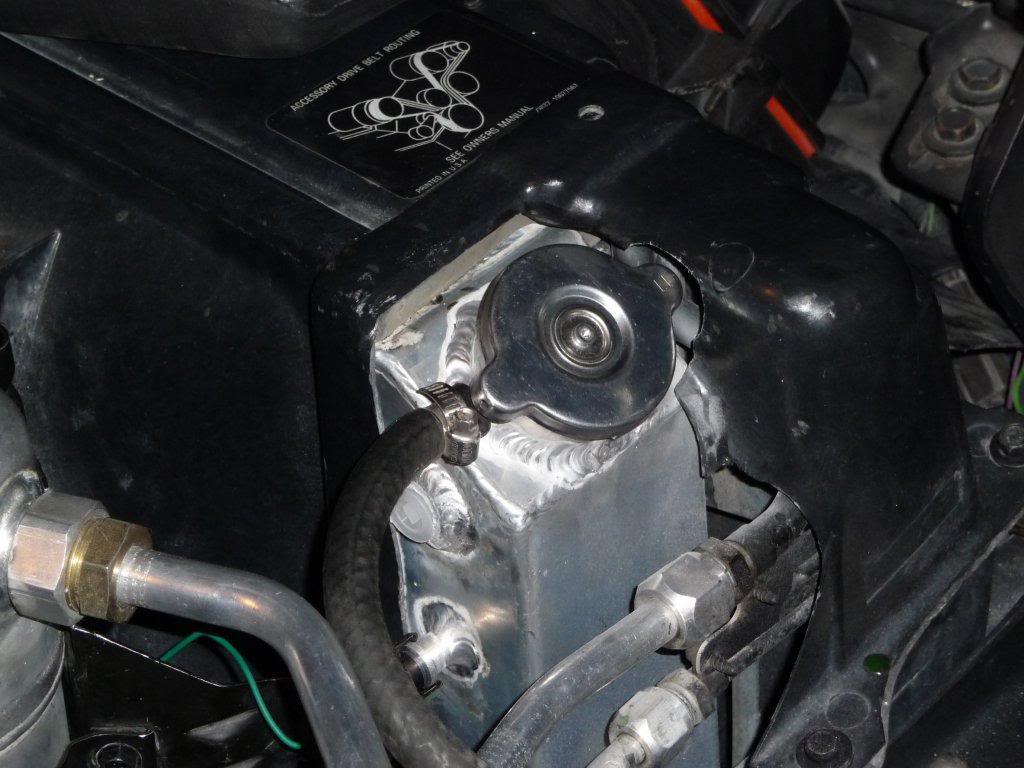
The cap is not screwed on in the picture above, but it's placed to demonstrate where contact would occur. When the job was complete, the feet and the modifications to the neck were the only changes required to install a much bigger radiator in the factory space.
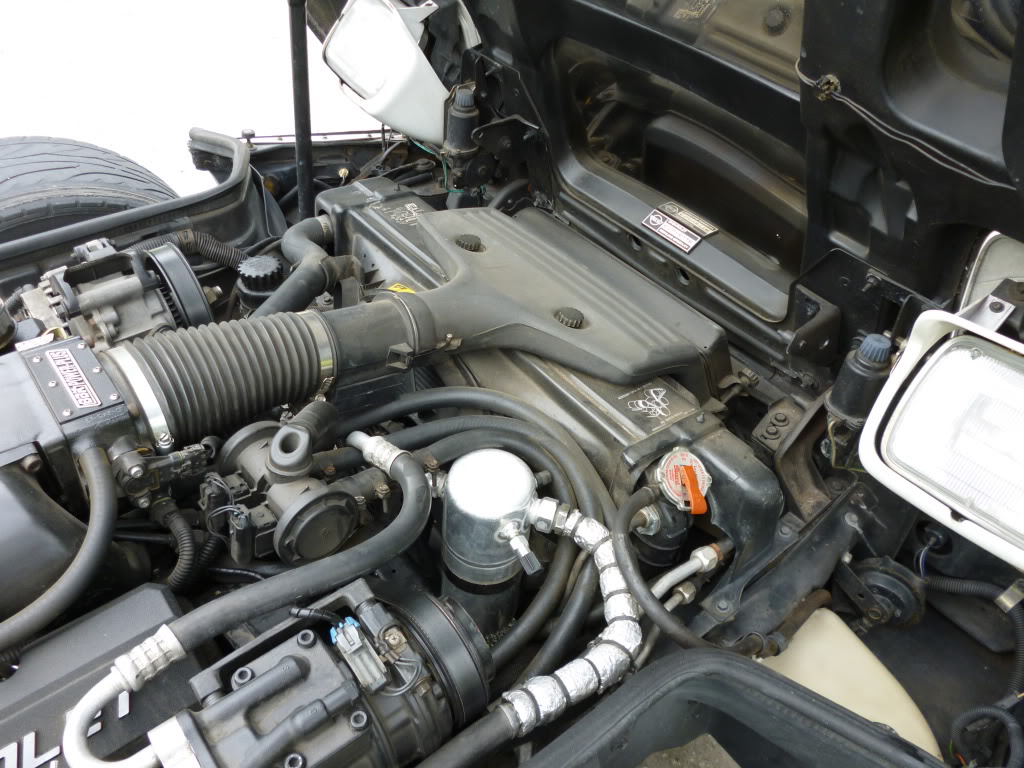
With great haste, I filled it (with green propoylene glycol and distilled water). I drove it around the block to see the result. As before, the engine quickly rose to temp. After the thermostat opened, it stayed in the mid 190's. When I ran it hard, it rose temporarily to 203...then fell right back to 195. I took it home and listened for the fans. The front fan was running. Because it's set to 195, I'll have to see if it ever shuts off! But, my idle temp problem appears cured. With the OEM unit, temps rose at idle (apparently w/o a ceiling). With this American Eagle unit, they rose a bit more slowly. Then, when the rear fan kicked on, the temps dropped back down. YEAH!!! With the OEM radiator, this didn't happen.
With the OEM radiator and a 383, I could not let the car sit and idle very long. Within a few minutes, it would hit 230 and keep climbing. Those aren't temps I can accept with 10.25:1SCR/8.25:1DCR compression. My target temps are 180-205. With the new radiator, my range was 195-208.
I still need to confirm if I stay below 210 with a longer run on a hot day with the A/C running. One of these days, I'll probably go back and buy another 180-stat. (Either my stat is defective (too high) or my guages are off. That's because I bought a 180-stat. It's never run in the 180's). Though I purchased a (Robert Shaw) Mr.Gasket hi-flow style, I'm not convinced it's fully open at 180. Maybe I need to run a poll or try a 160-stat JUST to see if I can get temps in the 180's. (Not sure how I'll proceed on that yet...195-208 is acceptable. But, I'd probably reprogram my front fan to come on around 203.
Figuring out the actual temp vs the display will be another step of the process. I'll see if scans match the display (so I know what the ECM is "seeing".)

After calling all the [two 1" row] budget radiator options I found three options out there: Silla, ECP, and Champion.
The Silla option is sold through several retailers with various badging. More importantly, is the thinnest of the 2-row cores. It's too thin to have two 1" rows like I was considering. From most retailers, this radiator typically sells in the $140-$150 range. (The Silla might also be marketed as "Muscle Road" and "Genesis". Pics make them look the same to me.)
Silla-Muscle Road
Champion just came out with a new option, the EC829. However, it's badged with the "American Eagle" brand. Maybe there's a separate arm of the company that deals with Chinese manufacturing. According to Champion, this radiator is designed in the US and made in China. It's a 2-row double-1" core radiator that's currently selling in the $170-$180 range. (This is the one I bought and installed.)
EngineeringCoolingProducts also sells a double 1" row radiator under the model number ECP829. The owner of this company would not provide phone contact information and mis-represented the differences between his radiator and the Champion line. Plus, he charges about $40 more for his radiators. ($209 + s/h) And, he adds shipping. He said the Champion radiators were painted silver as a sealing step for their cheap welds. Because I ended up with the Champion (AE) unit, I know this isn't true. He also said his hose necks were longer. When you compare the pics, you'll see it's either not true or insignificant. Between the higher cost and unwillingness to provide phone contact info, I decided against this option. I couldn't identify a single advantage for the higher price/risk.
With the exception of the American Eagle, I am reposting radiator pics from web pages.
So, again, I purchased the American Eagle. It's cost was in the middle, but it was the least expensive two 1" row radiator out there. Champion appears to be a very large, well-known radiator company. That helped in my decision making process. BTW...I also asked them about their 3-row radiator -- which has the same physical dimensions as the two row unit. Because of space limitation in the front of our Corvettes, their 3-row model could not be expanded beyond the 2-row dimensions. As such, Champion recommended I save my money and purchase the 2-row unit as it's cooling would likely equal the 3-row unit.
So...first things first:
Here's a comparison of stock vs American Eagle (Champion) EC829:
In the pics above, you can see a 2-row radiator is much wider than stock. You can also see it's a bit shorter. Neither difference inhibits installation. But, you must make some minor alterations.
There are four mounting "feet" that look like this. Two sit underneath and two sit on top. (Notice the magic marker for later reference)
With the OEM radiator, there are rails that sit in these rubber feet:
With the aftermarket radiator there are no rails...
Also, because of the extra thickness of the aftermarket radiator, the A/C condensor must move forward a bit. Overall, there is a 5.5" front-to-read space for the radiator and condenser to sit. The combined thickness of the radiator and condensor are about 4.5".
For reasons you'd see when installing this unit, you want the radiator as far back as possible. This provides best access to the petcock and hose tubes. I did not mind letting the radiator sit against the radiator "cabinet". However, I wanted space between the radiator and condensor plus space between the condenser and front of "cabinet". By trimming the feet as marked, rubber separates the radiator and condenser. Rubber also separates the condenser with the front of the "cabinet". Modification of the rubber mounting feet provide sole control over desired mounting positions. (If you refer back to the pic of the feet, I cut out the areas marked with an "X" to alter where the radiator and condenser sit.) After cutting those areas out, you end up with this...
The cuts were designed so the condenser gets moved forward from stock location. The amount removed from the curved end of the feet is the amount moved forward. You'll also see a small "rib" used to separate the condenser and radiator. That's to prevent them from vibrating/banging against each other.
With the bottom feet in position, I set the radiator and condensor in place...
Finally, I set the top rubber feet in position, I test fitted the shroud. I soon discovered the cap would not turn correctly due to interference with the shroud. I used a saber saw and file to modify the shroud and allow the cap to turn....
The cap is not screwed on in the picture above, but it's placed to demonstrate where contact would occur. When the job was complete, the feet and the modifications to the neck were the only changes required to install a much bigger radiator in the factory space.
With great haste, I filled it (with green propoylene glycol and distilled water). I drove it around the block to see the result. As before, the engine quickly rose to temp. After the thermostat opened, it stayed in the mid 190's. When I ran it hard, it rose temporarily to 203...then fell right back to 195. I took it home and listened for the fans. The front fan was running. Because it's set to 195, I'll have to see if it ever shuts off! But, my idle temp problem appears cured. With the OEM unit, temps rose at idle (apparently w/o a ceiling). With this American Eagle unit, they rose a bit more slowly. Then, when the rear fan kicked on, the temps dropped back down. YEAH!!! With the OEM radiator, this didn't happen.
With the OEM radiator and a 383, I could not let the car sit and idle very long. Within a few minutes, it would hit 230 and keep climbing. Those aren't temps I can accept with 10.25:1SCR/8.25:1DCR compression. My target temps are 180-205. With the new radiator, my range was 195-208.
I still need to confirm if I stay below 210 with a longer run on a hot day with the A/C running. One of these days, I'll probably go back and buy another 180-stat. (Either my stat is defective (too high) or my guages are off. That's because I bought a 180-stat. It's never run in the 180's). Though I purchased a (Robert Shaw) Mr.Gasket hi-flow style, I'm not convinced it's fully open at 180. Maybe I need to run a poll or try a 160-stat JUST to see if I can get temps in the 180's. (Not sure how I'll proceed on that yet...195-208 is acceptable. But, I'd probably reprogram my front fan to come on around 203.
Figuring out the actual temp vs the display will be another step of the process. I'll see if scans match the display (so I know what the ECM is "seeing".)
Last edited by GREGGPENN; 08-14-2011 at 01:52 AM. Reason: grammar spelling
 08-14-2011, 01:08 AM
#2
Instructor

Member Since: Oct 2010
Posts: 215
Likes: 0
Received 0 Likes
on
0 Posts
Wow thanks for the write-up and pics I am trying to decide on this upgrade too one of my reasons for this is on my 84 the sway bar is bent around the fan I have a 30mm bar but it is straight so trimming and modifying the shroud is needed. With that radiator I think I can make brackets to mount a dual fan setup like derale or flexalite
08-14-2011, 01:14 AM
#3


Nice write up Greg.
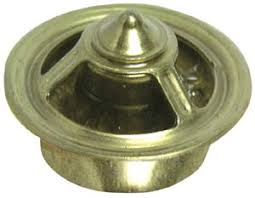
You ever see those modified Robert Shaw / Mr. Gasket Thermostats?
They have 3 separate drilled holes in top.
About 1/8" inch holes drilled by hand.
Stewart Performance Cooling systems & water pumps sell them.
They usually cater to the Roundy Round NASCAR crowd.
Supposed to balance the thermostat in high water flow rate GPM to prevent it closely premature at rated set temps.
I have had issues also with those Mr. Gasket GM 180 degree Robertshaw style T- Stats.
Not in my 87 Vert,
But in my 1963 G.P. when I ran my lightly built up Olds 403.
Those 180 degree Mr. Gasket T- stats would last for 6 months driving daily,
Then suddenly out of the blue,
stick closed on me.
Engine overheats of course & coolant boiled over out of the overflow tank.
I finally got fed up & installed a 5/8" hole MOROSO water restrictor plate instead of T-stat.
Water temps afterwards never reached over 170 degrees F even on a 95 - 100 day.
Makes for a cold ride to work on a cool fall morning of 32- 34F though till the engine warms up enough to reach 140F about 10 minutes later.
So I learned to run a MOROSO 5/8" holed water restrictor plate in hot summer driving.
Come September, I would purchase a New Napa 195F T- stat for cool weather driving so I would have adequate Heater & defrost operation.
I don't advise using a 160 F T-stat for street use.
makes for engine sludge unless you drive your car on the highway for at least 20 -30 minutes every day.
That way engine crankcase moisture has adaquate heat & time to boil off.
I use a Edelbrock Victor series water pump Reverse rotation for a GM TPI engine.
From my local speed shop for $110 about 3 years ago.
Installing that "E" water pump dropped my coolant temps down on the highway from 205- 207 steady to 190- 195 steady on 60 to 90 degree days.
When it was the hottest here in IL last month, I had seen 214 Fsteady with the air on high driving highway speeds.
Air temps around 100 to 105.
Hottest ever I driven my 87 Vert in since I bought it in 2007.
5/8" MOROSO water restrictor( the Gold anodized 1) in place of T-stat is 100% foolproof.
Never ever have to worry about a T-stat getting stuck on you in hot 95- 100F summer weather.
Just change to a regular T- stat when fall weather approaches.
Why do T- stats stick in GM cars ?
My answer.......................China.....
Brian
The following users liked this post:
project C4 (12-01-2019)
08-14-2011, 01:39 AM
#4
Race Director
Thread Starter
You ever see those modified Robert Shaw / Mr. Gasket Thermostats? They have 3 separate drilled holes in top. About 1/8" inch holes drilled by hand.
Stewart Performance Cooling systems & water pumps sell them.
They usually cater to the Roundy Round NASCAR crowd.
Supposed to balance the thermostat in high water flow rate GPM to prevent it closely premature at rated set temps.
I have had issues also with those Mr. Gasket GM 180 degree Robertshaw style T- Stats. Those 180 degree Mr. Gasket T- stats would last for 6 months driving daily, then suddenly out of the blue,
stick closed on me.
I don't advise using a 160 F T-stat for street use.
makes for engine sludge unless you drive your car on the highway for at least 20 -30 minutes every day.
That way engine crankcase moisture has adaquate heat & time to boil off.
But, maybe I need to try a different brand of stat. When I posted my disappointment (about the 190+ opening temp), replies said to dip in water and measure opening before being concerned. I can take 195-205 running temps so I haven't got bent out of shape yet.
You're right about the 160-stat though. Closer to boiling temps do a better job of eliminating moisture. That's one reason I let the slightly higher temps slide. Plus, they don't appear high enough to cause knock. Don't really see much on logs.
For my waterpump, I bought one of these for a song from another forum member.... (Thanks TShirtTom!)
http://www.prwonlinestore.com/flowma...terpump11.aspx
08-14-2011, 01:48 AM
#6
Drifting


I use a Stant super-stat and it works great. It's even got a slightly different operating principal that the Chinese junk and yes, most if not all, Stant stats are made here in the USA. The Stant tries to maintain a steady flow to keep the water at a steady temperature. It does this differently and more efficiently than others. If you compare an aftermarket thermostat to a Stant you will see a decided difference in appearance.
They can be bought at Advance Auto Parts.
They can be bought at Advance Auto Parts.
08-14-2011, 01:58 AM
#7
Yes, I have seen threads about drilling the holes to "burp" and let the air out. I've also seen instructions to remove cap when temp is above stat opening but below boiling. I've never understood the reason to do either since there is a vent hose at the cap neck -- which should equalize pressure (and/or burp) the system without removing the cap. Seems to work for me....
But, maybe I need to try a different brand of stat. When I posted my disappointment (about the 190+ opening temp), replies said to dip in water and measure opening before being concerned. I can take 195-205 running temps so I haven't got bent out of shape yet.
You're right about the 160-stat though. Closer to boiling temps do a better job of eliminating moisture. That's one reason I let the slightly higher temps slide. Plus, they don't appear high enough to cause knock. Don't really see much on logs.
For my waterpump, I bought one of these for a song from another forum member.... (Thanks TShirtTom!)
http://www.prwonlinestore.com/flowma...terpump11.aspx
Those modified Robert Shaw T-stats I am talking about don't have Burp holes in them.
On the top frame of them, the triangle area,
They drill 3 holes in the stamped brass frame around the center armature of the T- stat.
I have never used or bought one of those modified T- stats.
just wanted to let you know they are available.
Maybe would help, maybe not.
I know many cooling system tricks from working on dirt track cars in the past.
They are just about impossible to keep cool below 200 on a 90 degree summer night racing lap after lap at around 7K- 9 K WOT running 6.38:1 to 7:14 : 1 rear geared Ford 9 inch rears or Winter's quick change rear diffs.
the dirt flying around plugs up brand new Affco radiators in about 2 minutes.
have to think of & use other tricks.
I am waiting for my original 87 plastic side tanked aluminum radiator to go some day..........almost 25 years old.
No leaks yet.
I will be in the market shopping for an aftermarket performance radiator later this winter.
my 410.
400 based Chevy motor , 1971 "511 block"
400's are known to be problem childs' to keep cool on the street or track.
Siamonesed water jackets per adjacent cylinders.
The more HP & Torque you make,
the harder you tax the engine cooling system at all times.
You have over 600 ft/lbs of engine flywheel torque.
Engines displace around 80 - 85% of fuel burned in radiant heat out out to the cooling system & exhaust.
Far from 100% thermal efficiency per drop of gasoline ignited inside of the cylinder combustion chamber.
Brian
 08-14-2011, 10:48 AM
#10
Team Owner


Member Since: Oct 2004
Location: altered state
Posts: 81,242
Received 3,043 Likes
on
2,602 Posts
St. Jude Donor '05

Love this stat (milodon)
The climbing temps at idle/C4 thing took a lot of fun out of the driving experience good to see you found a cure. Gauge watching sux
The climbing temps at idle/C4 thing took a lot of fun out of the driving experience good to see you found a cure. Gauge watching sux
08-14-2011, 11:06 AM
#11
[IMG]High Flow Water Pumps Pro Series Water Pumps BMW High Performance Water Pump Electric Water Pumps Ford Mustang 4.6 High Performance/Replacement Water Pumps EMP Stewart Components Ultimate Performance Electric Fans Thermostats Bolt Kits Accessories High Performance Thermostats Manufactured by Robert Shaw and modified by Stewart, these custom thermostats feature a balanced sleeve design and are constructed for high flow, high RPM applications. Strongly recommended for any performance application - must be used with Stewart Stage 2, 3 or 4 water pumps. Our Stage 2,3 and 4 Small Block Chevy water pumps do not have the factory bypass hole, therefore we put three 3/16” hole in our modified high flow thermostats, this moves the bypass to thermostat. This also allows air to escape on initial system fill making bleeding the cooling system much easier. Thermostats[/IMG]
Ah crap, pics did not go through.
Try again for You guys.
Ah crap, pics did not go through.
Try again for You guys.
 08-14-2011, 11:21 AM
#14
[IMG]Red, gold and blue anodized aluminum restrictor plates are mounted under the water outlet on the intake manifold Kit consists of three restrictor plates with 5/8", 3/4" and 1" i.d. holes for optimum coolant flow, 2-1/8" o.d. No. Description/Application 63440 Water Outlet Restrictor Kit. GM V8, GM V6, Ford 260-302, 351Whttp://[/IMG]
08-14-2011, 12:40 PM
#15
Le Mans Master


 Nice write up
 Below are some picture of the 3 row version of the same Champion radiator swap I did a while back. I too had to make modifications to the rubber mounts in the same fashion but instead of cutting the upper portion of the shroud back for the radiator cap to clear I just changed it out for one that had smaller grip tabs. Total swap/clean up time was ~ 4 hours start to finish.
Stock radiator setup:
Stock VS 3 Row Champ:
Champion rad dropped in:
Buttoned up:
 08-14-2011, 12:52 PM
#16
Team Owner

Member Since: Sep 2003
Location: Freedom is never more than one generation away from extinction.
Posts: 20,161
Received 639 Likes
on
443 Posts
St. Jude '03-'04-'05-'06-'07-'08-'09-'10-'11-'12-'13-'14-'15-'16-'17-'18-�19-'20-'21-'22-'23-'24


Good job there Greg!
When opting for my choice the two candidates were Champion and DeWitts.
I chose DeWitts because its an American owned company and the products are produced in the USA. And they had a great sale going on at the time.......

When opting for my choice the two candidates were Champion and DeWitts.
I chose DeWitts because its an American owned company and the products are produced in the USA. And they had a great sale going on at the time.......
 08-14-2011, 03:36 PM
#18
Race Director
Thread Starter
08-14-2011, 03:44 PM
#19
Race Director
Thread Starter
Nice write up Below are some picture of the 3 row version of the same Champion radiator swap I did a while back. I too had to make modifications to the rubber mounts in the same fashion but instead of cutting the upper portion of the shroud back for the radiator cap to clear I just changed it out for one that had smaller grip tabs. Total swap/clean up time was ~ 4 hours start to finish.
It only took 1/2 hour to get everything out. Probably an hour to figure out fitment. About 1/2 hour on the neck issue. And, an hour for reinstallation. Of course, another hour to get antifreeze and distilled water.

Even though this isn't American-made, at least it's got American in the name!
 The price is even more American!
  08-14-2011, 03:50 PM
#20
Race Director
Thread Starter

The body of the two stat's pictured look the same as the shape of the Mr. Gasket version I purchased. I kinda figured one manufacturer with various badging, but maybe there's really a difference.
OTOH, I notice the description says 180 is the "opening temperature rating". It was pointed out (to me) that this could be the temperature the stat STARTS to open vs being fully open.
If the 180 runs at 195 in my car, maybe a 160 (from the same manufacturer) would run at 175? Probably better to stay at the higher temp for emissions and oil condensation removal though. Would be interesting to know if I got more power and better response at the lower temp....again due to the compression in the engine.