Best way to remove batwing bushings?
 06-23-2016, 09:22 PM
#1
Tech Contributor
Thread Starter
Member Since: Jun 2004
Location: I tend to be leery of any guy who doesn't own a chainsaw or a handgun.
Posts: 18,363
Received 771 Likes
on
553 Posts

Getting ready to put a C4 batwing on my '69 as it's several pounds lighter than the C3 batwing currently on the car. In the process I want to swap in some new (poly) bushings. I'm in the process of using a hole saw to cut out the majority of the bushing, and then do some cutting and chiseling on the sleeve, but so far it's pretty slow going. Anyone have some tips on making the bushing removal process go a bit faster?
Any helpful suggestions is greatly appreciated.
Any helpful suggestions is greatly appreciated.
 06-23-2016, 09:33 PM
#2
Max G�s

Getting ready to put a C4 batwing on my '69 as it's several pounds lighter than the C3 batwing currently on the car. In the process I want to swap in some new (poly) bushings. I'm in the process of using a hole saw to cut out the majority of the bushing, and then do some cutting and chiseling on the sleeve, but so far it's pretty slow going. Anyone have some tips on making the bushing removal process go a bit faster?
Any helpful suggestions is greatly appreciated.
Any helpful suggestions is greatly appreciated.
If you damaged them already, burn them out.
06-23-2016, 09:33 PM
#3
Team Owner

Pro Mechanic
Drill through the bushing a bunch of times, parallel to the bolt. Then push the rubber out. Use a hammer and punch or an air hammer, "cave in" the outer metal shell, then push it out (if it doesn't fall out).
You know that the C4 batwing bolts to a D36 or 44 rear...your '69 should have a 12 bolt rear. Different rears, different flanges.
You know that the C4 batwing bolts to a D36 or 44 rear...your '69 should have a 12 bolt rear. Different rears, different flanges.
The following users liked this post:
69427 (06-25-2016)
06-23-2016, 09:50 PM
#4
Tech Contributor
Thread Starter
Member Since: Jun 2004
Location: I tend to be leery of any guy who doesn't own a chainsaw or a handgun.
Posts: 18,363
Received 771 Likes
on
553 Posts
Drill through the bushing a bunch of times, parallel to the bolt. Then push the rubber out. Use a hammer and punch or an air hammer, "cave in" the outer metal shell, then push it out (if it doesn't fall out).
You know that the C4 batwing bolts to a D36 or 44 rear...your '69 should have a 12 bolt rear. Different rears, different flanges.
You know that the C4 batwing bolts to a D36 or 44 rear...your '69 should have a 12 bolt rear. Different rears, different flanges.


I'll give the multiple parallel drill holes a try.
 06-23-2016, 10:33 PM
#5
Team Owner
Pro Mechanic
Cool! I dig it.
06-24-2016, 02:35 AM
#6
Melting Slicks


I haven't tried this way yet but saw it on FB awhile back and would use it for out of the car like you have.
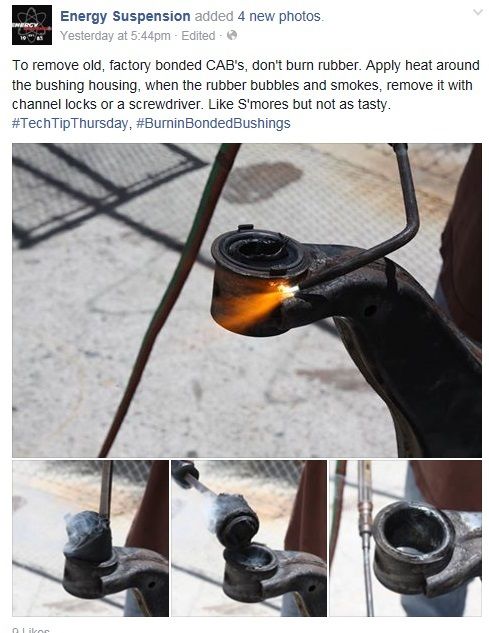
Being alum I prob would be careful to not melt it and use propane or map. Then just crush the sleeve in and beat it out or cut it like some do on here with a hacksaw blade.
I'm gonna do mine in car so I'll prob do the drill & hacksaw method, using a compact hacksaw.

Being alum I prob would be careful to not melt it and use propane or map. Then just crush the sleeve in and beat it out or cut it like some do on here with a hacksaw blade.
I'm gonna do mine in car so I'll prob do the drill & hacksaw method, using a compact hacksaw.
Last edited by BOOT77; 06-24-2016 at 03:57 AM.
06-24-2016, 09:39 AM
#7
Racer

Drill through the bushing a bunch of times, parallel to the bolt. Then push the rubber out. Use a hammer and punch or an air hammer, "cave in" the outer metal shell, then push it out (if it doesn't fall out).
You know that the C4 batwing bolts to a D36 or 44 rear...your '69 should have a 12 bolt rear. Different rears, different flanges.
You know that the C4 batwing bolts to a D36 or 44 rear...your '69 should have a 12 bolt rear. Different rears, different flanges.
 This is how I did mine. Once the inner metal sleeve is pushed out, the rubber will push right out.
Last edited by darklordftt; 06-24-2016 at 09:39 AM.
06-24-2016, 01:04 PM
#8
I just did this 2 weeks ago. on my spare dana 44. heated up with MAP gas. removed the inner steel sleeve. then softened up the rubber. Popped the remaining out. The outer steel sleeve shim. will need to be pressed out. upgrading to poly.
PS. smells great!!! Less filling!!
Last edited by THE 383 admiral; 06-24-2016 at 01:20 PM.
06-24-2016, 01:20 PM
#9
Le Mans Master

You need to be careful heating aluminum it's easy to turn a good part into recycling. I used 4 lb hammer and chisel once you get steel sleeve moving it not too bad Poly is a noise and vibration amplifier. I went all poly and changed gears and it's ....that's what they make radios for .....
06-24-2016, 02:00 PM
#10
I used a piece of threaded rod, a big deep well socket for the receiver, and a socket about the size of the OD of the bushing as the pusher a couple of nuts and washers on either end, my 1/2 inch impact (or wrench) they came right out. No heat and more importantly no sweat.
The following users liked this post:
69427 (06-25-2016)
06-24-2016, 03:41 PM
#11
Tech Contributor
Thread Starter
Member Since: Jun 2004
Location: I tend to be leery of any guy who doesn't own a chainsaw or a handgun.
Posts: 18,363
Received 771 Likes
on
553 Posts
I used a piece of threaded rod, a big deep well socket for the receiver, and a socket about the size of the OD of the bushing as the pusher a couple of nuts and washers on either end, my 1/2 inch impact (or wrench) they came right out. No heat and more importantly no sweat.
06-25-2016, 11:52 AM
#12
Tech Contributor
Thread Starter
Member Since: Jun 2004
Location: I tend to be leery of any guy who doesn't own a chainsaw or a handgun.
Posts: 18,363
Received 771 Likes
on
553 Posts
Got the bushings out. I combined the drilling and impact wrench suggestions. Went smooth, and took maybe 5-10 minutes per side. I appreciate the help.