
Adventures in Drivelines
 03-26-2012, 09:48 AM
#1
Melting Slicks

Thread Starter

Last year I installed a Z06 torque tube assembly, McLeod RXT Twin Disk clutch and QuickTime scattershield. I also did the recommended new pilot bearing, slave cylinder, and remote bleeder.
Not too long after the break-in period, I developed a grinding noise and slight vibration. The only thing that I didn't change were the propshaft couplers and I figured they must be wearing out. I also had some people tell me that it may be the pilot bearing. I continued to drive the car. Multiple street passes, races at Texas Invitational, dragstip passes, etc.
I finally began disassembly a few weeks ago and found that the pilot bearing was destroyed. It also caused damage to the input shaft on the propshaft, as well as the clutch.
I'll let the pictures do the talking:
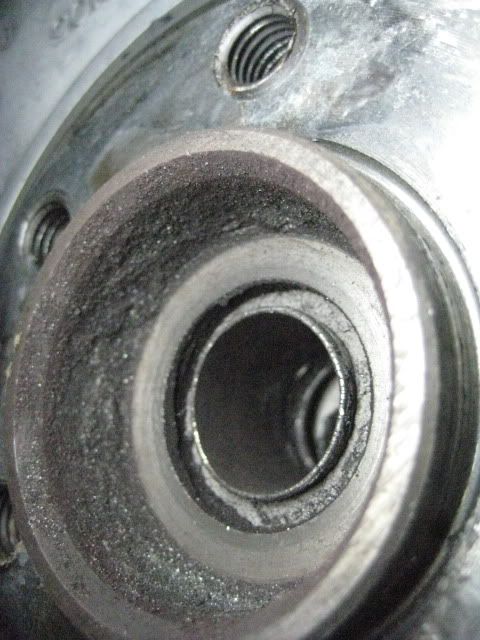
What's left of the pilot bearing
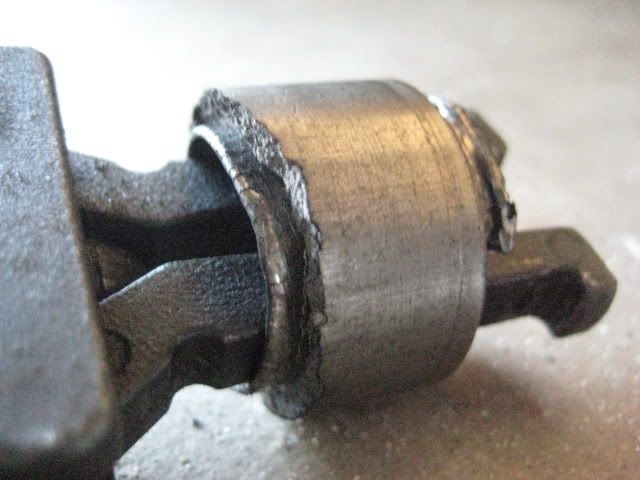
Damage to bearing surface of input shaft

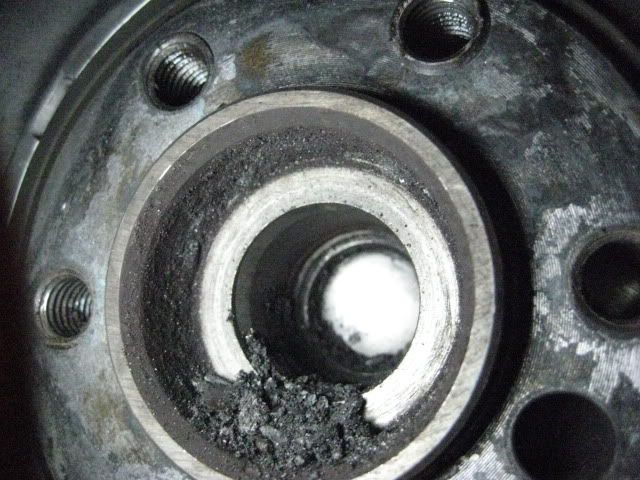
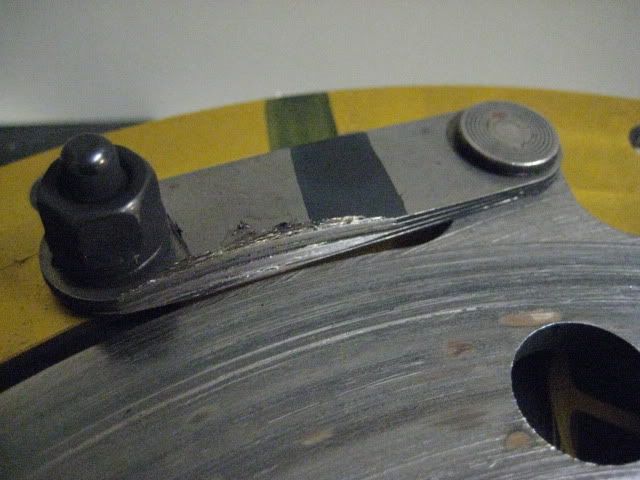
Adapter plate for Twin Disk
Clutch Disk grinding through staps for floating plate
Wear on drive plate due to pilot bearing debris
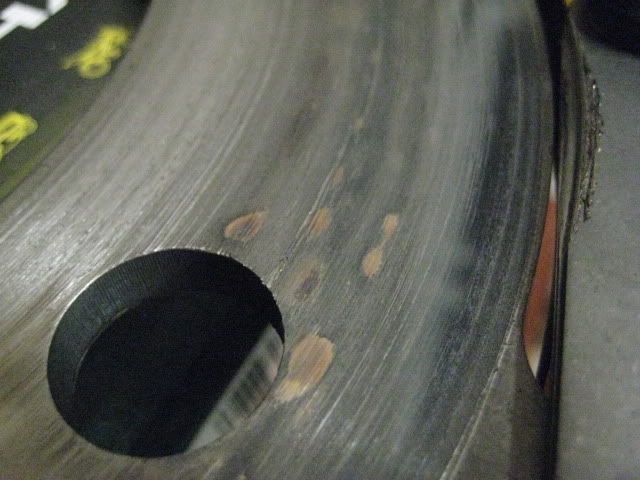
Wear on clutch disk due to debris

Not too long after the break-in period, I developed a grinding noise and slight vibration. The only thing that I didn't change were the propshaft couplers and I figured they must be wearing out. I also had some people tell me that it may be the pilot bearing. I continued to drive the car. Multiple street passes, races at Texas Invitational, dragstip passes, etc.
I finally began disassembly a few weeks ago and found that the pilot bearing was destroyed. It also caused damage to the input shaft on the propshaft, as well as the clutch.
I'll let the pictures do the talking:
What's left of the pilot bearing
Damage to bearing surface of input shaft
Adapter plate for Twin Disk
Clutch Disk grinding through staps for floating plate
Wear on drive plate due to pilot bearing debris
Wear on clutch disk due to debris
 03-26-2012, 09:59 AM
#2
Melting Slicks
Thread Starter
I'm fairly sure that it was the failure of the pilot bearing that led to the rest of the damage. Has anyone ever had pilot bearing failure? What is the usual cause of it?
Also does the clutch assembly look rebuildable or will I need to purchase a new one?
Also does the clutch assembly look rebuildable or will I need to purchase a new one?
 03-26-2012, 11:11 AM
#4
Team Owner


Member Since: Jan 2007
Location: cookeville tennessee
Posts: 28,846
Received 1,762 Likes
on
1,529 Posts

 100% man that thing had to be really off to do that that fast..
 You will have to get that bellhousing mic, in and get what ever offset pins into the block so your shaft lines up like it should.
03-26-2012, 11:33 AM
You will have to get that bellhousing mic, in and get what ever offset pins into the block so your shaft lines up like it should.
03-26-2012, 11:33 AM
#5
Melting Slicks
Thread Starter
You've got to be kidding me. 
Can someone tell more about this bellhousing alignment issue? It didn't mention anything in the instructions about checking the alignment or using offset dowel pins.
I just bolted it in when I installed it. Has everyone that uses this QuickTime bellhousing had to do make adjustments? Please give me some more information.
Thanks.
03-26-2012, 11:36 AM
#6
Melting Slicks
Anyone that installs one should be checking it. If not they will more than likely have the same experience that you did. I know a guy that has installed a few and all have needed the offset pins for proper alignment.
03-26-2012, 12:36 PM
#7
Le Mans Master

Man that bellhousing news is unfortunate. How the heck would someone even go about checking that? And if you get offset alignemnt dowls how does that not screw with the bolt holes?
03-26-2012, 02:06 PM
#8
Team Owner
Member Since: Jan 2007
Location: cookeville tennessee
Posts: 28,846
Received 1,762 Likes
on
1,529 Posts
 Have to use a dowl alignement that goes in the hole of the bellhousing, then you see from that how much the center line is off then pull the pins out of block and with the correct offset pins in place that will line your shaft center line up that goes into the back of the crank. :again man that was really off bad to do that that soon..thumbs:Plus if you take it to a shop cost is about 200.00 for this job...
03-26-2012, 03:04 PM
Have to use a dowl alignement that goes in the hole of the bellhousing, then you see from that how much the center line is off then pull the pins out of block and with the correct offset pins in place that will line your shaft center line up that goes into the back of the crank. :again man that was really off bad to do that that soon..thumbs:Plus if you take it to a shop cost is about 200.00 for this job...
03-26-2012, 03:04 PM
#9
Melting Slicks
Thread Starter
Thanks for bringing up the alignment issue. I am going to check it this evening.
I called McLeod and will be shipping the clutch kit back for a rebuild tomorrow. They said it will take 5 to 7 business days after they receive it.
Here is a link to one set of instructions for anyone wondering about the procedure for checking alignment on the bellhousing.
http://www.hurst-drivelines.com/file...206-15-09A.pdf
03-26-2012, 03:24 PM
#10
Melting Slicks
Thread Starter
I do have one positive item from all of the damage.
This will be going in when it all goes back together.
DSS C5 Carbon Fiber Driveshaft
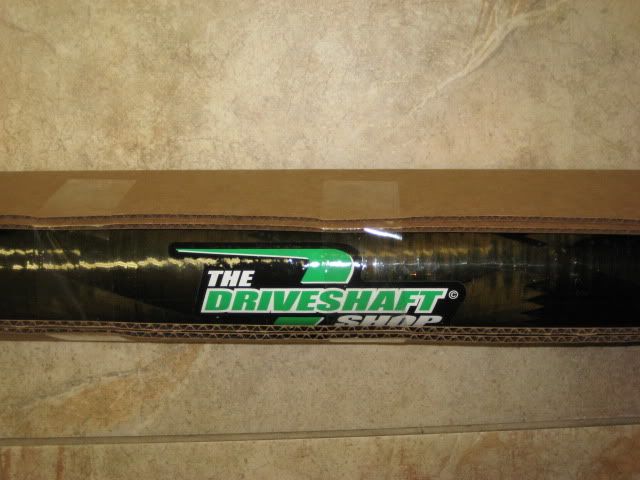
This will be going in when it all goes back together.
DSS C5 Carbon Fiber Driveshaft
03-26-2012, 03:24 PM
#11
Drifting

Wow. Ben I never knew you had a QT bell housing or I could have told you about the alignment thing. But I didn't know the QT were off that much. The Mcleods were off a lot I know(f-body). Not that it would have matered at this point, but we were talking the other night at Kats etc...
03-26-2012, 03:42 PM
#13
Melting Slicks
Thread Starter
Thanks, Jeff. I didn't think to mention it the other night. It never crossed my mind that the QT was the real problem. Now I know and hopefully others will benefit.
I did the research on the LS1 vs LS2 propshaft input and I think the LS2 would work, but it was even more expensive and I already had the LS1 input in hand. Thanks again for your advice.
I did the research on the LS1 vs LS2 propshaft input and I think the LS2 would work, but it was even more expensive and I already had the LS1 input in hand. Thanks again for your advice.
03-26-2012, 04:18 PM
#14
Le Mans Master
I guess you could look at the DSS shaft as a positive but it sounds like it wasn't needed. If the bellhousing is off that explains why you ate that first front guibo and why yout pilot and input shaft got eaten. Sorry to be a Debbie Downer. 

 03-26-2012, 05:25 PM
#16
Melting Slicks
Thread Starter
No worries, Bill. I agree that it may not have been needed, but at the same time I wll never have to deal with the rubber donuts again. Rubber and driveline don't coexist in my book.
I think I read somewhere that the road race cars had to replace theirs after every race.
Bruce, I have videos from outside and inside the car. I'll get them posted up tonight.
The best way that I can describe it is that when engaging the clutch from a stop, it sounded similar to when you missed a shift and the gears grinded.
Other symptoms
It had a large vibration from 3500 to 4500 at part throttle and had a real hard time shifting at WOT.
I could leave the car in gear at speed, push in the clutch, and rev the engine and it would create a grinding noise also.
03-26-2012, 06:24 PM
#17
Former Vendor
Here is why most pilot bearings fail..... Installation. When we install a clutch we always bolt the clutch assembly up with an alignment tool (or old input shaft in our case) then install the bellhousing. The torque tube needs to come apart and install the bare housing, once the bare housing is installed then you can easily slide the shaft assembly in from the rear. This way everything stays straight and you are not wrestling around the weight of the whole assembly, some even do it with the trans and diff still bolted up. This is just one step along with all the normal procedures (clean the crankshaft real good, install bearing in the proper direction, inspect input shaft, clean splines,proper torque,etc....)if you do this everything will be fine. I see this more than you can imagine.
This is just one step along with all the normal procedures (clean the crankshaft real good, install bearing in the proper direction, inspect input shaft, clean splines,proper torque,etc....)if you do this everything will be fine. I see this more than you can imagine.
03-26-2012, 11:18 PM
#18
Drifting
Here is why most pilot bearings fail..... Installation. When we install a clutch we always bolt the clutch assembly up with an alignment tool (or old input shaft in our case) then install the bellhousing. The torque tube needs to come apart and install the bare housing, once the bare housing is installed then you can easily slide the shaft assembly in from the rear. This way everything stays straight and you are not wrestling around the weight of the whole assembly, some even do it with the trans and diff still bolted up. This is just one step along with all the normal procedures (clean the crankshaft real good, install bearing in the proper direction, inspect input shaft, clean splines,proper torque,etc....)if you do this everything will be fine. I see this more than you can imagine.
This is just one step along with all the normal procedures (clean the crankshaft real good, install bearing in the proper direction, inspect input shaft, clean splines,proper torque,etc....)if you do this everything will be fine. I see this more than you can imagine.
03-26-2012, 11:30 PM
#19
Tech Contributor
I had an aftermarket bell housing on another car that I had to get centered. I'm afraid you're not going to like the way I had to do it though.
I put the flywheel and bell housing on with a magnetic base mounted to the flywheel and dial indicator touching the hole in the bell housing where the transmission met it. I turned the flywheel while watching the dial indicator changes which would indicate runout. I had more than the prescribed amount. I had to drill out the dowel holes and grind the area around them to make them over-sized. I bought new dowel locators from Summit (I believe). I kept the bolts just loose enough where I could manipulate the bell housing position with a rubber mallet. I would tap it and keep turning the flywheel until I got the run-out within tolerance. Then I completely torqued the bolts, slid the dowel locators over the dowels and MIG welded them in place.
It's one of those things that would really need to be done with the motor out of the car.
I hope you don't discover that's what you have to do in order to resolve this.
Just an FYI, Summit also sells a Kevlar pilot bushing. It won't gall your pilot shaft and won't blow apart like yours just did. That's what I'm currently running.

Ram Model: BU656K
One other thing to add to Rodney's installation tip. I don't pull everything apart, but to ease installation with multi disc clutches, I've noticed that my pilot-shaft based installation tool from RKT56 slides in nicely until everything's tightened up. I've tried many things to get it to slide in and out with ease with only on trick to solve the issue.
Rather than force the torque tube assembly in (which you should never do!), I keep the pressure plate only tight enough to hold the discs in place, making sure the pilot shaft tool still slides in and out easily.
I install the torque tube and then tighten the pressure plate bolts. The torque tube won't fully seat until you tighten the pressure plate bolts. That one little change in my installation technique has saved me tons of grief.
5 liter eater has my number. Feel free to contact me if you need anything.
I put the flywheel and bell housing on with a magnetic base mounted to the flywheel and dial indicator touching the hole in the bell housing where the transmission met it. I turned the flywheel while watching the dial indicator changes which would indicate runout. I had more than the prescribed amount. I had to drill out the dowel holes and grind the area around them to make them over-sized. I bought new dowel locators from Summit (I believe). I kept the bolts just loose enough where I could manipulate the bell housing position with a rubber mallet. I would tap it and keep turning the flywheel until I got the run-out within tolerance. Then I completely torqued the bolts, slid the dowel locators over the dowels and MIG welded them in place.
It's one of those things that would really need to be done with the motor out of the car.
I hope you don't discover that's what you have to do in order to resolve this.
Just an FYI, Summit also sells a Kevlar pilot bushing. It won't gall your pilot shaft and won't blow apart like yours just did. That's what I'm currently running.
Ram Model: BU656K
One other thing to add to Rodney's installation tip. I don't pull everything apart, but to ease installation with multi disc clutches, I've noticed that my pilot-shaft based installation tool from RKT56 slides in nicely until everything's tightened up. I've tried many things to get it to slide in and out with ease with only on trick to solve the issue.
Rather than force the torque tube assembly in (which you should never do!), I keep the pressure plate only tight enough to hold the discs in place, making sure the pilot shaft tool still slides in and out easily.
I install the torque tube and then tighten the pressure plate bolts. The torque tube won't fully seat until you tighten the pressure plate bolts. That one little change in my installation technique has saved me tons of grief.
5 liter eater has my number. Feel free to contact me if you need anything.