
Rebuilding the Ghost, aka Great White
 11-18-2014, 09:58 AM
#161
Melting Slicks


Meaning the LS1's in that location. And yeah we can use our stock C6 knock sensors as thats where they are normally located etc... I forgot about Joe's not working right as well so maybe he can give you a little more insight as to what they were doing. And it was word of mouth I herd about some ppl converting to the two wire newer C6 style knock sensors. I'd be looking on HPT forum to see if there is some good info on the swap or if its possible with your PCM etc... Looking good man! GL!

Your pcm is going to work with the new knock sensors if you manage to keep away false knock from piping. The sensitivity is in question though. You could increase sensitivity on the dyno once you have the tune about worked out. Make it detect KR and then back it off a hair. You shouldn't need them to tune the car, but sure is a nice safety for later on.
Hurry up and get those settings figured out. I could use that.

 01-03-2015, 04:50 PM
#163
Melting Slicks
Thread Starter

Wow, it looks like over a month has passed by since the last update. I've worked on the car a little when time permits. On to a few of the items and progress pics.
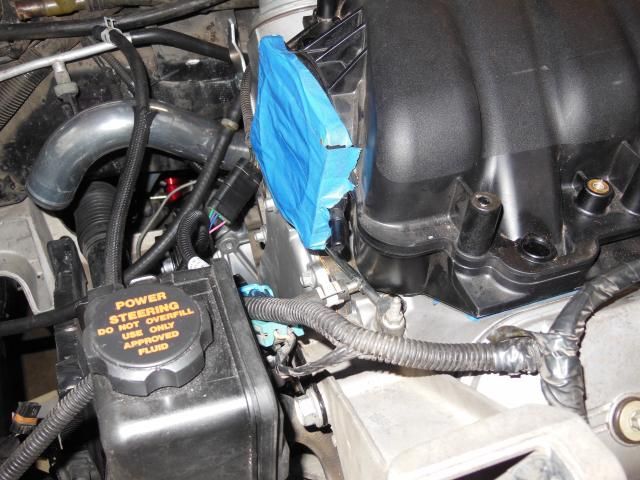
I went ahead and ordered the LS7 specific Aeromotive fuel rails and will hopefully do a comparison soon to see if they were needed or not. I also had to order a MAP sensor extension harness and an LS1 to LS2 throttle body conversion harness. All of the factory wiring harnesses have been restored to their proper routing and the starter is in place with the wires located away from heat sources.
I wanted to mock up the intake, throttle body and inlet tubing to see if any changes needed to be made. The ls6 coolant crossover tube was installed from the last build and a new truck crossover tube was installed for the rear steam vents.
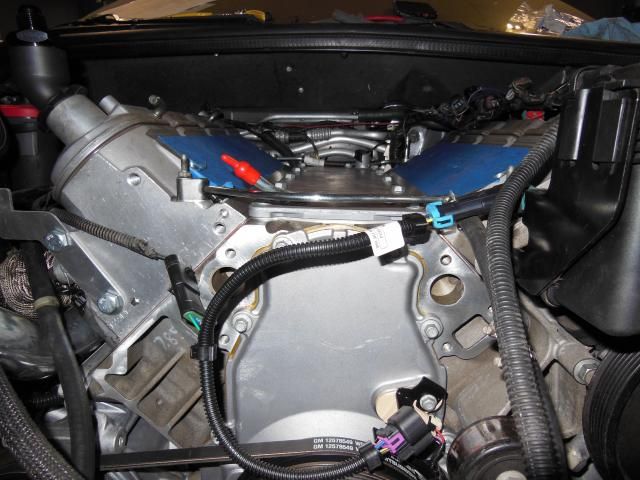
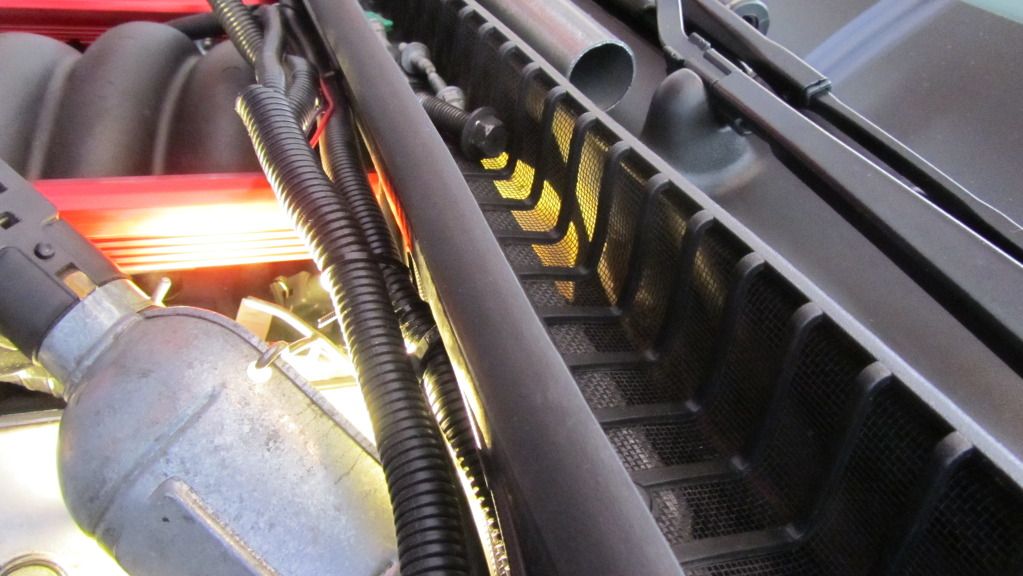
Right away, it was clear that the LS7 intake was hitting the front crossover tube.
Getting creative with a small pry bar, 2X4 wood block, and a hammer gave the needed clearance.
I went ahead and ordered the LS7 specific Aeromotive fuel rails and will hopefully do a comparison soon to see if they were needed or not. I also had to order a MAP sensor extension harness and an LS1 to LS2 throttle body conversion harness. All of the factory wiring harnesses have been restored to their proper routing and the starter is in place with the wires located away from heat sources.
I wanted to mock up the intake, throttle body and inlet tubing to see if any changes needed to be made. The ls6 coolant crossover tube was installed from the last build and a new truck crossover tube was installed for the rear steam vents.

Right away, it was clear that the LS7 intake was hitting the front crossover tube.

Getting creative with a small pry bar, 2X4 wood block, and a hammer gave the needed clearance.

 01-03-2015, 04:54 PM
#164
Melting Slicks
Thread Starter
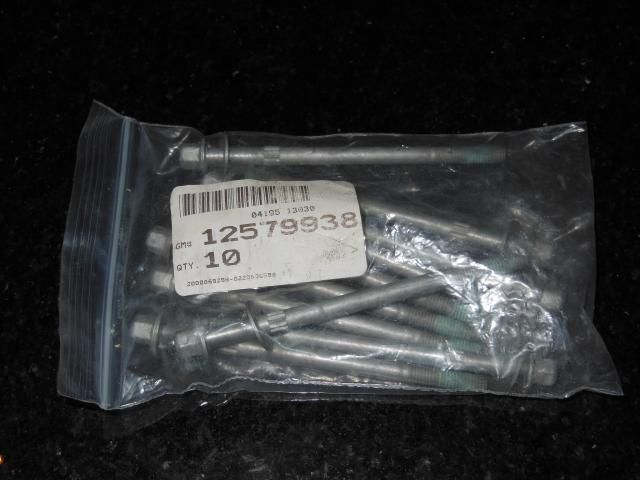
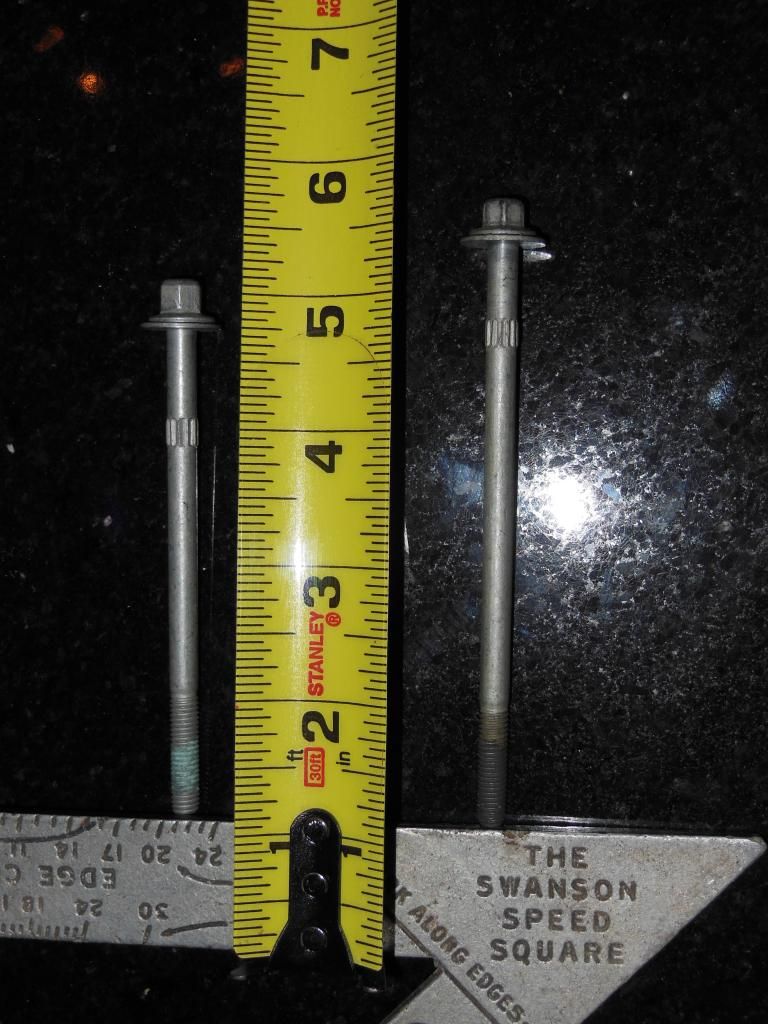
Another thing that you don't hear much about is that the LS7 intake bolts are specific to this intake. They are ~3-7/8" long vs. LS1/LS6 which are ~4-7/16" long. They were hard to source in-stock but I found a dealer down in Florida that had all 10 in inventory. The part number is 12579938.

 01-03-2015, 05:07 PM
#165
Melting Slicks
Thread Starter
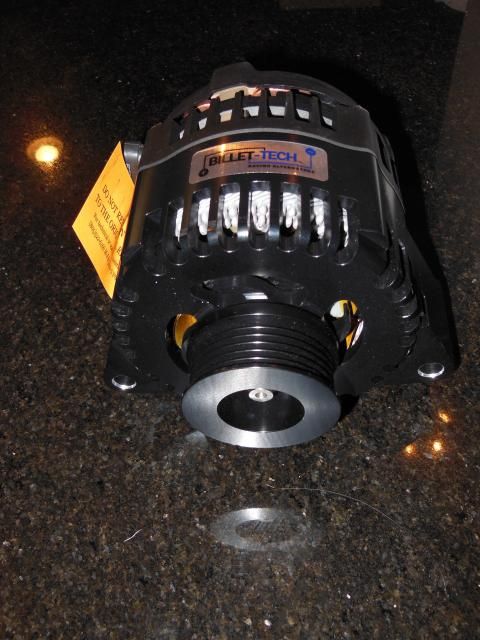
The only other item at this point is that I sold my original MN6 transmission and picked up an alternator from Brett. Thanks, Brett. 
 01-03-2015, 05:15 PM
#166
Melting Slicks
Thread Starter
Main items left to complete when I find the time:
I'm sure there will be some other small items that I haven't considered which will require a last minute order or trip to the hardware store or parts house.
- Adapt and install C6Z driveline
- Bolt-up suspension and brakes, bleed brakes/ABS module
- Install Fuel System
- Install Cooling System
- Complete A/C System
- Wrap downpipes
- Fabricate and install exhaust system
I'm sure there will be some other small items that I haven't considered which will require a last minute order or trip to the hardware store or parts house.
01-03-2015, 09:30 PM
#167
Burning Brakes


Great work Ben It's tough getting things done over the holidays. I know I didn't get nearly as much done as I would have liked to.
Cool looking charge pipe. Looks new?
You'll like the charge with that Billet-tech. And so will your coils and fuel system
It's tough getting things done over the holidays. I know I didn't get nearly as much done as I would have liked to. Cool looking charge pipe. Looks new?
You'll like the charge with that Billet-tech. And so will your coils and fuel system
 01-04-2015, 10:26 PM
#169
Race Director

Member Since: May 2004
Location: Raleigh, NC
Posts: 16,664
Received 1,193 Likes
on
1,052 Posts
St. Jude Donor '15

Sub'd!
01-05-2015, 11:45 AM
#170
Melting Slicks
Thread Starter
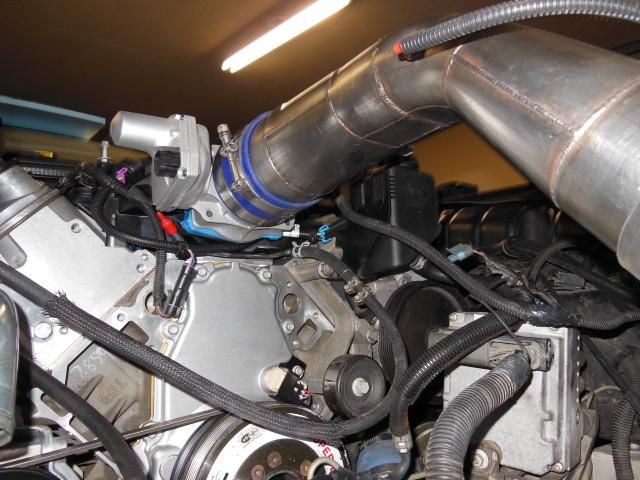
The charge pipe is something I designed and had fabricated a couple of years ago. It's 304SS. The K&N air bridge didn't stay clamped for me at higher boost levels, but mine was an older design and only reinforced at one end. Sometimes, I think about having it powdercoated, but the raw stainless looks good, too. Probably could use a polish and wax...

Here's a link to the old thread: https://www.corvetteforum.com/forums...take-pipe.html
01-11-2015, 08:01 PM
#171
Melting Slicks
Thread Starter
A little too cold for me to work in the uninsulated non-heated garage, so I brought some things inside. I tried to get my wife to let me move the whole car into the living room, but that wasn't happening.
I bought a used fuel system a few months ago and did some research on aftermarket LS1 fuel rail fitment to an LS7 intake manifold. The info out there wasn't totally conclusive, so I did my own analysis. The following pictures and info should shed light on it for anyone else.
Parts involved: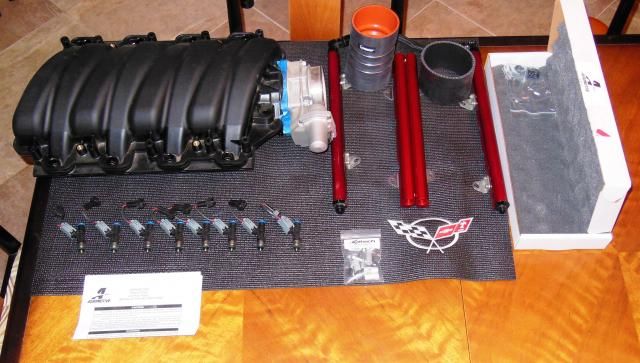
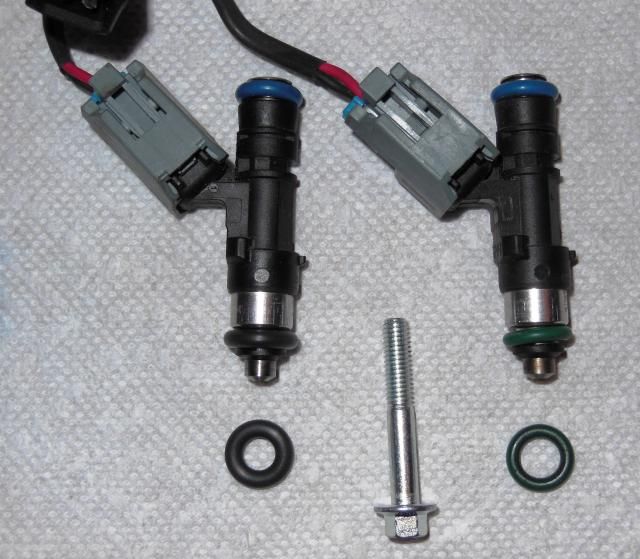
I purchased the Katech kit not realizing that the 14142 kit comes with brackets and o-rings.

The lower injector o-ring needs to be changed. LS7 specific o-ring (left) vs LS1 specific (right)
I bought a used fuel system a few months ago and did some research on aftermarket LS1 fuel rail fitment to an LS7 intake manifold. The info out there wasn't totally conclusive, so I did my own analysis. The following pictures and info should shed light on it for anyone else.
Parts involved:
- Aeromotive #14106 LS1 Rails
- Aeromotive #14142 LS7 Rails
- Katech KAT-A4674 fuel rail spacer kit
- -8AN fittings and crossover hose
- -8AN Feed fitting
- -6AN Return fitting
- ID1000 #1000.03.07.60.14.8 injectors
- Racetronix Fuel Injector harness adapters

I purchased the Katech kit not realizing that the 14142 kit comes with brackets and o-rings.

The lower injector o-ring needs to be changed. LS7 specific o-ring (left) vs LS1 specific (right)
 01-11-2015, 08:05 PM
#172
Melting Slicks
Thread Starter
Here is the loose fitment of the aftermarket LS1 rails on the LS7 intake. I say loose, because it’s obvious that they won’t bolt right on. It seems that some custom offset brackets could be built, but it’s just as easy to order the correct rails.
Here are some of the other differences observed between the two rails:
Top View - LS1 rail on top and LS7 rail on bottom
Top View Close-up of injector ports – LS1 rail (Top) vs. LS7 rail (bottom)

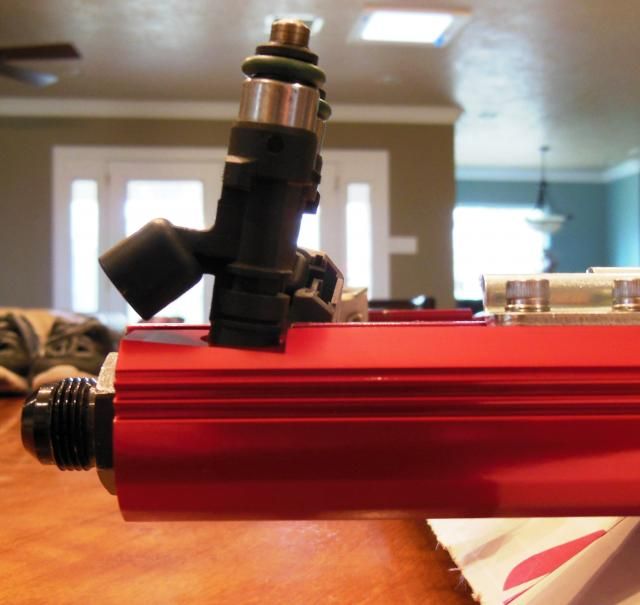
Side View Close-up of injector ports - LS1 rail (background) vs. LS7 rail (foreground)
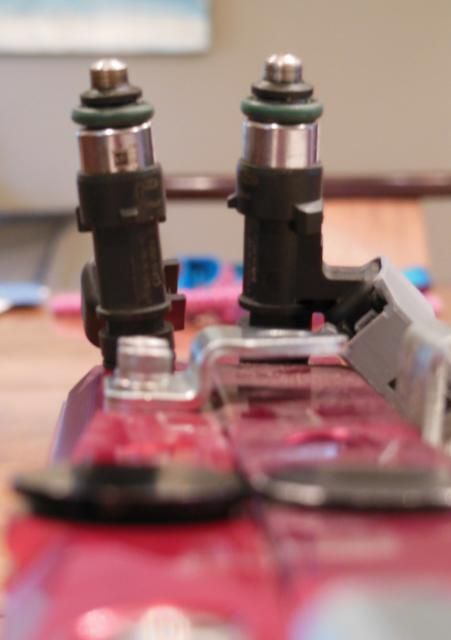
Side View with injectors installed. Slight side to side offset.
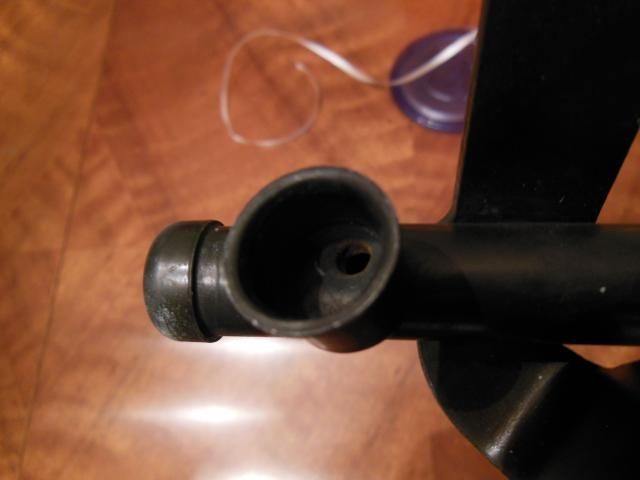
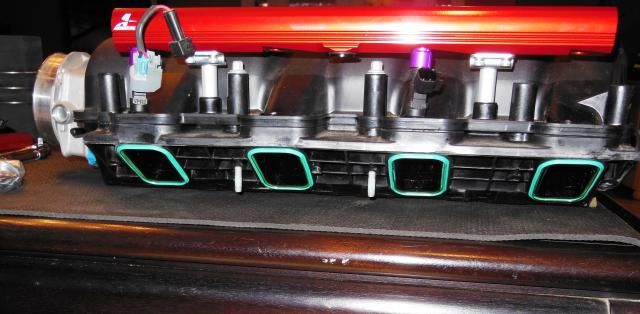
Here’s a view of the stock LS1 injector port opening. Never realized the small size of the actual feed port.
Down the Rail View – Slight Left to right offset (splayed)

Here are some of the other differences observed between the two rails:
Top View - LS1 rail on top and LS7 rail on bottom

Top View Close-up of injector ports – LS1 rail (Top) vs. LS7 rail (bottom)

Side View Close-up of injector ports - LS1 rail (background) vs. LS7 rail (foreground)

Side View with injectors installed. Slight side to side offset.

Here’s a view of the stock LS1 injector port opening. Never realized the small size of the actual feed port.

Down the Rail View – Slight Left to right offset (splayed)

Last edited by Turbo-Geist; 01-11-2015 at 08:47 PM.
01-11-2015, 08:07 PM
#173
Melting Slicks
Thread Starter
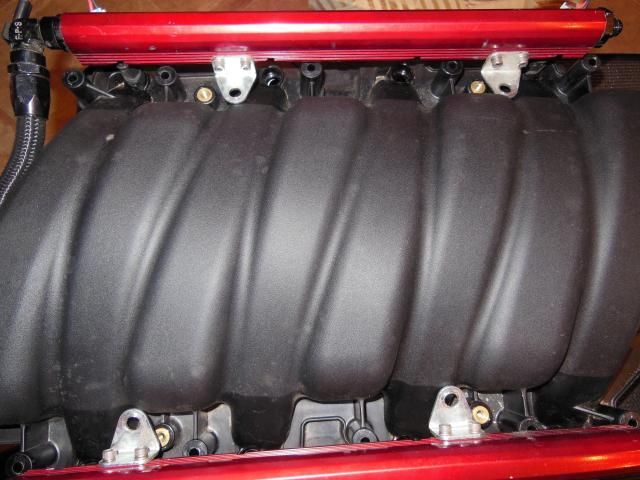
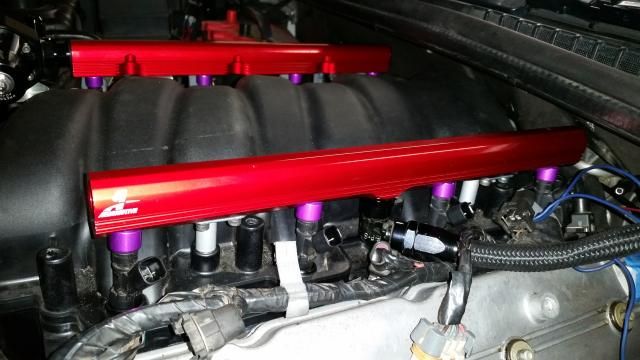
LS7 Specific rails mounted � Notice milled area for intake bolt clearance when removing intake. 
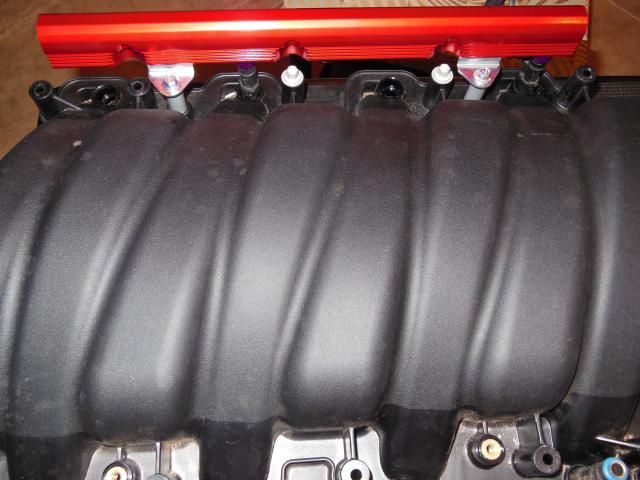
Side view of LS7 specific rails installed
I had to put the injector Top Hat adapters back on and not sure if there is an off the shelf spacer that will allow you to delete the adapters. This caused interference between the -8AN crossover hose and the firewall. I had to relocate the x-over to the front of the rails.
 01-11-2015, 08:45 PM
#174
Melting Slicks
Thread Starter
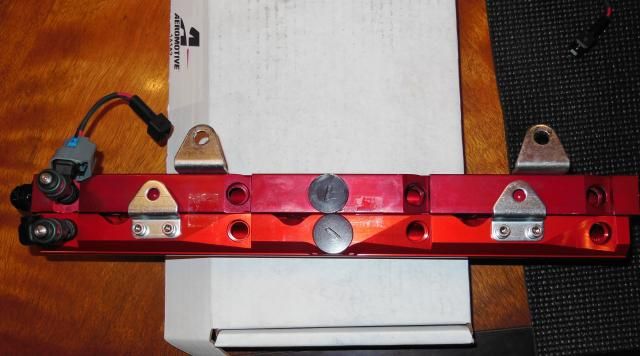
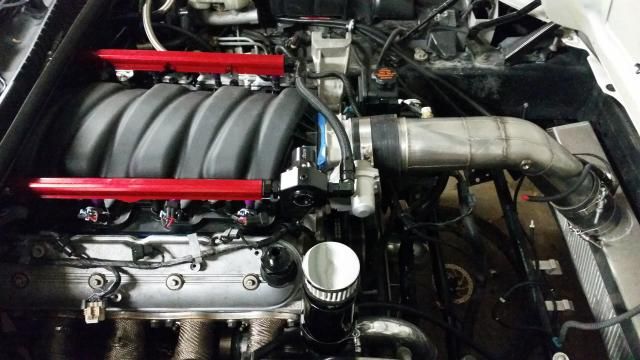
Here's a picture of the initial finished product for the intake. Can I get some feedback on the planned routing? Keep in mind, the system will need to ultimately provide 1400 flywheel horsepower worth of fuel. Injectors will be upgraded later.
Starting at the back
Intermediate
Front feed portion (shown in picture below)
Fuel return portion
Starting at the back
- Magnafuel 4303 external pump and Racetronix 255 internal pump.
- The 4303 will have a -8AN feed line to the front of the car and the 255 in-tank will use the factory feed line to the front.
Intermediate
- The two lines will go into a 'y' fitting.
Front feed portion (shown in picture below)
- -8AN feed to the rear of the driver side fuel rail.
- -8AN crossover to the front of the passenger side rail.
- Block off fitting in rear of passenger side rail.
Fuel return portion
- -6AN fitting on center port of driver side rail.
- -6AN hose to Aeromotive #13105 regulator.
- -6AN return line to fuel tank.
 01-11-2015, 10:19 PM
#175
Drifting

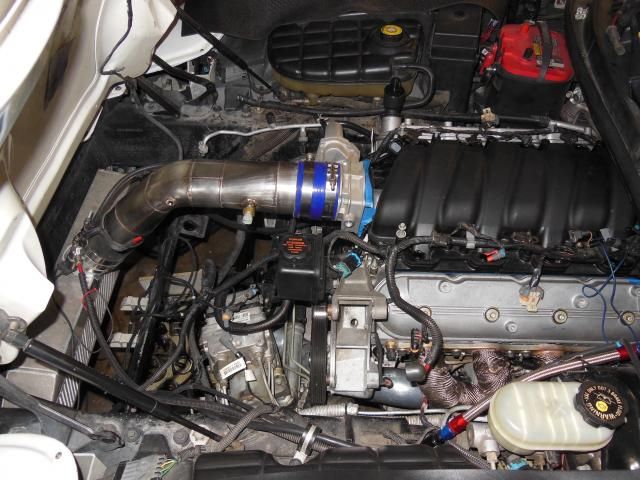
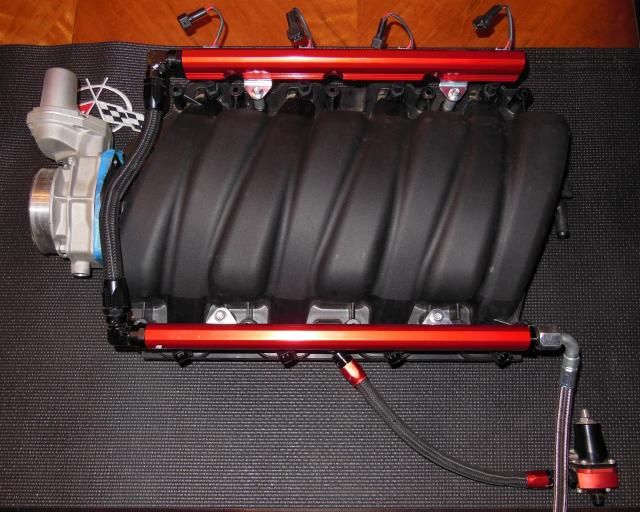
Well Ben after texting with you today I'll share what we talked about. I used to run my feed line in one fuel rail cross over to the other and return to a regulator back to the tank. Found this to look appealing and worked well up to about 850-900rwhp. Then I noticed that my plugs and pistons looked inconsistent. Starting from the feed side and following the cylinders to the return line they would trent leaner. Thought it must be something with supply, but I tried differnt size lines and pumps to see the same trend. Although the motors lasted great as the tunes were always safe etc... You could still see it on the pistons and plugs. In the end I decided to feed both and return both independently to the regulator and its worked great ever since. I'm posting the current config for example. I'm sure others may have other experiences. But these have been mine. I've never tried feeding both and returning from a single point on one of the two rails so I'm not sure if your going to have any issues or not. Just posting it for information for those who do there own work or like to have information to back up what they do etc...
01-11-2015, 10:32 PM
#176
Melting Slicks
Thread Starter
Wow, Jeff. I don't think I've seen these shots. Is this the current iteration? Looks awesome.
I appreciate the input and it seems to make sense for higher power levels where fuel flow is much greater. I guess I may have more work to do.
I could feed the back of both rails. Use the current -8AN on the driver side and get another assembly for the passenger side. Maybe get a fuel distribution log for tying together both feeds and the feed from the 255 into one junction point. I would also need to purchase a different regulator that has 2 inlet ports and 1 outlet port. I should be able to reuse everything else. What regulator are you using?
Can anyone else confirm or deny that this is the route to take?
01-11-2015, 10:57 PM
#177
Drifting
Wow, Jeff. I don't think I've seen these shots. Is this the current iteration? Looks awesome
01-29-2015, 10:00 PM
#178
Melting Slicks
Thread Starter
Another small update.
Based on some discussion, it looked like I needed to make some changes to the under hood portion of the fuel system for consistent fueling.
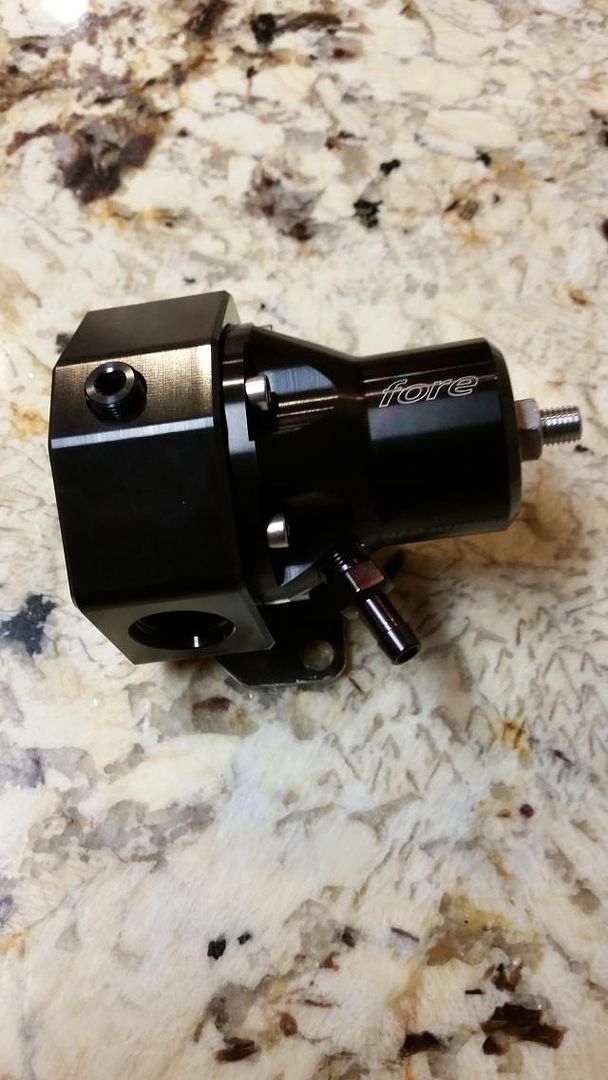
Placed an order for the Fore F2i Fuel Pressure regulator
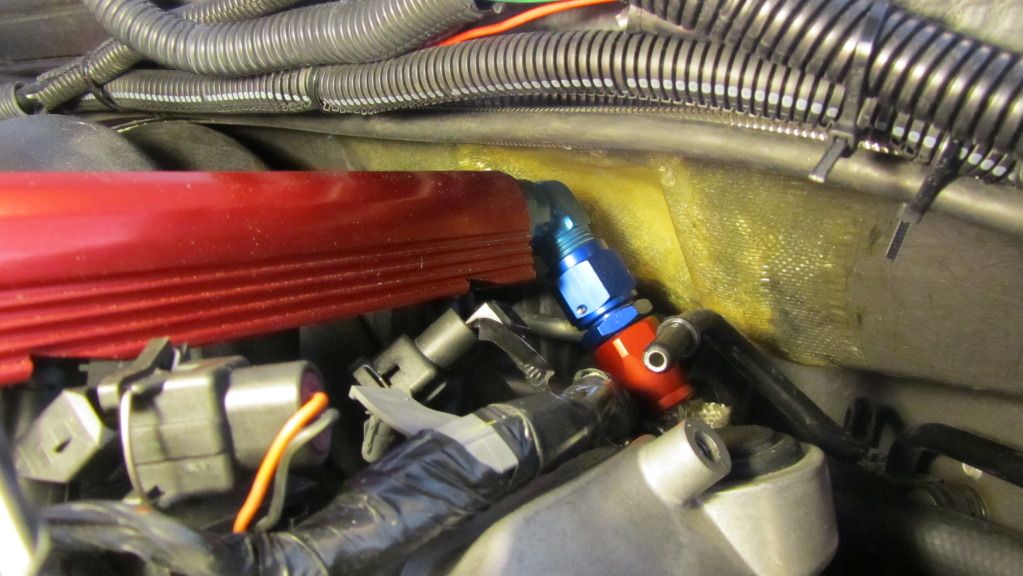
The crossover hose wasn't long enough to reach with the regulator on the driver's side so I tried this out for mock-up purposes:
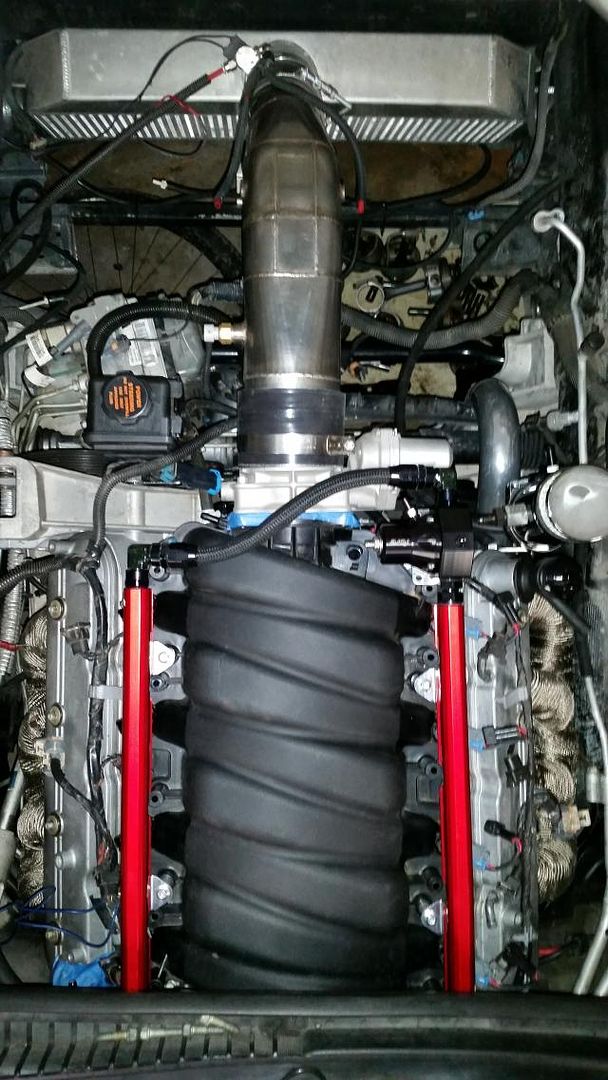
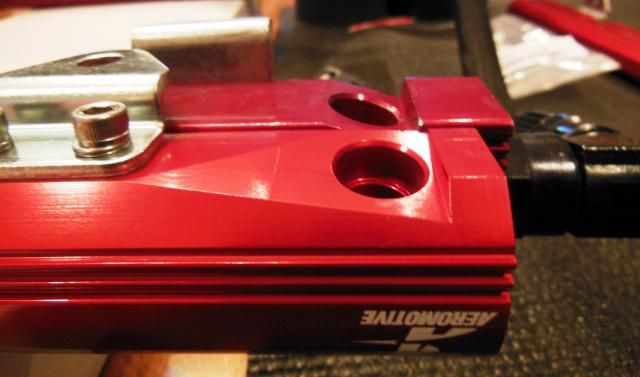
Now, it was time to see if the Fragola A-N 90 degree swivel (499208BL) would work at the back of the rail...
DENIED
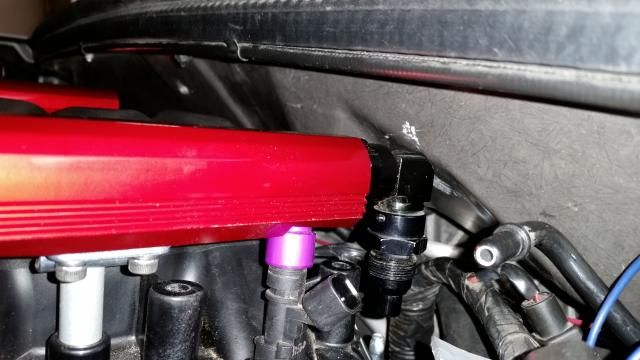
It looks like I may have to go with the center port on the bottom of the rail. You can see it mocked up in this picture with the -8AN hose attached. I test fit the coil packs and everything clears.
Based on some discussion, it looked like I needed to make some changes to the under hood portion of the fuel system for consistent fueling.
Placed an order for the Fore F2i Fuel Pressure regulator

The crossover hose wasn't long enough to reach with the regulator on the driver's side so I tried this out for mock-up purposes:


Now, it was time to see if the Fragola A-N 90 degree swivel (499208BL) would work at the back of the rail...
DENIED

It looks like I may have to go with the center port on the bottom of the rail. You can see it mocked up in this picture with the -8AN hose attached. I test fit the coil packs and everything clears.


 01-30-2015, 09:08 AM
#180
Drifting
Looking good, the drivers side back corner sucks *** for fuel rails which is probably worse with a ls7 intake. I think going of the center will be fine, but I know I used the passenger side to hook up my feed line since it had more room. I do believe a banjo fitting might be slightly lower profile, but they are also a little more restrictive.