
ECS fuel ring install help
 03-23-2015, 02:24 AM
#41
Melting Slicks


I've been following this thread because I was planning to install one of these. I did it last night and hope to shed some light on your situation. My car is a 99 and I'm using the ring that only has the outlet. The bolts that they provided are a 4mm x 0.7 thread x 30mm long. I took some measurements on the stack up with calipers and feel that the provided bolts are a little too short. I couldn't find any 35mm long hex head bolts, so I bought the 35mm long pan head bolts. These may be 1/16" too long so I used three washers as you'll see in the final pics.
Here is a picture showing the orientation of everything going into the tank. The tank has an embossed indication line on it and the little tab on the stock gasket needs to be lined up with this line as well as the reference line on the factory fuel hat. I think you can see each one of these reference points in this picture below.
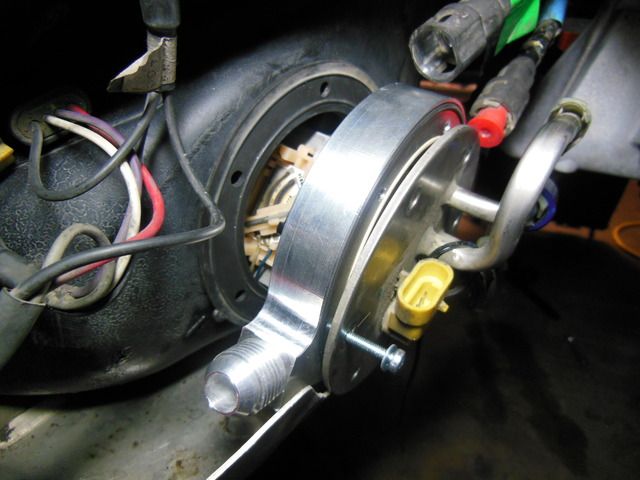
The factory gasket has an inner lip/flange that must be fully seated within the inside diameter of the opening in the tank and lined up as shown above. The entire assembly will not sit flat against the flange face of the tank if you try push the whole assembly together. The inner lip of the factory gasket will catch and become distorted and cause the complete assembly to not sit flush against the tank flange.
I started off threading in a few of the 35mm long bolts without any washers. This gave plenty of length to engage the threads in the tank without making things so tight that you didn't have room to wiggle the assembly. The only thing that would make this whole installation easier is studs instead of bolts. Studs would allow you to slide everything on and have less issues with alignment. I couldn't find any 4mm all-thread.
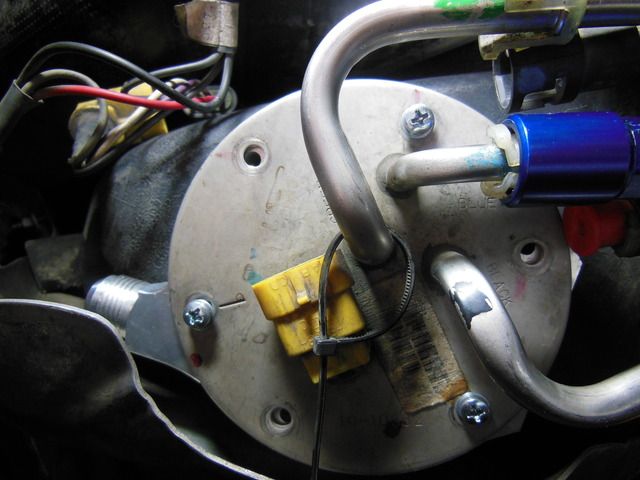
The next picture below shows the issues that you are likely facing.
See how the holes in the factory fuel hat aren't perfectly aligned with the fuel ring holes? There is a slight offset. Take note of the 3 fasteners that I have installed and their location. Those 2 on the right side are helping to hold that side down because it wants to not sit flush compared to the left side. There isn't much room to work with, but if the gasket is lined up and you slide the assembly straight on the fasteners can be threaded in with a little bit of adjustment. One of the keys is the longer fastener length. It allows for things to be loosely bolted up and still allowed to move and gain clearance for the other fasteners.
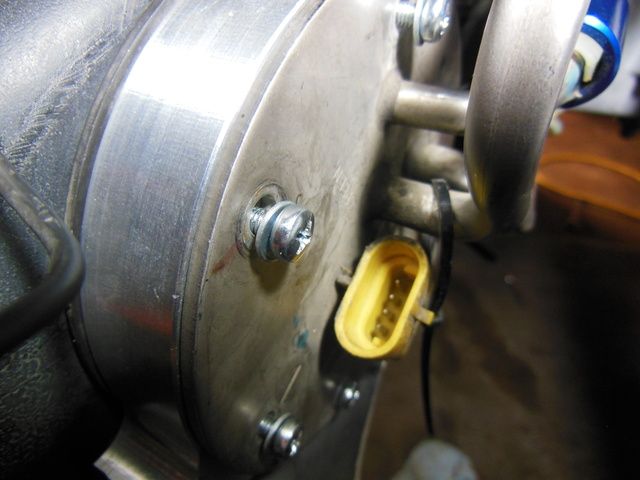
Below you can see one of the fasteners going into the hole at the 2:30 position where it looked like it wouldn't fit.
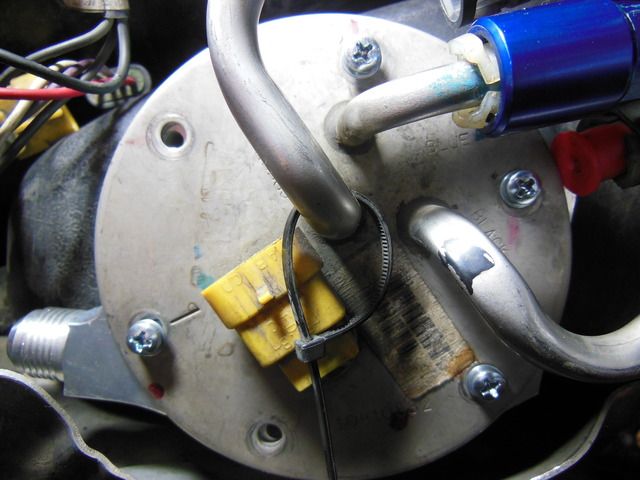
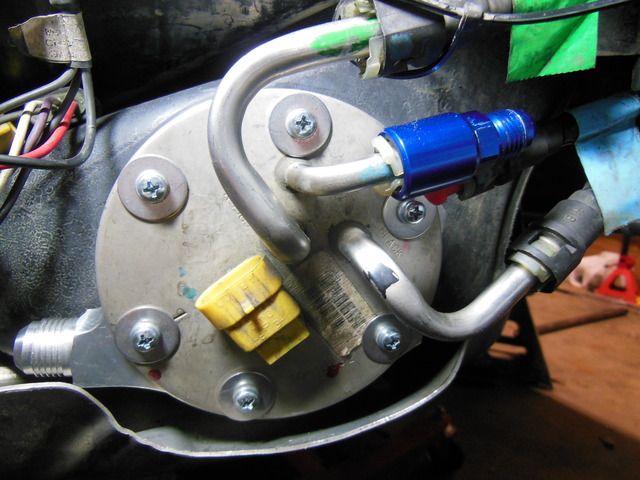
Here is the complete assembly installed with 2 - 4mm washers under each head along with the fender washers that were in the kit.
Here is a picture showing the orientation of everything going into the tank. The tank has an embossed indication line on it and the little tab on the stock gasket needs to be lined up with this line as well as the reference line on the factory fuel hat. I think you can see each one of these reference points in this picture below.

The factory gasket has an inner lip/flange that must be fully seated within the inside diameter of the opening in the tank and lined up as shown above. The entire assembly will not sit flat against the flange face of the tank if you try push the whole assembly together. The inner lip of the factory gasket will catch and become distorted and cause the complete assembly to not sit flush against the tank flange.
I started off threading in a few of the 35mm long bolts without any washers. This gave plenty of length to engage the threads in the tank without making things so tight that you didn't have room to wiggle the assembly. The only thing that would make this whole installation easier is studs instead of bolts. Studs would allow you to slide everything on and have less issues with alignment. I couldn't find any 4mm all-thread.

The next picture below shows the issues that you are likely facing.
See how the holes in the factory fuel hat aren't perfectly aligned with the fuel ring holes? There is a slight offset. Take note of the 3 fasteners that I have installed and their location. Those 2 on the right side are helping to hold that side down because it wants to not sit flush compared to the left side. There isn't much room to work with, but if the gasket is lined up and you slide the assembly straight on the fasteners can be threaded in with a little bit of adjustment. One of the keys is the longer fastener length. It allows for things to be loosely bolted up and still allowed to move and gain clearance for the other fasteners.

Below you can see one of the fasteners going into the hole at the 2:30 position where it looked like it wouldn't fit.

Here is the complete assembly installed with 2 - 4mm washers under each head along with the fender washers that were in the kit.

Last edited by Turbo-Geist; 03-23-2015 at 02:51 AM.
 03-23-2015, 02:29 AM
#42
Melting Slicks
I just thought of something that may help. They do have 40mm long hex bolts at some hardware stores. You could buy 3 of these and cut the heads off and thread them in first to use as alignment dowels. This would keep the gasket in the proper position and allow everything to go together piece by piece. You could then thread the fasteners into the other 3 holes, remove the dowels and replace them with the remaining 3 fasteners.
03-23-2015, 08:40 AM
#43
Drifting

Thread Starter
Thanks Turbo-Geist  Once I get home I will try to reproduce what you mentioned.
However I do see your tank is a bit different, I have metal stands on the outside of the tank for the bolts. Did you have those and removed them? You can see a little bit of what I am talking about in this picture.

Nah, its from the ECS video for the fastest stock short block C5.
Once I get home I will try to reproduce what you mentioned.However I do see your tank is a bit different, I have metal stands on the outside of the tank for the bolts. Did you have those and removed them? You can see a little bit of what I am talking about in this picture.
Nah, its from the ECS video for the fastest stock short block C5.
03-23-2015, 01:30 PM
#44
Drifting
Thread Starter
Doug@ECS gave me a ring and will be working with me to find out what I am either doing wrong, or to find the cause if its not user error. Once we have a solution I will post up.
03-23-2015, 02:26 PM
#45
Melting Slicks
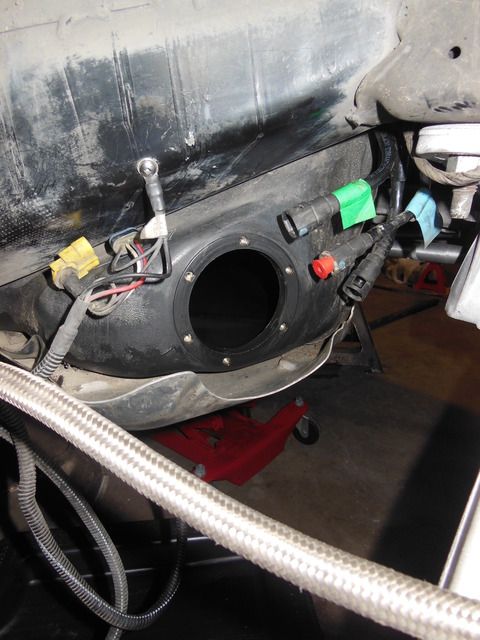
Here is a picture of my tank prior to installing everything.
 03-23-2015, 06:37 PM
#46
Safety Car


I tried the longer alignment studs/cutoff bolts and there wasnt enough room to twist and align everything. I threw the o-rings away as they wouldnt always stay in place and I used a factory gasket on each side of my 01 tank.
03-23-2015, 06:52 PM
#47
Le Mans Master

That works or glue the o'rings in place with thin layer of RTV
03-23-2015, 09:00 PM
#48
Race Director


Member Since: Dec 2010
Location: Atlanta, GA
Posts: 10,426
Received 1,261 Likes
on
1,056 Posts
2020 Corvette of the Year Finalist (performance mods)
C5 of Year Winner (performance mods) 2019

hmm, so basically half of the parts don't work very well so why not just tap the tank instead and build the rest of the system?
03-24-2015, 04:06 AM
#49

 03-24-2015, 11:27 AM
#50
Drifting
Thread Starter
I see what you mean regarding the tank. Mine seem to be a part of the tank. What year is your car? I guess you may not be able to follow what I said regarding bolt lengths. It still may be worthwhile to make some type or stud/alignment dowel.
Here is a picture of my tank prior to installing everything.
Here is a picture of my tank prior to installing everything.
03-25-2015, 03:26 PM
#51
Premium Supporting Vendor
Member Since: Oct 2004
Location: Providing the most proven supercharger kits for your C5/6/7 609-752-0321
Posts: 23,314
Received 1,085 Likes
on
656 Posts

Nullpointer, would you like me to make a video of one going together? It really is quick to install.
 03-25-2015, 03:35 PM
#52
Race Director
Member Since: May 2004
Location: Raleigh, NC
Posts: 16,664
Received 1,194 Likes
on
1,053 Posts
St. Jude Donor '15
03-25-2015, 03:35 PM
#53
EVER system leaks... ever one.. In fact.. this one has been tapped for over 7 years and its just about to leak..anytime..anytime...wait for it..wait for it!!!
03-25-2015, 03:42 PM
#54
Drifting
Thread Starter
Because drilling a plastic tank with pipe threads is half ***'d and dangerous. Every single one that ever came in here like that wept around the fitting and will never properly tighten.
Nullpointer, would you like me to make a video of one going together? It really is quick to install.
Nullpointer, would you like me to make a video of one going together? It really is quick to install.
03-25-2015, 04:26 PM
#56
Race Director
Member Since: Dec 2010
Location: Atlanta, GA
Posts: 10,426
Received 1,261 Likes
on
1,056 Posts
2020 Corvette of the Year Finalist (performance mods)
C5 of Year Winner (performance mods) 2019

 03-26-2015, 10:15 AM
#59
OP, if you want to just get rid of this part that does not work, post it up forsale and I will buy you a new bulk head fitting and ship it to your door for free just so you can have something that will work right on your car. Take care.
03-26-2015, 01:25 PM
#60
Melting Slicks
You've been waiting for 7 years to see if the fitting leaked? Why not go out and drive the car? There sure is a lot of dirt and grime around where the fitting attaches to the tank for a car that hasn't been driven much in 7 years. It appears that the fitting may actually be leaking. Why else would dirt be attracted to a smooth plastic tank?