C5 Forced Induction/Nitrous C5 Corvette Turbochargers, Superchargers, Centrifugal, Twin Screw & Roots Blowers, Twin Turbo Kits, Intercoolers, Wet & Dry Nitrous Injection, Meth
Sponsored by:
Sponsored by:

Kenne Bell Install Instructions Needed

Old 06-22-2015, 01:59 PM
  #41  
wildthingwood1994
Racer
Thread Starter
 
wildthingwood1994's Avatar
 
Member Since: Mar 2015
Location: Greenville South Carolina
Posts: 278
Likes: 0
Received 3 Likes on 3 Posts
Default

Originally Posted by NITRO UK


With the benefit of one less idler to squeak .

Would be a pleasure to pop over lol , work however says that ain't gonna happen at the mo, have been to Florida most Augusts for the last 20 years. Staying home this year though

That said , whatever problems you encounter just post it up or pm me I'll do my best to help ya


Cold beer does sound tempting lol
Appreciate it!
Old 06-22-2015, 11:45 PM
  #42  
umrjmac
Instructor
 
umrjmac's Avatar
 
Member Since: Mar 2009
Location: Lenexa KS
Posts: 173
Received 3 Likes on 3 Posts

Default

Originally Posted by NITRO UK
Hi this may be of interest if you didn't know about it , might not need the info but you might want to tinker at some point


When you do get around to changing the pulley just be aware the pulley bolt is a bit unique , think it had a hole drilled into it from the head right down and out the bottom to act as a breather.

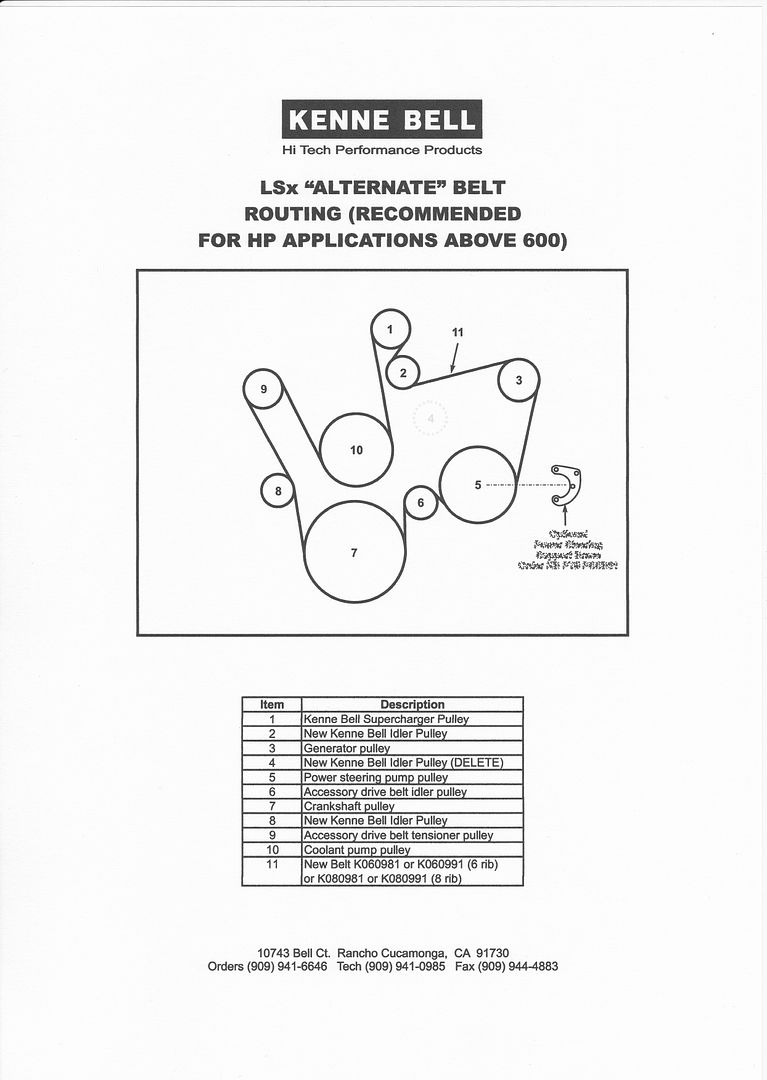
This is very cool to see. I hadn't seen this diagram before. Out of curiosity, what is the benefit of eliminating the idler and going with the shorter belt? There isn't a belt wrap on the SC pulley improvement, but maybe its reducing stress on the belt by eliminating 3 sharp turns?

Also, do you happen to know what that bracket is on the bottom right side of the diagram? I can't make out the text in the scan.

Thanks!
Old 06-23-2015, 01:48 AM
  #43  
Z06PSI
Team Owner

 
Z06PSI's Avatar
 
Member Since: May 2007
Location: In the woods so F%^$ O&&
Posts: 48,600
Received 245 Likes on 108 Posts
St. Jude Donor '17-'18-'19

Default

That's the power steering bracket on the inside of the larger bracket for the PS and Alternator.
Old 06-23-2015, 02:25 AM
  #44  
NITRO UK
Burning Brakes
 
NITRO UK's Avatar
 
Member Since: Sep 2006
Location: England United Kingdom
Posts: 936
Received 8 Likes on 8 Posts
Default

Thanks zo6 , yeah stock reinforcement bracket behind p/ steering pulley.

You would think it would be better going around number 4 , but if I remember correctly high boost it tossed the belt off the alternator pulley.

Old 06-23-2015, 09:44 AM
  #45  
wildthingwood1994
Racer
Thread Starter
 
wildthingwood1994's Avatar
 
Member Since: Mar 2015
Location: Greenville South Carolina
Posts: 278
Likes: 0
Received 3 Likes on 3 Posts
Default

I have a few pulleys with this kit I really don't need, is there a market on here or no?
Old 06-23-2015, 02:10 PM
  #46  
NITRO UK
Burning Brakes
 
NITRO UK's Avatar
 
Member Since: Sep 2006
Location: England United Kingdom
Posts: 936
Received 8 Likes on 8 Posts
Default

Pretty small , I would think they would be the same as Kb mustang pulleys
So you might get interest from those guys.
Old 06-23-2015, 03:43 PM
  #47  
wildthingwood1994
Racer
Thread Starter
 
wildthingwood1994's Avatar
 
Member Since: Mar 2015
Location: Greenville South Carolina
Posts: 278
Likes: 0
Received 3 Likes on 3 Posts
Default

Originally Posted by NITRO UK
Pretty small , I would think they would be the same as Kb mustang pulleys
So you might get interest from those guys.
What I thought.
Old 06-29-2015, 08:37 AM
  #48  
wildthingwood1994
Racer
Thread Starter
 
wildthingwood1994's Avatar
 
Member Since: Mar 2015
Location: Greenville South Carolina
Posts: 278
Likes: 0
Received 3 Likes on 3 Posts
Default

The kit calls for 732 sealant/gasket maker, can't find any in normal retail stores. Is there an equivalent that will work?
Old 06-29-2015, 01:26 PM
  #49  
NITRO UK
Burning Brakes
 
NITRO UK's Avatar
 
Member Since: Sep 2006
Location: England United Kingdom
Posts: 936
Received 8 Likes on 8 Posts
Default

URL=http://s110.photobucket.com/user/NITROTHECAT/media/White%20corvette%20ZO6/image.jpg1_zpsjqz6923q.jpg.html][/URL]

Works for me , autozone advanced auto parts .
Old 06-29-2015, 02:26 PM
  #50  
wildthingwood1994
Racer
Thread Starter
 
wildthingwood1994's Avatar
 
Member Since: Mar 2015
Location: Greenville South Carolina
Posts: 278
Likes: 0
Received 3 Likes on 3 Posts
Default

Originally Posted by NITRO UK
URL=http://s110.photobucket.com/user/NITROTHECAT/media/White%20corvette%20ZO6/image.jpg1_zpsjqz6923q.jpg.html][/URL]

Works for me , autozone advanced auto parts .
Thanks!
Old 06-30-2015, 11:09 AM
  #51  
umrjmac
Instructor
 
umrjmac's Avatar
 
Member Since: Mar 2009
Location: Lenexa KS
Posts: 173
Received 3 Likes on 3 Posts

Default

Originally Posted by wildthingwood1994
Thanks!
You can also call Kenne Bell and they will ship you a tube if you prefer that path. I bought one from them along with the square gasket between the LIM and boost bypass valve tube. If memory serves it was pretty inexpensive...more expensive than a generic tube of black RTV, but not bad.
Old 07-20-2015, 09:42 PM
  #52  
wildthingwood1994
Racer
Thread Starter
 
wildthingwood1994's Avatar
 
Member Since: Mar 2015
Location: Greenville South Carolina
Posts: 278
Likes: 0
Received 3 Likes on 3 Posts
Default

I don't have the crescent aligning tool for the idler bracket, how bad is it that I just held it flush and tightened it on? I have access to a laser alignment tool.
Old 07-21-2015, 02:09 AM
  #53  
NITRO UK
Burning Brakes
 
NITRO UK's Avatar
 
Member Since: Sep 2006
Location: England United Kingdom
Posts: 936
Received 8 Likes on 8 Posts
Default

Hi bud
Boy do I wish I had measured that tool, it's the kinda thing that is going to get lost.

Was there any marks on the blower snout where the bracket was positioned before??

I would try and check it if you can get a laser tool.
Old 07-21-2015, 07:27 AM
  #54  
wildthingwood1994
Racer
Thread Starter
 
wildthingwood1994's Avatar
 
Member Since: Mar 2015
Location: Greenville South Carolina
Posts: 278
Likes: 0
Received 3 Likes on 3 Posts
Default

Originally Posted by NITRO UK
Hi bud
Boy do I wish I had measured that tool, it's the kinda thing that is going to get lost.

Was there any marks on the blower snout where the bracket was positioned before??

I would try and check it if you can get a laser tool.
I'll have to look, I'm not really sure what I'm positioning, I mean it seems to just go on flush.
Old 07-21-2015, 12:48 PM
  #55  
NITRO UK
Burning Brakes
 
NITRO UK's Avatar
 
Member Since: Sep 2006
Location: England United Kingdom
Posts: 936
Received 8 Likes on 8 Posts
Default

Been a while, think it's to get the idlers belt contact surfaces parallel with pulleys, so belt doesn't ride off idlers like if there cocked.

See if the instructions tell you to tighten up that top snout bolt first then the lower ones, can't quite remember , would like to think there are some marks on the snout , that would be useful .

Also the idlers should have the belt contact patch , so maybe give it your best shot now and then see where the belt sits on the idler when running .

Old 07-21-2015, 04:23 PM
  #56  
wildthingwood1994
Racer
Thread Starter
 
wildthingwood1994's Avatar
 
Member Since: Mar 2015
Location: Greenville South Carolina
Posts: 278
Likes: 0
Received 3 Likes on 3 Posts
Default

Originally Posted by NITRO UK
Been a while, think it's to get the idlers belt contact surfaces parallel with pulleys, so belt doesn't ride off idlers like if there cocked.

See if the instructions tell you to tighten up that top snout bolt first then the lower ones, can't quite remember , would like to think there are some marks on the snout , that would be useful .

Also the idlers should have the belt contact patch , so maybe give it your best shot now and then see where the belt sits on the idler when running .

I'll look for marks which will hopefully get me close, obviously it's on a different car so tolerances will be a bit off.
Yes you do tighten the top snout bolt first. Hard to believe KB wouldn't have a tool laying around, I guess I could call but I know the answer I will get.
Old 07-22-2015, 02:31 AM
  #57  
NITRO UK
Burning Brakes
 
NITRO UK's Avatar
 
Member Since: Sep 2006
Location: England United Kingdom
Posts: 936
Received 8 Likes on 8 Posts
Default

I don't think it will be a problem, you would think kb would know the thickness of that tool if nothing else .

From memory around an inch, but that's a plain guess .

I have sent an email to the French guy that bought my car to see if he can measure the tool , not sure on getting a reply though.


Old 07-22-2015, 08:20 AM
  #58  
wildthingwood1994
Racer
Thread Starter
 
wildthingwood1994's Avatar
 
Member Since: Mar 2015
Location: Greenville South Carolina
Posts: 278
Likes: 0
Received 3 Likes on 3 Posts
Default

Originally Posted by NITRO UK
I don't think it will be a problem, you would think kb would know the thickness of that tool if nothing else .

From memory around an inch, but that's a plain guess .

I have sent an email to the French guy that bought my car to see if he can measure the tool , not sure on getting a reply though.


Awesome thanks.
Old 09-16-2021, 01:57 PM
  #59  
Twinscrw
1st Gear
 
Twinscrw's Avatar
 
Member Since: Sep 2021
Posts: 1
Likes: 0
Received 0 Likes on 0 Posts
Default Kenne bell for c5 instructions

Originally Posted by Z06PSI
I have it in two .pdf's. PM me your email.
I don’t have permission to pm you but I’m in desperate need of the kenne bell instructions for a 2004 c5. Can you help?
thanks


Thread Tools
Search this Thread
Quick Reply: Kenne Bell Install Instructions Needed


All times are GMT -4. The time now is 10:16 AM.