
Bend-Pak MD-6XP Scissor Lift – Install/Review – 20 Pics & Long (no 56K)
 08-28-2006, 01:25 AM
#1
Melting Slicks

Thread Starter
After many months of looking at mid-rise scissor lifts, I (and a lack of Norco distributors locally) decided to purchase a Bend-Pak MD-6XP.
I tried to buy this from www.asedeals.com, but their 'guaranteed lowest price' is B.S. - they go as low as they say they can, but won't price match if they don't like the margin. IMO -Don't buy from them.
I contacted a local distributor - www.bencostuff.com - and they were easy to buy from and have provided great service thus far.
Scissor 'or' 4 Post?
Not at all trying to get into this long-debated topic. I have a pretty good sized garage and don’t need the extra space of a 4-post lift at this time.
I wanted to be able to get under the C5, but also be able to get the wheels off quickly without additional bottle/air jacks that are commonly used with four-posters. I also thought that this type of lift would make wheel detailing or cleaning out the car a lot easier.
If I add another car to the stable, I will get a 4-post at that time.
Delivery and Install (Sorry No Pics)
When you have a truck with a hoist on the back, it makes short work of what would have been a real PIA for even a few guys. If you buy from an online company, be prepared to pay some extra for a lift-gate service to bring it down to ground level. At a minimum, you would want an engine lift capable of the 1300 lbs (with pallet/shipping materials) to move the lift into your garage and to remove the lift from the pallet.
I don’t have a hoist, so I decided to pay the $200 extra to have Benco deliver and set the lift up.
The setup of the lift was very simple:
The Lift
Paid $1550 for the lift (plus install/delivery mentioned above).
From what I could gather, the Bend-Pak is regarded very well vs many of the knock-off lifts out there.. Norco is alleged to be the best, but I honestly don’t know what could be more robust on this.. Mark and I will have to compare notes – he’s got the Norco 86002.
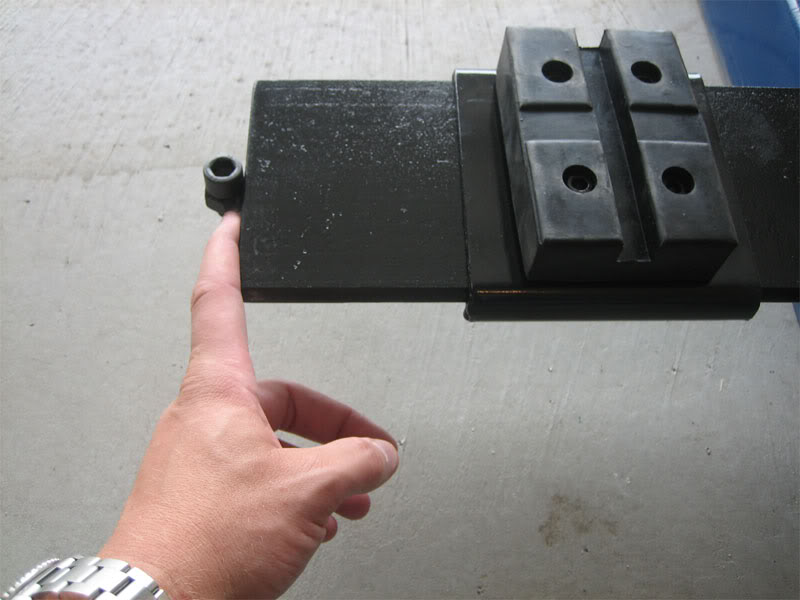
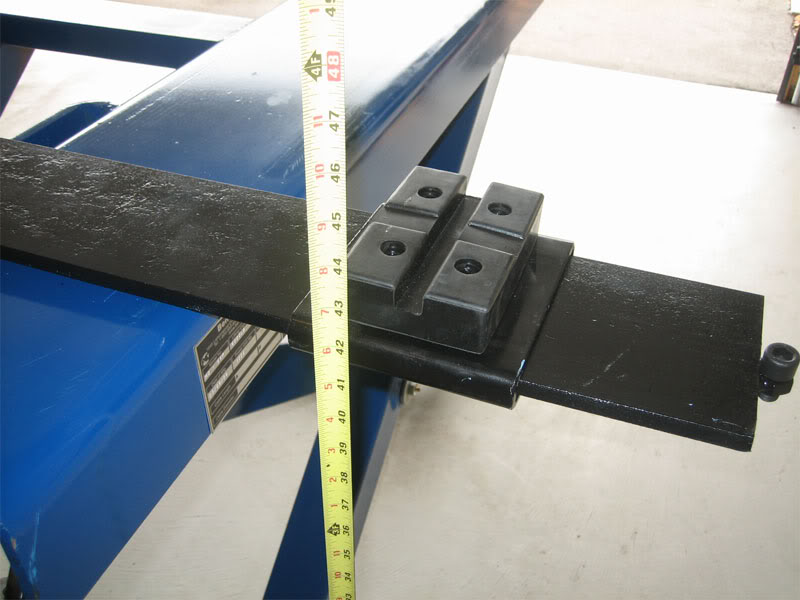
The lift comes with a base set of lift pads that are attached to a metal part that slides over the lift arm. It also comes standard with two riser plate sets that are handy if you’re lifting a vehicle that has exhaust or other things hanging below the jacking points. On a std. C5, this isn’t an issue as the bottom is virtually flat. I used my jacking pucks just because I had them, but the rubber lift pad is approximately 1” high and would do the job just fine.
Max lift height – on the the highest mechanical safety – puts the top of the base pad at about 43 inches. That’s essentially 44” from the bottom of the C5 to the floor – FYI in case you were tempted to add the 4 or so inches of ground clearance to the factory figure.
The minimum height listed by the factory with the pads installed is 4 ¾” – that is misleading because the safety mechanism and the hydraulic tubes are both higher than that – important because you may end up dragging your air dam over these parts. The highest ‘low’ point on the lift is the safety – 6.25” off the floor. Plan accordingly.
My car is lowered from stock about an inch due to the Bilstein sports. The quick math told me that my 4” of ground clearance would require a ramp system of at least 2.5 inches – made my decision to go with two 2x12’s stacked pretty easy. (More on the ramps later).
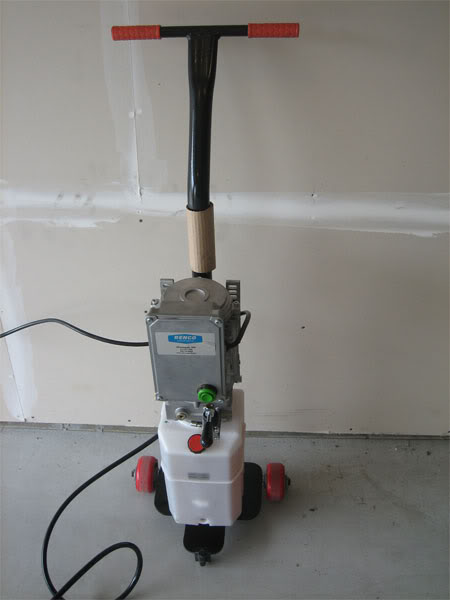
The lift handle has a little metal rod sticking up from it’s base plate. This cleverly allows the lift to be raised on one end (the end without the wheels – front on my pics) and move the lift around dragging it on the rear metal wheels. Note: This lift is powered at 110V.
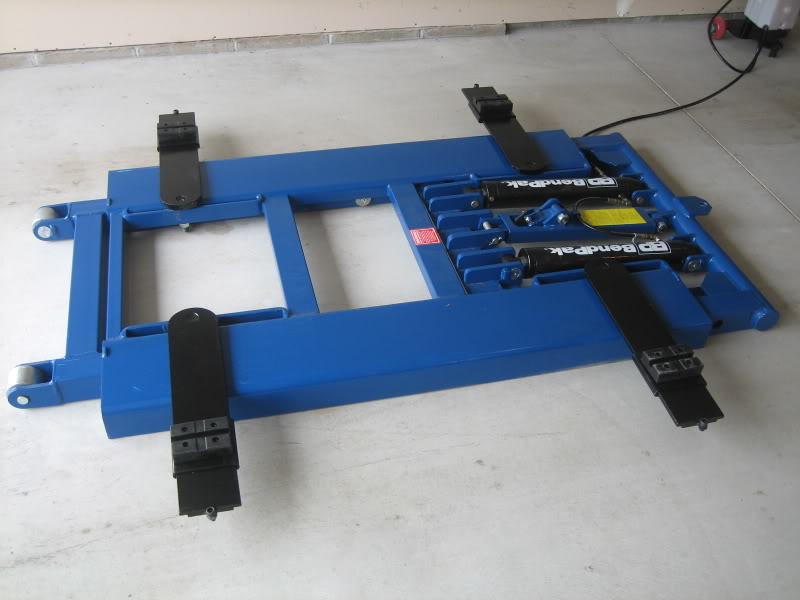
My thoughts when I first saw the lift were – ‘wow, this thing is really heavy-duty’. I knew it weighed 1200 lbs or so, but the size of the cylinders/lift arms and magnitude of the welds was very impressive. Looking at it, there was no doubting this could lift it’s rated capacity of 6000 lbs.
The lift is very well suited for the lifting points on the C5 – and the weight of the car is far below the capacity. I actually lifted my X5 4.4i up a couple of feet, but due to the arm extension’s being maxed out and the weight of the truck, I was not nearly as comfortable as I would like to have been.. I personally would NOT work under my SUV in this configuration. Unfortunately, there aren’t a lot of jacking point options on BMW – if you have another truck and can get the jacking points closer to the center of the lift, then you may be better off.
Lot’s of room underneath the C5 with my ramps to move the lift arms into position – you can remove the jacking pad assembly and fold the lift arms over the lift.
I opted for a neutral positioning of the C5 given it’s weight distribution.
It takes about 60 or so seconds to lift the car and about ½ of that if you’re in a hurry to get it down.
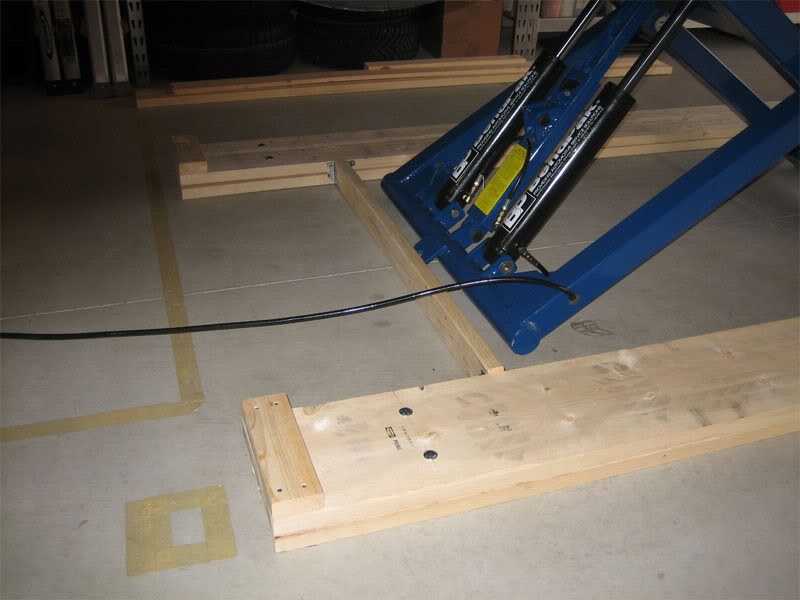
NOTE: the lift walks from the back – meaning the front of the lift doesn’t move. You’ll want to plan for that if you’re building ramps (and you will need ramps even with a stock height C5). I’ll cover this in more detail in a future ‘ramp thread’.
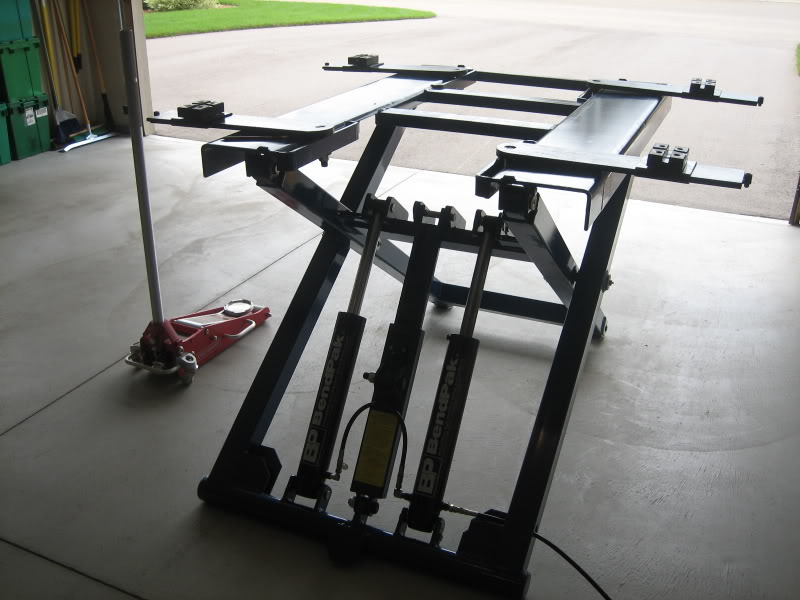
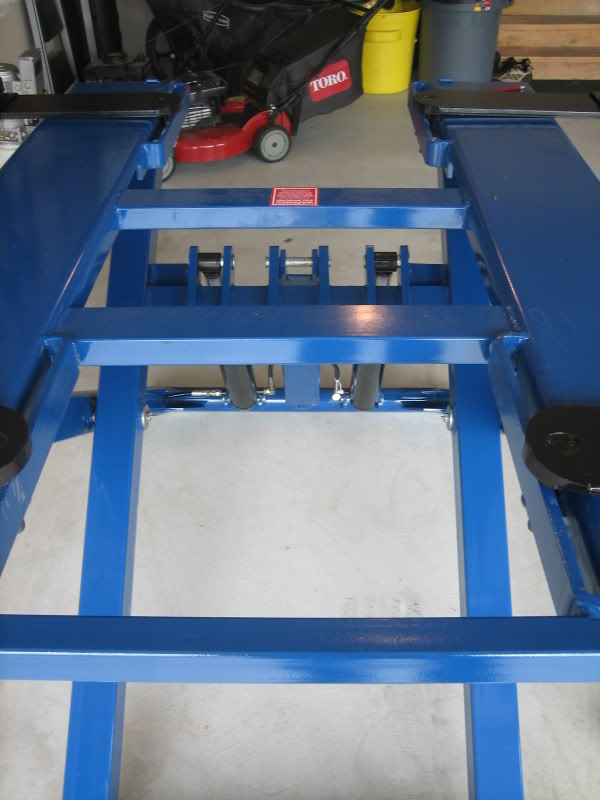
Lift after setup
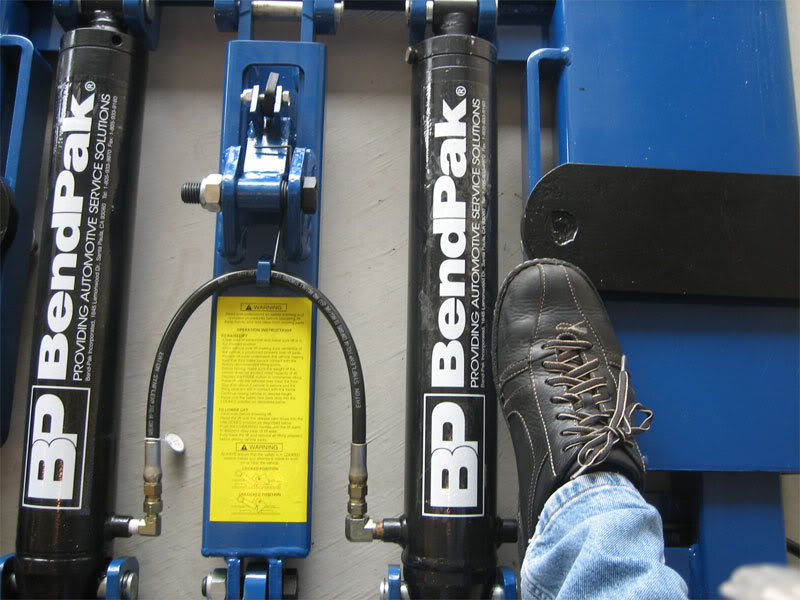
Lift hydraulic tubes – note my size 11 as reference
Lift welds closeup
Lift arms closeup – the lift arms are about ½ plate steel – note my fat finger for comparison
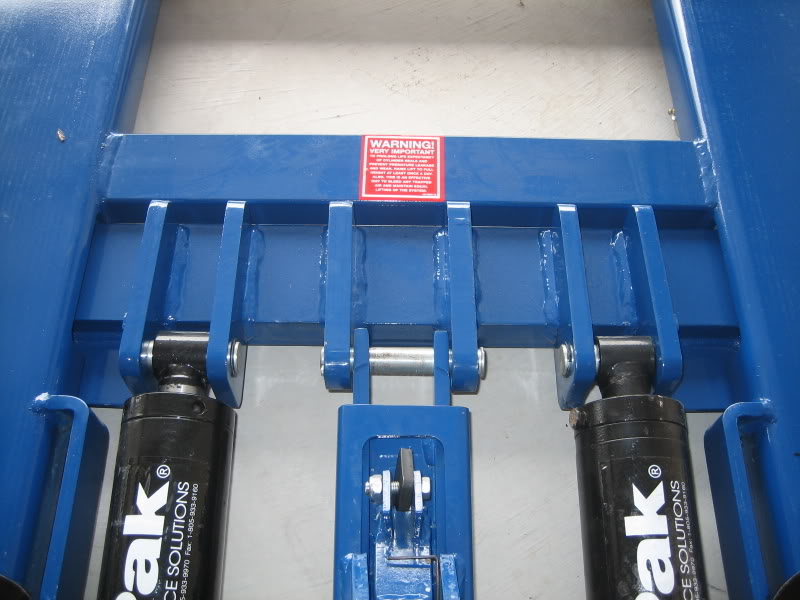
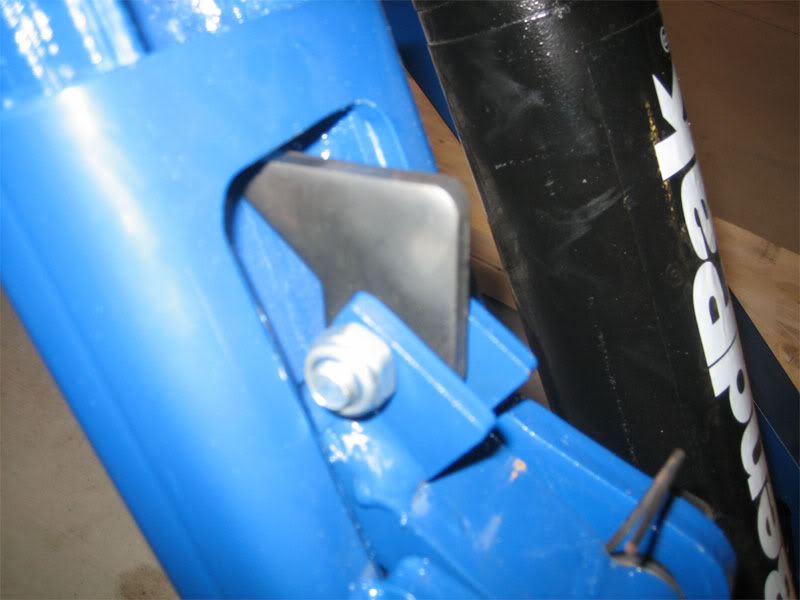
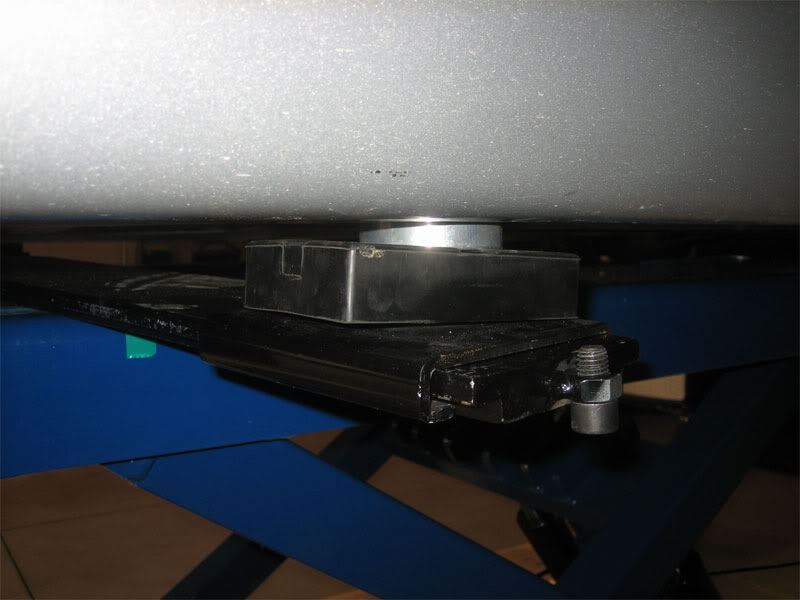
Lift safety – very clever two part design: The black finger and the blue safety catch. When you raise the lift, the black ‘finger’ ratchets the safety over the welded-in stops on the mechanical safety. If you want the lift to stop at a certain height, you lift just past the blue safety catch (before the finger comes down to over-ride the safety). Then just lower down on the mechanical. For me, I think I’ll plan to keep the hydraulics pumped up too along with the mechanical lock – when I’m under the car, more is more.
Lift opened
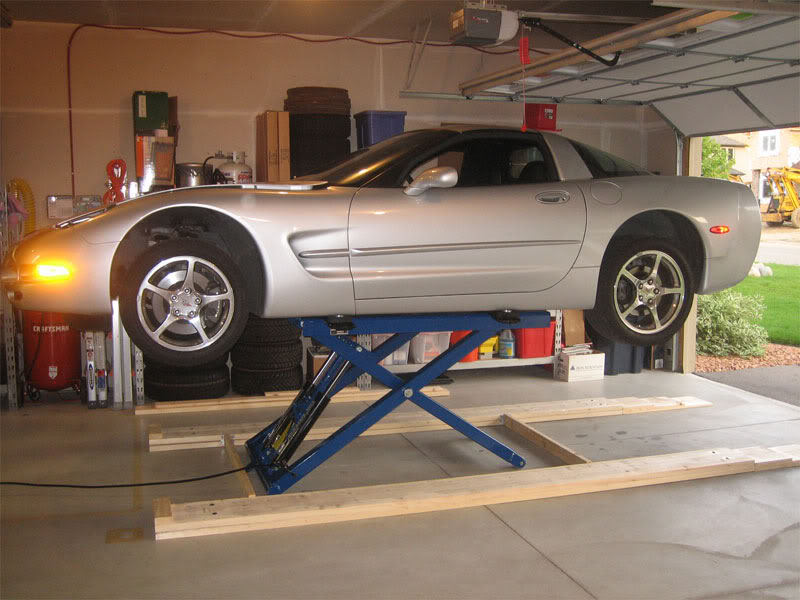
Lift max height on top mechanical safety
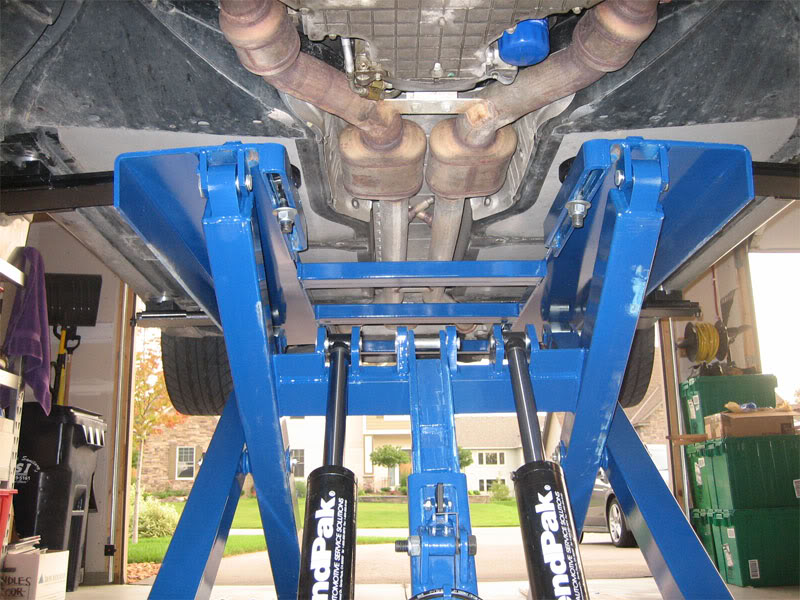
This lift has a lot of open space when elevated – two very big cavities and a very open front and rear – more it would seem than the Norco lift I was planning on getting.
There are more pics below from under my C5, but there shouldn’t be any access problems for most ‘home-grade’ work.
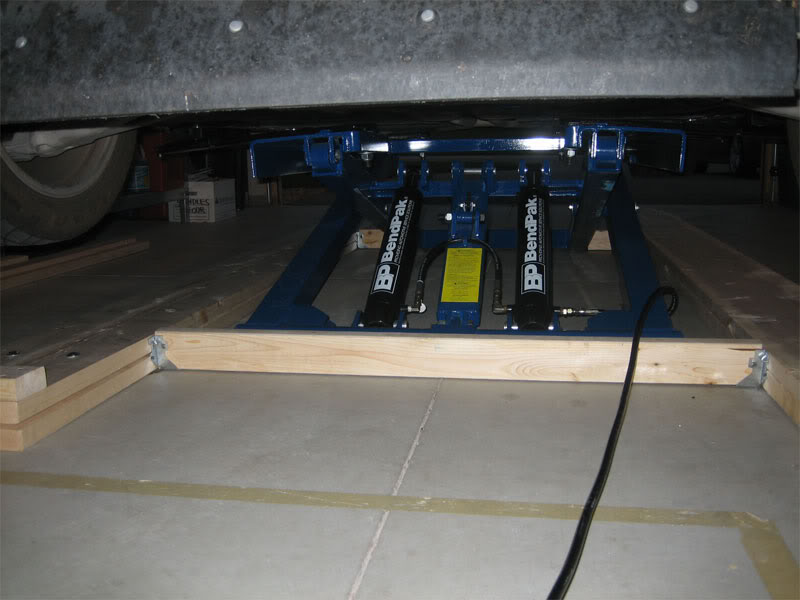
Lift lowered
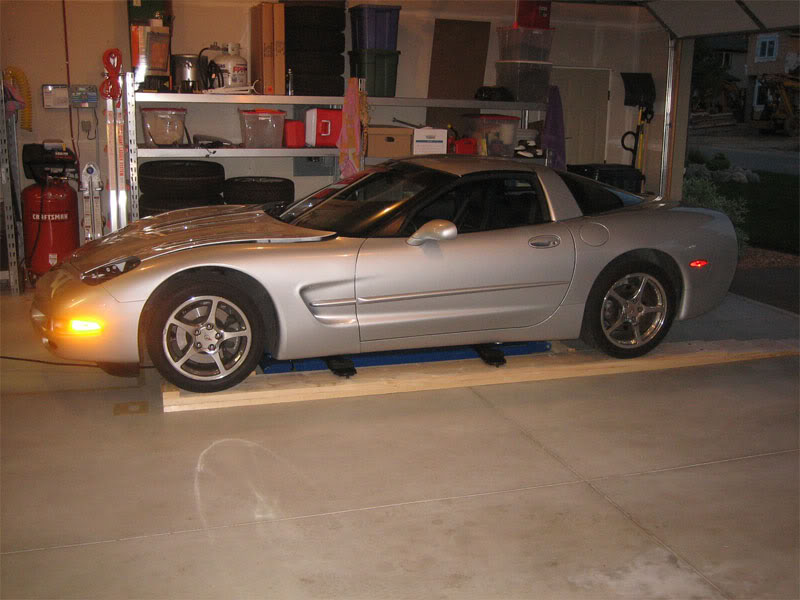
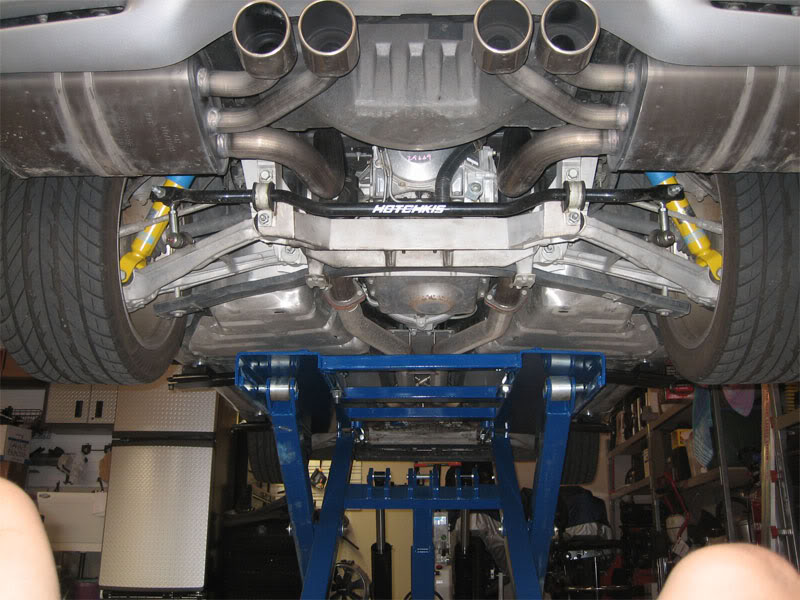
Lift at max height with my C5
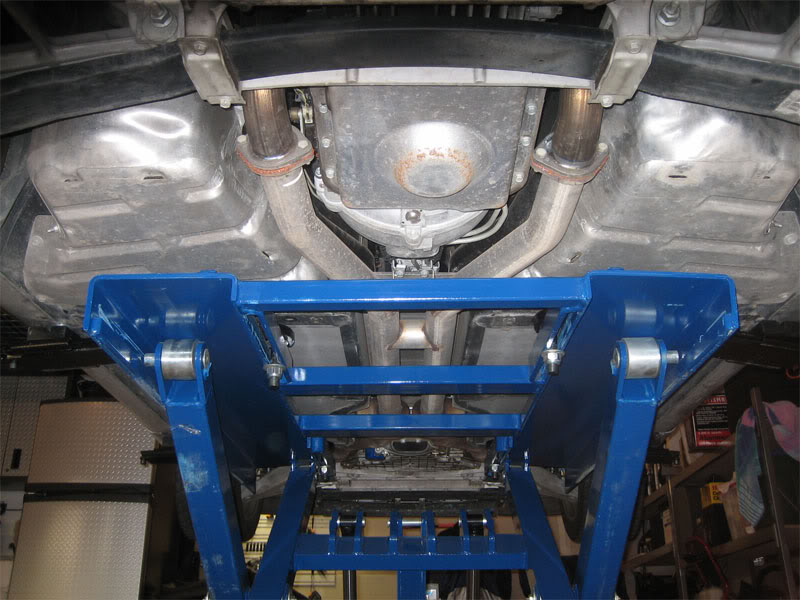
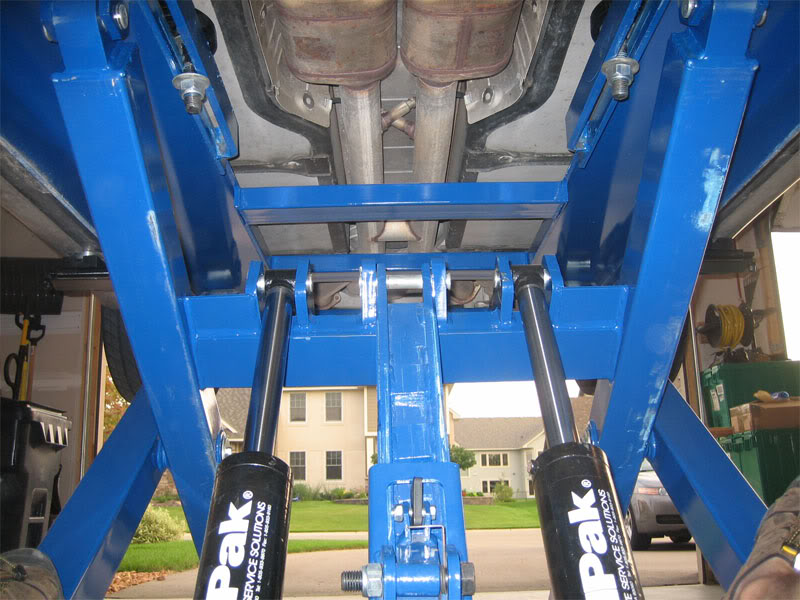
Back shots
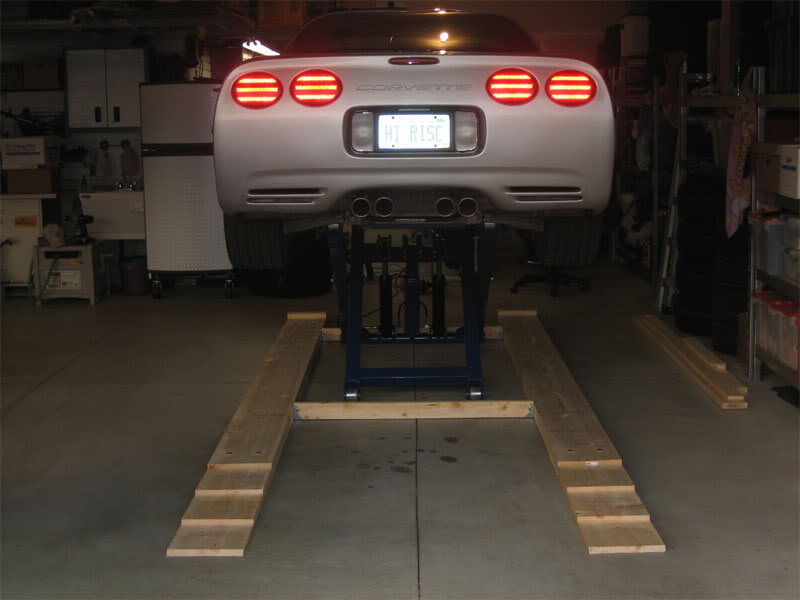

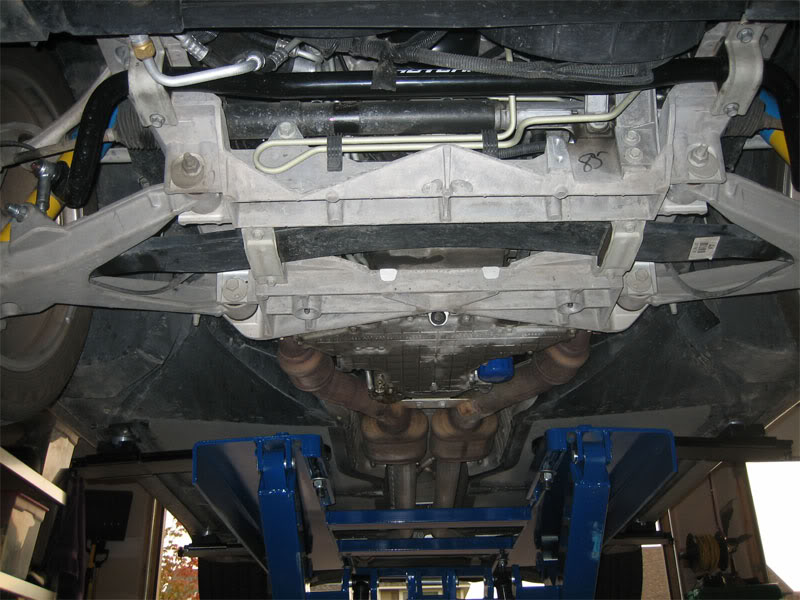
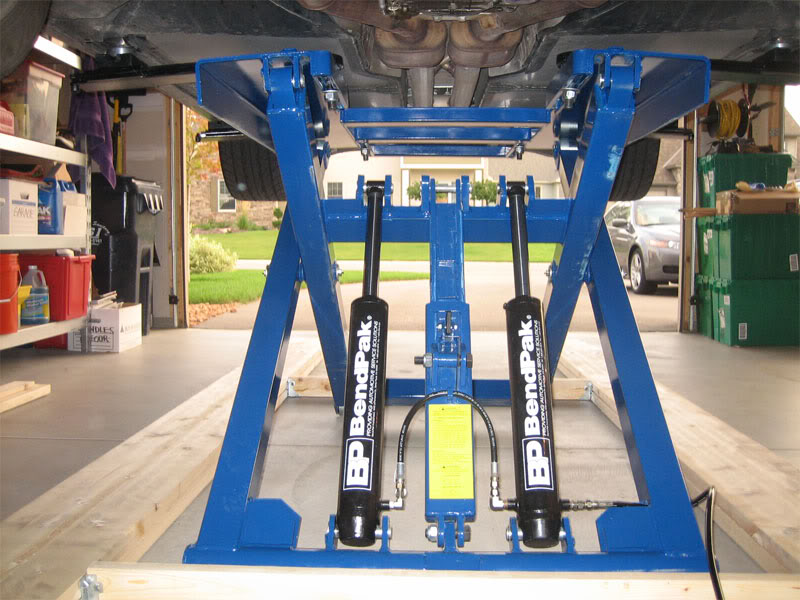
Front shots
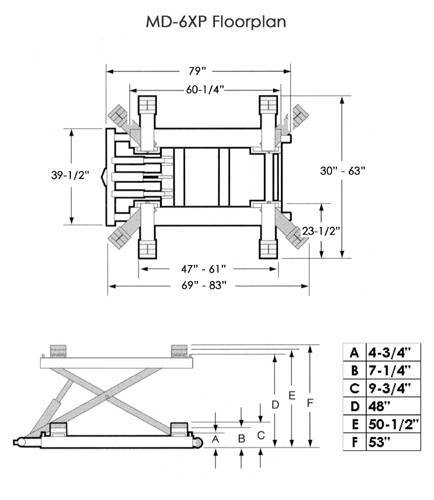
Lift floorplan:
It’s getting late, so I’ll post the photos/info/specs about my ramp setup in another thread and/or in an edit to this one. Update: Ramp info here.
If I can answer any questions about my lift, shoot me a PM and I’ll be happy to try and help.. Mark (Mark’s_C5TT) helped me out quite a bit, but I wasn’t really able to find out much online about the Bend-Pak version of the scissor lift.
All in all, I’m very impressed with the design, ruggedness and ease of use of this scissor lift. I’m looking forward to a whole new world of detailing and modding.

Chris
I tried to buy this from www.asedeals.com, but their 'guaranteed lowest price' is B.S. - they go as low as they say they can, but won't price match if they don't like the margin. IMO -Don't buy from them.
I contacted a local distributor - www.bencostuff.com - and they were easy to buy from and have provided great service thus far.
Scissor 'or' 4 Post?
Not at all trying to get into this long-debated topic. I have a pretty good sized garage and don’t need the extra space of a 4-post lift at this time.
I wanted to be able to get under the C5, but also be able to get the wheels off quickly without additional bottle/air jacks that are commonly used with four-posters. I also thought that this type of lift would make wheel detailing or cleaning out the car a lot easier.
If I add another car to the stable, I will get a 4-post at that time.
Delivery and Install (Sorry No Pics)
When you have a truck with a hoist on the back, it makes short work of what would have been a real PIA for even a few guys. If you buy from an online company, be prepared to pay some extra for a lift-gate service to bring it down to ground level. At a minimum, you would want an engine lift capable of the 1300 lbs (with pallet/shipping materials) to move the lift into your garage and to remove the lift from the pallet.
I don’t have a hoist, so I decided to pay the $200 extra to have Benco deliver and set the lift up.
The setup of the lift was very simple:
- Remove from pallet
- Unpack the arms/blocks/screws/pump mechanism
- Attach the hydraulic line from the lift to the pump mechanism
- Pour approx 1.75 gallons of hydraulic fluid into the pump mechanism
- Plug unit in and press the green button – cycle up and down 2 times.
The Lift
Paid $1550 for the lift (plus install/delivery mentioned above).
From what I could gather, the Bend-Pak is regarded very well vs many of the knock-off lifts out there.. Norco is alleged to be the best, but I honestly don’t know what could be more robust on this.. Mark and I will have to compare notes – he’s got the Norco 86002.
The lift comes with a base set of lift pads that are attached to a metal part that slides over the lift arm. It also comes standard with two riser plate sets that are handy if you’re lifting a vehicle that has exhaust or other things hanging below the jacking points. On a std. C5, this isn’t an issue as the bottom is virtually flat. I used my jacking pucks just because I had them, but the rubber lift pad is approximately 1” high and would do the job just fine.
Max lift height – on the the highest mechanical safety – puts the top of the base pad at about 43 inches. That’s essentially 44” from the bottom of the C5 to the floor – FYI in case you were tempted to add the 4 or so inches of ground clearance to the factory figure.
The minimum height listed by the factory with the pads installed is 4 ¾” – that is misleading because the safety mechanism and the hydraulic tubes are both higher than that – important because you may end up dragging your air dam over these parts. The highest ‘low’ point on the lift is the safety – 6.25” off the floor. Plan accordingly.
My car is lowered from stock about an inch due to the Bilstein sports. The quick math told me that my 4” of ground clearance would require a ramp system of at least 2.5 inches – made my decision to go with two 2x12’s stacked pretty easy. (More on the ramps later).
The lift handle has a little metal rod sticking up from it’s base plate. This cleverly allows the lift to be raised on one end (the end without the wheels – front on my pics) and move the lift around dragging it on the rear metal wheels. Note: This lift is powered at 110V.
My thoughts when I first saw the lift were – ‘wow, this thing is really heavy-duty’. I knew it weighed 1200 lbs or so, but the size of the cylinders/lift arms and magnitude of the welds was very impressive. Looking at it, there was no doubting this could lift it’s rated capacity of 6000 lbs.
The lift is very well suited for the lifting points on the C5 – and the weight of the car is far below the capacity. I actually lifted my X5 4.4i up a couple of feet, but due to the arm extension’s being maxed out and the weight of the truck, I was not nearly as comfortable as I would like to have been.. I personally would NOT work under my SUV in this configuration. Unfortunately, there aren’t a lot of jacking point options on BMW – if you have another truck and can get the jacking points closer to the center of the lift, then you may be better off.
Lot’s of room underneath the C5 with my ramps to move the lift arms into position – you can remove the jacking pad assembly and fold the lift arms over the lift.
I opted for a neutral positioning of the C5 given it’s weight distribution.
It takes about 60 or so seconds to lift the car and about ½ of that if you’re in a hurry to get it down.
NOTE: the lift walks from the back – meaning the front of the lift doesn’t move. You’ll want to plan for that if you’re building ramps (and you will need ramps even with a stock height C5). I’ll cover this in more detail in a future ‘ramp thread’.
Lift after setup
Lift hydraulic tubes – note my size 11 as reference
Lift welds closeup
Lift arms closeup – the lift arms are about ½ plate steel – note my fat finger for comparison
Lift safety – very clever two part design: The black finger and the blue safety catch. When you raise the lift, the black ‘finger’ ratchets the safety over the welded-in stops on the mechanical safety. If you want the lift to stop at a certain height, you lift just past the blue safety catch (before the finger comes down to over-ride the safety). Then just lower down on the mechanical. For me, I think I’ll plan to keep the hydraulics pumped up too along with the mechanical lock – when I’m under the car, more is more.
Lift opened
Lift max height on top mechanical safety
This lift has a lot of open space when elevated – two very big cavities and a very open front and rear – more it would seem than the Norco lift I was planning on getting.
There are more pics below from under my C5, but there shouldn’t be any access problems for most ‘home-grade’ work.
Lift lowered
Lift at max height with my C5
Back shots
Front shots
Lift floorplan:
It’s getting late, so I’ll post the photos/info/specs about my ramp setup in another thread and/or in an edit to this one. Update: Ramp info here.
If I can answer any questions about my lift, shoot me a PM and I’ll be happy to try and help.. Mark (Mark’s_C5TT) helped me out quite a bit, but I wasn’t really able to find out much online about the Bend-Pak version of the scissor lift.
All in all, I’m very impressed with the design, ruggedness and ease of use of this scissor lift. I’m looking forward to a whole new world of detailing and modding.
Chris
Last edited by HIRISC; 01-08-2007 at 08:47 AM. Reason: Added info on voltage.

The following users liked this post:
CMAvette (07-14-2016)
08-28-2006, 01:43 AM
#2
Melting Slicks

Nice photo's and write up!
Early this summer, I purchased a used Bend Pak model LR-60 lift. I've found for my Vette, it works perfect, excellent width spacing, etc, and it is REALLY nice to lift the Vette up and work on the doors, interior, etc w/o having to bend over
I haven't lifted many other vehicles w/ it, but I did notice that the frame on my FULL size pickup seems almost TOO narrow for my lift, and my '98 blazer was almost too WIDE for my lift
but it works - I think the quality is EXCELLENT, even though mine was used - I think you will like it.
08-28-2006, 10:21 AM
#3

Great Job Chris. The first time I saw a mid rise lift (The NORCO) was at a CF member's house 3 years ago and he had a simlar 3 step-level approach ramp setup to yours.
The BENDPAK looks great although I myself probably would have painted it Torch RED
I Definitely agree the 4 post lifts have their advantages as well but I too bought the midrise for the same reasons you list. It just makes it so much easier for access and as of yet there hasnt been anything that I havent been able to easily get too.
08-28-2006, 10:50 AM
#4
Originally Posted by HIRISC
.
From what I could gather, the Bend-Pak is regarded very well vs many of the knock-off lifts out there.. Norco is alleged to be the best, but I honestly don’t know what could be more robust on this.. Mark and I will have to compare notes – he’s got the Norco 86002.
From what I could gather, the Bend-Pak is regarded very well vs many of the knock-off lifts out there.. Norco is alleged to be the best, but I honestly don’t know what could be more robust on this.. Mark and I will have to compare notes – he’s got the Norco 86002.
The other clones you have to be carefull with, especially the cabling materials, steel casters vs cheap plastic ones, hydraulics etc. And the lifting arm dimensions of some of them fall a little short for the wide C5. They will still do the job but Ideally, The arms should be able to swing out pass the rockers and if they dont you may not be able to place the lifting pads under the jack lifting ponts or under the frame rails (like I have)
As you stated Chris, its a major PITA to get this thing in the garage if you dont have a hoist or forklift so you wanna make sure the lift you get does the trick. Once in the garage both are easy to move. I've had to move the NORCO forward a couple of times for perfect positioning under the car. I thinks its fair to say that the NORCO and BENDPAK are good solutions. I only regret not getting my Midrise lift 3 years ago when first saw it. It would have saved lot of time and back breaking work. I also would have learned my car much faster and would have discovered any problems quicker.
08-28-2006, 11:30 AM
#5
Racer


Member Since: Dec 2005
Location: bloomington Indiana
Posts: 321
Likes: 0
Received 3 Likes
on
3 Posts

Just as a general question........
Can you drop the rear cradle & transmission with this type of lift without the Vette dropping on it's nose? I'm not quite sure of the center of balance of a C5 supported on those pads if you're planning to R&R the rear end/tranny.
Just trying to keep anyone from getting into REAL trouble.
Can you drop the rear cradle & transmission with this type of lift without the Vette dropping on it's nose? I'm not quite sure of the center of balance of a C5 supported on those pads if you're planning to R&R the rear end/tranny.
Just trying to keep anyone from getting into REAL trouble.
 08-28-2006, 02:03 PM
#7
Originally Posted by bobc997615
Just as a general question........
Can you drop the rear cradle & transmission with this type of lift without the Vette dropping on it's nose? I'm not quite sure of the center of balance of a C5 supported on those pads if you're planning to R&R the rear end/tranny.
Just trying to keep anyone from getting into REAL trouble.
Can you drop the rear cradle & transmission with this type of lift without the Vette dropping on it's nose? I'm not quite sure of the center of balance of a C5 supported on those pads if you're planning to R&R the rear end/tranny.
Just trying to keep anyone from getting into REAL trouble.
Nevertheless, your question is an interesting one. But what does a Shop's 2 post lift do any differently to prevent the car from tipping over? And When i think about it, even if you could remove the tranny with a mide rise lift, the mid-rise lifts have more support underneath the car than the arms of 2-post so I dont think the car could possibly go anywhere. Ofcourse, I wont be the one to try my theory out to show that I am correct
08-28-2006, 02:21 PM
#8
Melting Slicks
Thread Starter

I think the limiting factor is the distance from the lift to the tube/tranny.. you can raise the car up by using the extension pad plates, but I personally wouldn't do it. 4 Post is much better suited to that kind of work.
Thanks again Mark for all the help/info - it was great to have!
I'll post something a bit shorter than this thread
 on the ramps if anyone is planning on making them.. I was 'this close' to ordering a custom built aluminum set to my spec's for $800, then decided that for about $700 less, I could live with wood. to mid-rise lift owners
Chris
08-28-2006, 02:28 PM
#9
Team Owner

Member Since: Mar 2001
Location: Virginia Beach
Posts: 25,889
Likes: 0
Received 5 Likes
on
5 Posts
CI 3-5-6-7-8 Veteran

Looks a bit unstable at full lift to me... like if I pushed on it laterally it might tip over because the base is narrow.
Looks great for cleaning up, wheel/tire/brake work and doing fluid changes.
If I were going to go the lift route I'd go all out though and get a good 4 post. They can be had for under $2000.
Looks great for cleaning up, wheel/tire/brake work and doing fluid changes.
If I were going to go the lift route I'd go all out though and get a good 4 post. They can be had for under $2000.
08-28-2006, 05:09 PM
#10
Melting Slicks
Thread Starter
Originally Posted by Cobra4B
Looks a bit unstable at full lift to me... like if I pushed on it laterally it might tip over because the base is narrow.
Looks great for cleaning up, wheel/tire/brake work and doing fluid changes.
If I were going to go the lift route I'd go all out though and get a good 4 post. They can be had for under $2000.
Looks great for cleaning up, wheel/tire/brake work and doing fluid changes.
If I were going to go the lift route I'd go all out though and get a good 4 post. They can be had for under $2000.
FWIW, it's a completely different lift than a 4 post for a completely different set of uses.. 4 posts are great for undercarriage work and storage - not so good (without a lot of monkey business) for getting the wheels/shocks/brakes worked on.
Optimally, one would have a four post and a scissor lift -
ps.. I would not recommend a sub-$2000 four post lift - IMO, they just aren't as safe as you'd want them to be with your car or your body.
Last edited by HIRISC; 08-28-2006 at 05:19 PM.
08-28-2006, 05:33 PM
#11
Originally Posted by Cobra4B
Looks a bit unstable at full lift to me... like if I pushed on it laterally it might tip over because the base is narrow.
 - no way.
  My car doesnt budge when its in the air and Ive actually leaned on the nose because I needed something to brace myself when I was on my step (The car approches a 4" step before its lifted)
Mid rise and low-rise lifts have been selling for years. I'm sure you can find an accident with even the most high tech lifts but leaning on the car and tipping it over wont be one of them
Last edited by GR8-LIFE; 08-28-2006 at 05:36 PM.
08-28-2006, 05:38 PM
#12
Originally Posted by HIRISC
I was 'this close' to ordering a custom built aluminum set to my spec's for $800, then decided that for about $700 less, I could live with wood.
Chris
Chris
08-29-2006, 01:57 AM
#13
Le Mans Master


Member Since: May 2001
Location: NoVA
Posts: 6,100
Likes: 0
Received 0 Likes
on
0 Posts

Very  . How easy is it to move around? Once it is installed, I'm assuming its not going anywhere since it it's around 1200 lbs? I'm strongly considering this lift but I would prefer to keep it on one side of my garage (2 car garage) when not in use but move it to the middle for extra work space. I'd prefer to do this without getting a friend or 3 to make this happen. What are the odds I can do this?
Looks good either way!
. How easy is it to move around? Once it is installed, I'm assuming its not going anywhere since it it's around 1200 lbs? I'm strongly considering this lift but I would prefer to keep it on one side of my garage (2 car garage) when not in use but move it to the middle for extra work space. I'd prefer to do this without getting a friend or 3 to make this happen. What are the odds I can do this?Looks good either way!
08-29-2006, 06:57 AM
#14
Administrator


Member Since: Mar 2001
Location: In a parallel universe. Currently own 2014 Stingray Coupe.
Posts: 342,660
Received 19,207 Likes
on
13,924 Posts
C7 of the Year - Modified Finalist 2021
MO Events Coordinator
St. Jude Co-Organizer
St. Jude Donor '03-'04-'05-'06-'07-'08-'09-'10-'11-'12-'13-'14-'15-'16-'17-'18-'19-
'20-'21-'22-'23-'24
NCM Sinkhole Donor
CI 5, 8 & 11 Veteran

Excellent write up. Looks like a very good lift and something I'll have to consider down the road.
08-29-2006, 07:30 AM
#15
Melting Slicks
Thread Starter
Originally Posted by steveC5
Very . How easy is it to move around? Once it is installed, I'm assuming its not going anywhere since it it's around 1200 lbs? I'm strongly considering this lift but I would prefer to keep it on one side of my garage (2 car garage) when not in use but move it to the middle for extra work space I'd prefer to do this without getting a friend or 3 to make this happen. What are the odds I can do this?
Looks good either way!
. How easy is it to move around? Once it is installed, I'm assuming its not going anywhere since it it's around 1200 lbs? I'm strongly considering this lift but I would prefer to keep it on one side of my garage (2 car garage) when not in use but move it to the middle for extra work space I'd prefer to do this without getting a friend or 3 to make this happen. What are the odds I can do this?Looks good either way!
I had it on the far left of my garage when I first built the ramps around it (because the Vette was sitting in it's current location). When I finished the ramp setup, I took it down to its components (8 with the stepped ramps), then hooked the trolly/pump assembly to the front of the ramp, lifted the front end (the no-wheel end) and pulled it over to the other side. I wouldn't want to move it everyday, but moving it on occassion shouldn't be a problem for you at all.
The lift is very, very stable.. The mobility part of the lift is a by-product of it needing wheels on the 'bottom' of the lift that allow it to walk up as the scissor part of the lift moves up. Pretty cool design.
With a Vette of any vintage, I would not personally have any trouble sitting under it for an extended period of time.
08-29-2006, 07:31 AM
#16
Melting Slicks
Thread Starter
Originally Posted by JDs00PewterCoupe
Excellent write up. Looks like a very good lift and something I'll have to consider down the road.
08-29-2006, 08:18 AM
#18
Team Owner
Member Since: Feb 2003
Location: Plano Texas
Posts: 37,329
Likes: 0
Received 12 Likes
on
8 Posts
CI 6-7-8-9 Veteran
CI-VI Car Show Winner
St. Jude Donor '07-'08-'09-'10-'11-'12-'13
Originally Posted by Cobra4B
Looks a bit unstable at full lift to me... like if I pushed on it laterally it might tip over because the base is narrow.
Looks great for cleaning up, wheel/tire/brake work and doing fluid changes.
If I were going to go the lift route I'd go all out though and get a good 4 post. They can be had for under $2000.
Looks great for cleaning up, wheel/tire/brake work and doing fluid changes.
If I were going to go the lift route I'd go all out though and get a good 4 post. They can be had for under $2000.
A 4 post for $2K?
Where?
Made in ........?
Company History?
08-29-2006, 09:43 AM
#19
Originally Posted by steveC5
Very . How easy is it to move around? Once it is installed, I'm assuming its not going anywhere since it it's around 1200 lbs? I'm strongly considering this lift but I would prefer to keep it on one side of my garage (2 car garage) when not in use but move it to the middle for extra work space. I'd prefer to do this without getting a friend or 3 to make this happen. What are the odds I can do this?
. How easy is it to move around? Once it is installed, I'm assuming its not going anywhere since it it's around 1200 lbs? I'm strongly considering this lift but I would prefer to keep it on one side of my garage (2 car garage) when not in use but move it to the middle for extra work space. I'd prefer to do this without getting a friend or 3 to make this happen. What are the odds I can do this?
08-29-2006, 03:38 PM
#20
Melting Slicks
Thread Starter
Originally Posted by MARK's_C5TT
I'm assuming Chris's Bendpak is similar but my NORCO has a clever portable technique. The Central station hooks into the loop on the lift making it mobile. I have a weak lower back due to neuroloical deficit so I asked my neighbor to move it for me but he did it himself without any help

