
Gentex Homelink Mirror Install Writeup [Pics, long]
 01-08-2007, 04:38 AM
#1
Night Owl for life

Thread Starter
Member Since: Nov 2003
Location: Bugs Bunny should'a made a left turn here
Posts: 23,200
Received 3,247 Likes
on
1,668 Posts

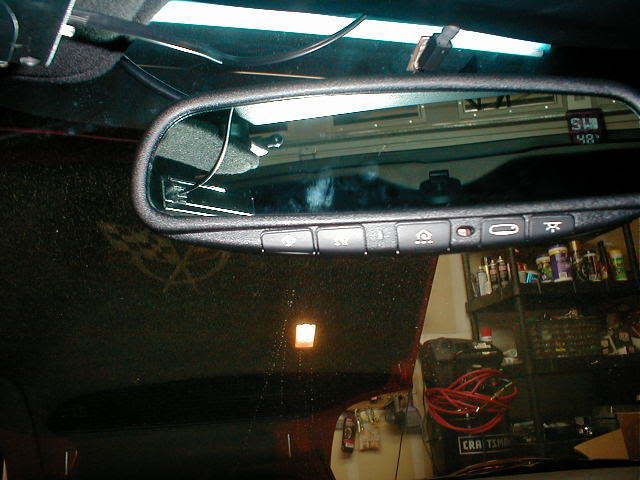
I have had my eye on this mirror for a while. It has auto dimming, map lights, temperature, compass and the major item: Homelink. The model is 50-GENK60.
A few weeks ago I had ordered an OEM auto dimming mirror to replace my regular one. I was having issues getting it wired correctly which turned out to be my own fault. That mirror worked fine once I figured out what I did wrong. (That mirror will be up for sale soon, with harness and instructions, BTW)
While I was fumbling with that mirror I came across a website that had this mirror for the cheapest price I've seen yet. It wasn't eBay, BTW but if anyone wants to know where I got it from, feel free to ask.
Even at the price I paid, the mirror is still damn pricy, so it's not for the feint of heart, but oh well...just about everything that is what you really want ends up being expensive, right?
The mirror comes with about 5 miles of wiring. It was a little intimidating at first because I wanted to use the stock wiring but I ended up using the full harness after calling Gentex.
I had to call them because the instructions that came with my mirror seemed incomplete. After speaking with a technician, we both learned that the girl who is responsible for packing the instructions was packing the wrong set. He directed me to a website that I could get the correct ones, so I printed them out and all was good.
The install instructions can be found here:
http://www.aaaremotes.com/homelinkmirrorinst.html
Installation:
The first part of the wiring harness connects to a 10-pin connector. This connector is way too wide to fit under the headliner and the mirror only uses 7 of the wires. I cut the un-needed portion off with a hacksaw and I was able to shove it underneath the headliner. I routed the wires to the passenger side of the car, went around the visor slit, and down the outside of the pillar. From there I went underneath to the fuse area in the passenger footwell.
Temperature wiring:
There are two green wires for the temperature. I placed the temp probe near the fog light area. This location is away from the engine heat and very near the stock temp probe location. It just needs to be away from any car generated heat sources. I ran the rest of the wiring up to the battery area.
Power wiring:
I fed all the wiring thru the grommet under the passenger footwell. I pulled the grommet into the passenger compartment and sliced the electrical tape to give more room to work.
There is a brown wire. (This controls the map lights). I spliced this wire into the orange wire that connects to the small footwell light just under the glove box. I had to splice a long wire to run this wire back into the passenger compartment because the brown wire is short and ends up in the battery compartment with the rest of the wiring. The brown wire is also connected to the little black box.
There is a yellow wire that connects to the battery. (This is for the Homelink to be powered at all times).
There is a red wire that is to be powered on with the ignition. I tapped into the fan3 fuse in the underhood fuse box. (This is so the compass and temp display turn off with the car).
Finally, there is a black ground wire.
Operation:
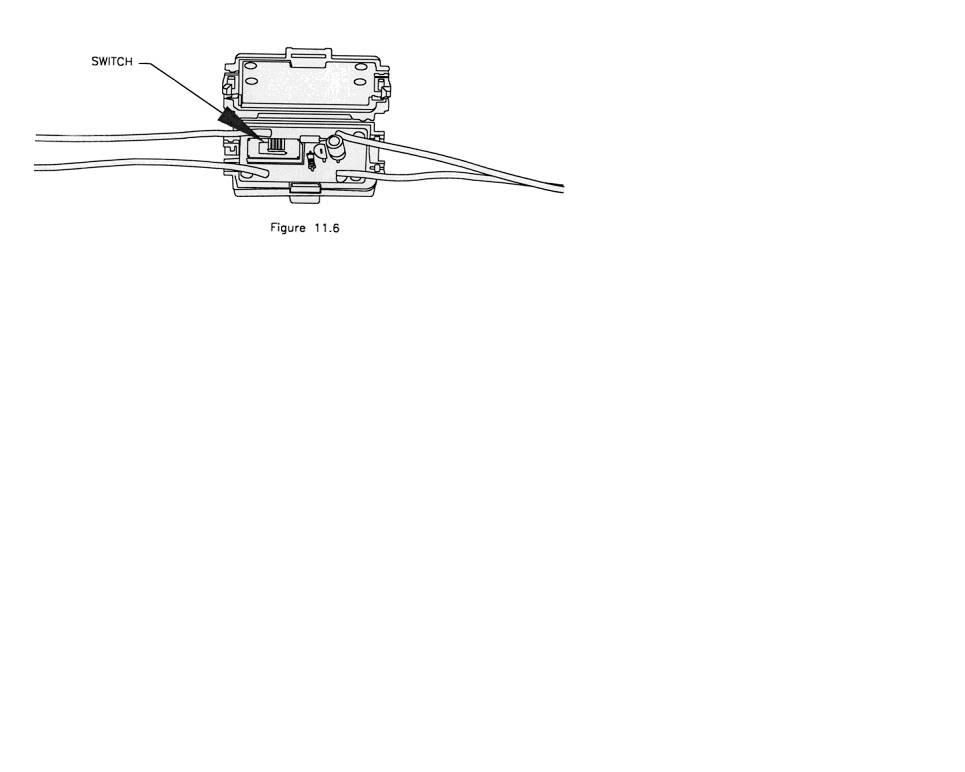
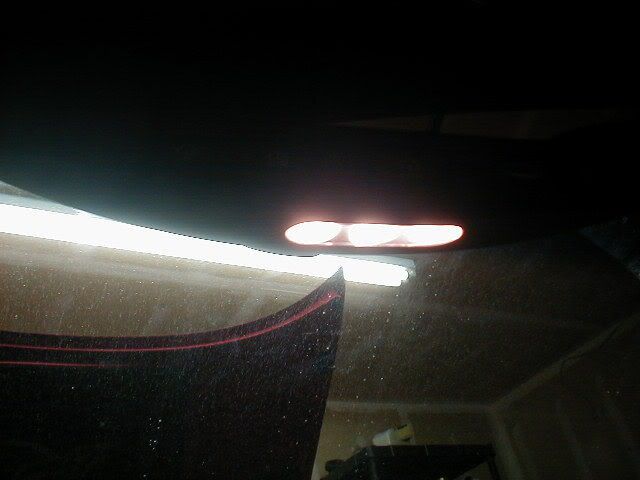
When all is wired up, you need to make sure the map lights are functioning correctly, so open the door and if the lights are working with the rest of the interior lights, you're good to go. If they are not, you have to pop the lid off of the little black box and slide the switch the other way. The map lights work exactly as stock did, coming on with the door switch and with the interior turn-on dial.
This is what the large black switch box looks like.
When turned on, the temp of the mirror showed a 1* difference from the temp on the climate control, but that's no big deal.
That's about all you need to do with the wiring. The programming of the compass and the Homelink are covered in the instructions. I got my garage button to work within a few minutes.
The compass will either auto-calibrate itself with an hour of driving, or it can be calibrated manually by pressing a sequence of buttons and driving in a circle 3 times.
The install may sound short and sweet, but it took me quite a few hours to complete. In the end, however, I am very pleased with the final results.
Map Lights:
If anyone needs help with this particular mirror in the future, give me a shout.
Jason

A few weeks ago I had ordered an OEM auto dimming mirror to replace my regular one. I was having issues getting it wired correctly which turned out to be my own fault. That mirror worked fine once I figured out what I did wrong. (That mirror will be up for sale soon, with harness and instructions, BTW)
While I was fumbling with that mirror I came across a website that had this mirror for the cheapest price I've seen yet. It wasn't eBay, BTW but if anyone wants to know where I got it from, feel free to ask.
Even at the price I paid, the mirror is still damn pricy, so it's not for the feint of heart, but oh well...just about everything that is what you really want ends up being expensive, right?
The mirror comes with about 5 miles of wiring. It was a little intimidating at first because I wanted to use the stock wiring but I ended up using the full harness after calling Gentex.
I had to call them because the instructions that came with my mirror seemed incomplete. After speaking with a technician, we both learned that the girl who is responsible for packing the instructions was packing the wrong set. He directed me to a website that I could get the correct ones, so I printed them out and all was good.
The install instructions can be found here:
http://www.aaaremotes.com/homelinkmirrorinst.html
Installation:
The first part of the wiring harness connects to a 10-pin connector. This connector is way too wide to fit under the headliner and the mirror only uses 7 of the wires. I cut the un-needed portion off with a hacksaw and I was able to shove it underneath the headliner. I routed the wires to the passenger side of the car, went around the visor slit, and down the outside of the pillar. From there I went underneath to the fuse area in the passenger footwell.
Temperature wiring:
There are two green wires for the temperature. I placed the temp probe near the fog light area. This location is away from the engine heat and very near the stock temp probe location. It just needs to be away from any car generated heat sources. I ran the rest of the wiring up to the battery area.
Power wiring:
I fed all the wiring thru the grommet under the passenger footwell. I pulled the grommet into the passenger compartment and sliced the electrical tape to give more room to work.
There is a brown wire. (This controls the map lights). I spliced this wire into the orange wire that connects to the small footwell light just under the glove box. I had to splice a long wire to run this wire back into the passenger compartment because the brown wire is short and ends up in the battery compartment with the rest of the wiring. The brown wire is also connected to the little black box.
There is a yellow wire that connects to the battery. (This is for the Homelink to be powered at all times).
There is a red wire that is to be powered on with the ignition. I tapped into the fan3 fuse in the underhood fuse box. (This is so the compass and temp display turn off with the car).
Finally, there is a black ground wire.
Operation:
When all is wired up, you need to make sure the map lights are functioning correctly, so open the door and if the lights are working with the rest of the interior lights, you're good to go. If they are not, you have to pop the lid off of the little black box and slide the switch the other way. The map lights work exactly as stock did, coming on with the door switch and with the interior turn-on dial.
This is what the large black switch box looks like.
When turned on, the temp of the mirror showed a 1* difference from the temp on the climate control, but that's no big deal.
That's about all you need to do with the wiring. The programming of the compass and the Homelink are covered in the instructions. I got my garage button to work within a few minutes.
The compass will either auto-calibrate itself with an hour of driving, or it can be calibrated manually by pressing a sequence of buttons and driving in a circle 3 times.
The install may sound short and sweet, but it took me quite a few hours to complete. In the end, however, I am very pleased with the final results.
Map Lights:
If anyone needs help with this particular mirror in the future, give me a shout.
Jason
Last edited by jdmvette; 02-19-2011 at 04:48 AM.


 01-08-2007, 06:22 AM
#4
Le Mans Master


Member Since: Mar 2002
Location: Mississauga, Ontario Corvettes were built to be driven...not trailered
Posts: 5,300
Likes: 0
Received 2 Likes
on
1 Post
St Jude Donor '07-'08-'09

Looks good J...thanks for the writeup. You mentioned "homnelink" in your title...can it be programmed to operate the garage door opener?
01-08-2007, 08:14 AM
#5
Night Owl for life
Thread Starter
Member Since: Nov 2003
Location: Bugs Bunny should'a made a left turn here
Posts: 23,200
Received 3,247 Likes
on
1,668 Posts
this mirror has 3 buttons for operating at 3 different places. i have my house programmed on the first button, i will program my mother's house on the 2nd button, and i will program my grandparent's gate on my 3rd button.
it's the same thing as the homelink mod you can get for your visor, just all integrated in one.
01-08-2007, 08:20 AM
#6
Pro

Member Since: Jun 2003
Location: DFW TX
Posts: 669
Likes: 0
Received 0 Likes
on
0 Posts
St. Jude Donor '08-'09

I've been looking at getting one of those for about 6-8 months now, I just couldnt bite on the price, the cheapest I found that mirror was $349. what did you get it for and where? I hate the cheap hack job look of the homelink visor, and IIRC that has the LED map lights, that I wanted like the Z06.
Thanks
Patrick
Thanks
Patrick
01-08-2007, 08:37 AM
#7
Night Owl for life
Thread Starter
Member Since: Nov 2003
Location: Bugs Bunny should'a made a left turn here
Posts: 23,200
Received 3,247 Likes
on
1,668 Posts
that's actually a better price than what i paid. my price was $379 shipped. -edit: this is where i got it from: http://electronics-pluz.stores.yahoo...umiwicoot.html
the way i broke it down was this:
coming from a plain mirror to an -01 and up electrochromatic mirror with a new wiring harness cost 179.
then the homelink visor mod was about the same with a full new visor replacement.
add them together and they cost about what this single mirror costs but without the extra features of the mirror (temp, compass, integration).
those of you with the EC mirror already could probably just go with the visor mod to get the homelink, but for those w/o the EC mirror who want it all, this is a nice package.
Last edited by jdmvette; 01-08-2007 at 08:40 AM.
 01-08-2007, 08:47 AM
#9
Drifting


Nice write up on the mirror and installation. Question, even with all the additional features of the new mirror, does it have the small yellow LED that illuminates the shifter area?
01-08-2007, 09:01 AM
#10
Administrator
Member Since: Mar 2001
Location: In a parallel universe. Currently own 2014 Stingray Coupe.
Posts: 342,917
Received 19,289 Likes
on
13,964 Posts
C7 of the Year - Modified Finalist 2021
MO Events Coordinator
St. Jude Co-Organizer
St. Jude Donor '03-'04-'05-'06-'07-'08-'09-'10-'11-'12-'13-'14-'15-'16-'17-'18-'19-
'20-'21-'22-'23-'24
NCM Sinkhole Donor
CI 5, 8 & 11 Veteran

Nice write-up - thanks for sharing your install experience with us. Very  mod you did.
mod you did.
01-08-2007, 09:22 AM
#11
Safety Car

Nice write up Jason. I see they have improved it since I bought and installed mine 3 years ago. Mine doesn't have constant power to the Homelinks. Good change, that's the ONLY thing I dislike about the unit, not being able to open the garage doors without having the key on.
01-08-2007, 09:58 AM
#12
Team Owner

Member Since: Mar 2004
Location: Oklahoma City OK
Posts: 58,259
Received 1,675 Likes
on
1,298 Posts
C6 of Year Finalist (appearance mods) 2019
That's a nice mod! Good job.
01-08-2007, 10:23 AM
#13
Night Owl for life
Thread Starter
Member Since: Nov 2003
Location: Bugs Bunny should'a made a left turn here
Posts: 23,200
Received 3,247 Likes
on
1,668 Posts
01-08-2007, 10:24 AM
#14
Night Owl for life
Thread Starter
Member Since: Nov 2003
Location: Bugs Bunny should'a made a left turn here
Posts: 23,200
Received 3,247 Likes
on
1,668 Posts
01-08-2007, 10:36 AM
#15
Le Mans Master
Super write-up as usual Jason  Considering the cars we drive, I don't think the price is bad at all
Considering the cars we drive, I don't think the price is bad at all
01-08-2007, 10:51 AM
#16
Team Owner

Nice write up, thanks for the info. I looked into this a while back and I would only do if it was plug and play. There were some issues going on about an adapter that would allow this. I have the EC mirror already, I wanted it for the compass and home link, I have the outside temp already on my CC display. I now I have a portable GPS I use so I don�t need the compass. The only thing I like is the home link but I can just get the upgraded visor for that.
01-08-2007, 11:41 AM
#18
Night Owl for life
Thread Starter
Member Since: Nov 2003
Location: Bugs Bunny should'a made a left turn here
Posts: 23,200
Received 3,247 Likes
on
1,668 Posts
i figured i'd do a whole writeup as opposed to just posting the 2 pics since i just completed the install and all the directions are still fresh in my mind.
ask me how to install this thing in 6 months and i'll be like

 01-08-2007, 12:35 PM
#19
Melting Slicks

01-08-2007, 01:55 PM
#20
Le Mans Master
Member Since: Dec 2005
Location: "This is not a psychotic episode, but a cleansing moment of clarity."
Posts: 6,420
Likes: 0
Received 4 Likes
on
4 Posts
Great write up. I had strongly considered that mirror because I really wanted homelink in a bad way and thought that this mirror was awesome. But I was intimidated by the installation process and your post assures me that I made the right decision -- for me -- by simply buying a Vettmods Homelink visor. I already have electrochromatic mirrors and was also concerned that the door mirror might no longer dim with the new Gentex mirror, so I just decided to leave well enough alone. If I would have had a '97-'00 'Vette without the dimming option already, I would have done the same thing you did.
I had strongly considered that mirror because I really wanted homelink in a bad way and thought that this mirror was awesome. But I was intimidated by the installation process and your post assures me that I made the right decision -- for me -- by simply buying a Vettmods Homelink visor. I already have electrochromatic mirrors and was also concerned that the door mirror might no longer dim with the new Gentex mirror, so I just decided to leave well enough alone. If I would have had a '97-'00 'Vette without the dimming option already, I would have done the same thing you did.