
seat recliner repair
 05-19-2010, 12:48 AM
#1
Burning Brakes

Thread Starter
Hello All:
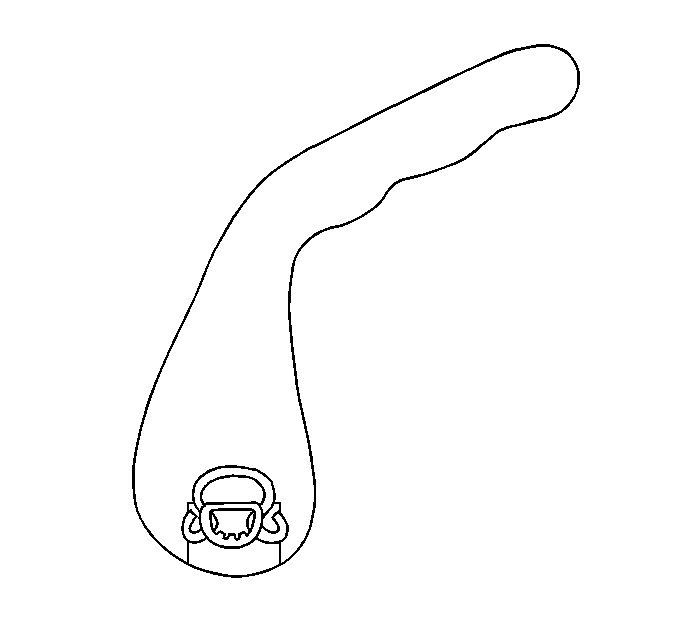
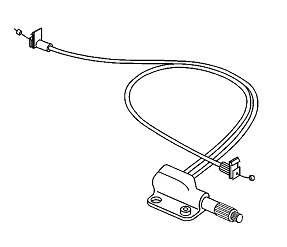
I have an 02 coupe with power sport seats. I broke the shaft connected to the driver's side seat recliner handle as shown in this borrowed pic:
http://i140.photobucket.com/albums/r...2/IMG_0726.jpg
The part # is 10278650, "seat recliner actuator cable"
I would be grateful if someone with a shop manual can post the repair procedure to replace this part. I ordered the part from Gene at GM Parts. Now I just need to find the least painful way of replacing it, disassembling as little of the seat as possible. All help appreciated.

The following users liked this post:
Mr1dfl (06-29-2016)
05-19-2010, 12:57 AM
#2
Tech Contributor
Member Since: Dec 2003
Location: Horncastle Lincolnshire, England
Posts: 19,384
Likes: 0
Received 79 Likes
on
61 Posts
2023 C5 of the Year Finalist - Unmodified

Its not very comprehensive
Document ID# 656468
2002 Chevrolet Corvette
Seat Back Recliner Handle Replacement - Front
Removal Procedure
1. With a suitable blunt ended tool inserted between the cushion and the handle push the handle retaining spring clip down.
2. Pull the handle from the shaft.
Installation Procedure
1. Position the handle retaining spring clip into the lock position.
2. Snap the handle onto the reclining mechanism shaft.
Last edited by DeeGee; 05-19-2010 at 01:01 AM.
05-19-2010, 01:03 AM
#3
Tech Contributor
Member Since: Dec 2003
Location: Horncastle Lincolnshire, England
Posts: 19,384
Likes: 0
Received 79 Likes
on
61 Posts
2023 C5 of the Year Finalist - Unmodified
Just reread the post. The pic is of the handle but you mention the cable. Is it the cable you're replacing?
05-19-2010, 01:25 AM
#4
Burning Brakes
Thread Starter

The following users liked this post:
CorvetteBrent (10-06-2020)
05-19-2010, 01:56 AM
#6
Tech Contributor
Member Since: Dec 2003
Location: Horncastle Lincolnshire, England
Posts: 19,384
Likes: 0
Received 79 Likes
on
61 Posts
2023 C5 of the Year Finalist - Unmodified
Here you go pics and all
Document ID# 656467
2002 Chevrolet Corvette
________________________________________
Seat Back Recliner Mechanism Replacement - Front
Removal Procedure
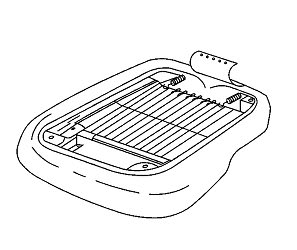
Picture 1
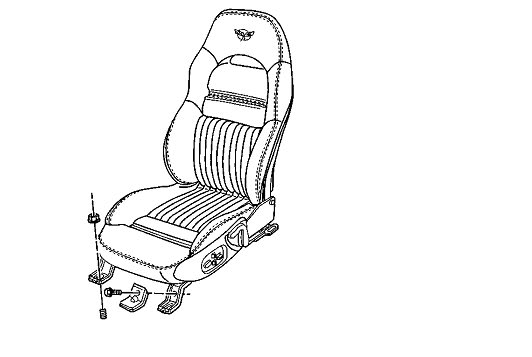
1. Raise the seat to the full up position (power seat).
2. Remove the seat. Refer to Seat Replacement .
Picture 2
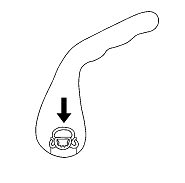
3. Remove the recliner handle.
A. With a suitable blunt ended tool inserted between the cushion and the handle push the handle retaining spring clip down.
B. Pull the handle from the shaft.
Picture 3
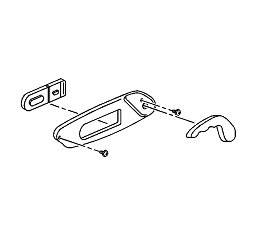
Remove the side trim panel. Refer to Trim Panel Replacement - Front Seat .
Picture 4
Remove the seat cushion cover. Refer to Seat Cushion Trim Cover and Pad Replacement .
Picture 5

Remove the hinge pin nuts and the hinge pins.
Lay the seatback down
Remove the cables from the actuators.
Picture 6
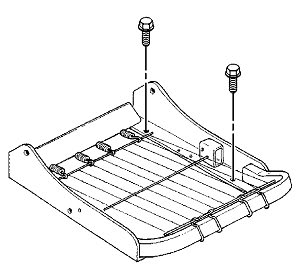
Remove the seat from the adjuster to access the recliner mechanism attaching screws (Base Seat only).
Picture 7
Remove the screws attaching the recliner mechanism.
Remove the recliner mechanism.
Installation Procedure
Important
Do not lubricate the seatback recliner mechanism.
Picture 7
1. Install the recliner mechanism to the seat frame.
2. Install the cables to the actuators.
3. Securely snap the cable retaining clips to the actuators with the tabs up.
Picture 6
4. Install the seat adjusters to the seat if removed.
Notice
Use the correct fastener in the correct location. Replacement fasteners must be the correct part number for that application. Fasteners requiring replacement or fasteners requiring the use of thread locking compound or sealant are identified in the service procedure. Do not use paints, lubricants, or corrosion inhibitors on fasteners or fastener joint surfaces unless specified. These coatings affect fastener torque and joint clamping force and may damage the fastener. Use the correct tightening sequence and specifications when installing fasteners in order to avoid damage to parts and systems.
5. Apply Loctite� 271 to the bolts and secure the adjuster to the seat.
Tighten
Tighten the bolts to 24 N�m (18 lb in).
Picture 5
Important
Use a tread locking compound on the hinge bolts.
6. Install the hinge bolts, seatback release cables, and nuts.
Tighten
Tighten the hinge bolt nuts to 24 N�m (18 lb ft).
Picture 4
7. Install the seat cushion trim cover. Refer to Seat Cushion Trim Cover and Pad Replacement .
Picture 3
8. Install the side trim panel. Refer to Trim Panel Replacement - Front Seat .
Picture 2
9. Install the recliner handle.
A. Position the handle retaining spring clip into the lock position.
B. Snap the handle onto the reclining mechanism shaft.
Picture 1
Install the seat. Refer to Seat Replacement
Document ID# 656467
2002 Chevrolet Corvette
Document ID# 656467
2002 Chevrolet Corvette
________________________________________
Seat Back Recliner Mechanism Replacement - Front
Removal Procedure
Picture 1
1. Raise the seat to the full up position (power seat).
2. Remove the seat. Refer to Seat Replacement .
Picture 2
3. Remove the recliner handle.
A. With a suitable blunt ended tool inserted between the cushion and the handle push the handle retaining spring clip down.
B. Pull the handle from the shaft.
Picture 3
Remove the side trim panel. Refer to Trim Panel Replacement - Front Seat .
Picture 4
Remove the seat cushion cover. Refer to Seat Cushion Trim Cover and Pad Replacement .
Picture 5
Remove the hinge pin nuts and the hinge pins.
Lay the seatback down
Remove the cables from the actuators.
Picture 6
Remove the seat from the adjuster to access the recliner mechanism attaching screws (Base Seat only).
Picture 7
Remove the screws attaching the recliner mechanism.
Remove the recliner mechanism.
Installation Procedure
Important
Do not lubricate the seatback recliner mechanism.
Picture 7
1. Install the recliner mechanism to the seat frame.
2. Install the cables to the actuators.
3. Securely snap the cable retaining clips to the actuators with the tabs up.
Picture 6
4. Install the seat adjusters to the seat if removed.
Notice
Use the correct fastener in the correct location. Replacement fasteners must be the correct part number for that application. Fasteners requiring replacement or fasteners requiring the use of thread locking compound or sealant are identified in the service procedure. Do not use paints, lubricants, or corrosion inhibitors on fasteners or fastener joint surfaces unless specified. These coatings affect fastener torque and joint clamping force and may damage the fastener. Use the correct tightening sequence and specifications when installing fasteners in order to avoid damage to parts and systems.
5. Apply Loctite� 271 to the bolts and secure the adjuster to the seat.
Tighten
Tighten the bolts to 24 N�m (18 lb in).
Picture 5
Important
Use a tread locking compound on the hinge bolts.
6. Install the hinge bolts, seatback release cables, and nuts.
Tighten
Tighten the hinge bolt nuts to 24 N�m (18 lb ft).
Picture 4
7. Install the seat cushion trim cover. Refer to Seat Cushion Trim Cover and Pad Replacement .
Picture 3
8. Install the side trim panel. Refer to Trim Panel Replacement - Front Seat .
Picture 2
9. Install the recliner handle.
A. Position the handle retaining spring clip into the lock position.
B. Snap the handle onto the reclining mechanism shaft.
Picture 1
Install the seat. Refer to Seat Replacement
Document ID# 656467
2002 Chevrolet Corvette
The following users liked this post:
CorvetteBrent (10-06-2020)
05-19-2010, 10:55 AM
#8
Administrator


Member Since: Mar 2001
Location: In a parallel universe. Currently own 2014 Stingray Coupe.
Posts: 342,707
Received 19,233 Likes
on
13,933 Posts
C7 of the Year - Modified Finalist 2021
MO Events Coordinator
St. Jude Co-Organizer
St. Jude Donor '03-'04-'05-'06-'07-'08-'09-'10-'11-'12-'13-'14-'15-'16-'17-'18-'19-
'20-'21-'22-'23-'24
NCM Sinkhole Donor
CI 5, 8 & 11 Veteran


Nice info DeeGee. Saved it for future reference. 
12-16-2011, 10:54 PM
#9

SO.....Just hopped in my car to run into town and reached down to adjust the seat back and ....BAM, damn it broke off in my hand. All the way to town I am thinking, crap on a cracker, probably have to replace the whole dang seat. Get home and find this post and get real happy...... until I get to the instructions. Shat...I got a head ache just reading it. Has anyone actually done this in their garage? It is my drivers seat, so I can just see me getting this thing all torn apart and then having to load up the seat in my yukon and carry it to the dealer to be repaired. If any of you have done this, and are not GM certified mechanic, please post or PM me and let me know how difficult it really is. Thanks in advance for the help.
Last edited by batone; 12-16-2011 at 11:05 PM.
12-17-2011, 03:56 AM
#10
Tech Contributor
Member Since: Dec 2003
Location: Horncastle Lincolnshire, England
Posts: 19,384
Likes: 0
Received 79 Likes
on
61 Posts
2023 C5 of the Year Finalist - Unmodified
SO.....Just hopped in my car to run into town and reached down to adjust the seat back and ....BAM, damn it broke off in my hand. ..... Has anyone actually done this in their garage? It is my drivers seat, ......... If any of you have done this, and are not GM certified mechanic, please post or PM me and let me know how difficult it really is. Thanks in advance for the help.
If it's just the recliner handle that broke, thats almost the first item you remove. Again, a tad fiddly but easy enough. Its just a spring clip and once you get the screwdriver in there it just pops off.
Last edited by DeeGee; 12-17-2011 at 04:01 AM.
The following users liked this post:
CorvetteBrent (10-06-2020)
11-20-2012, 12:57 PM
#11
Instructor

Member Since: Aug 2010
Location: Las Vegas NV
Posts: 186
Likes: 0
Received 0 Likes
on
0 Posts
I know this is an old post but I have the exact same issue.
I am not up for spending ~$40-50 just to replace it with more plastic.
Someone needs to make a metal version.
I am not up for spending ~$40-50 just to replace it with more plastic.
Someone needs to make a metal version.
11-23-2014, 08:42 PM
#12
Cruising

Member Since: Jul 2014
Posts: 14
Likes: 0
Received 0 Likes
on
0 Posts
My recliner went defunct when I slipped sitting down. The recliner handle popped off and the seat is in full recline position and must be braced from behind. Did I berth the cables or what?
 03-11-2016, 11:52 AM
#14

I know this is an old thread but thought I would post a link for anyone looking for this mechanism.
https://corvetteparts.com/c5/item/co...bles-1997-2004
https://corvetteparts.com/c5/item/co...bles-1997-2004
Last edited by JK's01Z06; 03-11-2016 at 11:53 AM.
The following users liked this post:
CorvetteBrent (10-06-2020)

 06-29-2016, 02:14 AM
#16
Team Owner

I know this is an old thread but thought I would post a link for anyone looking for this mechanism.
https://corvetteparts.com/c5/item/co...bles-1997-2004
https://corvetteparts.com/c5/item/co...bles-1997-2004
 ), there's this:
http://www.chevypartsprime.com/oem/c...cable-d-s.html
NOTE: The note in green in the link regarding fitment, is strictly based on the info given to their parts lookup system as to which year model car is being inquired about. This part fits ALL years C5 Corvettes with either Sport seats OR Standard seats. Btw, this is for the DRIVER'S SIDE ONLY.
Last edited by LoneStarFRC; 06-29-2016 at 02:15 AM.
 02-09-2020, 02:57 AM
#19
Melting Slicks

If you're just replacing the handle you don't need to take the bezel off. There are two screws holding the bezel on. If you are just taking a broken handle off, it's easy peasy with the seat out! Just come up from the bottom of the handle with a flat bladed screwdriver and pop one side of the spring off. It's kind of like a C-Clip. Push it up and pull the handle off.
Last edited by o2bnkc; 02-09-2020 at 02:57 AM.
The following users liked this post:
CorvetteBrent (10-06-2020)