
Razz's two-tone leather DIY door pulls, shifter knob and e-brake handle for 70 bucks
 05-08-2011, 12:23 AM
#1
Pro

Thread Starter
Member Since: Mar 2011
Location: Tuscaloosa AL
Posts: 738
Likes: 0
Received 0 Likes
on
0 Posts
To start I bought 2 sets of Two-tone Door Pull Wraps and 1 set of Light Oak Door pull Wraps from Mid America Motorworks
I had extra thread and needles from the Wheelskin steering wheel wrap I put on earlier this month (replacing soon) I used the thread and needle on the wheelskin to stitch the emergency brake. You can call wheelskin and ask for some needle and thread to use for a baseball stitch and they will send you some. They sent me mine for free because I bought a wheelskin from them. You may have to buy them but I'm sure it wont cost much. IF you go to a hobby store make sure you get thread that is waxed. Makes a world of a difference when stitching leather tight.
I asked MAMotorworks to not roll and stitch the sides. This is what they should look like:

The Emergency brake
I cut the stitches off the emergency brake leather making sure I didnt cut up the leather.

Take the existing leather and lay it over one of the two tone door wraps. Use a pen and trace around it then cut it out.

I used a cork board and push pins to make the thread holes in the leather. I found the push pins are perfect for this as they are the right spacing between the thread holes so no need to measure anything.

Once you have the thread holes, line the leather up on the e-brake. After I found the right spot I used a little super glue to keep it in place. I just put a couple dabs where the different color leather meets and pressed on to the handle. This will keep it from moving around while you stitch the other side.
Use a baseball stitch when stitching the leather together.

After you have it stitched up cut 4 V's in the end to allow a smooth fold into the end of the e-brake handle.

Use super glue and fold the sides in the handle end. For gods sake do not get any glue on your hands!... like I did....
Once it's glued in your done. Install and enjoy.

Door pulls
I originally bought these wraps for the door and I hated the way they looked. They didn't go to the end of the door pull. It just looked like crap to me so this is how I fixed that issue.
Again, The wraps from Mid America Motorworks without side stitches.
Your going to need to take your door panels off and take off your door pulls for this. I used Vette Essentials Instructions to do this. In fact, if you have the funds stop reading this now and buy your interior from them they have the best looking top of the line interiors I have ever seen. I based my interior on theirs. Anyway, for the rest of you DiY'ers, lay your wraps down and put the door pulls on them. Make sure you have at least 1/4 to 3/8 leather over lapping each side of the door pull.

Connect the velcro once you have it lined up properly. If its lose thats fine. Open one side of the velcro and pull the leather tight. Close it and do the other side of the velcro. Keep doing this until the leather is good and tight on the door pull.
If you have any over lapping leather on the white area where the door pull attaches to the door or anything over 3/8 inch overlapping cut it away.

It's Super Glue Time! When gluing you dont have to put the glue right on the edge of the leather. Put it inside a little bit and when you press it down kinda rub your fingers from the corner of the handle to the edge of the leather. This will spread out the glue and pull the leather tight. It's ok if the very edge of the leather isnt glued down. It will fit snug once you install it back on the door.

Do the same with the edge of the velcro area.

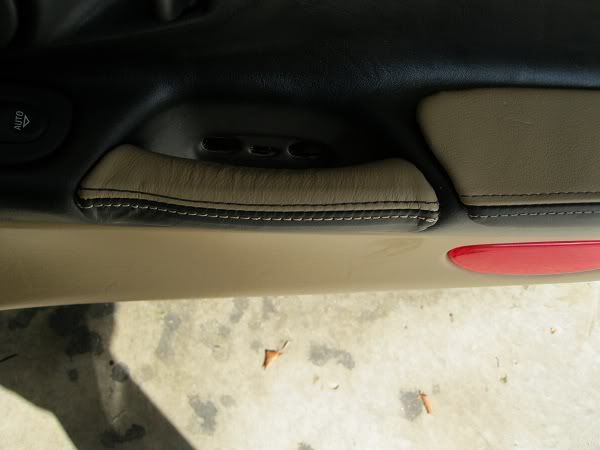
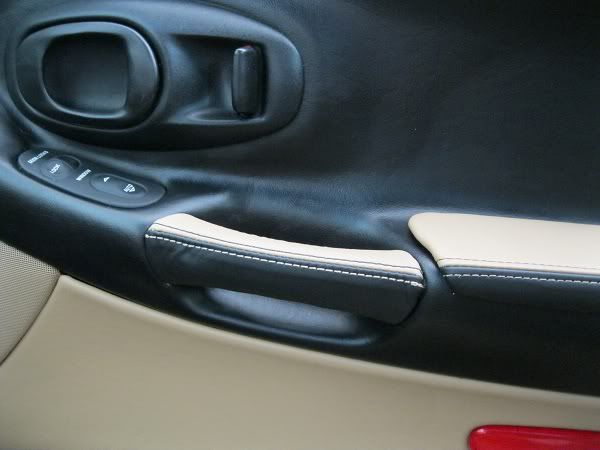
This is what it should look like when your done.


Install and Enjoy
Shifter ****:
I don't have many pics on this. For some reason my camera wasn't in a working mood. Some pics turned out good while others.... not so much. The good news is the process is pretty much the same as the emergency brake.
Cut the stitches on the **** making sure you dont mess up the leather. Use the leather as a template. I took the top piece and layed it over the light oak door wrap. Traced it and cut it out.

This is the really nice part. Put the old leather piece and new leather piece on top of one another and place on cork board. Use the existing leather piece's holes for your template on your new piece. Use push pins to make the initial holes in the leather. You have to make sure you line this up correctly as it will work directly with the existing piece of leather thats already on the ****.
Take some scrap leather and jam it down on the shifter **** on the top to keep the "black pushy thingy" from popping up. Pardon all the high end technical jargon
You will need 4 pieces of waxed thread for this.
Use a baseball stitch start on one side and go up past the first bend on the ****. You don't have to put it on the **** yet.

After you have gotten a little past the first bend wrap the leather on the **** and start on the other side and go all the way to the center of the front of the ****. Then go back to the other side and meet in the center of the front of the ****. The stitching part is very awkward, just focus, take your time and press on, it will look good after it's all done.
When you get done with the stitching it should look like this:


At the top of the **** cut an X with and exacto knife.

Open it up and pull out the scrap leather that was holding down the "black pushy thingy". Take some super glue and apply to the back of the the leather that you cut an X in. Use your leather needle to push the leather in the ****, around the black pushy thingy.

Install and Enjoy!
My apologies for not getting into proper Baseball Stitch method. Thats a whole other thread in and of itself. You can google it and pull up days of info on it though.
After I installed it all!!!
Next: 3M Carbon Fiber Vinyl on my Radio Bezel, Center Console and Door Openers. CoolArrow has been mentoring me on this. Many thanks CA!
I had extra thread and needles from the Wheelskin steering wheel wrap I put on earlier this month (replacing soon) I used the thread and needle on the wheelskin to stitch the emergency brake. You can call wheelskin and ask for some needle and thread to use for a baseball stitch and they will send you some. They sent me mine for free because I bought a wheelskin from them. You may have to buy them but I'm sure it wont cost much. IF you go to a hobby store make sure you get thread that is waxed. Makes a world of a difference when stitching leather tight.
I asked MAMotorworks to not roll and stitch the sides. This is what they should look like:
The Emergency brake
I cut the stitches off the emergency brake leather making sure I didnt cut up the leather.
Take the existing leather and lay it over one of the two tone door wraps. Use a pen and trace around it then cut it out.
I used a cork board and push pins to make the thread holes in the leather. I found the push pins are perfect for this as they are the right spacing between the thread holes so no need to measure anything.
Once you have the thread holes, line the leather up on the e-brake. After I found the right spot I used a little super glue to keep it in place. I just put a couple dabs where the different color leather meets and pressed on to the handle. This will keep it from moving around while you stitch the other side.
Use a baseball stitch when stitching the leather together.
After you have it stitched up cut 4 V's in the end to allow a smooth fold into the end of the e-brake handle.
Use super glue and fold the sides in the handle end. For gods sake do not get any glue on your hands!... like I did....
Once it's glued in your done. Install and enjoy.
Door pulls
I originally bought these wraps for the door and I hated the way they looked. They didn't go to the end of the door pull. It just looked like crap to me so this is how I fixed that issue.
Again, The wraps from Mid America Motorworks without side stitches.
Your going to need to take your door panels off and take off your door pulls for this. I used Vette Essentials Instructions to do this. In fact, if you have the funds stop reading this now and buy your interior from them they have the best looking top of the line interiors I have ever seen. I based my interior on theirs. Anyway, for the rest of you DiY'ers, lay your wraps down and put the door pulls on them. Make sure you have at least 1/4 to 3/8 leather over lapping each side of the door pull.
Connect the velcro once you have it lined up properly. If its lose thats fine. Open one side of the velcro and pull the leather tight. Close it and do the other side of the velcro. Keep doing this until the leather is good and tight on the door pull.
If you have any over lapping leather on the white area where the door pull attaches to the door or anything over 3/8 inch overlapping cut it away.
It's Super Glue Time! When gluing you dont have to put the glue right on the edge of the leather. Put it inside a little bit and when you press it down kinda rub your fingers from the corner of the handle to the edge of the leather. This will spread out the glue and pull the leather tight. It's ok if the very edge of the leather isnt glued down. It will fit snug once you install it back on the door.
Do the same with the edge of the velcro area.
This is what it should look like when your done.
Install and Enjoy
Shifter ****:
I don't have many pics on this. For some reason my camera wasn't in a working mood. Some pics turned out good while others.... not so much. The good news is the process is pretty much the same as the emergency brake.
Cut the stitches on the **** making sure you dont mess up the leather. Use the leather as a template. I took the top piece and layed it over the light oak door wrap. Traced it and cut it out.
This is the really nice part. Put the old leather piece and new leather piece on top of one another and place on cork board. Use the existing leather piece's holes for your template on your new piece. Use push pins to make the initial holes in the leather. You have to make sure you line this up correctly as it will work directly with the existing piece of leather thats already on the ****.
Take some scrap leather and jam it down on the shifter **** on the top to keep the "black pushy thingy" from popping up. Pardon all the high end technical jargon
You will need 4 pieces of waxed thread for this.
Use a baseball stitch start on one side and go up past the first bend on the ****. You don't have to put it on the **** yet.
After you have gotten a little past the first bend wrap the leather on the **** and start on the other side and go all the way to the center of the front of the ****. Then go back to the other side and meet in the center of the front of the ****. The stitching part is very awkward, just focus, take your time and press on, it will look good after it's all done.
When you get done with the stitching it should look like this:
At the top of the **** cut an X with and exacto knife.
Open it up and pull out the scrap leather that was holding down the "black pushy thingy". Take some super glue and apply to the back of the the leather that you cut an X in. Use your leather needle to push the leather in the ****, around the black pushy thingy.
Install and Enjoy!
My apologies for not getting into proper Baseball Stitch method. Thats a whole other thread in and of itself. You can google it and pull up days of info on it though.
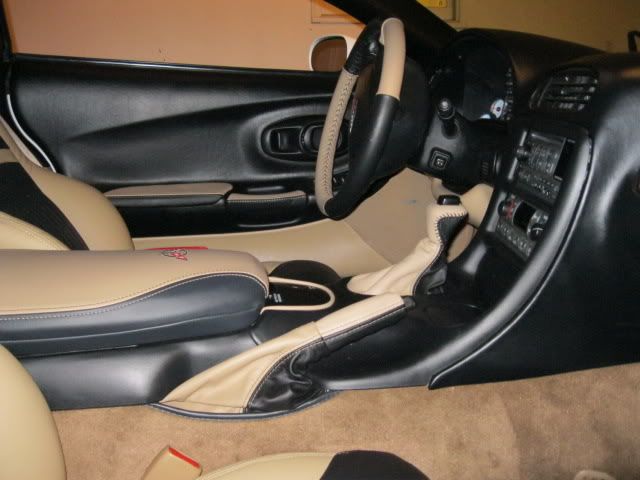
After I installed it all!!!
Next: 3M Carbon Fiber Vinyl on my Radio Bezel, Center Console and Door Openers. CoolArrow has been mentoring me on this. Many thanks CA!


