
Just finished my Radio Bezel Carbon Fiber 3M Vinyl
 05-09-2011, 04:47 PM
#1
Pro

Thread Starter
Member Since: Mar 2011
Location: Tuscaloosa AL
Posts: 738
Likes: 0
Received 0 Likes
on
0 Posts
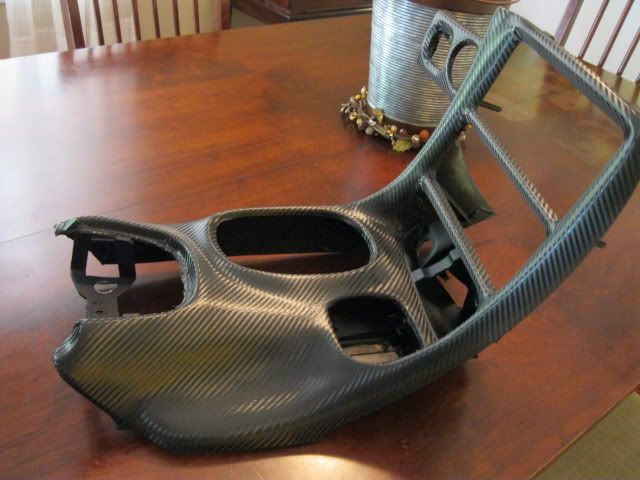
UPDATE:: 4th try. No blemishes at all this time around. Used one single sheet.
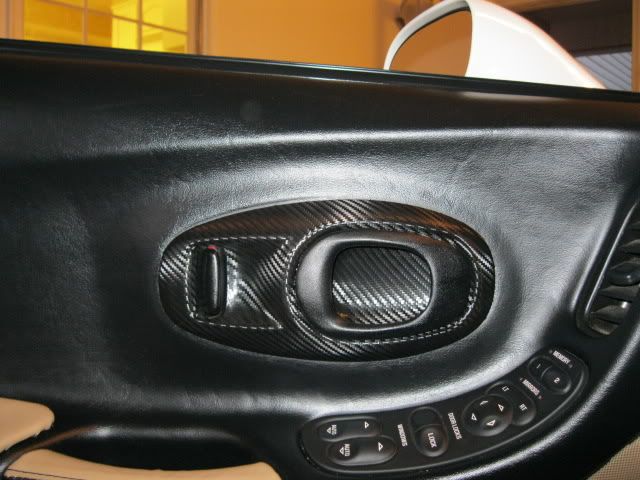
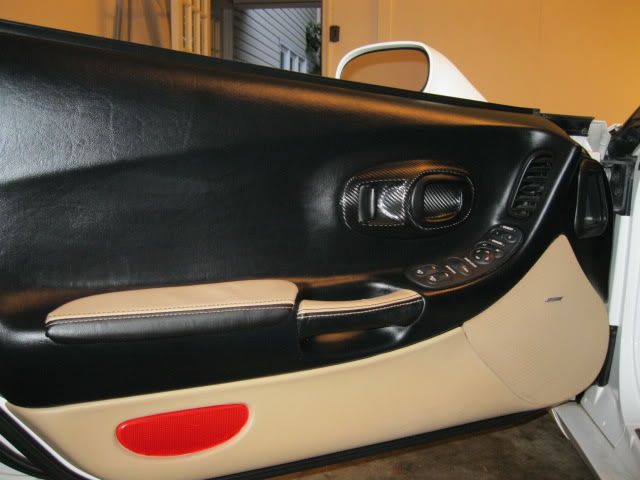
I did my door openers this time around also:
3RD TRY
Well after two tries with not so good of an outcome I was finally able to get it right this time with coolarrows advice.
This is only the main piece. I'm going to do the ashtray and drink lids this week and install on Saturday.


I did my door openers this time around also:
3RD TRY
Well after two tries with not so good of an outcome I was finally able to get it right this time with coolarrows advice.
This is only the main piece. I'm going to do the ashtray and drink lids this week and install on Saturday.
Last edited by Razzputon; 05-22-2011 at 09:56 PM.


 05-09-2011, 05:50 PM
#3
Pro
Thread Starter
Member Since: Mar 2011
Location: Tuscaloosa AL
Posts: 738
Likes: 0
Received 0 Likes
on
0 Posts
It's been trial and error so far. There are so many curves and stretch points, it's VERY unforgiving. One mess up and you pretty much have to scrap it and start again. You can patch if you like but, personally, I don't want to put anything in my car thats not perfectly done. It's easily the hardest of the DIY projects I have done so far. I have to do a little research on possibly making a mold of the radio bezel's ashtray and din areas to see if I cant make that part somewhat easier. however, I'm going to do another one this comming weekend. I'll take pictures on that one. 

 05-09-2011, 06:30 PM
#7
Tech Contributor
Member Since: Aug 1999
Location: Should this thoughtful, valuable contribution meet with no acknowledgement or 'thanks' this post----
Posts: 16,382
Received 399 Likes
on
257 Posts

very well done...definitely take some good photos for us...that is a great material to use all over the interior...
05-09-2011, 06:52 PM
#8
Team Owner

Member Since: Mar 2004
Location: Oklahoma City OK
Posts: 58,258
Received 1,674 Likes
on
1,297 Posts
C6 of Year Finalist (appearance mods) 2019
Looks good so far!
05-09-2011, 08:17 PM
#9
Instructor

Member Since: Mar 2010
Location: Houston TX
Posts: 153
Likes: 0
Received 0 Likes
on
0 Posts
Pics of installed? 
I work with the carbon vinyl but not 3m. I've got a vendor that I've used several times that's very similar to feel and quality of the 3m. Never done any anything for the vette though. I've done a few small pieces for bmw's and such.
The heat gun is so important wrapping interior pieces and complicated curves...
 05-09-2011, 09:55 PM
#11
Administrator


Member Since: Mar 2001
Location: In a parallel universe. Currently own 2014 Stingray Coupe.
Posts: 342,880
Received 19,282 Likes
on
13,960 Posts
C7 of the Year - Modified Finalist 2021
MO Events Coordinator
St. Jude Co-Organizer
St. Jude Donor '03-'04-'05-'06-'07-'08-'09-'10-'11-'12-'13-'14-'15-'16-'17-'18-'19-
'20-'21-'22-'23-'24
NCM Sinkhole Donor
CI 5, 8 & 11 Veteran

Looks great - I can only imagine how difficult it was to get that right with so many curves to work around.
 05-10-2011, 12:29 AM
#13
Melting Slicks


I've done a few parts but the 3m vinyl always seems to lift. Did you use the 3m primer or just wrap it directly on the bezel?
I will be interested to see if it stays in place on a hot summer day....
I hope it works out for you, it looks nice, the typical hydrocarbon look is just a little too "glossy" for me...
I will be interested to see if it stays in place on a hot summer day....
I hope it works out for you, it looks nice, the typical hydrocarbon look is just a little too "glossy" for me...
05-10-2011, 03:12 PM
#14
Pro
Thread Starter
Member Since: Mar 2011
Location: Tuscaloosa AL
Posts: 738
Likes: 0
Received 0 Likes
on
0 Posts
I've done a few parts but the 3m vinyl always seems to lift. Did you use the 3m primer or just wrap it directly on the bezel?
I will be interested to see if it stays in place on a hot summer day....
I hope it works out for you, it looks nice, the typical hydrocarbon look is just a little too "glossy" for me...
I will be interested to see if it stays in place on a hot summer day....
I hope it works out for you, it looks nice, the typical hydrocarbon look is just a little too "glossy" for me...
You bring up a good point about hot summer days. I put the bezel in the trunk of my car for a few days to see if it comes up or the edges around the ash tray pull back. I did use super glue on some edges, not around the ashtray though. Gonna give it a few days and check the results.
I have found something that might be the answer I'm looking for though. personally, I dont want to use super glue as an alternative adhsive. I ordered a Seat-it-pen a few moments ago. I'm going to wait for that to come in before I make another Cf wrap attempt.
I totally agree on your comment about the hydrocarbon look. It's fantastic work but the clear coat is to glossy for me. The glossy look of the carbon fiber vinyl blends better with the leather look of the interior imo.
Last edited by Razzputon; 05-10-2011 at 03:14 PM.
 05-13-2011, 11:38 AM
#17
Pro
Thread Starter
Member Since: Mar 2011
Location: Tuscaloosa AL
Posts: 738
Likes: 0
Received 0 Likes
on
0 Posts
Pics of installed?
I work with the carbon vinyl but not 3m. I've got a vendor that I've used several times that's very similar to feel and quality of the 3m. Never done any anything for the vette though. I've done a few small pieces for bmw's and such.
The heat gun is so important wrapping interior pieces and complicated curves...
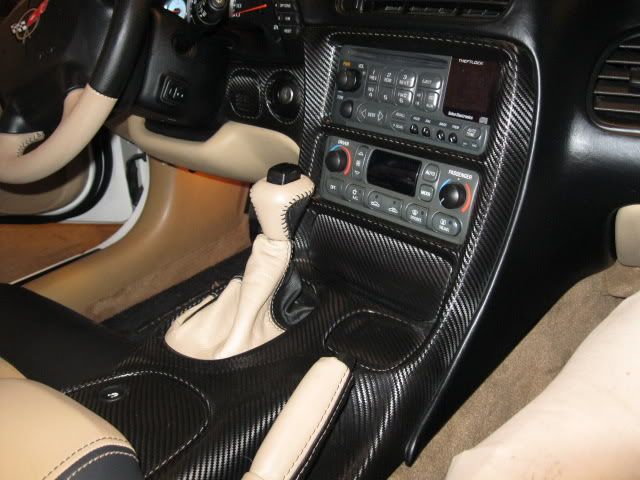
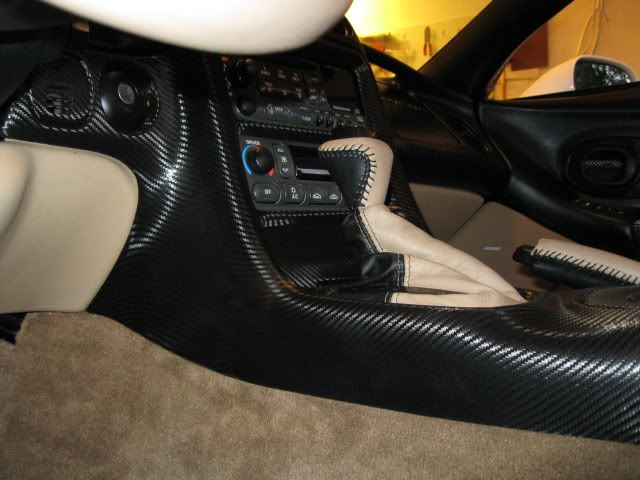
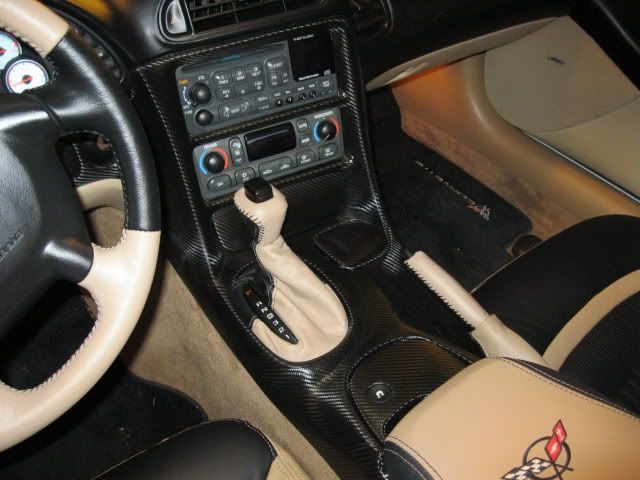
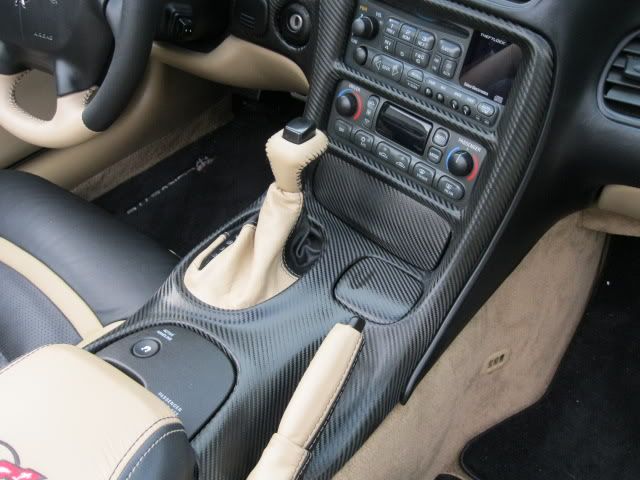
As soon as I get my 94 primer order in I'm going to give it another try and take step by step pics this time around. I posted my full interior in another post but here is what the Radio bezel looks like Installed.

Here are the pics showing the three areas I screwed up this try.

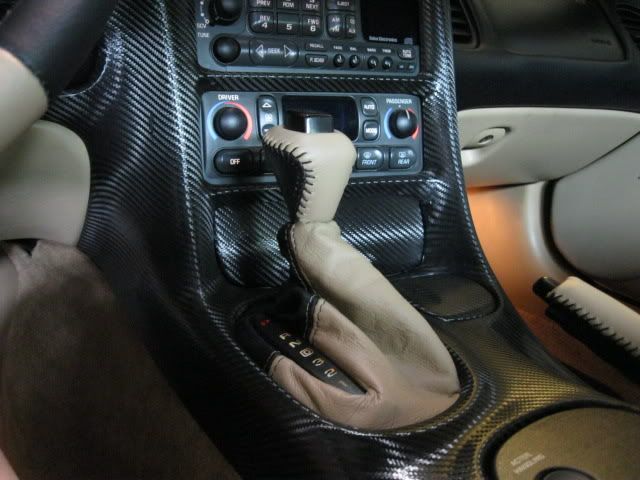
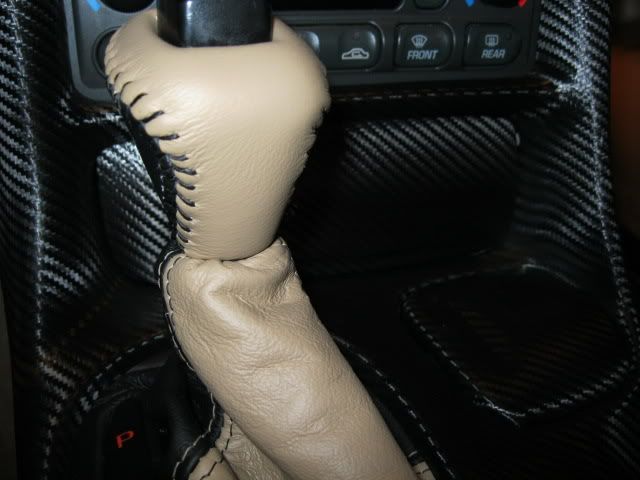
Still kinda getting used to it. I do like it better then the clearcoated stuff though. The Vinyl has a shine to it that doesn't really show up on pictures for some reason, but it still has a leathery look to it. If I decide to keep the look I'm going to finish covering the rest of the console area and the door openers.
Last edited by Razzputon; 05-13-2011 at 11:52 AM.
05-13-2011, 11:18 PM
#18
Racer
Member Since: Aug 2009
Location: Houston TX
Posts: 255
Likes: 0
Received 1 Like
on
1 Post
St. Jude Donor '12

Yep. Heat Gun is the key
As soon as I get my 94 primer order in I'm going to give it another try and take step by step pics this time around. I posted my full interior in another post but here is what the Radio bezel looks like Installed.
Here are the pics showing the three areas I screwed up this try.
Still kinda getting used to it. I do like it better then the clearcoated stuff though. The Vinyl has a shine to it that doesn't really show up on pictures for some reason, but it still has a leathery look to it. If I decide to keep the look I'm going to finish covering the rest of the console area and the door openers.
05-13-2011, 11:38 PM
#19
Melting Slicks
Looks good.
I used the 3M DiNoc on my door pulls and the entire center console, that I think turned out great. Its been in the 90's for several days here in Texas and have had no problem with it lifting. I did not use any primer just cleaned and washed the parts with mild soap and warm water. Your right it was a real pain getting everything bubble free and smooth, but if you take your time and use a heat gun it will come together.
I used the 3M DiNoc on my door pulls and the entire center console, that I think turned out great. Its been in the 90's for several days here in Texas and have had no problem with it lifting. I did not use any primer just cleaned and washed the parts with mild soap and warm water. Your right it was a real pain getting everything bubble free and smooth, but if you take your time and use a heat gun it will come together.
