
[PROCEDURE] ACA HID Modification with Morimito FX-R 1.1 Projectors
 04-14-2012, 03:45 PM
#1
Tech Contributor
Thread Starter
Guys:
I wanted to give a big thanks to forum member "matthewlfd" for listening to my PM's about this install.
This is all on my web site also.
www.ToqueZ06.com
Here are my new Morimito FX-R 1.1 HID Projectors.
http://shop.lightwerkz.net/Morimoto-...Projectors-D2S

Here is the Top Side

Here is the bottom side
The 2x Red wires go to a solenoid which lowers an internal plate allowing
all the light to shine out the projector giving you HIGH beams

You WILL need a Hi-4 harness from "TheRadioFlyer" so that the low beams stay on when the high beams are triggered.
http://forums.corvetteforum.com/1575724373-post132.html

I also decided to wire up a second relay. This relay keeps my Fog lights on when my High beams are on.


Remove the 3x screws holding the black light surround.

If you have ever removed the painted top cover you know its a pain to re-align when re-installing.
I drilled very small holes (both sides, and back). I verified that my thin nail fit before removing the painted top.

When re-installing the top, insert the nails first to align, then install screws..
Worked PERFECT for me when I re-installed everything.

Remove the 2x nuts/bolts from the piviot at the back of the light assy.

Be SURE to not damage the white plastic insert on the bolts.

Remove the Pivot arm from the motor.

High, and Low Beam connectors. Note the Colors of the wires.

Remove the 3x Bolts holding the ACA assy to the stock bracket.

Separate the ACA housing from the stock bracket.
Note the long Brass rod is for your lights up and down adjustment.
Note the short Brass rod is for your lights side to side adjustment.
This is a great time to lubricate these with lithium grease !!!
They break easily if not lubricated.

Remove the 4x screws to remove the ACA Projector

Remove ACA projector

Compare ACA and Morimito FX-R 1.1 Projectors.

The new FXR's are too tight a fit in the ACA housing.

Make sure to tape/seal off the projector hole in the ACA housing to keep inside the housing clean.
I trimmed the following areas which gave me room to...:
1.) Center the projector in the ACA housing properly.
2.) Verify its properly flush in the ACA housing.

The FXR now sits flush, and is centered with plenty of adjustment room if needed.

Required screws needed to mount the FXR's into the ACA housing.

This is CRITICAL !!!
Make sure to line up the 4x ACA mounting screw holes to where you want to drill holes in the FXR's
The screws MUST be countersunk also .
The spring for the high beam plate will make contact to the bolts if they sit too high.
I started out with a VERY small drill bit and located the correct spot to drill.
Then moved progressively larger ensuring that I'm drilling in the correct location.
Once my hole was properly drilled, I used a really large bit and countersunk the holes.

Use Blue Loctite on the tips of your screws to hold them in place.
Ensure that the FXR is centered in the ACA housing.
Screw down all 4 bolts gently as not to strip out the ACA housing holes.

Its perfectly centered, and looks like any regular ACA projector.

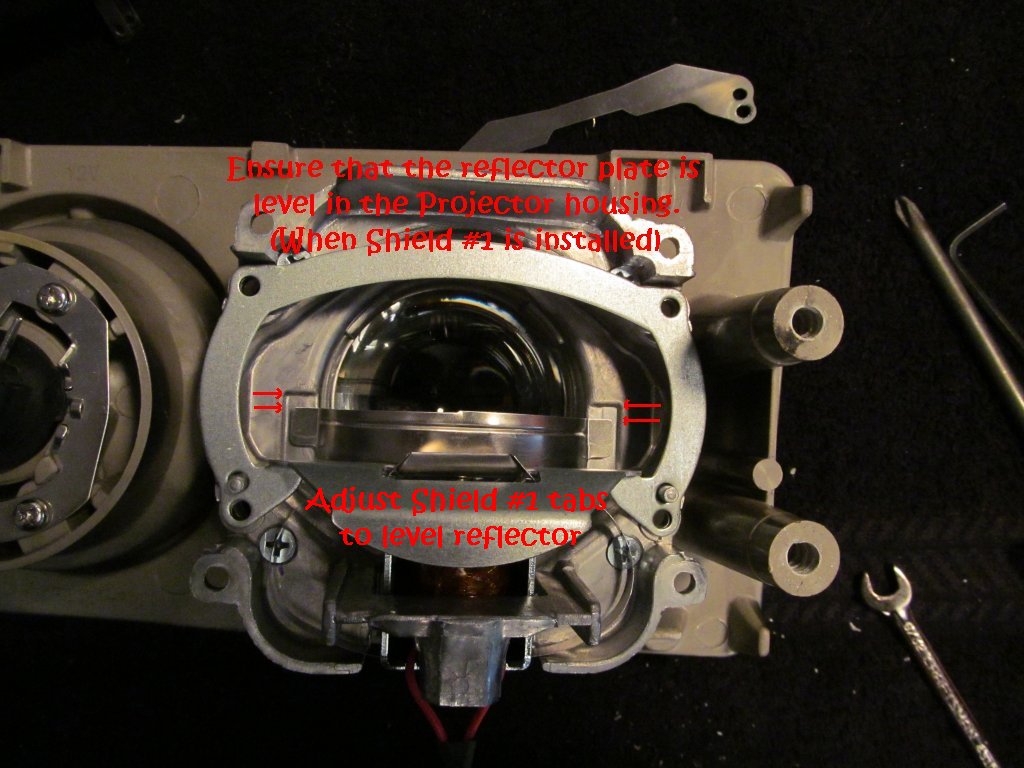
Both Projector shields installed in the housing.

Both Projector shields removed.

Take a close look at the small tabs on shield #1 that can be used to adjust the projector reflector level.

Install Shield #1, and ensure that the reflector is level liks seen below.
I did not re-install shield #2
Notice the lip on the EBAY D2S bulb below. It would not sit "flush" in the projector housing.
The OEM D2S Phillips bulb does not have this lip.
I had to shave the lip off the EBAY bulb.
This is EXTREMELY important to do if needed. The bulb must fit flat and flush in the reflector.

Shaved lip off the D2S EBAY bulb.

Ensure that the bulb is centered in the projector.

Ensure that the bulb is centered in the projector.

By now you realize that the mounting screws for the reflector will be super hard to install.
They mount in such a way that we no longer can get to easily.
I went out and got some 4mm screws, nuts, washers, and lock washers and it worked perfectly.

Use Blue LocTite on the threads to secure them.

Reflector mounting bolts from the top side.

D2S HID bulb installed.

The 2x red wires will plug directly into the high beam connector.
I heat shrinked the wires to keep them together and safer from damage.
They control the internal plate in the FXR.
When high beam is activated, the plate moves out of the way to allow all the light to exit the projector.
You may have noticed that the FXR's do not come with connectors to mate to your high beam connector.
You will need to purchase connectors for this. I had some already but I suspect Radio Shack would have them.

FXR's mounted to ACA housing complete. (side view)

FXR's mounted to ACA housing complete. (top view)

You need to trim an area on you're factory light bracket.
Its metal so your going need more than just cutters.

I put 3M Double sided tape on the HID ballast.
If you have ever tried to remove one you know how strong this tape is.

Connect the D2S wire connector to the bulb.
Make sure to orient the old high beam bulb away from the light lift arm.
It will crush the light bulb housing if not oriented correctly.

New 35w ballast mounted with the wiring ready to connect.
Note the inline resistor pack for the Low beam connector.
This cures the light UP/DOWN issue with having HID's on C5's.
http://www.shop.jwmotoring.com/produ...8&categoryId=4

Install the assembly back into your car.
If your light does not turn on, try flipping the low beam connector.
Often times the (+) and (-) wires are not correct.
I have nothing wired to my ACA high beams. They are useless since the FXR's do Low and High beam now.

Now perform the same procedure above on the other side of the car... 8-)
.
.
.
.
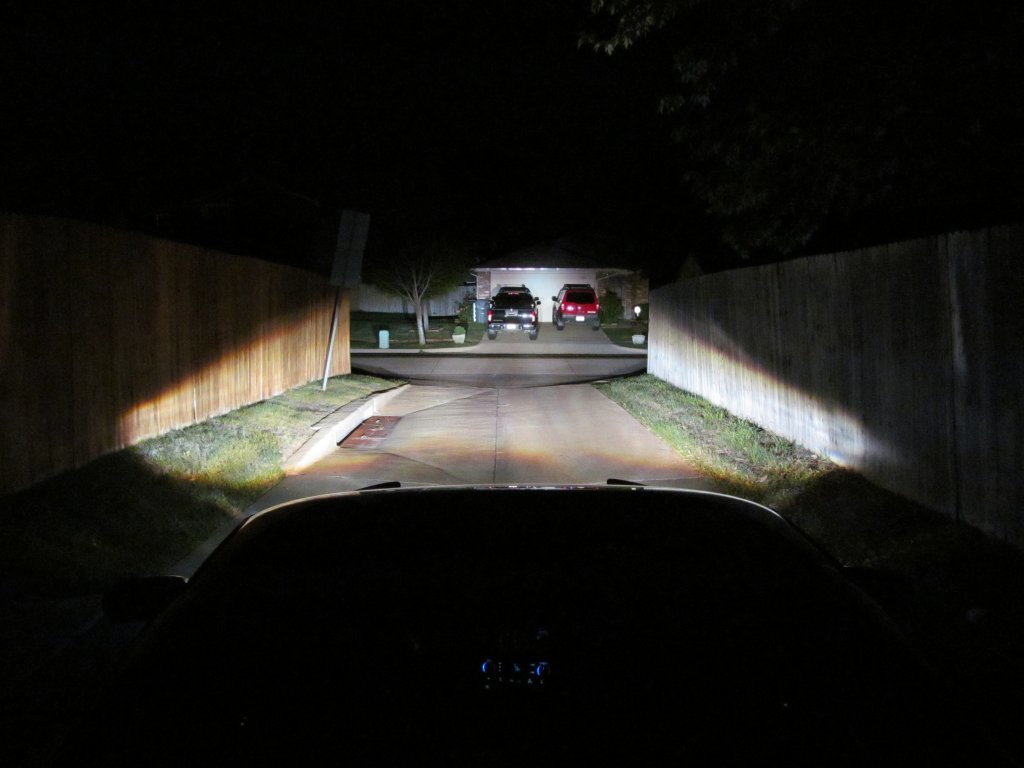
Here is how they look at night.
First off I want to say that my camera taking ability at night SUCKS ! The pictures do NOT do this light setup justice at all...
Low Beams (6000K 35W) and Fog Lights (6000K 35W)

Low Beams (6000K 35W)

Low Beams (6000K 35W) and Fog Lights (6000K 35W)

High Beams (6000K 35W) and Fog Lights (6000K 35W)

.
.
.
I also tried a set of 55W 5000K HID lights.
I found them to be WAY too bright for my taste, and too "yellow" for my liking.
I don't need to draw any more attention from the Law at night... 8-)
.
.
.
Low Beams (5000K 55W)

High Beams (5000K 55W)
I wanted to give a big thanks to forum member "matthewlfd" for listening to my PM's about this install.
This is all on my web site also.
www.ToqueZ06.com
Here are my new Morimito FX-R 1.1 HID Projectors.
http://shop.lightwerkz.net/Morimoto-...Projectors-D2S
Here is the Top Side
Here is the bottom side
The 2x Red wires go to a solenoid which lowers an internal plate allowing
all the light to shine out the projector giving you HIGH beams
You WILL need a Hi-4 harness from "TheRadioFlyer" so that the low beams stay on when the high beams are triggered.
http://forums.corvetteforum.com/1575724373-post132.html
I also decided to wire up a second relay. This relay keeps my Fog lights on when my High beams are on.
Remove the 3x screws holding the black light surround.
If you have ever removed the painted top cover you know its a pain to re-align when re-installing.
I drilled very small holes (both sides, and back). I verified that my thin nail fit before removing the painted top.
When re-installing the top, insert the nails first to align, then install screws..
Worked PERFECT for me when I re-installed everything.
Remove the 2x nuts/bolts from the piviot at the back of the light assy.
Be SURE to not damage the white plastic insert on the bolts.
Remove the Pivot arm from the motor.
High, and Low Beam connectors. Note the Colors of the wires.
Remove the 3x Bolts holding the ACA assy to the stock bracket.
Separate the ACA housing from the stock bracket.
Note the long Brass rod is for your lights up and down adjustment.
Note the short Brass rod is for your lights side to side adjustment.
This is a great time to lubricate these with lithium grease !!!
They break easily if not lubricated.
Remove the 4x screws to remove the ACA Projector
Remove ACA projector
Compare ACA and Morimito FX-R 1.1 Projectors.
The new FXR's are too tight a fit in the ACA housing.
Make sure to tape/seal off the projector hole in the ACA housing to keep inside the housing clean.
I trimmed the following areas which gave me room to...:
1.) Center the projector in the ACA housing properly.
2.) Verify its properly flush in the ACA housing.
The FXR now sits flush, and is centered with plenty of adjustment room if needed.
Required screws needed to mount the FXR's into the ACA housing.
This is CRITICAL !!!
Make sure to line up the 4x ACA mounting screw holes to where you want to drill holes in the FXR's
The screws MUST be countersunk also .
The spring for the high beam plate will make contact to the bolts if they sit too high.
I started out with a VERY small drill bit and located the correct spot to drill.
Then moved progressively larger ensuring that I'm drilling in the correct location.
Once my hole was properly drilled, I used a really large bit and countersunk the holes.
Use Blue Loctite on the tips of your screws to hold them in place.
Ensure that the FXR is centered in the ACA housing.
Screw down all 4 bolts gently as not to strip out the ACA housing holes.
Its perfectly centered, and looks like any regular ACA projector.
Both Projector shields installed in the housing.
Both Projector shields removed.
Take a close look at the small tabs on shield #1 that can be used to adjust the projector reflector level.
Install Shield #1, and ensure that the reflector is level liks seen below.
I did not re-install shield #2
Notice the lip on the EBAY D2S bulb below. It would not sit "flush" in the projector housing.
The OEM D2S Phillips bulb does not have this lip.
I had to shave the lip off the EBAY bulb.
This is EXTREMELY important to do if needed. The bulb must fit flat and flush in the reflector.
Shaved lip off the D2S EBAY bulb.
Ensure that the bulb is centered in the projector.
Ensure that the bulb is centered in the projector.
By now you realize that the mounting screws for the reflector will be super hard to install.
They mount in such a way that we no longer can get to easily.
I went out and got some 4mm screws, nuts, washers, and lock washers and it worked perfectly.
Use Blue LocTite on the threads to secure them.
Reflector mounting bolts from the top side.
D2S HID bulb installed.
The 2x red wires will plug directly into the high beam connector.
I heat shrinked the wires to keep them together and safer from damage.
They control the internal plate in the FXR.
When high beam is activated, the plate moves out of the way to allow all the light to exit the projector.
You may have noticed that the FXR's do not come with connectors to mate to your high beam connector.
You will need to purchase connectors for this. I had some already but I suspect Radio Shack would have them.
FXR's mounted to ACA housing complete. (side view)
FXR's mounted to ACA housing complete. (top view)
You need to trim an area on you're factory light bracket.
Its metal so your going need more than just cutters.
I put 3M Double sided tape on the HID ballast.
If you have ever tried to remove one you know how strong this tape is.
Connect the D2S wire connector to the bulb.
Make sure to orient the old high beam bulb away from the light lift arm.
It will crush the light bulb housing if not oriented correctly.
New 35w ballast mounted with the wiring ready to connect.
Note the inline resistor pack for the Low beam connector.
This cures the light UP/DOWN issue with having HID's on C5's.
http://www.shop.jwmotoring.com/produ...8&categoryId=4
Install the assembly back into your car.
If your light does not turn on, try flipping the low beam connector.
Often times the (+) and (-) wires are not correct.
I have nothing wired to my ACA high beams. They are useless since the FXR's do Low and High beam now.
Now perform the same procedure above on the other side of the car... 8-)
.
.
.
.
Here is how they look at night.
First off I want to say that my camera taking ability at night SUCKS ! The pictures do NOT do this light setup justice at all...
Low Beams (6000K 35W) and Fog Lights (6000K 35W)
Low Beams (6000K 35W)
Low Beams (6000K 35W) and Fog Lights (6000K 35W)
High Beams (6000K 35W) and Fog Lights (6000K 35W)
.
.
.
I also tried a set of 55W 5000K HID lights.
I found them to be WAY too bright for my taste, and too "yellow" for my liking.
I don't need to draw any more attention from the Law at night... 8-)
.
.
.
Low Beams (5000K 55W)
High Beams (5000K 55W)
Last edited by Toque; 04-14-2012 at 05:59 PM.

 04-14-2012, 05:48 PM
#3
Tech Contributor
Thread Starter
 04-14-2012, 07:28 PM
#5
Melting Slicks


Amazing work!
Did you do anything to prevent water from getting//inside the projectors? The solenoid area is open and water intrusion will ruin your setup in short order. I built caps for.mine. I'm amazed at how much water gets around them even from washing with the lights closed.
I've found that with good projectors like the fxr, there's no need for 55w systems. They put out plenty of light! But if you do want to consider them just get d2s bulbs designed for 55w operation such as the 5five series and they wont shift. I have 2 fxr's at 55w 6000k and 2 at 35w 6000k and the color matches perfectly, as lo/ as you don't use 35w bulbs with 55w ballasts.
Nice work!
04-14-2012, 07:48 PM
#6
Tech Contributor
Thread Starter
Thanks !
Thank you ! it was a fun challenge for me. I love doing this stuff.
I don't have anything to prevent water getting in them so far. I don't drive it in the rain. I don't even use water to wash my car.
If you know how to build a water cap for the FXR please let me know. I'd love to do it !
Thanks !
toque
Amazing work!
Did you do anything to prevent water from getting//inside the projectors? The solenoid area is open and water intrusion will ruin your setup in short order. I built caps for.mine. I'm amazed at how much water gets around them even from washing with the lights closed.
I've found that with good projectors like the fxr, there's no need for 55w systems. They put out plenty of light! But if you do want to consider them just get d2s bulbs designed for 55w operation such as the 5five series and they wont shift. I have 2 fxr's at 55w 6000k and 2 at 35w 6000k and the color matches perfectly, as lo/ as you don't use 35w bulbs with 55w ballasts.
Nice work!
Did you do anything to prevent water from getting//inside the projectors? The solenoid area is open and water intrusion will ruin your setup in short order. I built caps for.mine. I'm amazed at how much water gets around them even from washing with the lights closed.
I've found that with good projectors like the fxr, there's no need for 55w systems. They put out plenty of light! But if you do want to consider them just get d2s bulbs designed for 55w operation such as the 5five series and they wont shift. I have 2 fxr's at 55w 6000k and 2 at 35w 6000k and the color matches perfectly, as lo/ as you don't use 35w bulbs with 55w ballasts.
Nice work!
I don't have anything to prevent water getting in them so far. I don't drive it in the rain. I don't even use water to wash my car.
If you know how to build a water cap for the FXR please let me know. I'd love to do it !
Thanks !
toque
04-14-2012, 08:13 PM
#7
Instructor

Member Since: Aug 2011
Location: Kalamazoo Michigan
Posts: 233
Likes: 0
Received 10 Likes
on
6 Posts

Nice job Mark, way better write up than mine. Hopefully this will convince a few more people to do the DIY!
mcgilles - what did you use to seal yours? I'm in the same boat as toque...I don't usually drive in the rain, especially with the lights up, but would still like to seal them up just for peace of mind. I was going to either use some rubber PVC pipe reducers or the cut the bladder from inside a football in half and use the two ends to seal it. But if you had a better suggestion, I'm all ears!
mcgilles - what did you use to seal yours? I'm in the same boat as toque...I don't usually drive in the rain, especially with the lights up, but would still like to seal them up just for peace of mind. I was going to either use some rubber PVC pipe reducers or the cut the bladder from inside a football in half and use the two ends to seal it. But if you had a better suggestion, I'm all ears!
04-14-2012, 10:52 PM
#8
Melting Slicks
Thanks !
Thank you ! it was a fun challenge for me. I love doing this stuff.
I don't have anything to prevent water getting in them so far. I don't drive it in the rain. I don't even use water to wash my car.
If you know how to build a water cap for the FXR please let me know. I'd love to do it !
Thanks !
toque
I love doing this stuff too! And its such a great feeling to work through a project and get to enjoy the results.
If you can find my post on my low profile twin bi-xenon headlights you can see a few pictures of how I waterproofed my fxr's. I used ABS plastic boxes, project boxes from radio shack actually. I added some extra pieces, some pecan, and fiberglassed it all together. They made caps that fit perfectly over the solenoid mechanism. Black silicone holds it in place and provides the seal. Then I used silicone to seal up the rest of the projector inserting a small nylon tube in the top to provide a vent. It allows the pressure out when the bulbs get hot and allows any moisture that does end up inside a way out. I've driven it through torrential downpours!
04-14-2012, 11:48 PM
#9
Tech Contributor
Member Since: Aug 1999
Location: Should this thoughtful, valuable contribution meet with no acknowledgement or 'thanks' this post----
Posts: 16,382
Received 399 Likes
on
257 Posts

Nice write up Mark! Looks like a lot of work. My only concern is oncoming traffic....the ACAs already are certainly adequate and strong enough to cause blinding. This mod seems to only be usable when you are alone on a deserted road, correct? I recall also some discussion about the maximum number of bulbs allowed by the DOT is 4 at the front of a vehicle. Does this mod result in 6 bulbs on simultaneously? I admit, I just scanned the last half of the write up...
04-14-2012, 11:56 PM
#10
Melting Slicks
here's the thread, sorry I didn't have a link earlier, if the typos weren't enough of an indication, I was on my phone :-)
http://forums.corvetteforum.com/c5-g...and-video.html
waterproof FX-R


http://forums.corvetteforum.com/c5-g...and-video.html
waterproof FX-R
04-14-2012, 11:59 PM
#11
Melting Slicks
Nice write up Mark! Looks like a lot of work. My only concern is oncoming traffic....the ACAs already are certainly adequate and strong enough to cause blinding. This mod seems to only be usable when you are alone on a deserted road, correct? I recall also some discussion about the maximum number of bulbs allowed by the DOT is 4 at the front of a vehicle. Does this mod result in 6 bulbs on simultaneously? I admit, I just scanned the last half of the write up...
like all properly done HID projector setups the FX-R has a cutoff sheild, when used in low beam mode as long as it is aimed properly, they are no more blinding to oncoming traffic than stock, perhaps even less. while providing much more light on the ground.
a bi-xenon setup uses only one bulb for both high and low beam, in high beam mode the cutoff shield is simply moved out of the way to allow the light to shine up higher and farther down the road. oncoming traffic will be seeing spots of course, but that's why you don't use high beams when there's on coming traffic! high beam or low beam, there are only 2 lights on at a time. if the ACA's built in high beams are wired so they still work, then that's 4. since the fog lights turn off automatically when the high beams come on, the setup will never have more than 4 white lights on at a time.
04-15-2012, 12:24 AM
#12
Melting Slicks
Member Since: Mar 2009
Location: Odessa FL
Posts: 2,300
Received 113 Likes
on
99 Posts
St. Jude Donor '10-'12-'13-'14-'15-'16-'17
Question: Were the ACA's you started with originally Halogen projectors, and had you installed a HID kit to the ACA's before replacing them with the Morimito FX-R 1.1 HID projectors? The reason I ask is that it looks like you did not have to modify the pivot bracket by removing the raised ribs until you replaced the original projectors. I am about to install some ACA's and thought I had to modify the bracket for the projectors in the ACA's but it looks like from your pictures that it wont be required unless I do the Morimito FX-R 1.1 HID projector. Is that correct? Thanks.
Last edited by alxltd1; 04-15-2012 at 12:50 AM.


 04-15-2012, 11:19 AM
#15
Tech Contributor
Thread Starter
Thank everyone !!!
I don't have my high beam ACA bulb wired up at all. They are useless with the Bi-xenon setup that the FXR's give me. The ACA high beams are completely useless anyway. Just ask anyone with ACA's and they can confirm.
I only have 4 forward facing lights at one time. My FXR's which do both high and low beams... and my fog lamps. Thats why I installed the relay to keep my fogs ON when my high beams are ON. I still only have 4 forward facing lights.
There is no glare for oncoming cars with these FXR's. Its just much more of a wider beam pattern, and better projection overall.
After 8 long years of owning my car since new, I finally got high beams that work !!!
 ... thanks
I bought they off Ebay with the HID bulbs with it (35W 6000K).
I should have modified the ribs on the bracket back on first install. The projector was kinda touching, but not much. If you install the standard ACA kit, then just look really close when your putting it together. You may feel you don't have to, or you may feel you need to. Its not hard to do at all...
Toque
Nice write up Mark! Looks like a lot of work. My only concern is oncoming traffic....the ACAs already are certainly adequate and strong enough to cause blinding. This mod seems to only be usable when you are alone on a deserted road, correct? I recall also some discussion about the maximum number of bulbs allowed by the DOT is 4 at the front of a vehicle. Does this mod result in 6 bulbs on simultaneously? I admit, I just scanned the last half of the write up...
I only have 4 forward facing lights at one time. My FXR's which do both high and low beams... and my fog lamps. Thats why I installed the relay to keep my fogs ON when my high beams are ON. I still only have 4 forward facing lights.
There is no glare for oncoming cars with these FXR's. Its just much more of a wider beam pattern, and better projection overall.
After 8 long years of owning my car since new, I finally got high beams that work !!!
... thanks Question: Were the ACA's you started with originally Halogen projectors, and had you installed a HID kit to the ACA's before replacing them with the Morimito FX-R 1.1 HID projectors? The reason I ask is that it looks like you did not have to modify the pivot bracket by removing the raised ribs until you replaced the original projectors. I am about to install some ACA's and thought I had to modify the bracket for the projectors in the ACA's but it looks like from your pictures that it wont be required unless I do the Morimito FX-R 1.1 HID projector. Is that correct? Thanks.
I should have modified the ribs on the bracket back on first install. The projector was kinda touching, but not much. If you install the standard ACA kit, then just look really close when your putting it together. You may feel you don't have to, or you may feel you need to. Its not hard to do at all...
Toque
04-15-2012, 11:22 AM
#16
Tech Contributor
Thread Starter
here's the thread, sorry I didn't have a link earlier, if the typos weren't enough of an indication, I was on my phone :-)
http://forums.corvetteforum.com/c5-g...and-video.html
http://forums.corvetteforum.com/c5-g...and-video.html
Where did you get the covers ? I have high temp gasket maker stuff I could use to seal it.
Thanks !
Toque
 04-15-2012, 01:36 PM
#17
Melting Slicks
They were custom built, the design actually evolved one piece at a time.
the main piece of the cap is an ABS project box from radio shack, I made a few adjustments to it and left the top off to make the biggest part of the cap. that didn't extend upwards enough on the back half of he projector, nor was it wide enough. I took a couple of additional boxes, larger this time so the sides were larger and cut the corners off of them to expand the sides. I used a contour gage to cut the shape I needed. I glued them together.
then in then in test fitting I found they extended back farther than they needed to and it hit my mounting bracket, so I measured and cut the back off the caps and replaced it with a single lexan sheet so the cap extends no more than a couple mms farther back than the solenoid unit. on the outermost projectors I also cut the rear corner off and used another lexan piece at a 45* angle. if I had it to do all over again I would have done this to both sides of all of the projectors. since it provides more clearance.
then I used fiberglass to join all of those pieces together into one form, some body filler just for appearance purposes to smooth it out and make it look like it was all one piece to begin with. then I painted it silver so it would blend in with the projector as much as possible.
04-15-2012, 06:08 PM
#18
Tech Contributor
Thread Starter
Thanks!
They were custom built, the design actually evolved one piece at a time.
the main piece of the cap is an ABS project box from radio shack, I made a few adjustments to it and left the top off to make the biggest part of the cap. that didn't extend upwards enough on the back half of he projector, nor was it wide enough. I took a couple of additional boxes, larger this time so the sides were larger and cut the corners off of them to expand the sides. I used a contour gage to cut the shape I needed. I glued them together.
then in then in test fitting I found they extended back farther than they needed to and it hit my mounting bracket, so I measured and cut the back off the caps and replaced it with a single lexan sheet so the cap extends no more than a couple mms farther back than the solenoid unit. on the outermost projectors I also cut the rear corner off and used another lexan piece at a 45* angle. if I had it to do all over again I would have done this to both sides of all of the projectors. since it provides more clearance.
then I used fiberglass to join all of those pieces together into one form, some body filler just for appearance purposes to smooth it out and make it look like it was all one piece to begin with. then I painted it silver so it would blend in with the projector as much as possible.
I have no doubt my solution will be less nice than yours..

I'll go to Radio shack and look for this ABS project box.
Thanks !
Toque
 04-15-2012, 10:10 PM
#20
Melting Slicks
Member Since: Mar 2009
Location: Odessa FL
Posts: 2,300
Received 113 Likes
on
99 Posts
St. Jude Donor '10-'12-'13-'14-'15-'16-'17
I bought they off Ebay with the HID bulbs with it (35W 6000K).
I should have modified the ribs on the bracket back on first install. The projector was kinda touching, but not much. If you install the standard ACA kit, then just look really close when your putting it together. You may feel you don't have to, or you may feel you need to. Its not hard to do at all...
Toque