
Automatic shift knob adapter install
 06-19-2014, 08:14 PM
#41
Racer


I just installed mine last night. No pictures yet, but it looks like Rj-Lo's only in blue pearl. 
I'm a bit concerned with the final result though. Doesn't seem like the **** is very solidly installed. It all works well, but if I lift up on it, I can pull the whole unit off the gear lever.... Am I missing something here? Tighten the set screws more?
And is there nothing you can do (glue?) to keep that black cap from spinning and lifting?
I'm a bit concerned with the final result though. Doesn't seem like the **** is very solidly installed. It all works well, but if I lift up on it, I can pull the whole unit off the gear lever....
Am I missing something here? Tighten the set screws more?And is there nothing you can do (glue?) to keep that black cap from spinning and lifting?
 07-01-2014, 02:08 PM
#42
Melting Slicks

Member Since: Sep 2012
Location: LaGrange Park, IL IL
Posts: 2,308
Received 158 Likes
on
131 Posts
St. Jude Donor '13, '15
I haven't been on here specifically for this project recently, but wanted to get back to my situation.
Has anyone figured out a way though to keep the entire **** and adapter assembly from being lifted off the shifter altogether? Did I drill out too much of the adapter walls? Is this just normal for these types of adapters? I could try to tighten the set screws, but that still won't keep me from pulling the whole thing off. The **** looks awesome, but the movement like this makes the whole thing feel cheap.
Has anyone figured out a way though to keep the entire **** and adapter assembly from being lifted off the shifter altogether? Did I drill out too much of the adapter walls? Is this just normal for these types of adapters? I could try to tighten the set screws, but that still won't keep me from pulling the whole thing off. The **** looks awesome, but the movement like this makes the whole thing feel cheap.
07-01-2014, 02:35 PM
#43
Burning Brakes

Thread Starter
I dunno dude� I didn't have anything going on like that. However in all fairness I can't say that I've really tried to pull up and yank mine off. I don't doubt that I could if I really wanted to but then again why would I want to? Once I tightened the set screw on mine it was very secure. Does it feel loose or anything under normal operation? If not then I'm confused on why your trying to pull it off once its mounted anyway.
I haven't been on here specifically for this project recently, but wanted to get back to my situation.
Has anyone figured out a way though to keep the entire **** and adapter assembly from being lifted off the shifter altogether? Did I drill out too much of the adapter walls? Is this just normal for these types of adapters? I could try to tighten the set screws, but that still won't keep me from pulling the whole thing off. The **** looks awesome, but the movement like this makes the whole thing feel cheap.
Has anyone figured out a way though to keep the entire **** and adapter assembly from being lifted off the shifter altogether? Did I drill out too much of the adapter walls? Is this just normal for these types of adapters? I could try to tighten the set screws, but that still won't keep me from pulling the whole thing off. The **** looks awesome, but the movement like this makes the whole thing feel cheap.
07-01-2014, 02:57 PM
#44
Melting Slicks
Member Since: Sep 2012
Location: LaGrange Park, IL IL
Posts: 2,308
Received 158 Likes
on
131 Posts
St. Jude Donor '13, '15
I dunno dude� I didn't have anything going on like that. However in all fairness I can't say that I've really tried to pull up and yank mine off. I don't doubt that I could if I really wanted to but then again why would I want to? Once I tightened the set screw on mine it was very secure. Does it feel loose or anything under normal operation? If not then I'm confused on why your trying to pull it off once its mounted anyway.
I was following your instructions stating to tighten the set screw to the point where it sticks on the way back up, then loosen it a hair. Maybe I need to be tighter on these? But then will I have problems having it retract?
07-01-2014, 03:51 PM
#45
Burning Brakes
Thread Starter
Gottcha� now I understand. Would drive me nuts too if it was loose thats for sure. I wonder if maybe you drilled it out a little too much. I would try tightening those set screws a smidge and see what that does. if it drags retracting then its too tight. It was kinda finicky as far as getting it just right from what I remember. But your right It shouldn't be loose or shimmy around.
It is loose under normal operation. I'm not really trying to pull it off, but that is my dilemna, it's so loose that I could pull it off without hardly trying. I can shimmy it around. I don't want to, just not sure why mine does so easily.
I was following your instructions stating to tighten the set screw to the point where it sticks on the way back up, then loosen it a hair. Maybe I need to be tighter on these? But then will I have problems having it retract?
I was following your instructions stating to tighten the set screw to the point where it sticks on the way back up, then loosen it a hair. Maybe I need to be tighter on these? But then will I have problems having it retract?
07-01-2014, 04:08 PM
#46
Melting Slicks
Member Since: Sep 2012
Location: LaGrange Park, IL IL
Posts: 2,308
Received 158 Likes
on
131 Posts
St. Jude Donor '13, '15
Gottcha… now I understand. Would drive me nuts too if it was loose thats for sure. I wonder if maybe you drilled it out a little too much. I would try tightening those set screws a smidge and see what that does. if it drags retracting then its too tight. It was kinda finicky as far as getting it just right from what I remember. But your right It shouldn't be loose or shimmy around.
Last edited by imgn tht; 07-01-2014 at 08:39 PM.
07-02-2014, 09:40 AM
#47
Racer
Guys, the way I did mine. With the **** removed there are basically 2 shafts the outer one with the 2 slots and the smaller inner shaft that moves up and down when the button or the **** is pushed down. I lined the set screws up with the slots and tightened them to the inner rod. That way the **** is secure and the set screws move up and down in the slots on the outer shaft. Mine does not move around works smooth and will not come off unless the set screws are loosened.
07-02-2014, 09:54 AM
#49
Melting Slicks
Member Since: Sep 2012
Location: LaGrange Park, IL IL
Posts: 2,308
Received 158 Likes
on
131 Posts
St. Jude Donor '13, '15
Guys, the way I did mine. With the **** removed there are basically 2 shafts the outer one with the 2 slots and the smaller inner shaft that moves up and down when the button or the **** is pushed down. I lined the set screws up with the slots and tightened them to the inner rod. That way the **** is secure and the set screws move up and down in the slots on the outer shaft. Mine does not move around works smooth and will not come off unless the set screws are loosened.

 10-22-2016, 01:27 AM
#51
Burning Brakes
I am looking at one of these adapters on Ebay. Aside from the simple drilling fix to increase the inside diameter of the adapter, how easy is it to shift the through the gears with the adapter in place? It looks like the adapter makes the shifter a little taller.

 10-23-2016, 10:22 PM
#53
Melting Slicks
Member Since: Sep 2012
Location: LaGrange Park, IL IL
Posts: 2,308
Received 158 Likes
on
131 Posts
St. Jude Donor '13, '15
Love mine. It does get a bit taller, but nothing absurd imo. I do feel that I have to push a little bit harder to get it to engage than the stock button type, but the look totally makes up for it.
10-25-2016, 04:19 AM
#54
yep plenty of ways of tweaking it if ya wanna put the time in. I think it would be cool to shorten the whole shifter rod and make the shifter even shorter than stock... project for another day the weekend is here, the top is off, the weather is beautiful, My Bday is tomorrow and its time to have some fun 
 11-02-2017, 08:54 AM
#55
2nd Gear

Member Since: Jun 2016
Posts: 2
Likes: 0
Received 0 Likes
on
0 Posts
Hey y'all, I ordered one of the SICKSPEED brand Automatic shift **** adapters from Ebay and it came in yesterday. Everybody says its a 10 min job which it's probably only a 5 min job if the adapter fits correctly. Mine however did not and took me a little longer. The fix was fairly easy but thought I would post what the issue was and how I handled it to save some frustration for someone else that runs into the same thing.
Pros
1) The kit is fairly cheap and comes with the shift ball.
2) The shift ball is actually really nice
3) When finished it looks great and totally at home IMO
4) Easy to do (would be easier if it fit right the first time)
5) Came with a sticker and everybody loves getting a free sticker
Cons
1) The adapter was not machined to the correct diameter and therefor didn't fit properly.
2) the finished product sticks up slightly higher than the stock shift **** but not a huge deal or anything that anyone who didn't have knowledge of what it looked like before would notice.
3) came with no instructions whatsoever
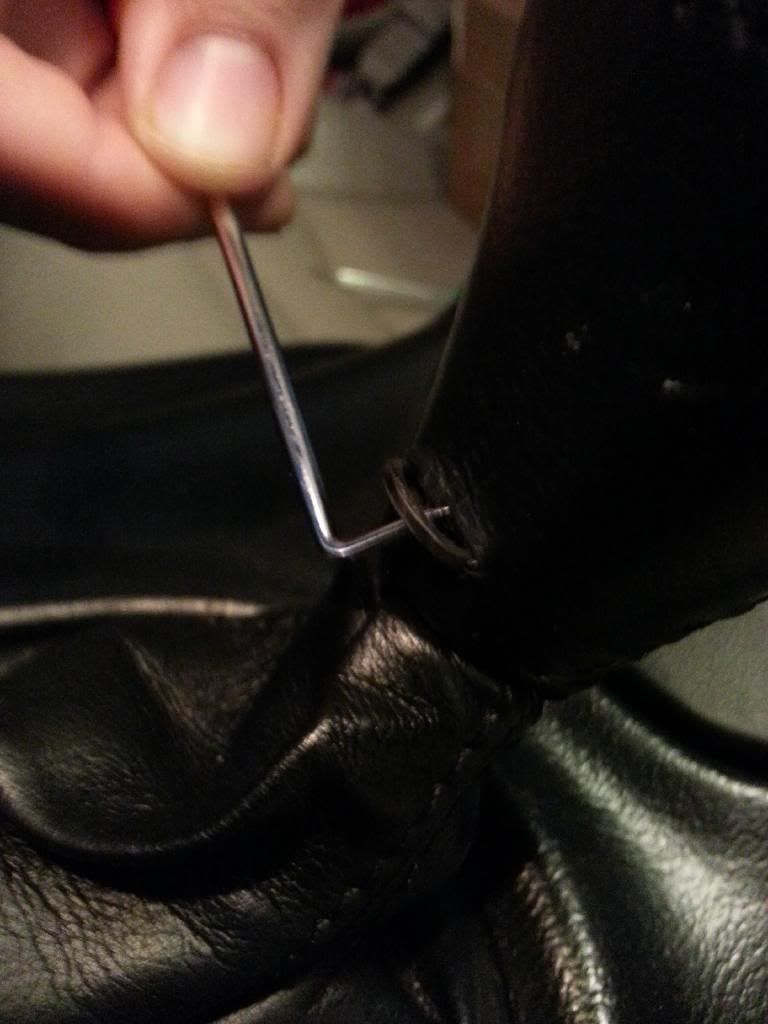
Ok so here we go... In the front(toward the dash) of the shift **** you see a little bar this is the key that holds the shift **** onto the shifter you want to take a small thin flat head screw driver or other similar tool (I used one of my small pics from a $4.99 pick set these thing come in handy so much) and just pop it out. It comes out very easy.
Once out the shift **** just lifts right off
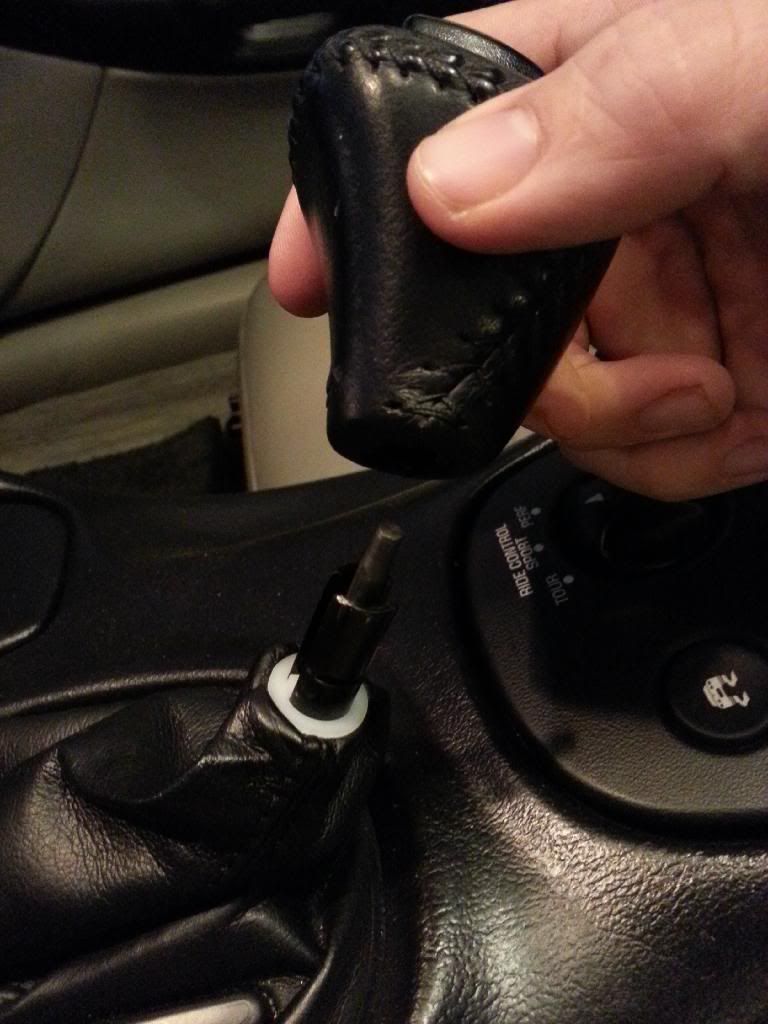
Here is what you have. You need to use your small screwdriver again and slowly and carefully pull the boot from underneath the white retaining ring.
Just keep tugging and using your screwdriver to pull out the boot and work your way around. The more that comes out the easier it gets.
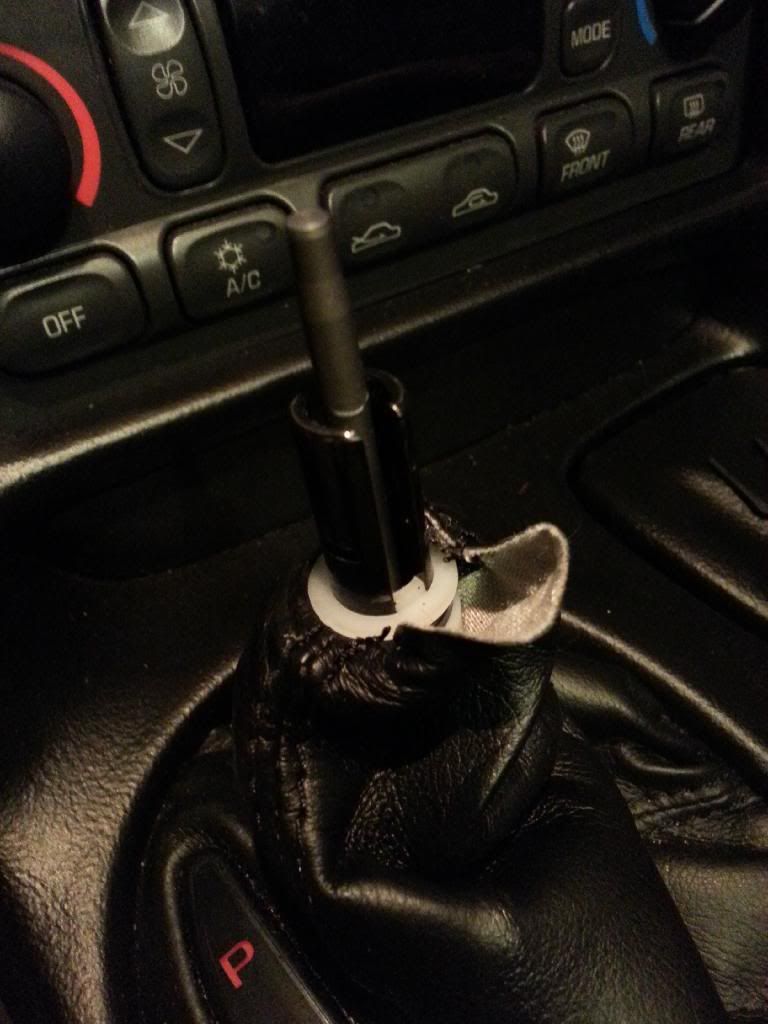
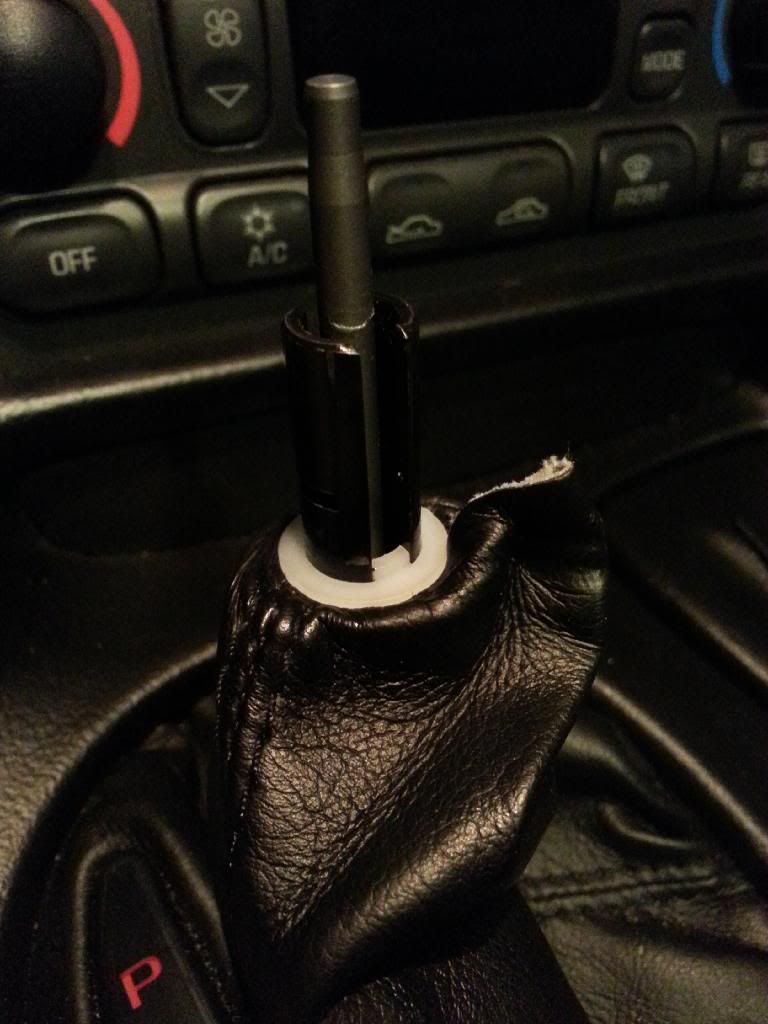
Once it's all out you can see what was holding it on was a tiny little black ziptie I just popped that off. You will no longer need it. Now push the boot down around the shifter
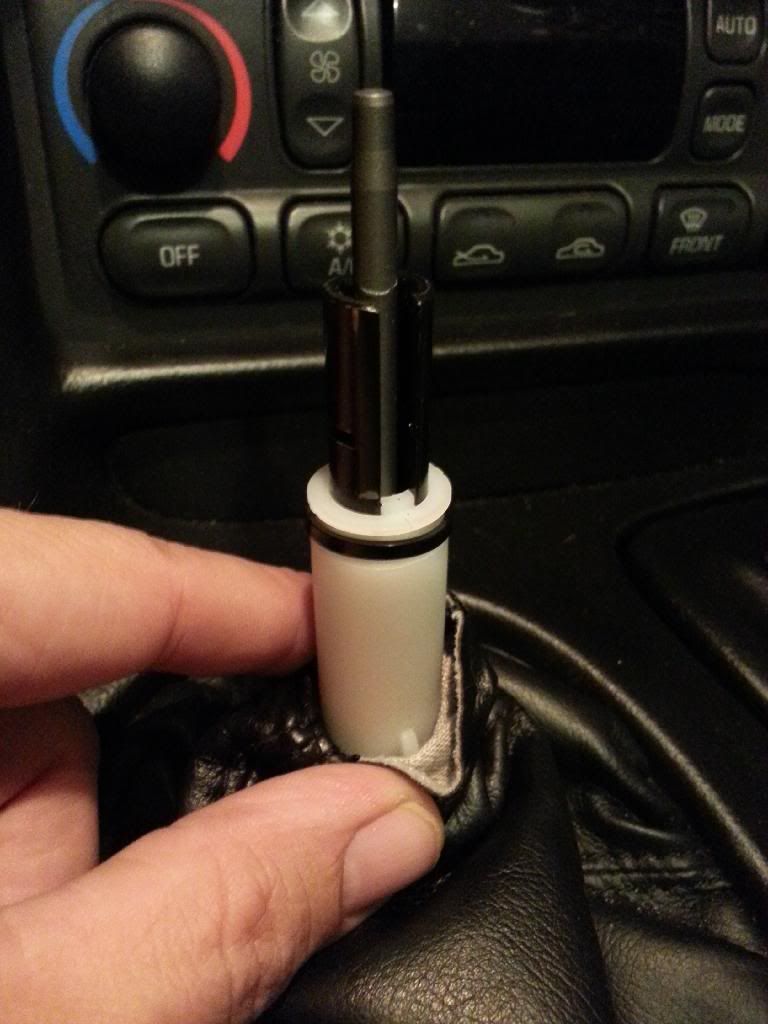
Take the spring that came with the kit and place it over the shifter and slide it all the way down until it stops. This is what will pop the shift ball back up to make sure your shifter still locks into gear.
So far so good right? what have you invested so far to get to this point... maybe 3-4 minutes tops. Well this is where my install came to a hault. You are supposed to then just slide the adapter onto the shifter and slide it all the way till it stops PROBLEM!!!! it doesn't want to go on very easily. As a matter of fact in order to get it to go anywhere near all the way on I have to hit with my hand fairly hard and pound it on... This is NO FREAKING GOOD!! there is no way with it fitting that snug that it will ever return or move up in order to lock. At this point it's either on and jammed in place or it's off. I can see that the diameter of the hole drilled into the adapter is too small and is scraping the metal of the shaft of the shifter so I try to file the shaft a little but that made little to no difference. I figured if I am going to mess something up better to be my new adapter than my shifter sooooo I do what any other logical sane person would do at 9:30 at night when installing their cool new mod and I.....
stick the adapter in a pair of vice grips and grab my drill and drill out the center to make the hole bigger. So that it can slip over the shifter and slide up and down like it's supposed to.
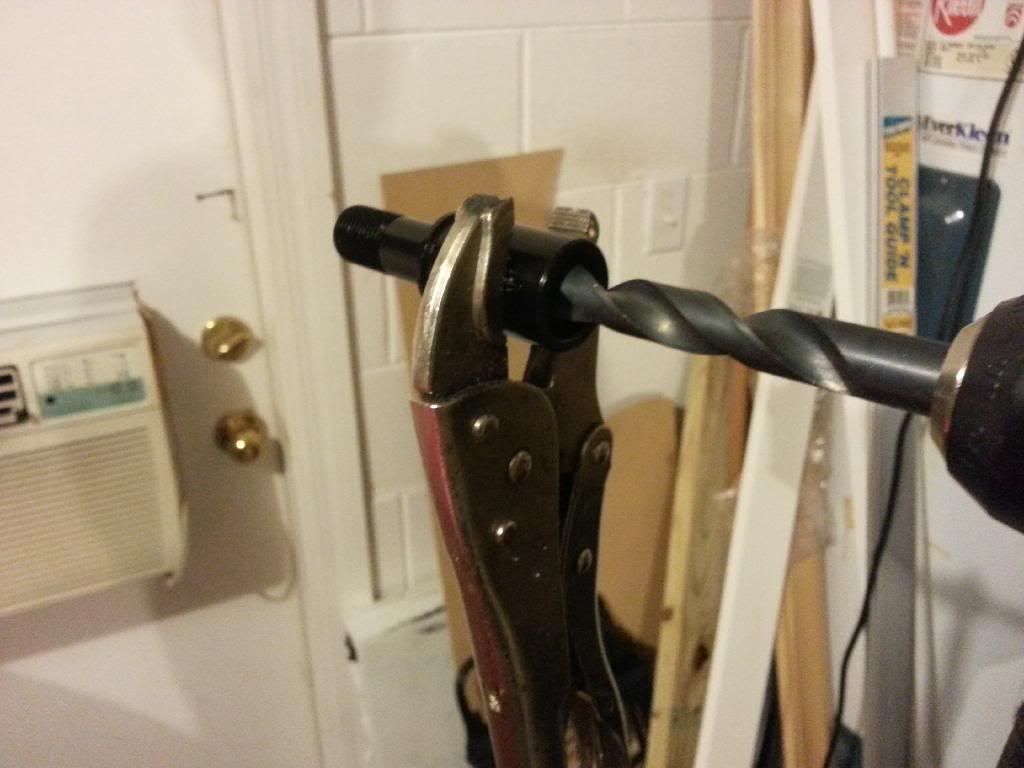
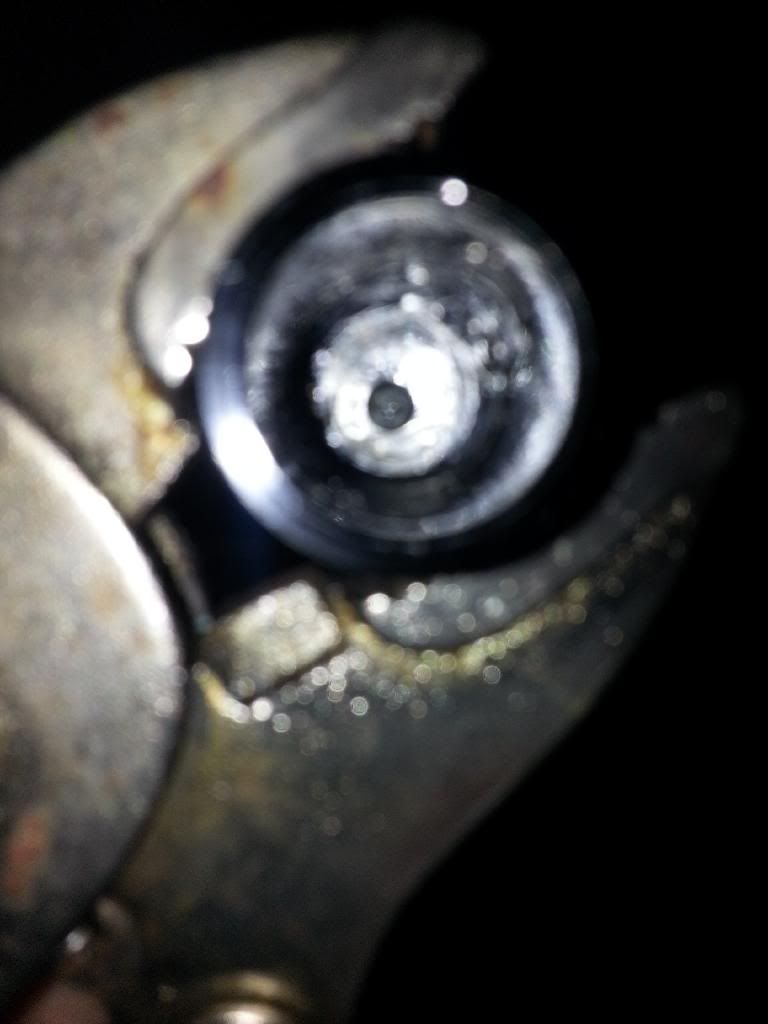
I keep drilling a little more at a time slowly and test fitting and it's getting better and better... this might actually work! This is what the inside looks like when finished. I had to remove quite a bit of material. 2 things to remember 1) GO SLOWLY only take out a little at a time until it fits. 2) If your clamping in vice grips like me or a vice or whatever clamp on the adapter end not the end the threaded end that the shift ball goes on to because that part is visible the adapter side is covered up by the shift boot so if it gets a couple nicks no one will ever see it.
Ok folks almost done with this simple 10 min mod
I put a little grease inside and its on and sliding up and down with ease. There are two small allen screws (one in front and one in back) these press against the center rod and hold it. This is what allows your shifter to unlock and change gears. Tighten them up equally front and back until the you feel the shifter kinda start to stick when you push it down and then loosen up the set screw just a hair until the shifter moves freely and will come right back up all on its own after you push it down . do the the other screw the same way. Your almost done!
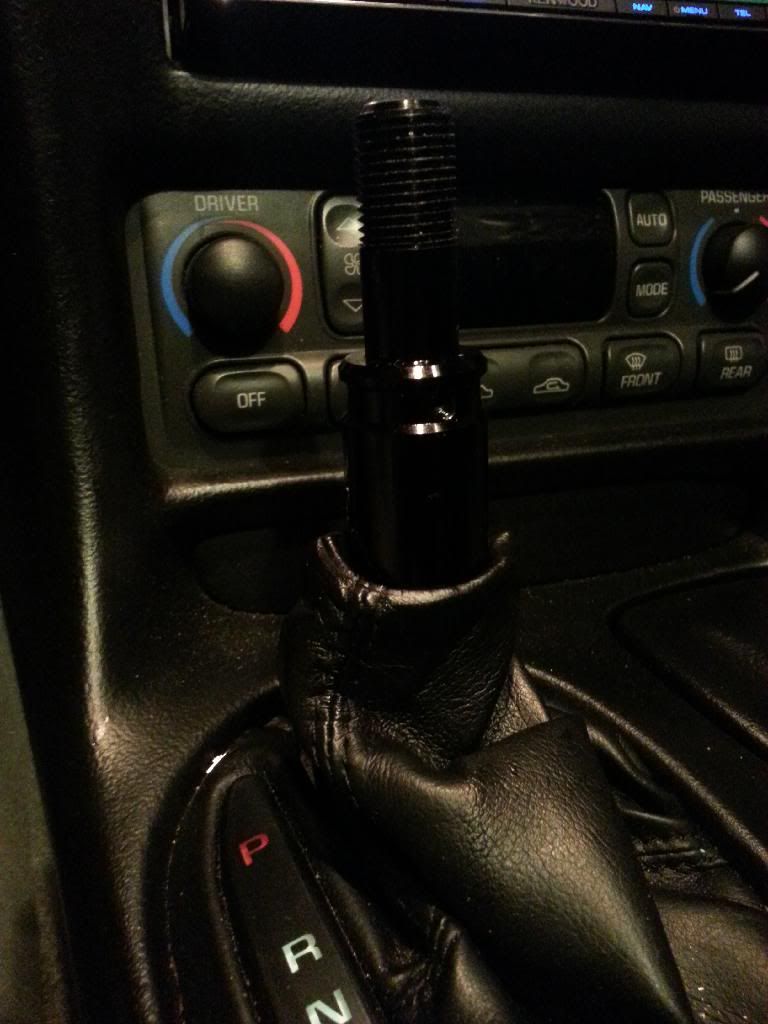
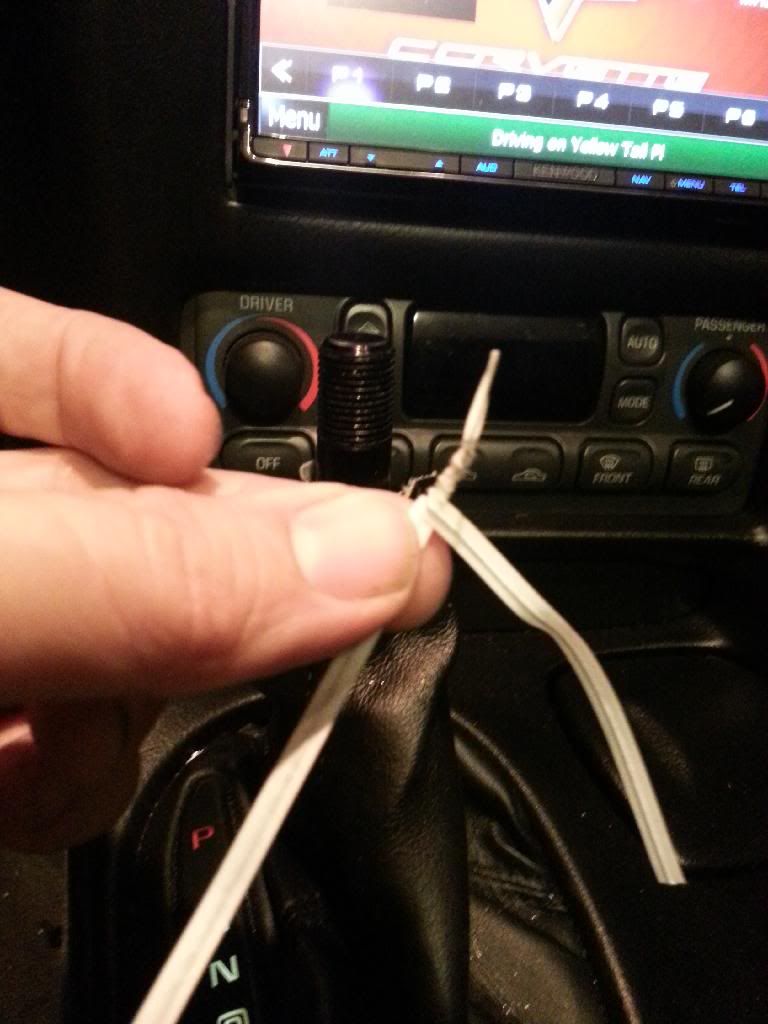
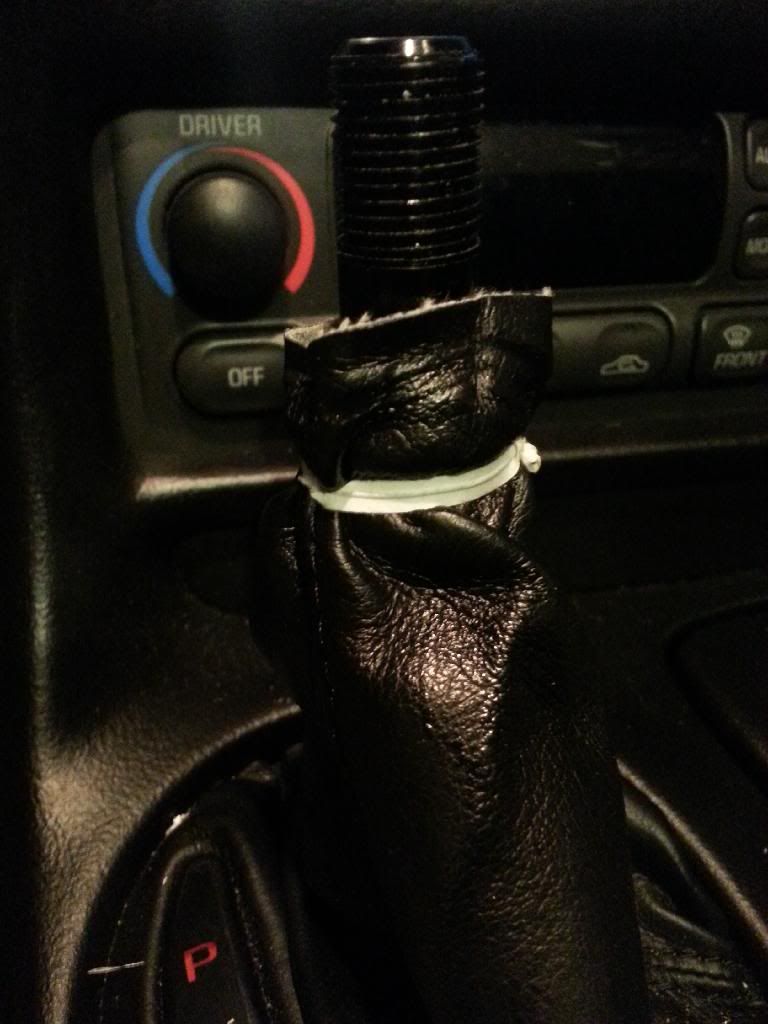
Now time to secure the shift boot to the adapter. I had some tiny zipties and thought i just secure it the same way however they were not quite long enough and they were too bulky to fit under the black sleeve that covers up the edge of the boot.... so I pirate rigged it with some (bowing head in shame) twisty ties! I almost can't say that without cracking myself up YES I USED TWISTY TIES to hold my vette together anyway it worked! I just twisted a couple together then twisted it tight around the top of the adapter then just twisted them until the excess broke off now the boot was secure and the sleeve fit over it no problem at all and covered everything up perfect.
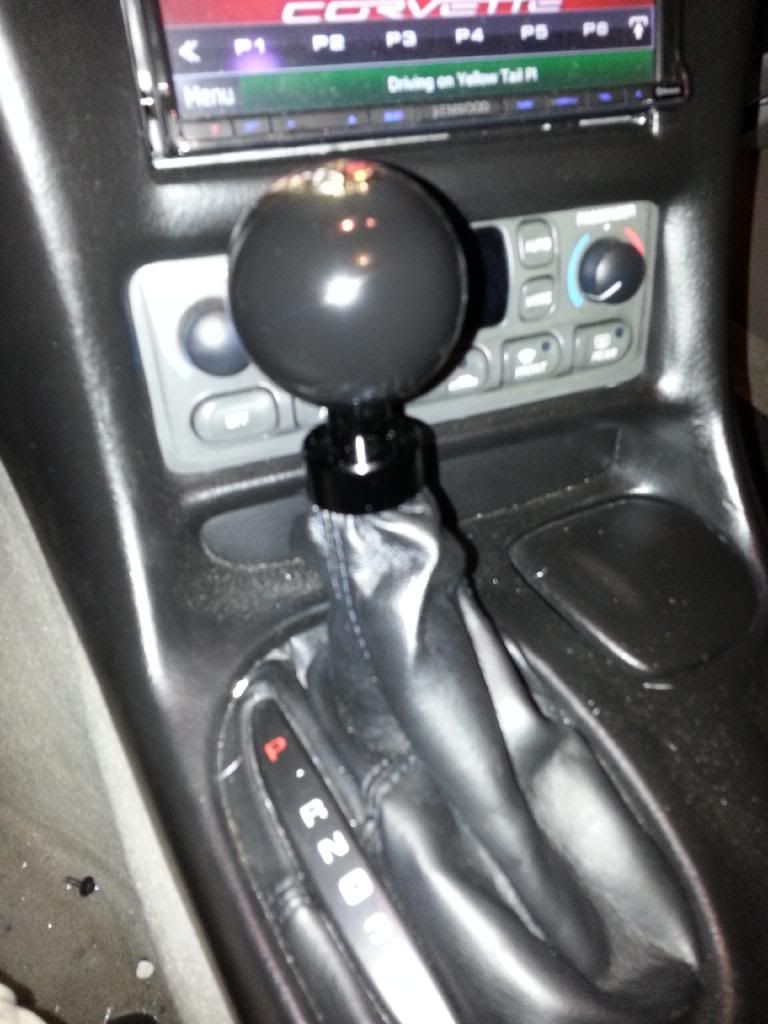
And finally it's time for the Pi�ce de r�sistance... the shift ****!

Once out the shift **** just lifts right off

Here is what you have. You need to use your small screwdriver again and slowly and carefully pull the boot from underneath the white retaining ring.

Just keep tugging and using your screwdriver to pull out the boot and work your way around. The more that comes out the easier it gets.

Once it's all out you can see what was holding it on was a tiny little black ziptie I just popped that off. You will no longer need it. Now push the boot down around the shifter

Take the spring that came with the kit and place it over the shifter and slide it all the way down until it stops. This is what will pop the shift ball back up to make sure your shifter still locks into gear.
So far so good right? what have you invested so far to get to this point... maybe 3-4 minutes tops. Well this is where my install came to a hault. You are supposed to then just slide the adapter onto the shifter and slide it all the way till it stops PROBLEM!!!! it doesn't want to go on very easily. As a matter of fact in order to get it to go anywhere near all the way on I have to hit with my hand fairly hard and pound it on... This is NO FREAKING GOOD!! there is no way with it fitting that snug that it will ever return or move up in order to lock. At this point it's either on and jammed in place or it's off. I can see that the diameter of the hole drilled into the adapter is too small and is scraping the metal of the shaft of the shifter so I try to file the shaft a little but that made little to no difference. I figured if I am going to mess something up better to be my new adapter than my shifter sooooo I do what any other logical sane person would do at 9:30 at night when installing their cool new mod and I.....
stick the adapter in a pair of vice grips and grab my drill and drill out the center to make the hole bigger. So that it can slip over the shifter and slide up and down like it's supposed to.

I keep drilling a little more at a time slowly and test fitting and it's getting better and better... this might actually work! This is what the inside looks like when finished. I had to remove quite a bit of material. 2 things to remember 1) GO SLOWLY only take out a little at a time until it fits. 2) If your clamping in vice grips like me or a vice or whatever clamp on the adapter end not the end the threaded end that the shift ball goes on to because that part is visible the adapter side is covered up by the shift boot so if it gets a couple nicks no one will ever see it.

Ok folks almost done with this simple 10 min mod
I put a little grease inside and its on and sliding up and down with ease. There are two small allen screws (one in front and one in back) these press against the center rod and hold it. This is what allows your shifter to unlock and change gears. Tighten them up equally front and back until the you feel the shifter kinda start to stick when you push it down and then loosen up the set screw just a hair until the shifter moves freely and will come right back up all on its own after you push it down . do the the other screw the same way. Your almost done!

Now time to secure the shift boot to the adapter. I had some tiny zipties and thought i just secure it the same way however they were not quite long enough and they were too bulky to fit under the black sleeve that covers up the edge of the boot.... so I pirate rigged it with some (bowing head in shame) twisty ties! I almost can't say that without cracking myself up YES I USED TWISTY TIES to hold my vette together
anyway it worked! I just twisted a couple together then twisted it tight around the top of the adapter then just twisted them until the excess broke off now the boot was secure and the sleeve fit over it no problem at all and covered everything up perfect.

And finally it's time for the Pi�ce de r�sistance... the shift ****!

Would you be able to Email me your install post so I can buy one and install?
Please let me know
Daddymae@icloud.com
Thanks!
11-02-2017, 09:12 AM
#56
2nd Gear
Member Since: Jun 2016
Posts: 2
Likes: 0
Received 0 Likes
on
0 Posts
Hey y'all, I ordered one of the SICKSPEED brand Automatic shift **** adapters from Ebay and it came in yesterday. Everybody says its a 10 min job which it's probably only a 5 min job if the adapter fits correctly. Mine however did not and took me a little longer. The fix was fairly easy but thought I would post what the issue was and how I handled it to save some frustration for someone else that runs into the same thing.
Pros
1) The kit is fairly cheap and comes with the shift ball.
2) The shift ball is actually really nice
3) When finished it looks great and totally at home IMO
4) Easy to do (would be easier if it fit right the first time)
5) Came with a sticker and everybody loves getting a free sticker
Cons
1) The adapter was not machined to the correct diameter and therefor didn't fit properly.
2) the finished product sticks up slightly higher than the stock shift **** but not a huge deal or anything that anyone who didn't have knowledge of what it looked like before would notice.
3) came with no instructions whatsoever
Pros
1) The kit is fairly cheap and comes with the shift ball.
2) The shift ball is actually really nice
3) When finished it looks great and totally at home IMO
4) Easy to do (would be easier if it fit right the first time)
5) Came with a sticker and everybody loves getting a free sticker
Cons
1) The adapter was not machined to the correct diameter and therefor didn't fit properly.
2) the finished product sticks up slightly higher than the stock shift **** but not a huge deal or anything that anyone who didn't have knowledge of what it looked like before would notice.
3) came with no instructions whatsoever
Ok so here we go... In the front(toward the dash) of the shift **** you see a little bar this is the key that holds the shift **** onto the shifter you want to take a small thin flat head screw driver or other similar tool (I used one of my small pics from a $4.99 pick set these thing come in handy so much) and just pop it out. It comes out very easy.
Once out the shift **** just lifts right off
Here is what you have. You need to use your small screwdriver again and slowly and carefully pull the boot from underneath the white retaining ring.
Just keep tugging and using your screwdriver to pull out the boot and work your way around. The more that comes out the easier it gets.
Once it's all out you can see what was holding it on was a tiny little black ziptie I just popped that off. You will no longer need it. Now push the boot down around the shifter
Take the spring that came with the kit and place it over the shifter and slide it all the way down until it stops. This is what will pop the shift ball back up to make sure your shifter still locks into gear.
So far so good right? what have you invested so far to get to this point... maybe 3-4 minutes tops. Well this is where my install came to a hault. You are supposed to then just slide the adapter onto the shifter and slide it all the way till it stops PROBLEM!!!! it doesn't want to go on very easily. As a matter of fact in order to get it to go anywhere near all the way on I have to hit with my hand fairly hard and pound it on... This is NO FREAKING GOOD!! there is no way with it fitting that snug that it will ever return or move up in order to lock. At this point it's either on and jammed in place or it's off. I can see that the diameter of the hole drilled into the adapter is too small and is scraping the metal of the shaft of the shifter so I try to file the shaft a little but that made little to no difference. I figured if I am going to mess something up better to be my new adapter than my shifter sooooo I do what any other logical sane person would do at 9:30 at night when installing their cool new mod and I.....
stick the adapter in a pair of vice grips and grab my drill and drill out the center to make the hole bigger. So that it can slip over the shifter and slide up and down like it's supposed to.
I keep drilling a little more at a time slowly and test fitting and it's getting better and better... this might actually work! This is what the inside looks like when finished. I had to remove quite a bit of material. 2 things to remember 1) GO SLOWLY only take out a little at a time until it fits. 2) If your clamping in vice grips like me or a vice or whatever clamp on the adapter end not the end the threaded end that the shift ball goes on to because that part is visible the adapter side is covered up by the shift boot so if it gets a couple nicks no one will ever see it.
Ok folks almost done with this simple 10 min mod
I put a little grease inside and its on and sliding up and down with ease. There are two small allen screws (one in front and one in back) these press against the center rod and hold it. This is what allows your shifter to unlock and change gears. Tighten them up equally front and back until the you feel the shifter kinda start to stick when you push it down and then loosen up the set screw just a hair until the shifter moves freely and will come right back up all on its own after you push it down . do the the other screw the same way. Your almost done!
Now time to secure the shift boot to the adapter. I had some tiny zipties and thought i just secure it the same way however they were not quite long enough and they were too bulky to fit under the black sleeve that covers up the edge of the boot.... so I pirate rigged it with some (bowing head in shame) twisty ties! I almost can't say that without cracking myself up YES I USED TWISTY TIES to hold my vette together anyway it worked! I just twisted a couple together then twisted it tight around the top of the adapter then just twisted them until the excess broke off now the boot was secure and the sleeve fit over it no problem at all and covered everything up perfect.
And finally it's time for the Pi�ce de r�sistance... the shift ****!
Once out the shift **** just lifts right off
Here is what you have. You need to use your small screwdriver again and slowly and carefully pull the boot from underneath the white retaining ring.
Just keep tugging and using your screwdriver to pull out the boot and work your way around. The more that comes out the easier it gets.
Once it's all out you can see what was holding it on was a tiny little black ziptie I just popped that off. You will no longer need it. Now push the boot down around the shifter
Take the spring that came with the kit and place it over the shifter and slide it all the way down until it stops. This is what will pop the shift ball back up to make sure your shifter still locks into gear.
So far so good right? what have you invested so far to get to this point... maybe 3-4 minutes tops. Well this is where my install came to a hault. You are supposed to then just slide the adapter onto the shifter and slide it all the way till it stops PROBLEM!!!! it doesn't want to go on very easily. As a matter of fact in order to get it to go anywhere near all the way on I have to hit with my hand fairly hard and pound it on... This is NO FREAKING GOOD!! there is no way with it fitting that snug that it will ever return or move up in order to lock. At this point it's either on and jammed in place or it's off. I can see that the diameter of the hole drilled into the adapter is too small and is scraping the metal of the shaft of the shifter so I try to file the shaft a little but that made little to no difference. I figured if I am going to mess something up better to be my new adapter than my shifter sooooo I do what any other logical sane person would do at 9:30 at night when installing their cool new mod and I.....
stick the adapter in a pair of vice grips and grab my drill and drill out the center to make the hole bigger. So that it can slip over the shifter and slide up and down like it's supposed to.
I keep drilling a little more at a time slowly and test fitting and it's getting better and better... this might actually work! This is what the inside looks like when finished. I had to remove quite a bit of material. 2 things to remember 1) GO SLOWLY only take out a little at a time until it fits. 2) If your clamping in vice grips like me or a vice or whatever clamp on the adapter end not the end the threaded end that the shift ball goes on to because that part is visible the adapter side is covered up by the shift boot so if it gets a couple nicks no one will ever see it.
Ok folks almost done with this simple 10 min mod
I put a little grease inside and its on and sliding up and down with ease. There are two small allen screws (one in front and one in back) these press against the center rod and hold it. This is what allows your shifter to unlock and change gears. Tighten them up equally front and back until the you feel the shifter kinda start to stick when you push it down and then loosen up the set screw just a hair until the shifter moves freely and will come right back up all on its own after you push it down . do the the other screw the same way. Your almost done!
Now time to secure the shift boot to the adapter. I had some tiny zipties and thought i just secure it the same way however they were not quite long enough and they were too bulky to fit under the black sleeve that covers up the edge of the boot.... so I pirate rigged it with some (bowing head in shame) twisty ties! I almost can't say that without cracking myself up YES I USED TWISTY TIES to hold my vette together
anyway it worked! I just twisted a couple together then twisted it tight around the top of the adapter then just twisted them until the excess broke off now the boot was secure and the sleeve fit over it no problem at all and covered everything up perfect.And finally it's time for the Pi�ce de r�sistance... the shift ****!
Would you be able to Email me your install post so I can buy one and install?
Please let me know
Daddymae@icloud.com
Thanks!
05-01-2018, 05:30 PM
#57
Heel & Toe

Member Since: Apr 2018
Posts: 20
Likes: 0
Received 0 Likes
on
0 Posts
Hey y'all, I ordered one of the SICKSPEED brand Automatic shift **** adapters from Ebay and it came in yesterday. Everybody says its a 10 min job which it's probably only a 5 min job if the adapter fits correctly. Mine however did not and took me a little longer. The fix was fairly easy but thought I would post what the issue was and how I handled it to save some frustration for someone else that runs into the same thing.
Pros
1) The kit is fairly cheap and comes with the shift ball.
2) The shift ball is actually really nice
3) When finished it looks great and totally at home IMO
4) Easy to do (would be easier if it fit right the first time)
5) Came with a sticker and everybody loves getting a free sticker
Cons
1) The adapter was not machined to the correct diameter and therefor didn't fit properly.
2) the finished product sticks up slightly higher than the stock shift **** but not a huge deal or anything that anyone who didn't have knowledge of what it looked like before would notice.
3) came with no instructions whatsoever
Pros
1) The kit is fairly cheap and comes with the shift ball.
2) The shift ball is actually really nice
3) When finished it looks great and totally at home IMO
4) Easy to do (would be easier if it fit right the first time)
5) Came with a sticker and everybody loves getting a free sticker
Cons
1) The adapter was not machined to the correct diameter and therefor didn't fit properly.
2) the finished product sticks up slightly higher than the stock shift **** but not a huge deal or anything that anyone who didn't have knowledge of what it looked like before would notice.
3) came with no instructions whatsoever
Ok so here we go... In the front(toward the dash) of the shift **** you see a little bar this is the key that holds the shift **** onto the shifter you want to take a small thin flat head screw driver or other similar tool (I used one of my small pics from a $4.99 pick set these thing come in handy so much) and just pop it out. It comes out very easy.
Once out the shift **** just lifts right off
Here is what you have. You need to use your small screwdriver again and slowly and carefully pull the boot from underneath the white retaining ring.
Just keep tugging and using your screwdriver to pull out the boot and work your way around. The more that comes out the easier it gets.
Once it's all out you can see what was holding it on was a tiny little black ziptie I just popped that off. You will no longer need it. Now push the boot down around the shifter
Take the spring that came with the kit and place it over the shifter and slide it all the way down until it stops. This is what will pop the shift ball back up to make sure your shifter still locks into gear.
So far so good right? what have you invested so far to get to this point... maybe 3-4 minutes tops. Well this is where my install came to a hault. You are supposed to then just slide the adapter onto the shifter and slide it all the way till it stops PROBLEM!!!! it doesn't want to go on very easily. As a matter of fact in order to get it to go anywhere near all the way on I have to hit with my hand fairly hard and pound it on... This is NO FREAKING GOOD!! there is no way with it fitting that snug that it will ever return or move up in order to lock. At this point it's either on and jammed in place or it's off. I can see that the diameter of the hole drilled into the adapter is too small and is scraping the metal of the shaft of the shifter so I try to file the shaft a little but that made little to no difference. I figured if I am going to mess something up better to be my new adapter than my shifter sooooo I do what any other logical sane person would do at 9:30 at night when installing their cool new mod and I.....
stick the adapter in a pair of vice grips and grab my drill and drill out the center to make the hole bigger. So that it can slip over the shifter and slide up and down like it's supposed to.
I keep drilling a little more at a time slowly and test fitting and it's getting better and better... this might actually work! This is what the inside looks like when finished. I had to remove quite a bit of material. 2 things to remember 1) GO SLOWLY only take out a little at a time until it fits. 2) If your clamping in vice grips like me or a vice or whatever clamp on the adapter end not the end the threaded end that the shift ball goes on to because that part is visible the adapter side is covered up by the shift boot so if it gets a couple nicks no one will ever see it.
Ok folks almost done with this simple 10 min mod
I put a little grease inside and its on and sliding up and down with ease. There are two small allen screws (one in front and one in back) these press against the center rod and hold it. This is what allows your shifter to unlock and change gears. Tighten them up equally front and back until the you feel the shifter kinda start to stick when you push it down and then loosen up the set screw just a hair until the shifter moves freely and will come right back up all on its own after you push it down . do the the other screw the same way. Your almost done!
Now time to secure the shift boot to the adapter. I had some tiny zipties and thought i just secure it the same way however they were not quite long enough and they were too bulky to fit under the black sleeve that covers up the edge of the boot.... so I pirate rigged it with some (bowing head in shame) twisty ties! I almost can't say that without cracking myself up YES I USED TWISTY TIES to hold my vette together anyway it worked! I just twisted a couple together then twisted it tight around the top of the adapter then just twisted them until the excess broke off now the boot was secure and the sleeve fit over it no problem at all and covered everything up perfect.
And finally it's time for the Pi�ce de r�sistance... the shift ****!
Once out the shift **** just lifts right off
Here is what you have. You need to use your small screwdriver again and slowly and carefully pull the boot from underneath the white retaining ring.
Just keep tugging and using your screwdriver to pull out the boot and work your way around. The more that comes out the easier it gets.
Once it's all out you can see what was holding it on was a tiny little black ziptie I just popped that off. You will no longer need it. Now push the boot down around the shifter
Take the spring that came with the kit and place it over the shifter and slide it all the way down until it stops. This is what will pop the shift ball back up to make sure your shifter still locks into gear.
So far so good right? what have you invested so far to get to this point... maybe 3-4 minutes tops. Well this is where my install came to a hault. You are supposed to then just slide the adapter onto the shifter and slide it all the way till it stops PROBLEM!!!! it doesn't want to go on very easily. As a matter of fact in order to get it to go anywhere near all the way on I have to hit with my hand fairly hard and pound it on... This is NO FREAKING GOOD!! there is no way with it fitting that snug that it will ever return or move up in order to lock. At this point it's either on and jammed in place or it's off. I can see that the diameter of the hole drilled into the adapter is too small and is scraping the metal of the shaft of the shifter so I try to file the shaft a little but that made little to no difference. I figured if I am going to mess something up better to be my new adapter than my shifter sooooo I do what any other logical sane person would do at 9:30 at night when installing their cool new mod and I.....
stick the adapter in a pair of vice grips and grab my drill and drill out the center to make the hole bigger. So that it can slip over the shifter and slide up and down like it's supposed to.
I keep drilling a little more at a time slowly and test fitting and it's getting better and better... this might actually work! This is what the inside looks like when finished. I had to remove quite a bit of material. 2 things to remember 1) GO SLOWLY only take out a little at a time until it fits. 2) If your clamping in vice grips like me or a vice or whatever clamp on the adapter end not the end the threaded end that the shift ball goes on to because that part is visible the adapter side is covered up by the shift boot so if it gets a couple nicks no one will ever see it.
Ok folks almost done with this simple 10 min mod
I put a little grease inside and its on and sliding up and down with ease. There are two small allen screws (one in front and one in back) these press against the center rod and hold it. This is what allows your shifter to unlock and change gears. Tighten them up equally front and back until the you feel the shifter kinda start to stick when you push it down and then loosen up the set screw just a hair until the shifter moves freely and will come right back up all on its own after you push it down . do the the other screw the same way. Your almost done!
Now time to secure the shift boot to the adapter. I had some tiny zipties and thought i just secure it the same way however they were not quite long enough and they were too bulky to fit under the black sleeve that covers up the edge of the boot.... so I pirate rigged it with some (bowing head in shame) twisty ties! I almost can't say that without cracking myself up YES I USED TWISTY TIES to hold my vette together
anyway it worked! I just twisted a couple together then twisted it tight around the top of the adapter then just twisted them until the excess broke off now the boot was secure and the sleeve fit over it no problem at all and covered everything up perfect.And finally it's time for the Pi�ce de r�sistance... the shift ****!
05-01-2018, 07:48 PM
#60
Burning Brakes
I don't understand what is happening with these photo sharing applications suddenly not allowing sharing on forums. There are broken links on every forum imaginable.