Show me your Valve Covers with Coil relocation setups !
 10-12-2014, 11:29 AM
#61


I found that 38" wires worked great for me since my routing from the fenders was near mid-engine on both sides. Better to have too much wire than not enough. Allowed me to do emergency surgery on one of my wires this morning due to a "goober" move I did (pulled from the wire instead of the boot). Had enough slack to fix the plug connection back onto the wire and runs perfectly

Last edited by MAJ_Charlie; 10-12-2014 at 11:33 AM.

The following users liked this post:
Daniel Day (05-16-2016)
10-12-2014, 11:45 AM
#62
Tech Contributor
Thread Starter
 10-13-2014, 12:42 PM
#63
Burning Brakes


here are my proforms in cast grey color.
the nice thing about these are the factory style baffles !!
the nice thing about these are the factory style baffles !!


Last edited by LedfootLarry; 10-13-2014 at 12:56 PM. Reason: add photo
10-18-2014, 11:52 PM
#65
Race Director


Member Since: Dec 2010
Location: Atlanta, GA
Posts: 10,426
Received 1,260 Likes
on
1,055 Posts
2020 Corvette of the Year Finalist (performance mods)
C5 of Year Winner (performance mods) 2019

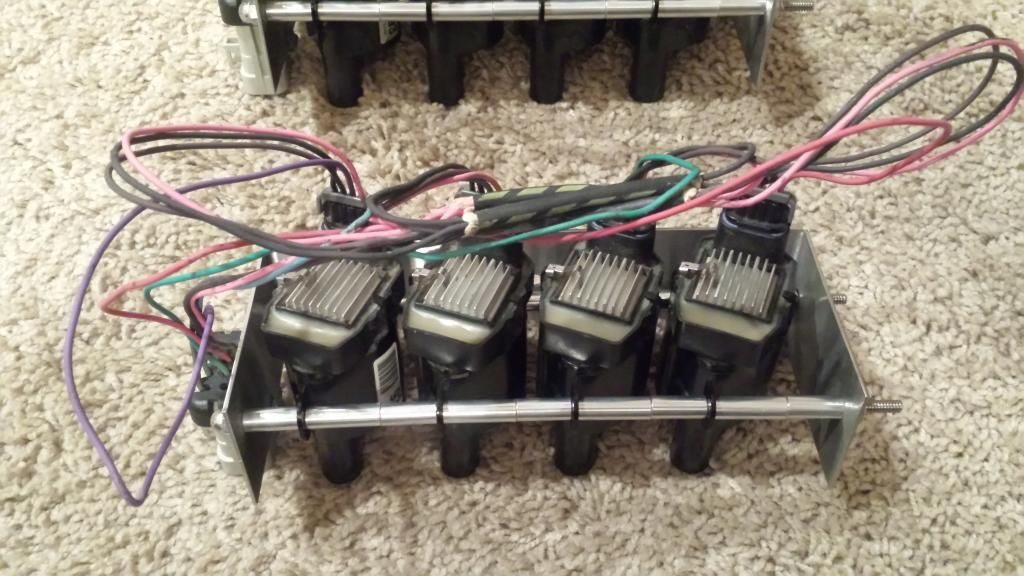
I've been gathering parts for my coil relocation setup... I have a bunch of other crap going on with the car besides this so it's going to be a looooonng project... sorry if any of these pics suck, I just took some quick shots with my phone
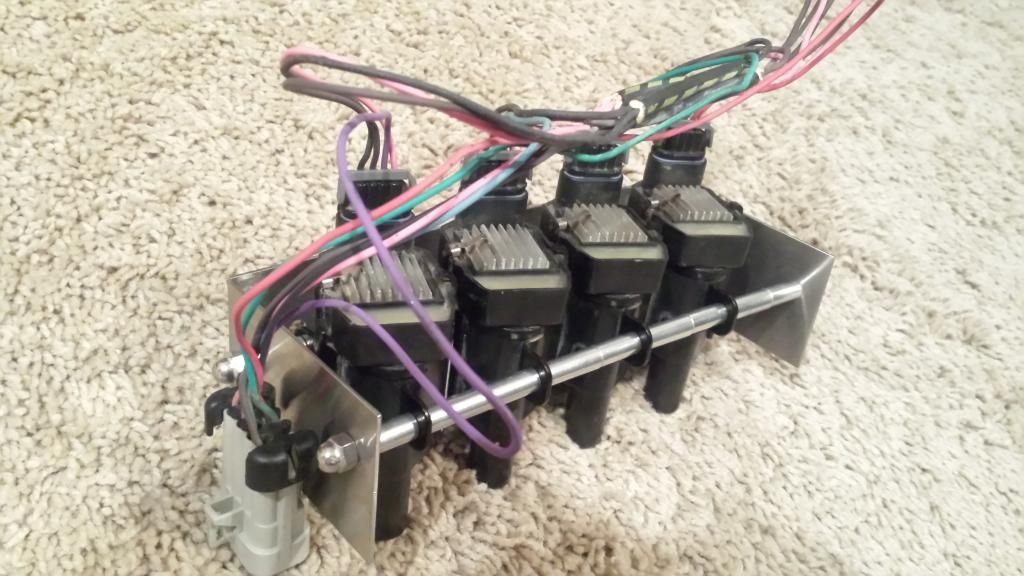
picked up some truck coils with heatsinks and some brackets to mount them... I've been toying around with finding a place behind the fenders to mount them... I hope I can find room where they won't interfere with anything, I might have to grind the sharp edges down to slim them a bit to help with clearance... once I verify that they fit I'm going to shorten each end of the harness and cover it with heat shrink and some type of loom

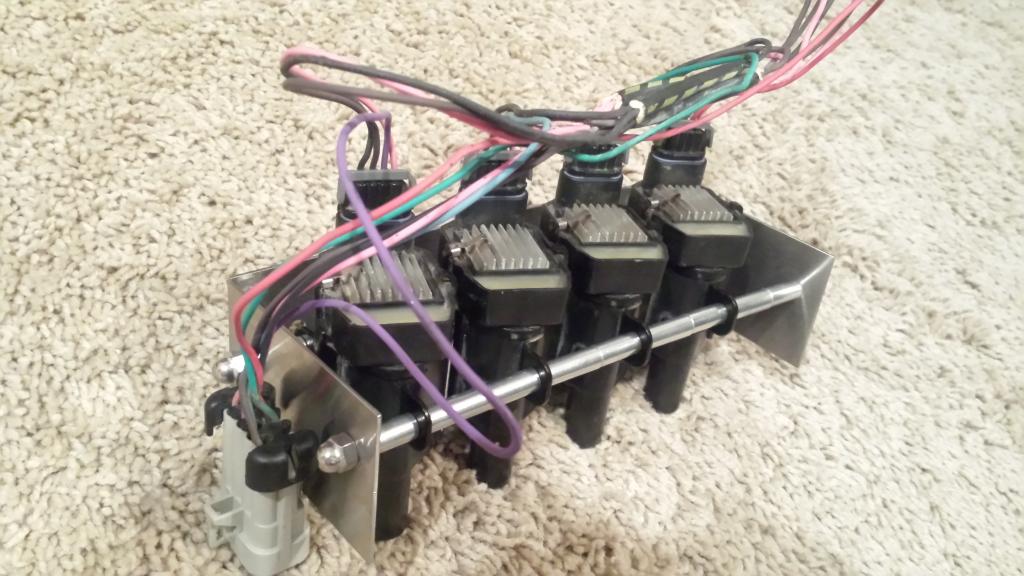
I'm going to use Taylor thundervolt wires (had bad experiences with msd)... this is a universal set so you have to cut to length and crimp your own ends... I got some with 90� spark plug ends instead of straight ends so I can run them under the headers for a more stealth look... I test fitted them and the plug ends cleared the primaries of my lg superpros, for anyone with those headers you know how bad they are with plug wire routing... the universal set only comes with distributor/hei ends so you will have to buy a set of ls coil ends to make them work... depending on how I end up routing them I might have to buy a couple of longer wires... maybe not the cheapest route but I think it will look clean when it's done


and these are the valve covers I ended up getting... haven't came in yet but they are gm performance 2" covers... I had originally planned to use my stock covers and grind the tabs off and have them hydrodipped in carbon fiber but I abandoned that idea quickly... I never realized how much casting slag there is on our valve covers so the whole cover would need to be sanded smooth and a lot of metal filler in the coil mounting holes and the horizontal lines in between the bolts in order to get them smooth for dipping/painting... in other words just way too much work... I'm going to take the new covers and have some -10 bungs welded into them for my breather can and then see how they turn out with dipping... if I don't like that I'll just have them powdercoated black

picked up some truck coils with heatsinks and some brackets to mount them... I've been toying around with finding a place behind the fenders to mount them... I hope I can find room where they won't interfere with anything, I might have to grind the sharp edges down to slim them a bit to help with clearance... once I verify that they fit I'm going to shorten each end of the harness and cover it with heat shrink and some type of loom
I'm going to use Taylor thundervolt wires (had bad experiences with msd)... this is a universal set so you have to cut to length and crimp your own ends... I got some with 90� spark plug ends instead of straight ends so I can run them under the headers for a more stealth look... I test fitted them and the plug ends cleared the primaries of my lg superpros, for anyone with those headers you know how bad they are with plug wire routing... the universal set only comes with distributor/hei ends so you will have to buy a set of ls coil ends to make them work... depending on how I end up routing them I might have to buy a couple of longer wires... maybe not the cheapest route but I think it will look clean when it's done
and these are the valve covers I ended up getting... haven't came in yet but they are gm performance 2" covers... I had originally planned to use my stock covers and grind the tabs off and have them hydrodipped in carbon fiber but I abandoned that idea quickly... I never realized how much casting slag there is on our valve covers so the whole cover would need to be sanded smooth and a lot of metal filler in the coil mounting holes and the horizontal lines in between the bolts in order to get them smooth for dipping/painting... in other words just way too much work... I'm going to take the new covers and have some -10 bungs welded into them for my breather can and then see how they turn out with dipping... if I don't like that I'll just have them powdercoated black
10-19-2014, 10:39 AM
#66
Team Owner


You can see where I relocated my coils further up in this thread. I also have the same wires neutron82 is using. I am running the LS7 exhaust manifolds so, hopefully, they will effectively hide the wires.
I did, at one point, polish my stock valve covers. Took me a couple of days and was not fun.That is some really hard aluminum - maybe cast 356. It took a lot of polishing with a metal polishing kit from Caswell. First I sand-blasted them and then hit them with a series of different grades of compounds to smooth the finish out using an electric drill and polishing *****. It took me many hours and lots of elbow grease to get them this way.
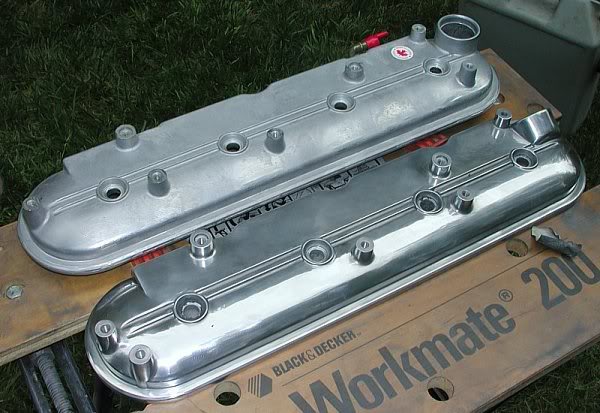
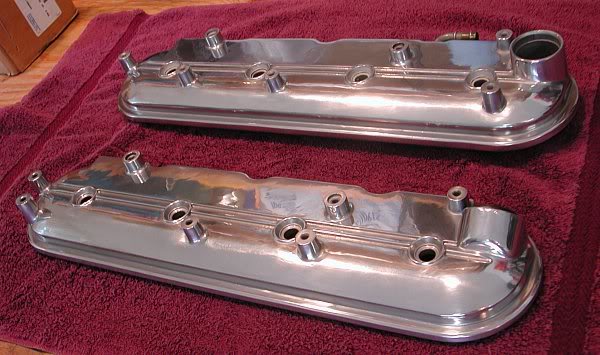
I now have a set of aftermarket vc's just like Toque's but I'm leaving mine polished to go with the theme of my bay. It's a work in progress so no finished pics yet.
I did, at one point, polish my stock valve covers. Took me a couple of days and was not fun.That is some really hard aluminum - maybe cast 356. It took a lot of polishing with a metal polishing kit from Caswell. First I sand-blasted them and then hit them with a series of different grades of compounds to smooth the finish out using an electric drill and polishing *****. It took me many hours and lots of elbow grease to get them this way.
I now have a set of aftermarket vc's just like Toque's but I'm leaving mine polished to go with the theme of my bay. It's a work in progress so no finished pics yet.
10-19-2014, 11:08 AM
#67
Tech Contributor
Thread Starter
I've been gathering parts for my coil relocation setup... I have a bunch of other crap going on with the car besides this so it's going to be a looooonng project... sorry if any of these pics suck, I just took some quick shots with my phone
picked up some truck coils with heatsinks and some brackets to mount them... I've been toying around with finding a place behind the fenders to mount them... I hope I can find room where they won't interfere with anything, I might have to grind the sharp edges down to slim them a bit to help with clearance... once I verify that they fit I'm going to shorten each end of the harness and cover it with heat shrink and some type of loom
I'm going to use Taylor thundervolt wires (had bad experiences with msd)... this is a universal set so you have to cut to length and crimp your own ends... I got some with 90� spark plug ends instead of straight ends so I can run them under the headers for a more stealth look... I test fitted them and the plug ends cleared the primaries of my lg superpros, for anyone with those headers you know how bad they are with plug wire routing... the universal set only comes with distributor/hei ends so you will have to buy a set of ls coil ends to make them work... depending on how I end up routing them I might have to buy a couple of longer wires... maybe not the cheapest route but I think it will look clean when it's done
and these are the valve covers I ended up getting... haven't came in yet but they are gm performance 2" covers... I had originally planned to use my stock covers and grind the tabs off and have them hydrodipped in carbon fiber but I abandoned that idea quickly... I never realized how much casting slag there is on our valve covers so the whole cover would need to be sanded smooth and a lot of metal filler in the coil mounting holes and the horizontal lines in between the bolts in order to get them smooth for dipping/painting... in other words just way too much work... I'm going to take the new covers and have some -10 bungs welded into them for my breather can and then see how they turn out with dipping... if I don't like that I'll just have them powdercoated black
Thats going to look great !
Continue to post up how things are progressing !
Toque
10-19-2014, 12:16 PM
#68
I've been gathering parts for my coil relocation setup... I have a bunch of other crap going on with the car besides this so it's going to be a looooonng project... sorry if any of these pics suck, I just took some quick shots with my phone
picked up some truck coils with heatsinks and some brackets to mount them... I've been toying around with finding a place behind the fenders to mount them... I hope I can find room where they won't interfere with anything, I might have to grind the sharp edges down to slim them a bit to help with clearance... once I verify that they fit I'm going to shorten each end of the harness and cover it with heat shrink and some type of loom
I'm going to use Taylor thundervolt wires (had bad experiences with msd)... this is a universal set so you have to cut to length and crimp your own ends... I got some with 90� spark plug ends instead of straight ends so I can run them under the headers for a more stealth look... I test fitted them and the plug ends cleared the primaries of my lg superpros, for anyone with those headers you know how bad they are with plug wire routing... the universal set only comes with distributor/hei ends so you will have to buy a set of ls coil ends to make them work... depending on how I end up routing them I might have to buy a couple of longer wires... maybe not the cheapest route but I think it will look clean when it's done
and these are the valve covers I ended up getting... haven't came in yet but they are gm performance 2" covers... I had originally planned to use my stock covers and grind the tabs off and have them hydrodipped in carbon fiber but I abandoned that idea quickly... I never realized how much casting slag there is on our valve covers so the whole cover would need to be sanded smooth and a lot of metal filler in the coil mounting holes and the horizontal lines in between the bolts in order to get them smooth for dipping/painting... in other words just way too much work... I'm going to take the new covers and have some -10 bungs welded into them for my breather can and then see how they turn out with dipping... if I don't like that I'll just have them powdercoated black
picked up some truck coils with heatsinks and some brackets to mount them... I've been toying around with finding a place behind the fenders to mount them... I hope I can find room where they won't interfere with anything, I might have to grind the sharp edges down to slim them a bit to help with clearance... once I verify that they fit I'm going to shorten each end of the harness and cover it with heat shrink and some type of loom
I'm going to use Taylor thundervolt wires (had bad experiences with msd)... this is a universal set so you have to cut to length and crimp your own ends... I got some with 90� spark plug ends instead of straight ends so I can run them under the headers for a more stealth look... I test fitted them and the plug ends cleared the primaries of my lg superpros, for anyone with those headers you know how bad they are with plug wire routing... the universal set only comes with distributor/hei ends so you will have to buy a set of ls coil ends to make them work... depending on how I end up routing them I might have to buy a couple of longer wires... maybe not the cheapest route but I think it will look clean when it's done
and these are the valve covers I ended up getting... haven't came in yet but they are gm performance 2" covers... I had originally planned to use my stock covers and grind the tabs off and have them hydrodipped in carbon fiber but I abandoned that idea quickly... I never realized how much casting slag there is on our valve covers so the whole cover would need to be sanded smooth and a lot of metal filler in the coil mounting holes and the horizontal lines in between the bolts in order to get them smooth for dipping/painting... in other words just way too much work... I'm going to take the new covers and have some -10 bungs welded into them for my breather can and then see how they turn out with dipping... if I don't like that I'll just have them powdercoated black
 I originally wanted to use these coils as well, but wasn't able to find brackets that would work so I ended up using LS7 coils. Where did you get your brackets?
10-19-2014, 12:22 PM
I originally wanted to use these coils as well, but wasn't able to find brackets that would work so I ended up using LS7 coils. Where did you get your brackets?
10-19-2014, 12:22 PM
#69
Race Director
Member Since: Dec 2010
Location: Atlanta, GA
Posts: 10,426
Received 1,260 Likes
on
1,055 Posts
2020 Corvette of the Year Finalist (performance mods)
C5 of Year Winner (performance mods) 2019
thanks guys, I'm hoping the finished product comes out as good as I'm envisioning it... I got the brackets from 99blancoss, he used to be a vendor on here and ls1tech but has his own site and ebay store now... these were the only ones I could find and they were $90 and after seeing how simple they are I probably could have made my own... but for parts and an hour labor of someone's time to make them that's about right so I'm not complaining
10-19-2014, 12:45 PM
#70
Team Owner
That is a good price for those brackets - I made my own only because I wanted to customize them for the locations where I was putting them and the ones I found on ebay and elswhere were a bit bulky for the tight mounting I was looking for. I had all the materials I needed on hand but it did take me several hours to come up with the configurations and then making the brackets to fit. Those look very nice and should work well.
10-25-2014, 08:58 PM
#71
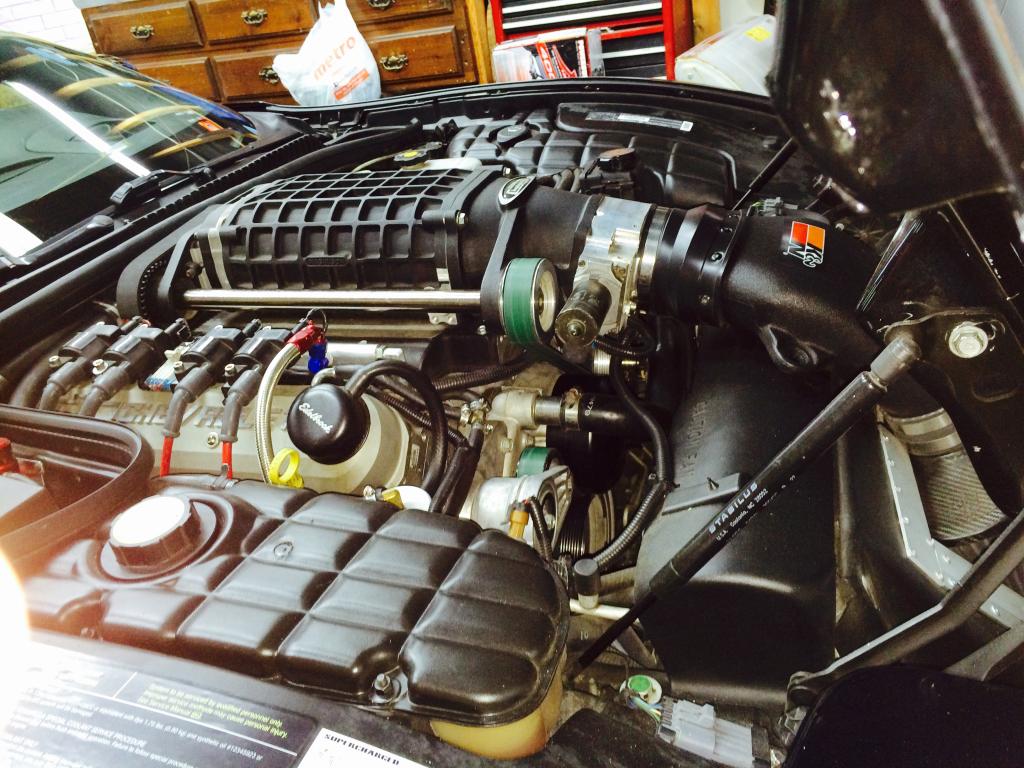
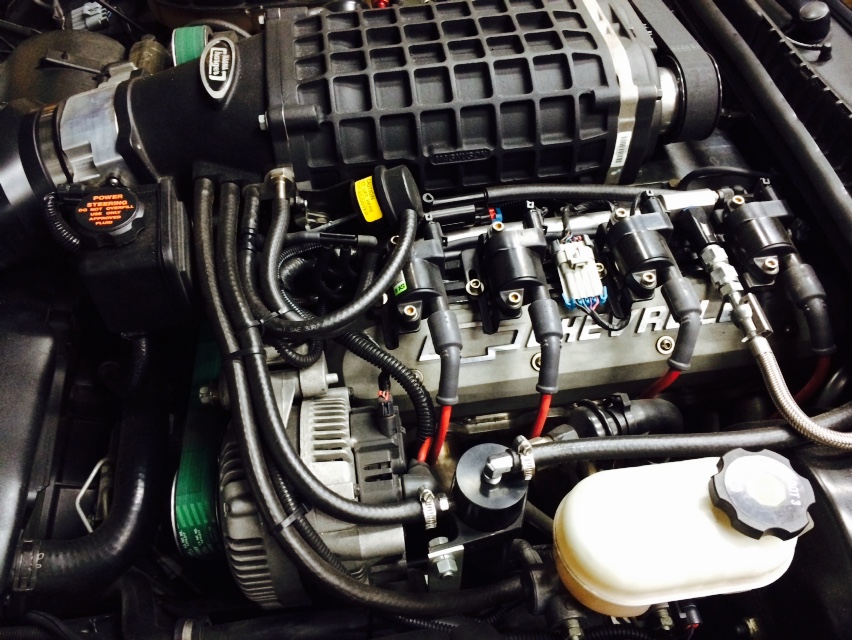
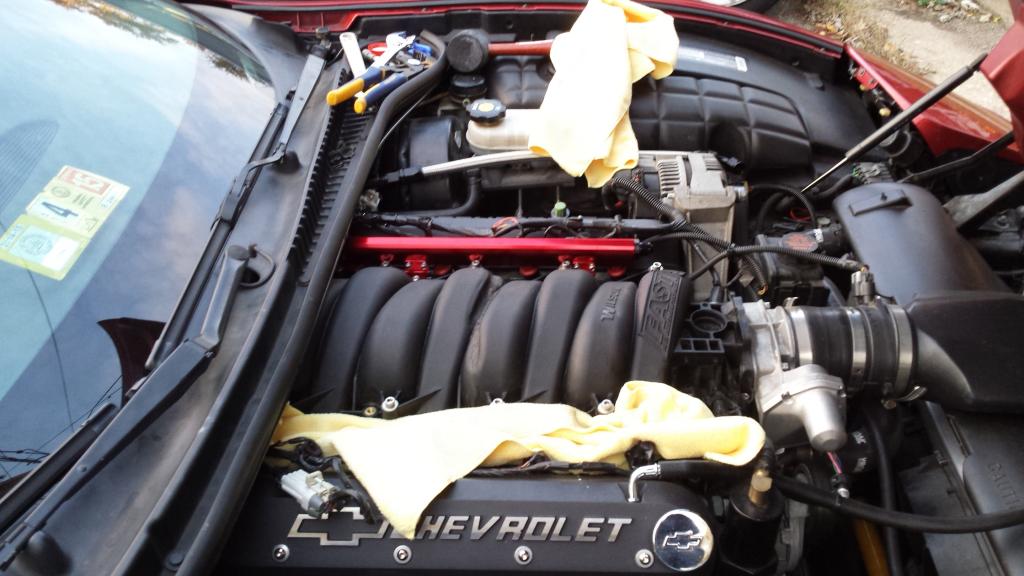
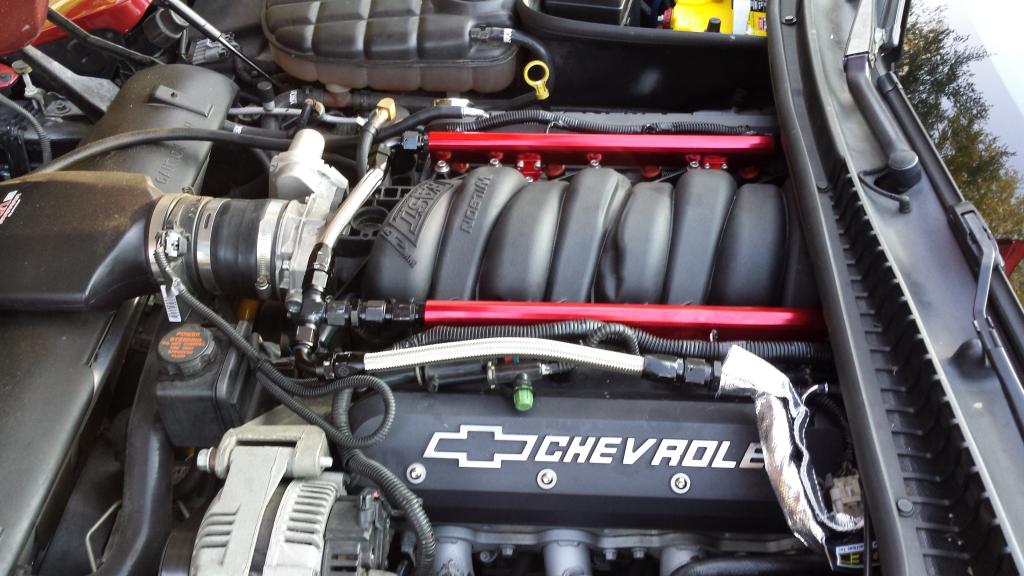
I had been waiting to do this project for a while and finally got it done. Following Toque's write-up I followed his procedure for my install. I took off the stock fuel rails and realized I was past the point of no return once I snapped two of the retaining clips for the injectors that sit right under the stock rails. Therefore I had no choice but to make it work. I acquired the fuel rail kit from Wayne at Fasster.com who has provided excellent customer service and a very high quality product. My setup involves -8AN fuel rails, braided steel lines, and connections. I know I'll not have to worry about my injectors getting enough fuel ever again
I started with the fuel line and once I got the female 3/8 to female -8AN connector and line on I moved on to the rails.
Turned out the fuel line was too long so I had to put a few "curves" in the line.
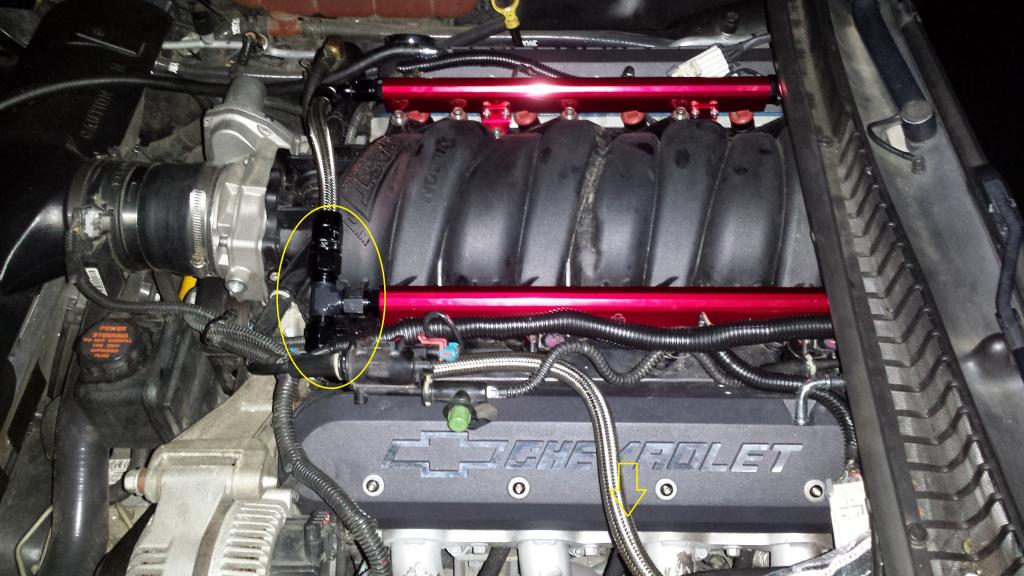
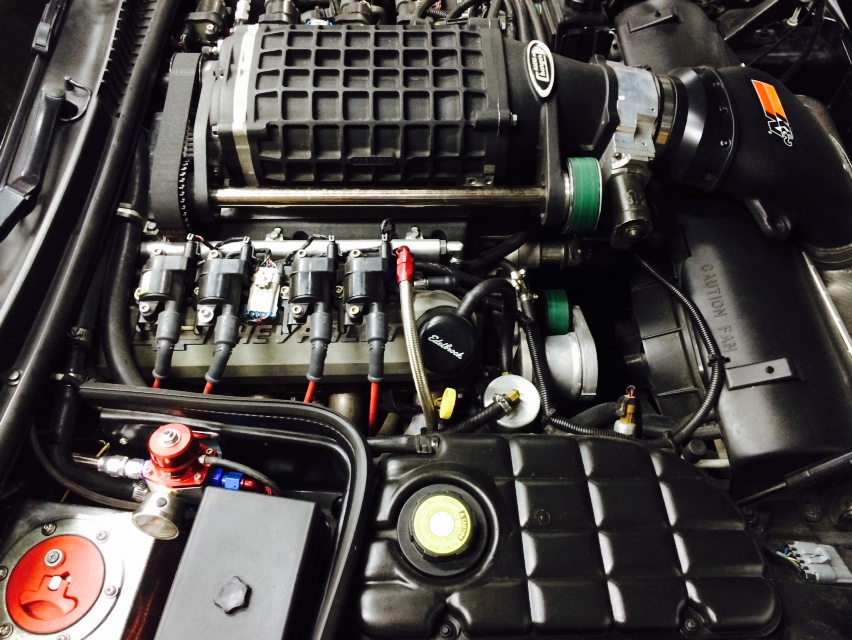
This cause the feeder connector to be pointed towards the brake booster instead of remaining straight. Additionally, I was checking out the setup Rick (RKT Performance) was using on his 440 build. He really like the rails I had and gave me his My original plan was to do a 90* connection at the rear of the driver's side fuel rail, but after talking to Rick I learned there would not have been enough room and he recommended a T-connection at the front of the driver's side. I acquired that piece from Maryland Performance (a few doors down from Rick's shop). Great bunch of guys there. This probably would have worked with a stock intake, but with the FAST intake it but the connection for the fuel line in a very awkward position. Rather than drive all the way back to Frederick, MD I opted to go to Speed Unlimited which was a lot closer to me for a few -8AN unions, a coupler, and a 90* hose end so I could change the position of the fuel line.
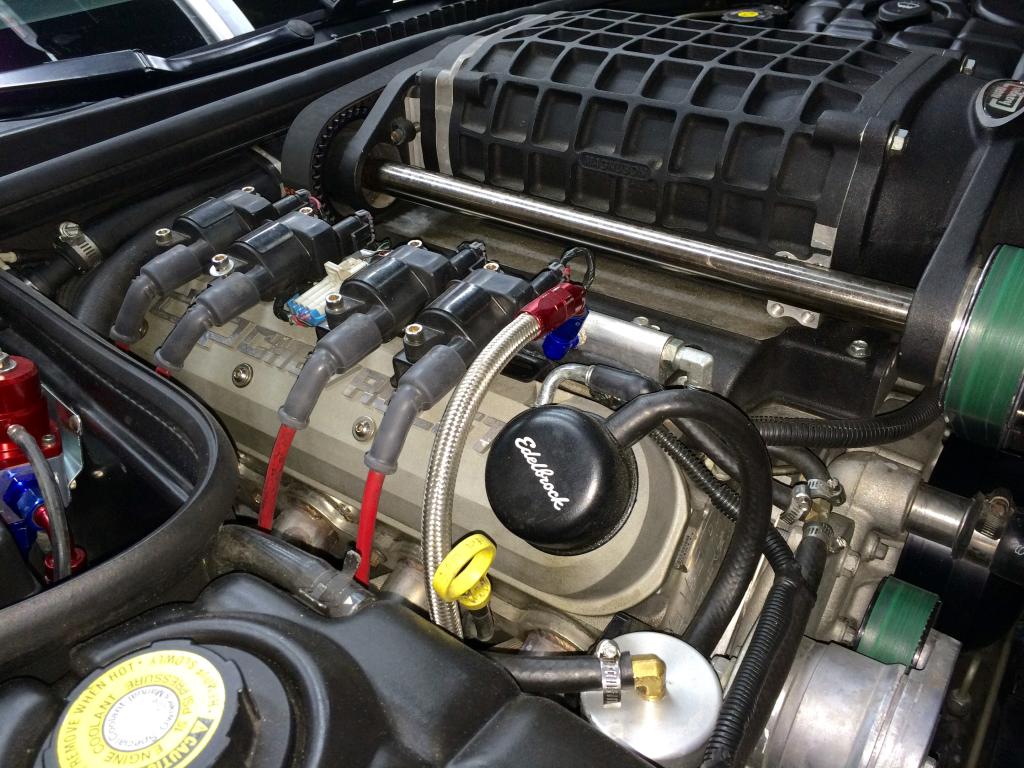
I was able to make a 90* connection at the fuel feeder...
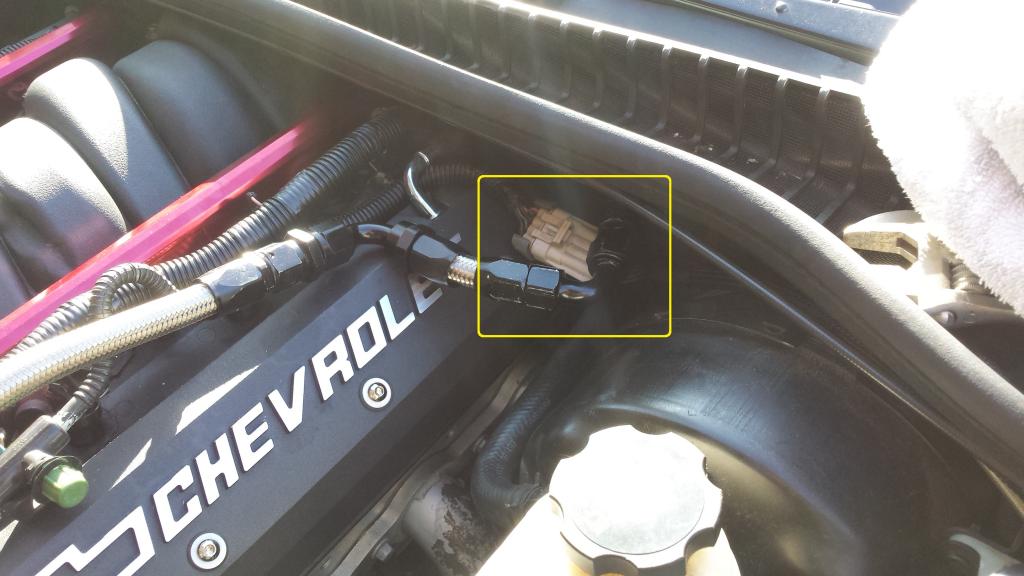
and shorten the fuel line to run it parallel to the valve cover...
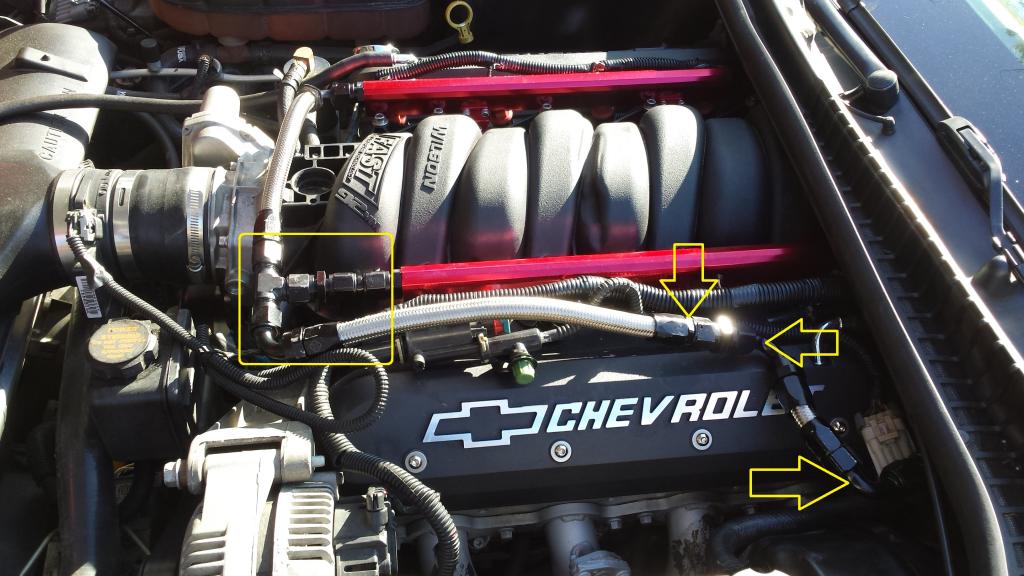
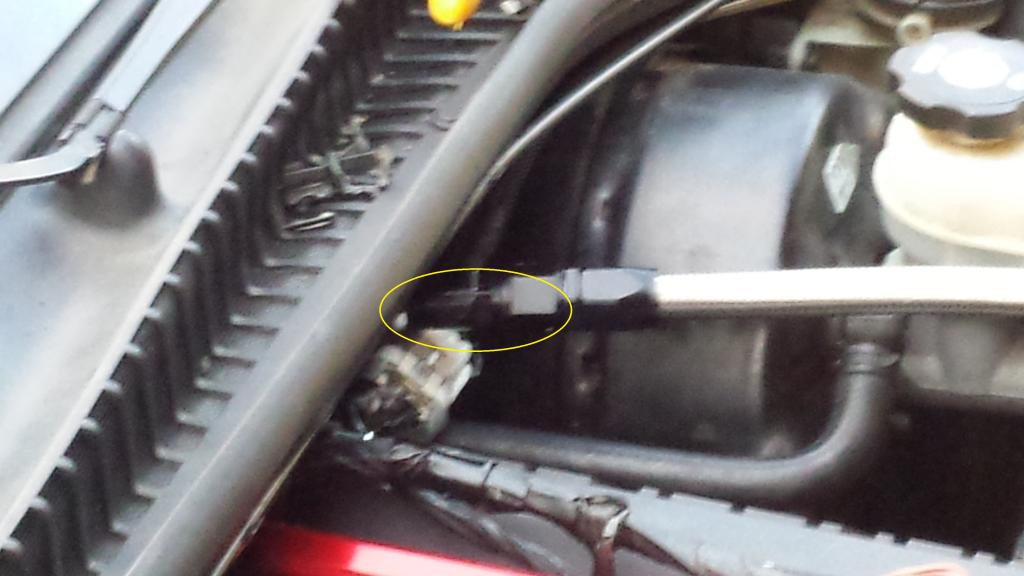
Once I had the lengths I was happy with I tightened them down to the angles I wanted and added heat shielding to insulate the fuel line from rattling against the brake booster or the valve cover...
This video was during the 3rd heat cycle. During the first heat cycle I discovered where I had not tightened the connections enough. No leaks observed during the 2nd or 3rd heat cycle.
put the heat shielding on after I confirmed I had no leaks and fired it up again for a final confirmation. Looking forward to showing this off at my Sunday meetup group
I started with the fuel line and once I got the female 3/8 to female -8AN connector and line on I moved on to the rails.

Turned out the fuel line was too long so I had to put a few "curves" in the line.


This cause the feeder connector to be pointed towards the brake booster instead of remaining straight. Additionally, I was checking out the setup Rick (RKT Performance) was using on his 440 build. He really like the rails I had and gave me his
My original plan was to do a 90* connection at the rear of the driver's side fuel rail, but after talking to Rick I learned there would not have been enough room and he recommended a T-connection at the front of the driver's side. I acquired that piece from Maryland Performance (a few doors down from Rick's shop). Great bunch of guys there. This probably would have worked with a stock intake, but with the FAST intake it but the connection for the fuel line in a very awkward position. Rather than drive all the way back to Frederick, MD I opted to go to Speed Unlimited which was a lot closer to me for a few -8AN unions, a coupler, and a 90* hose end so I could change the position of the fuel line.I was able to make a 90* connection at the fuel feeder...

and shorten the fuel line to run it parallel to the valve cover...

Once I had the lengths I was happy with I tightened them down to the angles I wanted and added heat shielding to insulate the fuel line from rattling against the brake booster or the valve cover...


This video was during the 3rd heat cycle. During the first heat cycle I discovered where I had not tightened the connections enough. No leaks observed during the 2nd or 3rd heat cycle.
put the heat shielding on after I confirmed I had no leaks and fired it up again for a final confirmation. Looking forward to showing this off at my Sunday meetup group
Last edited by MAJ_Charlie; 11-20-2014 at 08:41 PM.
10-25-2014, 10:59 PM
#72
Race Director
Member Since: Dec 2010
Location: Atlanta, GA
Posts: 10,426
Received 1,260 Likes
on
1,055 Posts
2020 Corvette of the Year Finalist (performance mods)
C5 of Year Winner (performance mods) 2019
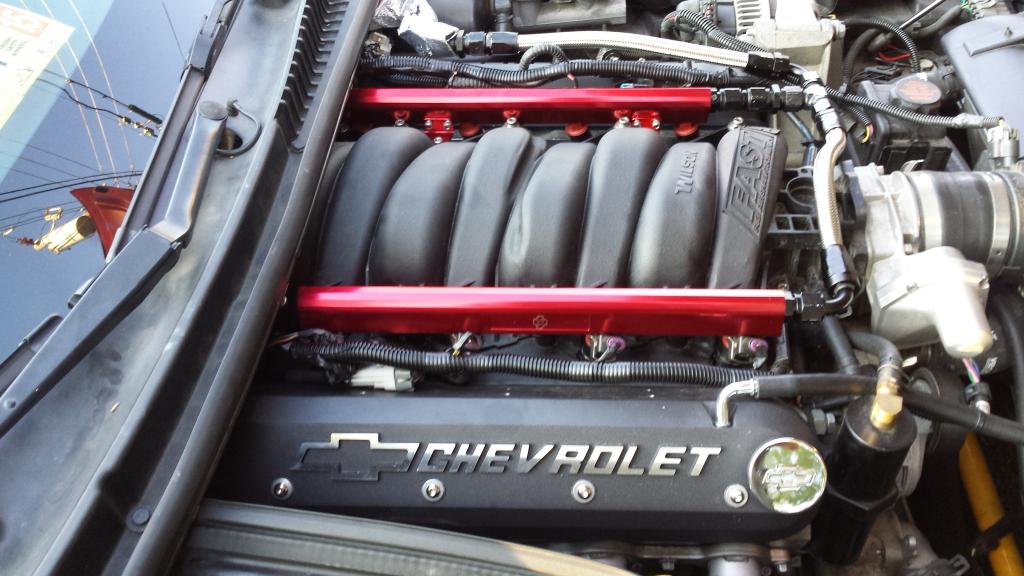
looks much better without the factory rails... the anodized red matches your car better, mine is torch red and I didn't like the difference in color so I had mine powdercoated, they came out pretty nice... I know you're done with the fuel line now but you could have ran a 180 fitting off the factory feed line, capped the back side of the driver side rail, and ran the feed line behind the intake to the back of the passenger side rail... the crossover will feed the driver side rail... nothing is wrong with how you did it, there is just a bunch of clutter from the factory on the driver side in my opinion... I even removed the evap solenoid and tuned it out to free up some space on that side
10-25-2014, 11:09 PM
#73
Got lucky on the color choice. As far as the routing...thought about going behind the rails, but didn't want to take the chance of the line getting "pinched" or any other adverse possibilities (with my luck). I still would have needed the coupler and union on the driver's side so the x-feed line would clear the front of the intake. My setup could change in the future, but for now this is what I went with.
10-25-2014, 11:23 PM
#74
Race Director
Member Since: Dec 2010
Location: Atlanta, GA
Posts: 10,426
Received 1,260 Likes
on
1,055 Posts
2020 Corvette of the Year Finalist (performance mods)
C5 of Year Winner (performance mods) 2019
are you running a fuel pressure gauge in the engine bay or in the car?... if so you could also use one of these on the front of the driver side rail to extend off the fitting and help your crossover clear, http://www.jegs.com/i/JEGS-Performan...oductId=752574 ... I prefer a gauge in the car since the one on the rails only let's you see the pressure at idle... heck even if you didn't want to use a gauge you could get a 1/8npt plug and plug it up... the possibilities are endless with these fittings and it gets real expensive real fast which I'm sure you got a taste of
10-26-2014, 12:31 AM
#75
Pro

CPT Charlie, I really like what you did!
I can sympathize with the"...I finally got it done..." I just recently got the exhaust installed that I bought from you, along with the Yank 3200 stall, differential parts, TQ tube rebuild, etc. I've been stock piling parts for a year and a half....

I have a few small parts to install, including a "big brake" kit for the rear, then it's on to the heads, & cam upgrade....I want my car to sound like yours when it grows up!!
 I've got to read back through your posts to see if you listed your H/C/I info and results....
Anyway, great job on the coils / fuel rails!
Regards,
KoreaJon
10-26-2014, 09:09 AM
#76
Melting Slicks

I tried to install some "tall" valve covers on my 243 heads when I did my engine mods because I had to get new ones due to the 243 heads having different hold down method from the 241s that I replaced. (My 98 had the perimeter hold down bolts on the 241s. The 243s are center hold down bolts). The taller valve covers did not work as they interfered with the alternator. Hope you have better luck. My options were to either get some stock 243 valve covers or mod the alternator bracket. I just opted for stock valve covers as I didn't want to take the extra time. Let us know how it turns out sir... Thanks! 
10-26-2014, 12:34 PM
#77
Race Director
Member Since: Dec 2010
Location: Atlanta, GA
Posts: 10,426
Received 1,260 Likes
on
1,055 Posts
2020 Corvette of the Year Finalist (performance mods)
C5 of Year Winner (performance mods) 2019
I tried to install some "tall" valve covers on my 243 heads when I did my engine mods because I had to get new ones due to the 243 heads having different hold down method from the 241s that I replaced. (My 98 had the perimeter hold down bolts on the 241s. The 243s are center hold down bolts). The taller valve covers did not work as they interfered with the alternator. Hope you have better luck. My options were to either get some stock 243 valve covers or mod the alternator bracket. I just opted for stock valve covers as I didn't want to take the extra time. Let us know how it turns out sir... Thanks!
10-26-2014, 04:25 PM
#78
Melting Slicks
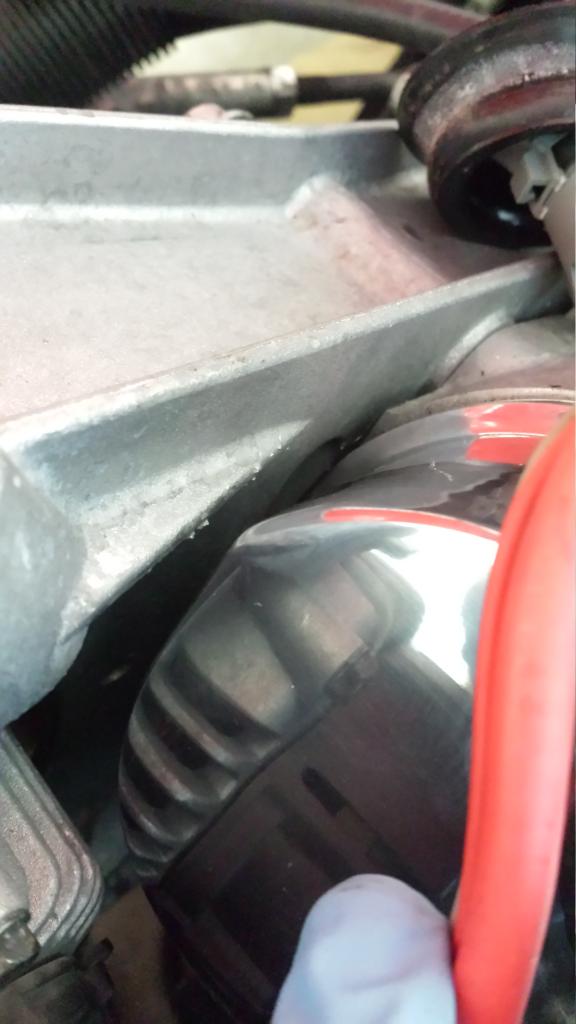
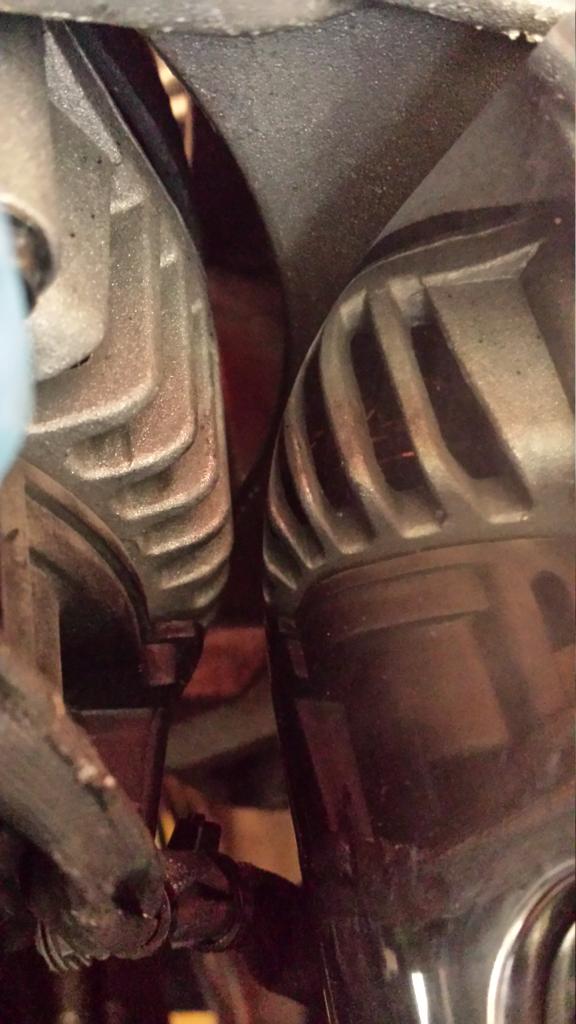
well I certainly hope they work or I will be pissed lol... I did test fit them on the heads and they fit but not with the alternator on yet, I will be working on the car later today so I will check that... I was planning on having them dipped/powdercoated and welding some bungs into them for my breather so I would be really irritated if I did that to find out they don't fit
10-26-2014, 05:06 PM
#79
Race Director
Member Since: Dec 2010
Location: Atlanta, GA
Posts: 10,426
Received 1,260 Likes
on
1,055 Posts
2020 Corvette of the Year Finalist (performance mods)
C5 of Year Winner (performance mods) 2019
to anyone interested, I just test fit these valve covers and they fit and clear the alternator and bracket just fine by about 1/4"... I've ran into a few problems already and glad this didn't add to that list lol