XSPower C5 Longtube Header Systems!
 12-07-2012, 09:13 AM
#1
Former Vendor
Thread Starter


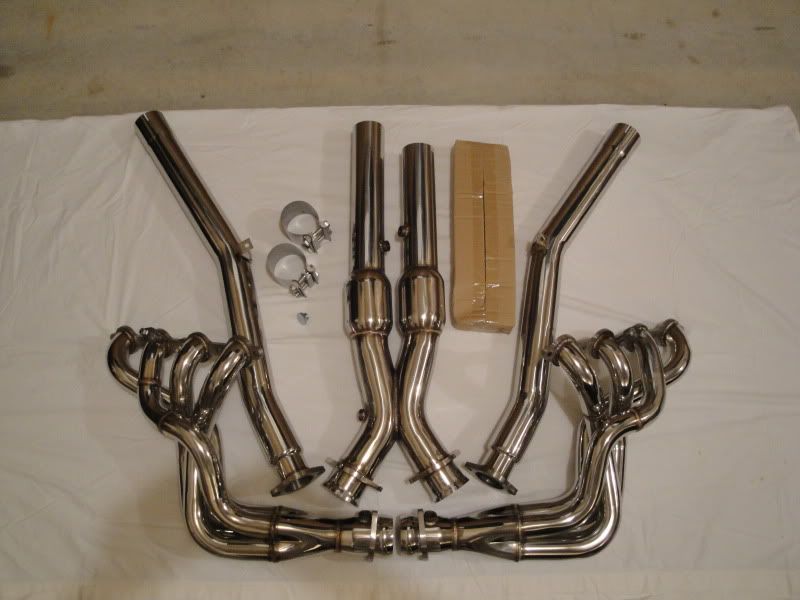
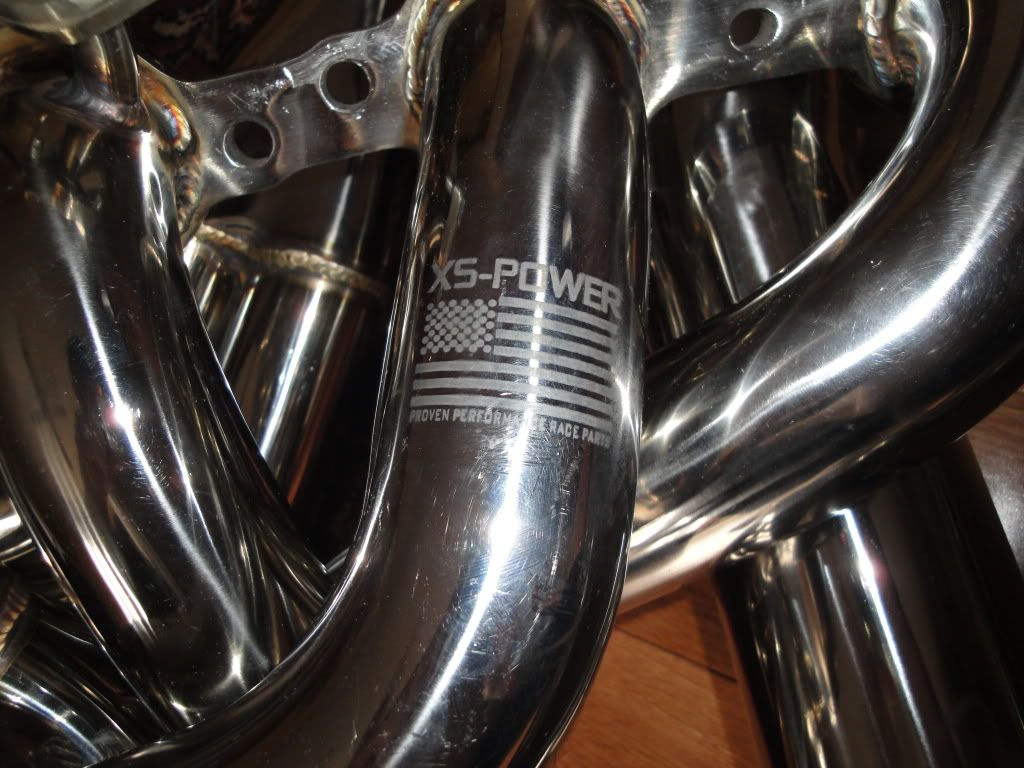
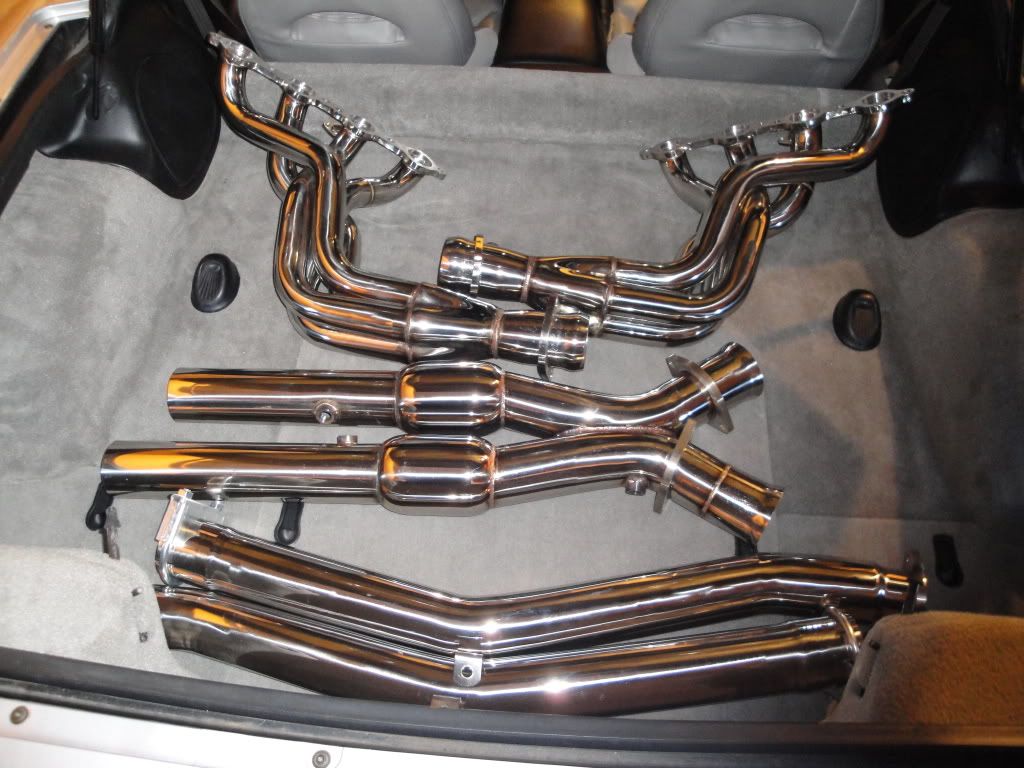
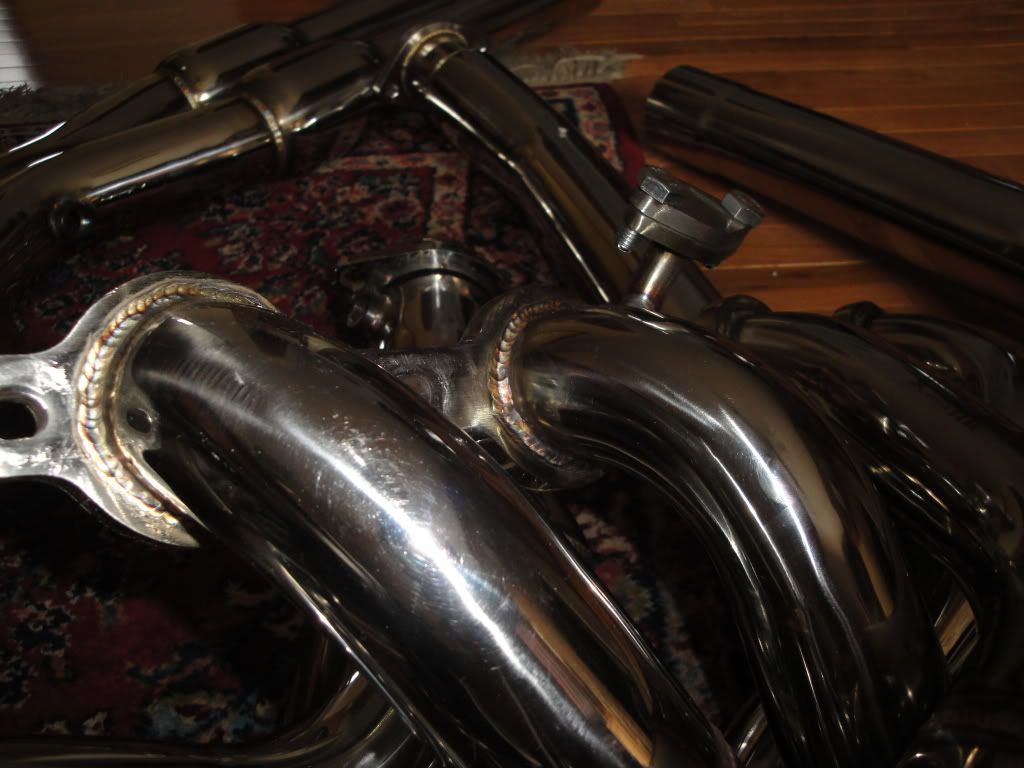
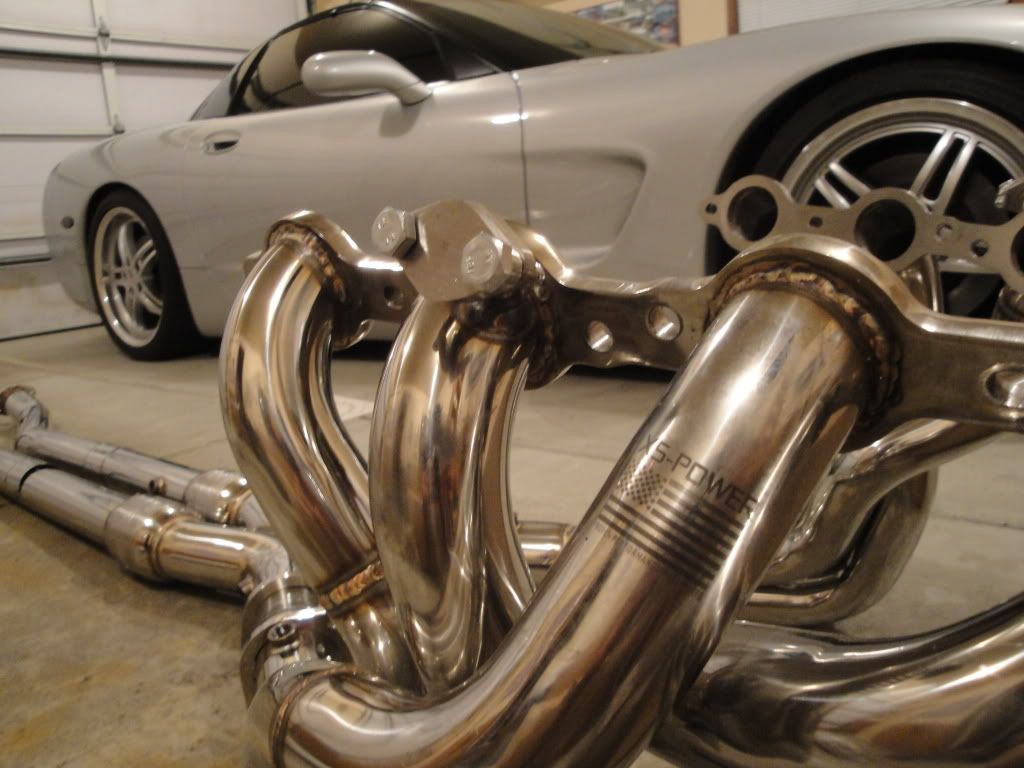
XSPower Longtube Header Systems. For Corvette Forum members 
***Systems are available for order once again! They will begin shipping in the order received beginning on Friday, December 14, 2012!
You can order direct from the website at:
CLICK HERE TO ORDER
Also check us out now on Facebook for all the latest specials and product updates!

$25 off when you "Like" us on Facebook and use the Coupon Code found in the News Feed!
Catted systems- $924.99 shipped
Offroad systems- $774.99 shipped
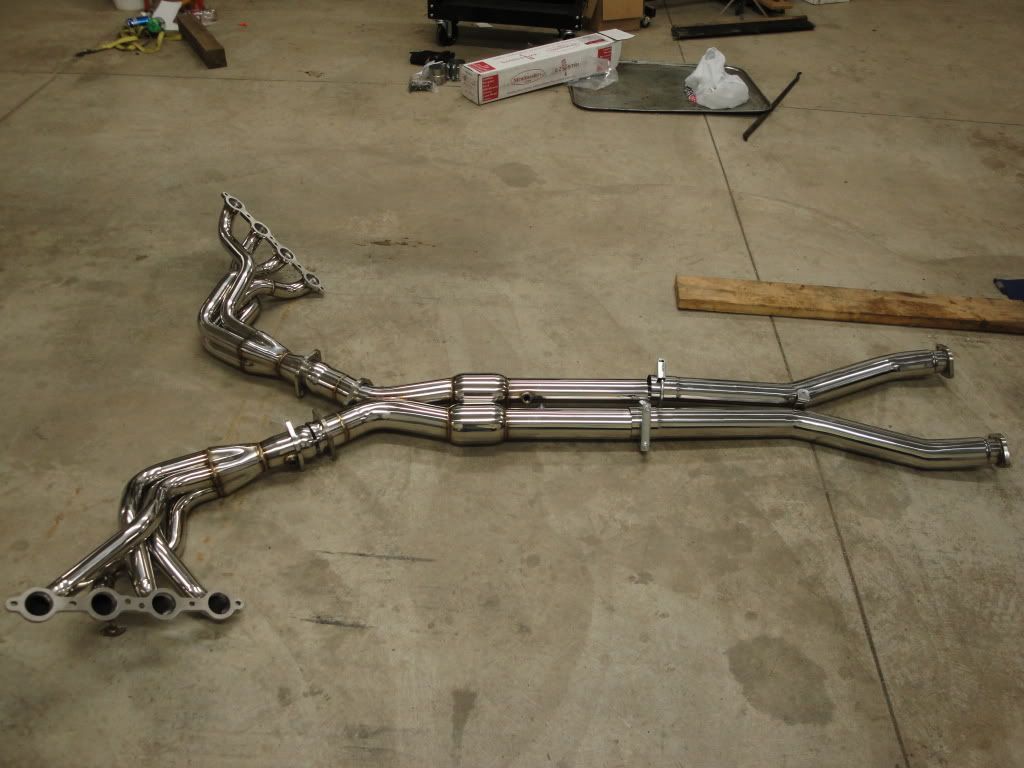
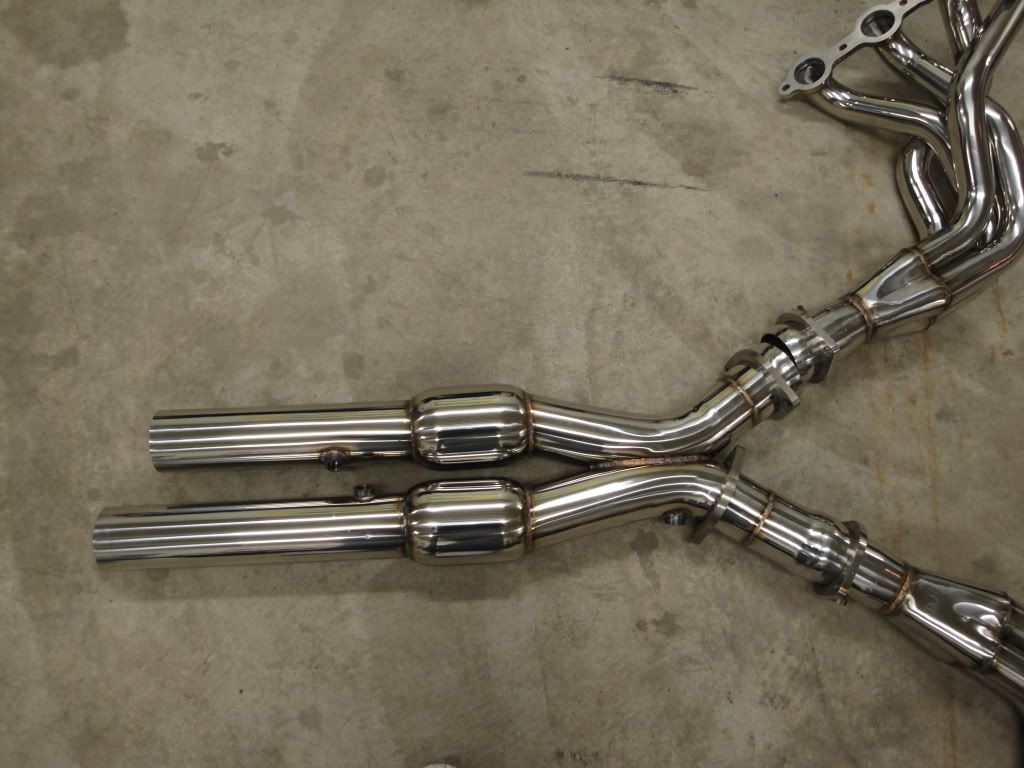
XS Power Longtube headers / X-pipe
-Made of high quality 321 Stainless Steel
-Polished to a chrome like finish
-1 3/4" Primaries
-No O2 extensions required!
-Wideband bung in the X-pipe
-Available in either High Flow 220 cell cats or for Off-Road use
-3" X-pipe necked down to 2.5" at the very end to mate to most all catbacks!
-3" Lap Style Band Clamps Included!
-Header gaskets Included!
-01-04 AIR fittings with block-off plates Included!
-97-00’s can change to the 01-04 passenger AIR tube, modify their current tube if you want to keep AIR, or use the SUPPLIED block off plates and delete AIR.
-Flanges are thick 7/16" and welds are gorgeous
-Spiked Race merge collectors!
-Complete all the way to the stock catback location!
Check here for customers who have the product and their thoughts along with install input/questions!
http://forums.corvetteforum.com/c5-p...er-thread.html
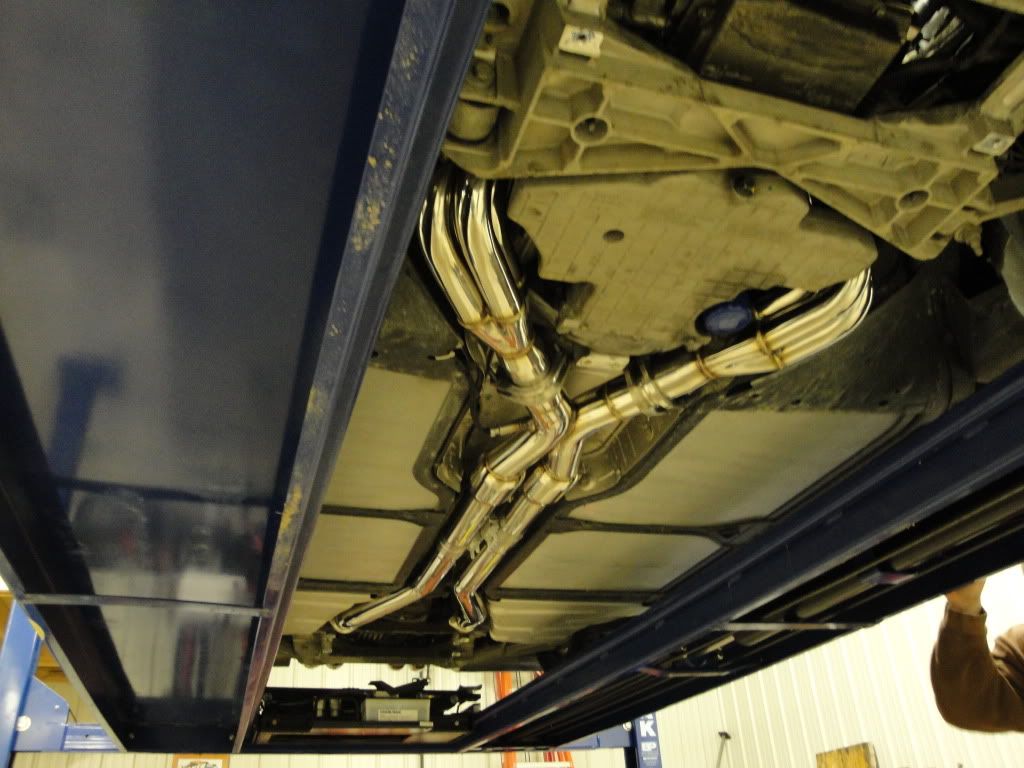
-Drivers side header slides right up and in from the bottom.
-Passenger side all that is needed is to drop the starter and it will slide right up and in from the bottom as well!
http://forums.corvetteforum.com/tran...uperman09.html
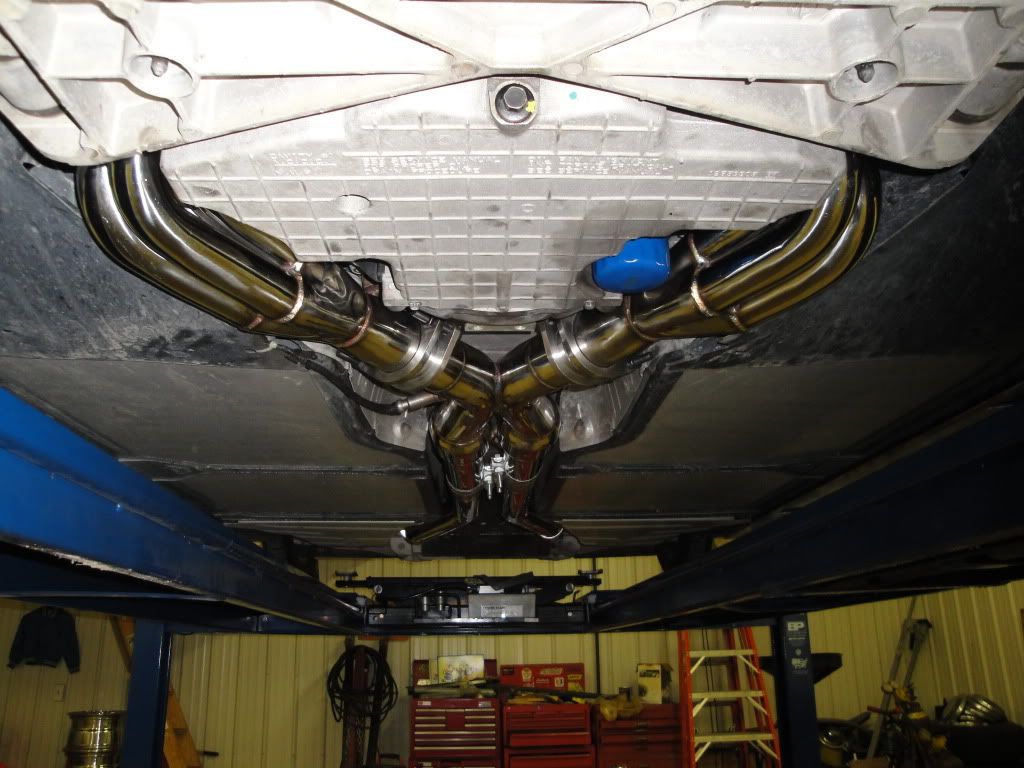


The CATs are metalic core European 110 cell units, VERY free flowing and legal! As a matter of fact, during testing the difference between the CATted versus NonCATted systems were negligable;

Clearences are very good all around, the primary O2 sensors are fine;


No issues with Sparkplugs;


Here is the process I followed to remove my stock exhaust. I just made some notes of what I did and put them together for any of you that may want some direction of how to get the stock exhaust off. This is what I did!
1.) Disconnect negative cable from battery.
2.) Remove Oil Fill cap and Fuel Rail Covers http://i291.photobucket.com/albums/l...a/DSC00030.jpg
3.) Remove spark plug wires from coil packs, simply pull out. http://i291.photobucket.com/albums/l...a/DSC00031.jpg
4.) Having another buddy to tackle one side of the engine bay while you tackle the other is very beneficial/time saving if you can trust their work! http://i291.photobucket.com/albums/l...a/DSC00037.jpg
5.) Disconnect connection on both coil packs. http://i291.photobucket.com/albums/l...a/DSC00034.jpg
6.) Remove bolts connecting coil pack brackets to valve covers (10mm) http://i291.photobucket.com/albums/l...a/DSC00035.jpg
7.) Remove coil packs on brackets from the valve covers. http://i291.photobucket.com/albums/l...a/DSC00039.jpg http://i291.photobucket.com/albums/l...a/DSC00043.jpg
8.) Remove oil dipstick tube on passenger side. (10mm bolt on manifold) http://i291.photobucket.com/albums/l...a/DSC00048.jpg
9.) Disconnect AIR fittings from manifolds on both sides. http://i291.photobucket.com/albums/l...a/DSC00046.jpg http://i291.photobucket.com/albums/l...a/DSC00049.jpg
10.) Remove the accessory belt
11.) Remove alternator from bracket (2 large bolts) set alternator aside http://i291.photobucket.com/albums/l...a/DSC00075.jpg
12.) Safely raise vehicle leaving enough room to work under. http://i291.photobucket.com/albums/l...a/DSC00050.jpg If you do not have access to a lift, refer to owner’s manual for proper instructions on lifting your Corvette.
13.) Remove 3 nuts/bolts on each side connecting the stock H-Pipe to the manifolds http://i291.photobucket.com/albums/l...a/DSC00051.jpg
14.) Remove the 2 bolts holding the stock H pipe up to car http://i291.photobucket.com/albums/l...a/DSC00053.jpg
15.) Remove O2 sensors in the H pipe, leave harnesses connected http://i291.photobucket.com/albums/l...a/DSC00055.jpg
16.) Remove 2 bolts per side connecting stock H pipe to your catback http://i291.photobucket.com/albums/l...a/DSC00057.jpg
17.) Support the H pipe while you remove the last 2 bolts connected to the spring mounts which will allow the h pipe to be removed http://i291.photobucket.com/albums/l...a/DSC00058.jpg
18.) Remove the H pipe http://i291.photobucket.com/albums/l...a/DSC00061.jpg http://i291.photobucket.com/albums/l...a/DSC00064.jpg
19.) Disconnect O2 sensors at the ends of each stock exhaust manifold
20.) Relocate to top of vehicle in engine bay
21.) Remove 10mm bolts connecting the manifolds to heads http://i291.photobucket.com/albums/l...a/DSC00047.jpg
22.) Remove stock exhaust manifolds out the top http://i291.photobucket.com/albums/l...a/DSC00068.jpg http://i291.photobucket.com/albums/l...a/DSC00073.jpg
23.) Now is a great/easy time to remove sparkplugs if you choose install new ones at this time.
24.) Your stock exhaust system is now removed!
25.) Move back under the vehicle
26.) Remove the 2 bolts holding starter to the block on the passenger side along with the 2 nuts holding the electrical connections.
http://i291.photobucket.com/albums/l...a/DSC00070.jpg
27.) Remove the starter wiring *note what attaches where*
28.) Remove the starter
29.) Place the passenger side header up into place, do not bolt down.
30.) With the header up into the engine bay now, slide the starter over the collector. If the header wants to fall out, having someone hold it here works well.
31.) Re-attach wiring to the starter with the header up into the engine bay but still completely unbolted.
32.) Bolt the starter up to the engine with the header still loose.
33.) With the header still loose, install your front O2 sensors
34.) Now bolt the header down to the engine, still leaving somewhat loose for fitment.
35.) Headers install from the BOTTOM
36.) Install drivers side header from the BOTTOM.
37.) Before bolting the header to the engine, install your front O2 sensor.
38.) Bolt the drivers side header to the engine, leaving somewhat loose for fitment.
39.) Fit the X-pipe up into the header collectors. With help, have someone hold the X-pipe while you re-install the rear O2 sensors and complete the next few steps.
40.) Use Copper Spray Gasket on the ball and socket flanges of the header collectors and X-pipe, loosely bolt the X-pipe to the headers. Using high-temp thread locker on these bolts is recommended.
41.) Moving back, slip the mid-pipes over the X-pipe and hang using the factory spring mounts.
42.) Connect the rear mid-pipes to the catback, don't forget the gasket!
43.) Moving forward, tighten the headers down the engine using proper torque and torquing method.
44.) Tighten the X-pipe down to the header collectors ensuring EVEN tightening to both side to draw the X-pipe in straight to prevent leaks.
45.) Install clamps to the X-pipe to Mid-pipe connection and tighten.
46.) Tighten the Mid-pipes down to the catback
47.) Go over all connections making sure they are properly tightened with everything aligned.
48.) After a heat cycle of the system, it is recommended to re-check all connections to make sure they are tight as the heat with expand the system.
49.) Re-install all factory items such as dipstick, plug wires, coil packs, alternator, and anything else that may have been removed for the removal of the stock system or the install of the new system.
-Jon
You can order direct from the website at:
CLICK HERE TO ORDER
***Systems are available for order once again! They will begin shipping in the order received beginning on Friday, December 14, 2012!
You can order direct from the website at:
CLICK HERE TO ORDER
Also check us out now on Facebook for all the latest specials and product updates!
$25 off when you "Like" us on Facebook and use the Coupon Code found in the News Feed!
Catted systems- $924.99 shipped
Offroad systems- $774.99 shipped
XS Power Longtube headers / X-pipe
-Made of high quality 321 Stainless Steel
-Polished to a chrome like finish
-1 3/4" Primaries
-No O2 extensions required!
-Wideband bung in the X-pipe
-Available in either High Flow 220 cell cats or for Off-Road use
-3" X-pipe necked down to 2.5" at the very end to mate to most all catbacks!
-3" Lap Style Band Clamps Included!
-Header gaskets Included!
-01-04 AIR fittings with block-off plates Included!
-97-00’s can change to the 01-04 passenger AIR tube, modify their current tube if you want to keep AIR, or use the SUPPLIED block off plates and delete AIR.
-Flanges are thick 7/16" and welds are gorgeous
-Spiked Race merge collectors!
-Complete all the way to the stock catback location!
Check here for customers who have the product and their thoughts along with install input/questions!
http://forums.corvetteforum.com/c5-p...er-thread.html
-Drivers side header slides right up and in from the bottom.
-Passenger side all that is needed is to drop the starter and it will slide right up and in from the bottom as well!
http://forums.corvetteforum.com/tran...uperman09.html
The CATs are metalic core European 110 cell units, VERY free flowing and legal! As a matter of fact, during testing the difference between the CATted versus NonCATted systems were negligable;
Clearences are very good all around, the primary O2 sensors are fine;
No issues with Sparkplugs;
Here is the process I followed to remove my stock exhaust. I just made some notes of what I did and put them together for any of you that may want some direction of how to get the stock exhaust off. This is what I did!
1.) Disconnect negative cable from battery.
2.) Remove Oil Fill cap and Fuel Rail Covers http://i291.photobucket.com/albums/l...a/DSC00030.jpg
3.) Remove spark plug wires from coil packs, simply pull out. http://i291.photobucket.com/albums/l...a/DSC00031.jpg
4.) Having another buddy to tackle one side of the engine bay while you tackle the other is very beneficial/time saving if you can trust their work! http://i291.photobucket.com/albums/l...a/DSC00037.jpg
5.) Disconnect connection on both coil packs. http://i291.photobucket.com/albums/l...a/DSC00034.jpg
6.) Remove bolts connecting coil pack brackets to valve covers (10mm) http://i291.photobucket.com/albums/l...a/DSC00035.jpg
7.) Remove coil packs on brackets from the valve covers. http://i291.photobucket.com/albums/l...a/DSC00039.jpg http://i291.photobucket.com/albums/l...a/DSC00043.jpg
8.) Remove oil dipstick tube on passenger side. (10mm bolt on manifold) http://i291.photobucket.com/albums/l...a/DSC00048.jpg
9.) Disconnect AIR fittings from manifolds on both sides. http://i291.photobucket.com/albums/l...a/DSC00046.jpg http://i291.photobucket.com/albums/l...a/DSC00049.jpg
10.) Remove the accessory belt
11.) Remove alternator from bracket (2 large bolts) set alternator aside http://i291.photobucket.com/albums/l...a/DSC00075.jpg
12.) Safely raise vehicle leaving enough room to work under. http://i291.photobucket.com/albums/l...a/DSC00050.jpg If you do not have access to a lift, refer to owner’s manual for proper instructions on lifting your Corvette.
13.) Remove 3 nuts/bolts on each side connecting the stock H-Pipe to the manifolds http://i291.photobucket.com/albums/l...a/DSC00051.jpg
14.) Remove the 2 bolts holding the stock H pipe up to car http://i291.photobucket.com/albums/l...a/DSC00053.jpg
15.) Remove O2 sensors in the H pipe, leave harnesses connected http://i291.photobucket.com/albums/l...a/DSC00055.jpg
16.) Remove 2 bolts per side connecting stock H pipe to your catback http://i291.photobucket.com/albums/l...a/DSC00057.jpg
17.) Support the H pipe while you remove the last 2 bolts connected to the spring mounts which will allow the h pipe to be removed http://i291.photobucket.com/albums/l...a/DSC00058.jpg
18.) Remove the H pipe http://i291.photobucket.com/albums/l...a/DSC00061.jpg http://i291.photobucket.com/albums/l...a/DSC00064.jpg
19.) Disconnect O2 sensors at the ends of each stock exhaust manifold
20.) Relocate to top of vehicle in engine bay
21.) Remove 10mm bolts connecting the manifolds to heads http://i291.photobucket.com/albums/l...a/DSC00047.jpg
22.) Remove stock exhaust manifolds out the top http://i291.photobucket.com/albums/l...a/DSC00068.jpg http://i291.photobucket.com/albums/l...a/DSC00073.jpg
23.) Now is a great/easy time to remove sparkplugs if you choose install new ones at this time.
24.) Your stock exhaust system is now removed!
25.) Move back under the vehicle
26.) Remove the 2 bolts holding starter to the block on the passenger side along with the 2 nuts holding the electrical connections.
http://i291.photobucket.com/albums/l...a/DSC00070.jpg
27.) Remove the starter wiring *note what attaches where*
28.) Remove the starter
29.) Place the passenger side header up into place, do not bolt down.
30.) With the header up into the engine bay now, slide the starter over the collector. If the header wants to fall out, having someone hold it here works well.
31.) Re-attach wiring to the starter with the header up into the engine bay but still completely unbolted.
32.) Bolt the starter up to the engine with the header still loose.
33.) With the header still loose, install your front O2 sensors
34.) Now bolt the header down to the engine, still leaving somewhat loose for fitment.
35.) Headers install from the BOTTOM
36.) Install drivers side header from the BOTTOM.
37.) Before bolting the header to the engine, install your front O2 sensor.
38.) Bolt the drivers side header to the engine, leaving somewhat loose for fitment.
39.) Fit the X-pipe up into the header collectors. With help, have someone hold the X-pipe while you re-install the rear O2 sensors and complete the next few steps.
40.) Use Copper Spray Gasket on the ball and socket flanges of the header collectors and X-pipe, loosely bolt the X-pipe to the headers. Using high-temp thread locker on these bolts is recommended.
41.) Moving back, slip the mid-pipes over the X-pipe and hang using the factory spring mounts.
42.) Connect the rear mid-pipes to the catback, don't forget the gasket!
43.) Moving forward, tighten the headers down the engine using proper torque and torquing method.
44.) Tighten the X-pipe down to the header collectors ensuring EVEN tightening to both side to draw the X-pipe in straight to prevent leaks.
45.) Install clamps to the X-pipe to Mid-pipe connection and tighten.
46.) Tighten the Mid-pipes down to the catback
47.) Go over all connections making sure they are properly tightened with everything aligned.
48.) After a heat cycle of the system, it is recommended to re-check all connections to make sure they are tight as the heat with expand the system.
49.) Re-install all factory items such as dipstick, plug wires, coil packs, alternator, and anything else that may have been removed for the removal of the stock system or the install of the new system.
-Jon
You can order direct from the website at:
CLICK HERE TO ORDER
Last edited by Superman09; 12-07-2012 at 09:17 AM.
 12-07-2012, 01:05 PM
#3
Former Vendor
Thread Starter
12-08-2012, 09:00 AM
#4
Melting Slicks

Member Since: Mar 2009
Location: Odessa FL
Posts: 2,300
Received 113 Likes
on
99 Posts
St. Jude Donor '10-'12-'13-'14-'15-'16-'17

Ok just ordered these from the web site before I saw the above regarding a discount for forum members. Can I still get the discount. Payment was made via PayPal (bilmorelli@aol.com)
Thanks.
Thanks.
12-08-2012, 09:14 AM
#5
Racer

Member Since: Jan 2007
Location: Wisconsin
Posts: 335
Likes: 0
Received 0 Likes
on
0 Posts
For having to wait 4+ months for these to be back in stock seems kinda sudden to jump the price. (just my opinion).
Will be waiting until spring to to order mine.
Last edited by Native; 12-08-2012 at 09:27 AM.
12-08-2012, 09:41 AM
#6
Former Vendor
Thread Starter
12-08-2012, 05:16 PM
#8
Melting Slicks
Member Since: Mar 2009
Location: Odessa FL
Posts: 2,300
Received 113 Likes
on
99 Posts
St. Jude Donor '10-'12-'13-'14-'15-'16-'17
To those running the XS-Power headers and X-Pipes. How have they held up color-wise? Do they tarnish much? I was thinking of having them ceramic coated before installing, has anybody tried that as well? Thanks.
12-08-2012, 10:09 PM
#9
Former Vendor
Thread Starter
I have had a few people coat them, but I really do not see the need for it as I never had any issues from heat!
Jon
 12-10-2012, 09:28 AM
#12
Former Vendor
Thread Starter
 12-10-2012, 08:23 PM
#16
Drifting


Mine are fine. I would not bother with coating. They look like the pictures.
12-13-2012, 12:04 PM
#19
Melting Slicks
Member Since: Mar 2009
Location: Odessa FL
Posts: 2,300
Received 113 Likes
on
99 Posts
St. Jude Donor '10-'12-'13-'14-'15-'16-'17
is shipping still targeted to start tomorrow the 14th for those who have ordered and payed? Just trying to judge timing for an install. Thanks.
12-13-2012, 12:09 PM
#20
Former Vendor
Thread Starter