
Headlight switch failed. Decided to repair instead of replace…
 07-05-2008, 03:38 PM
#41
Instructor

Does anyone have a wiring diagram of which wires go together for the turn signals? I think that my switch is going BAD (what a surprise) !!!
I just want to jump the leads to make sure its the switch. Thanx.

I just want to jump the leads to make sure its the switch. Thanx.
 07-07-2008, 10:09 PM
#42
Drifting


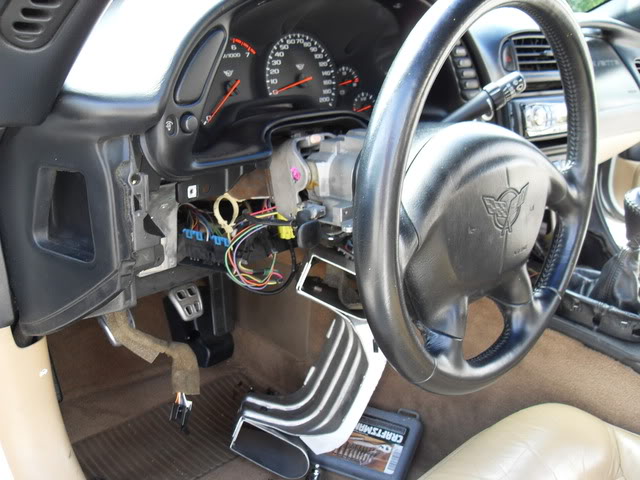
Yep, did the stalk mod yesterday. I actually took the switch apart while it was in the car instead of totally removing it w/ the harness. Of course I did disconnect the wiring 1st. Seems to work fine now and I'll test it more tomorrow. One thing I struggled with was getting the bottom part of the plastic steering cover to separate from the top piece. I found after removing those 2 torx bolts (t 25 bolts) I had to pull down on the bottom piece closest to the steering wheel 1st and once that was opened I then pushed that bottom piece back toward the instrument cluster to get those hooks to disengage.
The other tough one was that t25 bolt on the the switch. I found it easiest to put my T25 torx head piece on the bolt and use a 1/4 in open end wrench to turn it. That worked great for me. Definitely don't try to use anything but a T25 for that bolt or you will strip it. Thanks for the tips everyone!
The other tough one was that t25 bolt on the the switch. I found it easiest to put my T25 torx head piece on the bolt and use a 1/4 in open end wrench to turn it. That worked great for me. Definitely don't try to use anything but a T25 for that bolt or you will strip it. Thanks for the tips everyone!
 08-30-2008, 10:50 AM
#44
Melting Slicks


I'm having more and more problems with my multifunction switch. I think I might give this a try. I've been having the cruise control problem for a while but its so in intermittent that it didn't bother me.
during a 5 hour drive last night I started to have another problem. one that I had 2-3 times before but it was always short lived and no big deal...my headlights randomly went out! I have all HID's so 1) I blamed something wrong with my HID install first, 2) the fog lights were bright enough that even without the headlights for a couple minutes I could see nothing like being in the middle of nowhere central virginia in the middle of the night and suddenly having no headlights!
the headlight loss always seemed to come along with a small bump in the road. they would come back the same way. the couple of times this has happened before turning the headlight switch off and on again would bring them back, this time it didn't.
I have a high beam/low beam mod applied, and when going to high beams the headlights always came back on. both would go out and come back at exactly the same time, so I strongly suspect the multifunction switch. its got to be something in common between the two of them. My high/low mod puts power directly to the low beam circuit when ever I turn on the high beams, they always worked and brought the low beams back on with them.
sound like a good diagnosis? I guess I've got nothing to loose by trying this and see if the problem goes away.
during a 5 hour drive last night I started to have another problem. one that I had 2-3 times before but it was always short lived and no big deal...my headlights randomly went out! I have all HID's so 1) I blamed something wrong with my HID install first, 2) the fog lights were bright enough that even without the headlights for a couple minutes I could see
nothing like being in the middle of nowhere central virginia in the middle of the night and suddenly having no headlights!the headlight loss always seemed to come along with a small bump in the road. they would come back the same way. the couple of times this has happened before turning the headlight switch off and on again would bring them back, this time it didn't.
I have a high beam/low beam mod applied, and when going to high beams the headlights always came back on. both would go out and come back at exactly the same time, so I strongly suspect the multifunction switch. its got to be something in common between the two of them. My high/low mod puts power directly to the low beam circuit when ever I turn on the high beams, they always worked and brought the low beams back on with them.
sound like a good diagnosis? I guess I've got nothing to loose by trying this and see if the problem goes away.
08-30-2008, 11:50 AM
#45
Advanced

Member Since: May 2007
Location: Sterling VA
Posts: 97
Likes: 0
Received 0 Likes
on
0 Posts
The repair probably will not last long. Switches are normally manufactured with phosphor bronze or beryllium copper metal to provide the spring tension. They are heat treated to provide the desired spring tension and over time with usage will fatique.
Failure due to loss of tension is ususally an end of life indicator. About the only way to recover the temper is to retreat the metal in a furnace. Problem is the furnace likely is a vacuum furnace, hydrogen reduction furnace or filled with inert gas during the heat treatment. Neither choice is cheap. The switches may look cheap but there is a lot of knowledge used in their production and you can believe that Detroit did not use any method other than the one providing the lowest cost on a production run.
To retreat the metal you need to know the specific alloy, the temps used to treat it, the time held at temperature and the time cycle for cooling. In other words buy another switch if the switch is a pill to R&R. Plus a lot of times the contact surfaces are metalized with another metal after heat treatment and retreating them will destroy the contact surface. Lots of gotchas in the process.
Sorry to bear such bad news but the fix is temporary at best.
Last edited by Harry Bilgewater; 08-30-2008 at 11:51 AM. Reason: spelling
08-31-2008, 01:37 AM
#46
Instructor
Member Since: May 2008
Location: Twain Harte CA
Posts: 149
Likes: 0
Received 0 Likes
on
0 Posts
Wonderful post, Mike! Great photos and great fix! I did the same thing with the bad contacts on a Kenmore Dryer timer about 8 years ago, after plunking down about $35 for a new timer. I was curious, so I took the old one apart, bent the contacts toward each other (the contacts had gotten hot from arcing and actually fell off the copper springs), and Voila!
The dryer was still working when we moved 6 mos ago (left it in the old house)!
Your fix could potentially last the life of the car. Total wattage draw through the contact will be far less than that of an electric dryer - - 130 max for the high beam headlights, probably 20 - 30 watts for all dash lights, and maybe 200 - 300 watts for the headlight actuator motors (short-term current draw of just 2 - 3 seconds) as opposed to 5000 watts for the dryer.
You can prolong the life of the contacts - by helping heat transfer and conductivity at the contacts. Apply a very small amount of conductive grease (such as that used by electricians for commercial wiring) to each contact. GL makes a good product and a small tube costs less than $5.
Last edited by bassman12350; 08-31-2008 at 01:38 AM. Reason: spelling
09-13-2008, 08:53 PM
#47
7th Gear

Member Since: Sep 2006
Location: Las Vegas Nevada
Posts: 7
Likes: 0
Received 0 Likes
on
0 Posts
Thank you for the directions...they were awesome!! Also the links you attached helped alot. Thanks again for saving me the money and headaches of going to the dealer!!
10-18-2008, 03:44 AM
#48
Racer
Member Since: May 2008
Posts: 462
Likes: 0
Received 0 Likes
on
0 Posts
Thank you Miker, you just saved me a good amount of money. I originally came here today to find instructions on swapping the headlight (multi function) switch. After a little searching I found this thread. My problem was no rear running lights and the cluster lights off with the head/parking lights on. My problem was exactly what was posted in this thread. She's all fixed and working fine now, if it goes out again I'll just replace the MF switch.
01-26-2009, 04:38 PM
#49
6th Gear

Member Since: Jan 2009
Location: Pinson AL
Posts: 6
Likes: 0
Received 0 Likes
on
0 Posts
Thanks Mike! I followed your instructions to a "T" and without over-analyzing the composition of the contacts or the theory of heat-treatment, I no longer take the back roads home at night in my '99 coupe to avoid Andy & Barney. I'm no metallurgist so I can't tell ya how tension is achieved on the contacts but if the original manufactured design lasted 10 years, I'd be happy if your thrifty fix lasts half as long. Shoot, if it lasts 2 1/2 years I'll gladly bend them contacts again cause I might be a simple-minded, booger-hookin Redneck but I'm a cheap, simple-minded, booger-hookin Redneck! I just wish you'd have warned me about the spring that came rolling out when I removed the one module. I was tapping some serious cotton until I spotted the recess and nipple that holds the proper alignment. None-the-less, your write-up is a keeper!!
03-16-2009, 03:10 PM
#50
Racer

Member Since: Apr 2007
Location: Salt Lake City Utah
Posts: 270
Likes: 0
Received 0 Likes
on
0 Posts

Thanks a ton MIKER!! I just fixed my park lights/dash lights problem with this thread!! Great thread that is easy to follow!! Easy fix, once you know what you are looking for! 
~Jason
~Jason
03-17-2009, 08:58 PM
#51
Tech Contributor


Member Since: Dec 1999
Location: Anthony TX
Posts: 32,736
Received 2,180 Likes
on
1,583 Posts
CI 6,7,8,9,11 Vet
St. Jude Donor '08

TTT for an EXCELLENT POST that needs to be a stickey. These switches are dropping like flies!
03-24-2009, 06:54 PM
#52
8th Gear

Member Since: Sep 2007
Posts: 8
Likes: 0
Received 0 Likes
on
0 Posts
Simple job if you follow the links and advice.
More and more convinced I could not own this car without you guys being around. Begining to lose count of all the failures I have repaired with your advice and knowledge.
Thanks
More and more convinced I could not own this car without you guys being around. Begining to lose count of all the failures I have repaired with your advice and knowledge.
Thanks
05-18-2009, 02:18 AM
#53
Instructor
Member Since: Jun 2007
Location: College Station Texas
Posts: 117
Likes: 0
Received 3 Likes
on
1 Post
Thanks! I had the same problem as thrasher64, the contact had gotten hot and melted into the white plastic cog so far that the lights would turn on in the off position. What is annoying is that I turned the lights off and left the car and it then melted down and turned the lights on by itself after I had gone inside. Luckily a neighbor spotted it before my battery went dead.
Took it apart, cleaned the contacts, then sanded down and refilled the lobe with some plastic epoxy and now everything works perfectly!
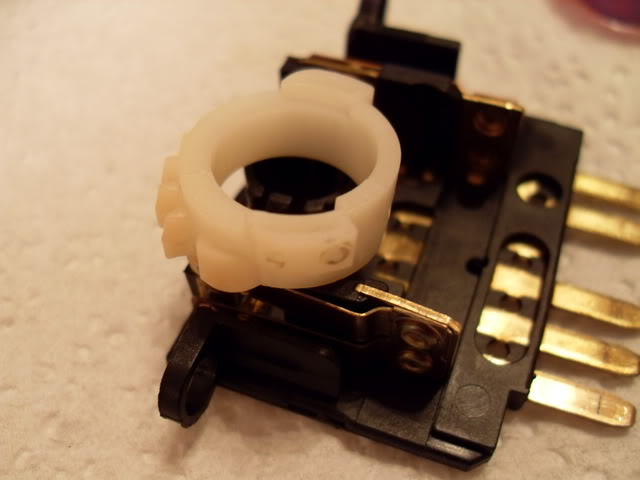
Took it apart, cleaned the contacts, then sanded down and refilled the lobe with some plastic epoxy and now everything works perfectly!
Last edited by BrandonAGr; 05-18-2009 at 02:30 AM. Reason: add pics
07-08-2009, 05:19 PM
#54
Pro

Member Since: Dec 2007
Location: Orlando / Daytona Beach Florida
Posts: 630
Likes: 0
Received 0 Likes
on
0 Posts
does anyone think this may work if only my driver side rear turnsignals dont work? Its weird because they work fine when I press the hazard light switch and work fine when the lights or brakes is pressed.. Thanks for your advice!!
07-09-2009, 10:05 AM
#55
Le Mans Master

A few days ago I had to fix mine for the third time
This time I ended up tweaking the actual copper arm. Total time 15 minutes, never even unplugged the harness or removed the knee bolster. Of course the fact that Im getting good at this is getting annoying.
This time I ended up tweaking the actual copper arm. Total time 15 minutes, never even unplugged the harness or removed the knee bolster.
Of course the fact that Im getting good at this is getting annoying.
07-25-2009, 04:31 PM
#56
Racer
Member Since: Jan 2009
Location: San Jose CA
Posts: 327
Likes: 0
Received 0 Likes
on
0 Posts
I just did this fix.
Please advise future members about the spring for the 1st module you remove. If you do not reinstall it, your high beams will stay on.
Also, you need a Torx #8 for the 3 long screws. I didn't see that throughout this entire thread.
Works fine now!
Please advise future members about the spring for the 1st module you remove. If you do not reinstall it, your high beams will stay on.
Also, you need a Torx #8 for the 3 long screws. I didn't see that throughout this entire thread.
Works fine now!
 08-01-2009, 04:56 PM
#58
Advanced
Member Since: Jul 2009
Location: Lancaster Pennsylvania
Posts: 54
Likes: 0
Received 0 Likes
on
0 Posts
I was not sure if this one would fix my problem or not.
Any help would be greatly appreciated!
Thanks,
Peter
08-28-2009, 10:40 AM
#59
Pro
Bump! I noticed my dashlights were not on when I went to work this morning, even though I had the headlights on. Got to the gate, turned it back to parking lights only, through the gate, turn headlights back on and the dash lights came on. I thought about it on the way to my building and when I got the car, the headlights sometimes would stay popped up. I had to turn them on and off a few times before they would go down. I searched the forum, found this thread and I think this DIY will do the trick. Thanks for the great write up! While I am replacing my hazard switch tomorrow morning, I am going to give this a shot...!

