
EBCM Removal
 09-06-2009, 09:30 PM
#1
Pro

Thread Starter

Trying to remove the EBCM on my YR 2000 vette - I have removed the 4 torx screws and the one 10mm bolt on the bottom
Two issues:
1) How do I removed the wiring plug
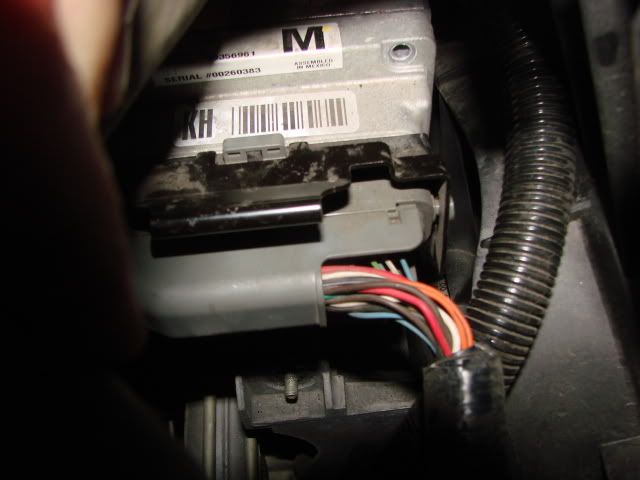
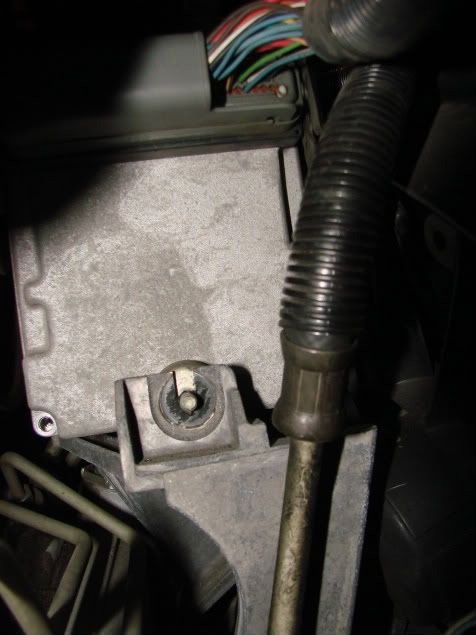
2) There is a 10mm bolt on the bottom middle which I removed - When I try to separate the EBCM from the BPMV, the EBCM pushed against the bolt and I'm afraid to lift it above it so it will clear
Two issues:
1) How do I removed the wiring plug
2) There is a 10mm bolt on the bottom middle which I removed - When I try to separate the EBCM from the BPMV, the EBCM pushed against the bolt and I'm afraid to lift it above it so it will clear
Last edited by csc67; 09-06-2009 at 09:51 PM.
 09-06-2009, 10:08 PM
#2

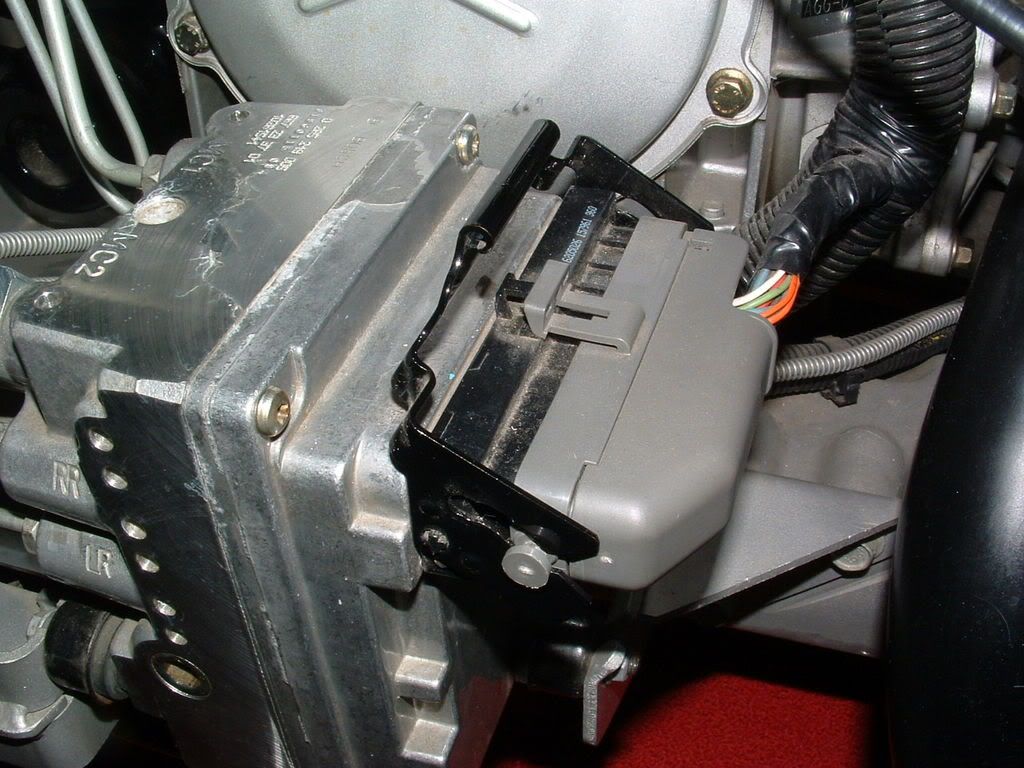
Chris, for the plug, that big black thing that looks like a hinge is retainer for the plug -- if you open that up, it will pull the plug for you.
BTW, mine is a 97, so the EBTCM is in the rear for me -- it was much easier to get at!
BTW, mine is a 97, so the EBTCM is in the rear for me -- it was much easier to get at!

 09-07-2009, 12:23 AM
#4
Team Owner

Lift up on the black metal bail (handle) and the cam-action of it will unlock the connector like TurboB says. 
That bolt at the bottom has to be removed since it goes all the way through a hole EBCM. You need to raise the whole assembly high enough to get it out. Even if you slightly bend the metal brake line tubes a little, it won't hurt them.
HTH
That bolt at the bottom has to be removed since it goes all the way through a hole EBCM. You need to raise the whole assembly high enough to get it out. Even if you slightly bend the metal brake line tubes a little, it won't hurt them.
HTH
09-07-2009, 12:28 AM
#5
Team Owner
09-07-2009, 08:16 AM
#6
Burning Brakes


Member Since: Jan 2006
Location: Magnolia Greens NC
Posts: 1,170
Likes: 0
Received 25 Likes
on
8 Posts
The procedure for replacing the EBCM..... The only special tool you need is a T-20 Torx screwdriver.
I have a Craftsman tool set that has a 1/4" drive screwdriver with and adapter for many different size bit. Unfortunately, the adapter was too long to fit between the EBCM and water pump, so I purchased a set of Craftsman 5 pc. Torx screwdriver set that worked fine. A flathead screwdriver may also be needed to pry apart the EBCM from the BPMV
1 - make sure the car is off.
2 - You will probably need to remove the air bridge to get to the EBCM.
3 - Remove the wire harness by first removing the white plastic clip that locks it in place (I cut it off and replaced it with a zip-tie) , then lift gray handle and pull back on the wire harness . At this point, you will be able to see the second wire connection that is removed by pulling down EBCM.
The EBCM is on the left with the large wire harness coming into it and the sticker on top. The Brake Pressure Modulator Valve (BPMV) in on the right with the brake lines coming out.
4 - The service manual calls for you the remove the 2 insulator nuts that hold the BPMV to the brackets and lift the EBCM/BPMV out of the bracket. I do not think this step is necessary because there is plenty of room while it is still in the bracket and you do not gain much additional clearance since the brake lines restricts the movement.
5 - Remove the 6 T-20 Torx screws connecting the EBCM and BPMV - 1 on each corner and 2 on the sides
6 - "Separate the EBCM from the BPMV by gently pulling apart until separated" - I should start laughing here, but it's not that funny. It's been my experience that anytime the instructions call for you to do something gently, nothing gentle is going to work. In this case, I had to use a flathead screwdriver to break the seal. Once it moved a little, the rest was easy. In addition to the rubber seal, each of the 12 holes you see in has a peg in them from the BPMV. Don't go crazy, but be prepared to force them apart.
7 - At this point, all you've got to do is put it all back together. Push the new EBCM onto the BPMV.
8 - Replace the 6 T-20 torx screws
9 - Reconnect the wire harness
10 - Put the intake back on
09-07-2009, 08:56 AM
#7
Tech Contributor


Member Since: Dec 1999
Location: Anthony TX
Posts: 32,736
Received 2,180 Likes
on
1,583 Posts
CI 6,7,8,9,11 Vet
St. Jude Donor '08

Heres a better shot of the plug and the bail that secures the plug.
Normaly theres a small plastic security plug that is inserted into the hole on the TOP of the connector. You need to remove that plastic plug first. Then just lift up on the bail.
Bail shut:
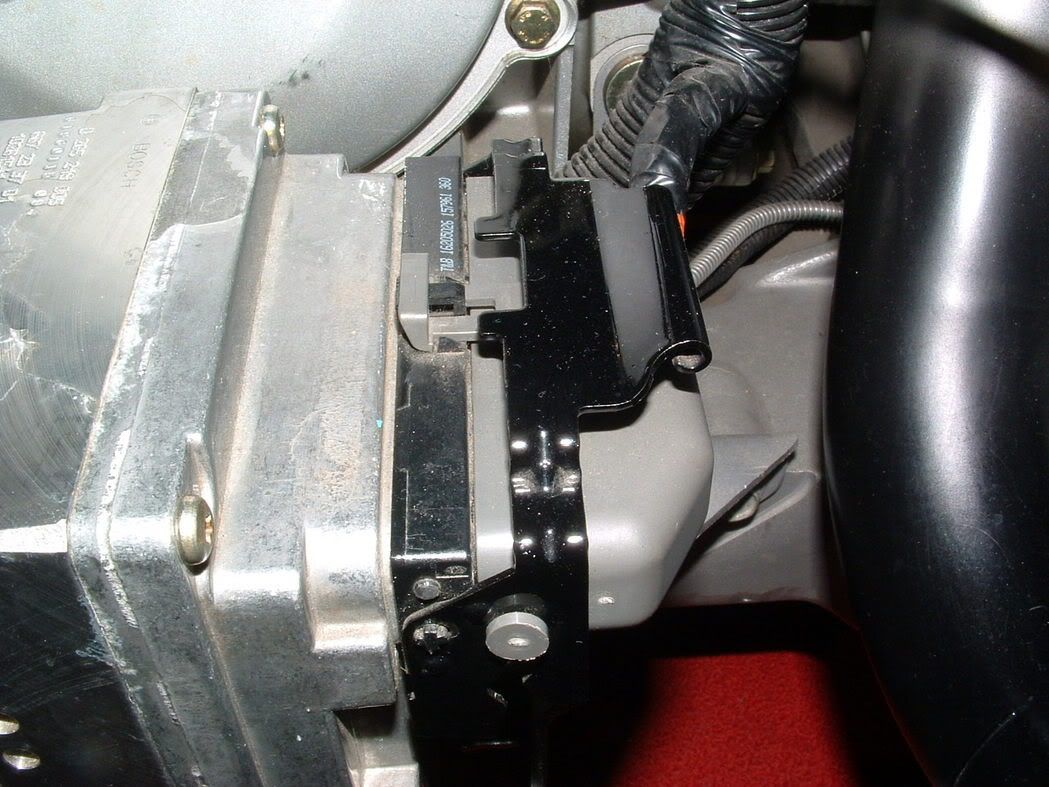
Bail OPEN:
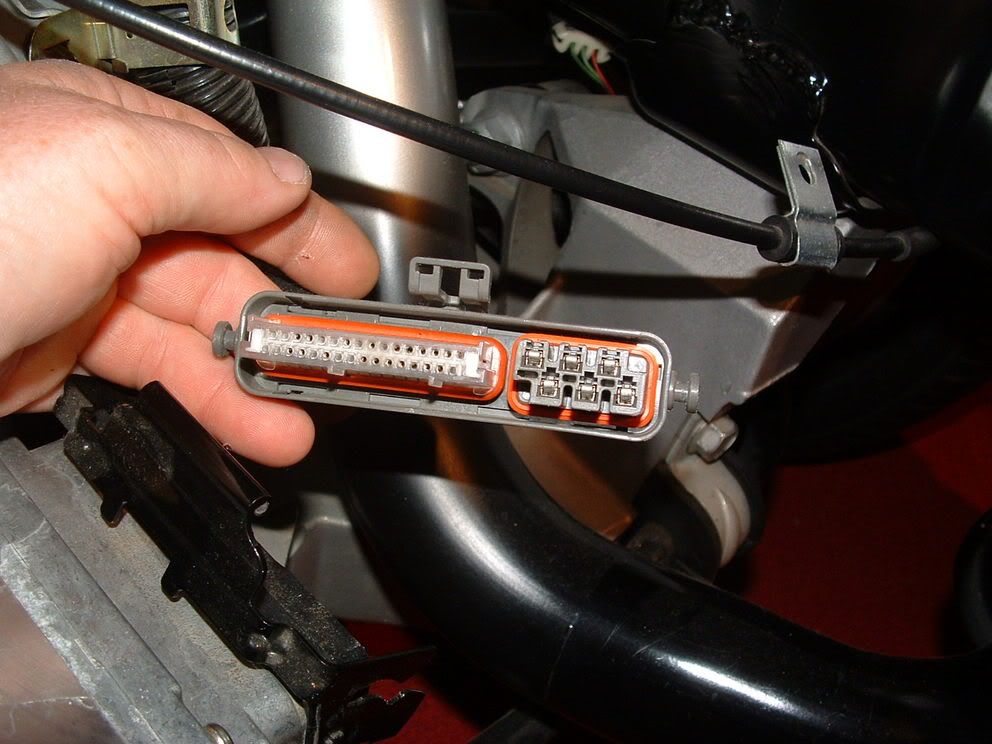
BC
Normaly theres a small plastic security plug that is inserted into the hole on the TOP of the connector. You need to remove that plastic plug first. Then just lift up on the bail.
Bail shut:
Bail OPEN:
BC
Last edited by Bill Curlee; 09-07-2009 at 09:03 AM.
09-07-2009, 09:17 AM
#8
Team Owner
The procedure for replacing the EBCM..... The only special tool you need is a T-20 Torx screwdriver.
I have a Craftsman tool set that has a 1/4" drive screwdriver with and adapter for many different size bit. Unfortunately, the adapter was too long to fit between the EBCM and water pump, so I purchased a set of Craftsman 5 pc. Torx screwdriver set that worked fine. A flathead screwdriver may also be needed to pry apart the EBCM from the BPMV
1 - make sure the car is off.
2 - You will probably need to remove the air bridge to get to the EBCM.
3 - Remove the wire harness by first removing the white plastic clip that locks it in place (I cut it off and replaced it with a zip-tie) , then lift gray handle and pull back on the wire harness . At this point, you will be able to see the second wire connection that is removed by pulling down EBCM.
The EBCM is on the left with the large wire harness coming into it and the sticker on top. The Brake Pressure Modulator Valve (BPMV) in on the right with the brake lines coming out.
4 - The service manual calls for you the remove the 2 insulator nuts that hold the BPMV to the brackets and lift the EBCM/BPMV out of the bracket. I do not think this step is necessary because there is plenty of room while it is still in the bracket and you do not gain much additional clearance since the brake lines restricts the movement.
5 - Remove the 6 T-20 Torx screws connecting the EBCM and BPMV - 1 on each corner and 2 on the sides
6 - "Separate the EBCM from the BPMV by gently pulling apart until separated" - I should start laughing here, but it's not that funny. It's been my experience that anytime the instructions call for you to do something gently, nothing gentle is going to work. In this case, I had to use a flathead screwdriver to break the seal. Once it moved a little, the rest was easy. In addition to the rubber seal, each of the 12 holes you see in has a peg in them from the BPMV. Don't go crazy, but be prepared to force them apart.
7 - At this point, all you've got to do is put it all back together. Push the new EBCM onto the BPMV.
8 - Replace the 6 T-20 torx screws
9 - Reconnect the wire harness
10 - Put the intake back on
I have a Craftsman tool set that has a 1/4" drive screwdriver with and adapter for many different size bit. Unfortunately, the adapter was too long to fit between the EBCM and water pump, so I purchased a set of Craftsman 5 pc. Torx screwdriver set that worked fine. A flathead screwdriver may also be needed to pry apart the EBCM from the BPMV
1 - make sure the car is off.
2 - You will probably need to remove the air bridge to get to the EBCM.
3 - Remove the wire harness by first removing the white plastic clip that locks it in place (I cut it off and replaced it with a zip-tie) , then lift gray handle and pull back on the wire harness . At this point, you will be able to see the second wire connection that is removed by pulling down EBCM.
The EBCM is on the left with the large wire harness coming into it and the sticker on top. The Brake Pressure Modulator Valve (BPMV) in on the right with the brake lines coming out.
4 - The service manual calls for you the remove the 2 insulator nuts that hold the BPMV to the brackets and lift the EBCM/BPMV out of the bracket. I do not think this step is necessary because there is plenty of room while it is still in the bracket and you do not gain much additional clearance since the brake lines restricts the movement.
5 - Remove the 6 T-20 Torx screws connecting the EBCM and BPMV - 1 on each corner and 2 on the sides
6 - "Separate the EBCM from the BPMV by gently pulling apart until separated" - I should start laughing here, but it's not that funny. It's been my experience that anytime the instructions call for you to do something gently, nothing gentle is going to work. In this case, I had to use a flathead screwdriver to break the seal. Once it moved a little, the rest was easy. In addition to the rubber seal, each of the 12 holes you see in has a peg in them from the BPMV. Don't go crazy, but be prepared to force them apart.
7 - At this point, all you've got to do is put it all back together. Push the new EBCM onto the BPMV.
8 - Replace the 6 T-20 torx screws
9 - Reconnect the wire harness
10 - Put the intake back on
His EBCM only has 4 T20 Torx screws holding it onto the BPMV and he only has 1 (one) electrical plug-in connector, not 2.
Although most of the basic info regarding location, tools, etc is the same, there are differences in C5 EBTM modules, depending on which year model is being serviced.
09-07-2009, 09:31 AM
#9
Pro
Thread Starter
One down, one to go
Resolved the pin issue - Bill thanks for pictures - I wasn't pulling the handle hard enough, I stopped pulling at the first 'notch' in fear of breaking something
STILL don't know how to resolve the removal of bushing in picture # 2 - I could force the EBCM up, but would have to move in at least 3 inches and concerned about bending brake lines
09-07-2009, 09:46 AM
#10
Team Owner
One down, one to go
Resolved the pin issue - Bill thanks for pictures - I wasn't pulling the handle hard enough, I stopped pulling at the first 'notch' in fear of breaking something
STILL don't know how to resolve the removal of bushing in picture # 2 - I could force the EBCM up, but would have to move in at least 3 inches and concerned about bending brake lines
Resolved the pin issue - Bill thanks for pictures - I wasn't pulling the handle hard enough, I stopped pulling at the first 'notch' in fear of breaking something
STILL don't know how to resolve the removal of bushing in picture # 2 - I could force the EBCM up, but would have to move in at least 3 inches and concerned about bending brake lines
I just performed this task a few weeks ago and it can be done, you just have to be a little patient and not afraid to use the force necessary to raise the assembly up and over out of the mounting bracket.
Tip: Leave one of the top 2 T20 Torx screws installed ("finger tight" is fine) until you remove that bottom stud I mentioned. Once you raise the assembly high enough, you will see that this mounting stud has a hex on it for a 13mm/14mm?? (don't quote me on size here) that is concealed behind the mounting bracket and not visible when installed. Remove the stud first (easy to do), and then remove that last T20 screw.
HTH
09-07-2009, 10:16 PM
#11
Drifting

I got to the separation point and was using a screwdriver and it wouldn't budge. I finally realized I had one bolt still holding it together....hence why I say to go slowly.

Did you see my post about this? I took a few pictures of the unit and where it was bolted that might help (at the bottom of the first page)
http://forums.corvetteforum.com/c5-t...c-c1243-h.html
09-08-2009, 06:24 AM
#12
Team Owner
Yes. The two lower screws are on the driver's side of the car. You don't need to remove them, merely loosen them a bit and the entire unit can be raised an inch or so (just enough to lift it above the bracket). Once it is out of the bracket, you can then seperate the unit. You might need a flat head screwdriver to do this and do it slowly, ensuring you have all of the bolts removed.
I got to the separation point and was using a screwdriver and it wouldn't budge. I finally realized I had one bolt still holding it together....hence why I say to go slowly.
Did you see my post about this? I took a few pictures of the unit and where it was bolted that might help (at the bottom of the first page)
http://forums.corvetteforum.com/c5-t...c-c1243-h.html
 10-04-2009, 12:44 AM
#13
Instructor


Member Since: May 2005
Location: Ramona CA
Posts: 247
Likes: 0
Received 0 Likes
on
0 Posts
Yes. The two lower screws are on the driver's side of the car. You don't need to remove them, merely loosen them a bit and the entire unit can be raised an inch or so (just enough to lift it above the bracket). Once it is out of the bracket, you can then seperate the unit. You might need a flat head screwdriver to do this and do it slowly, ensuring you have all of the bolts removed.
I got to the separation point and was using a screwdriver and it wouldn't budge. I finally realized I had one bolt still holding it together....hence why I say to go slowly.
Did you see my post about this? I took a few pictures of the unit and where it was bolted that might help (at the bottom of the first page)
http://forums.corvetteforum.com/c5-t...c-c1243-h.html
I got to the separation point and was using a screwdriver and it wouldn't budge. I finally realized I had one bolt still holding it together....hence why I say to go slowly.
Did you see my post about this? I took a few pictures of the unit and where it was bolted that might help (at the bottom of the first page)
http://forums.corvetteforum.com/c5-t...c-c1243-h.html
10-04-2009, 07:46 AM
#15
Pro
Thread Starter
SKelly,
You won't have Traction control or ABS capabilities, but still drives fine - You will notice that it is a little harder to turn the steering wheel
After I removed my EBCM, I covered it with plastic and zipped tied it to keep rain and dirt out
Why are you removing your EBCM (what codes)? What year is yours?
10-04-2009, 02:07 PM
#17
Team Owner
Personally, I would not buy used. You may very well just be buying someone else's problem. Personally I got lucky and found an individual selling a new unit for $300 on one of the other Corvette web-sites.
Note: As long as you do NOT have Active Handling on your car, you need GM part number: 9367071
10-21-2009, 03:09 PM
#19
Tech Contributor
Member Since: Aug 2008
Location: Oak Hill Virginia
Posts: 2,902
Likes: 0
Received 19 Likes
on
5 Posts
Is your "new" EBCM new or used and where did you get it? If your pretty sure you don't have a defective unit I'd suggest inspecting the wiring plug/harness and ensuring that no damage was done when you removed it. I had to take mine out to send it to ABSFixer a couple of weeks ago, so I know you have to pull pretty hard...
I'm sure one of the electrical experts here will chime in at some point.
I'm sure one of the electrical experts here will chime in at some point.
Last edited by cdkcorvette7; 10-21-2009 at 03:12 PM.
10-22-2009, 12:08 AM
#20
Instructor
Member Since: May 2005
Location: Ramona CA
Posts: 247
Likes: 0
Received 0 Likes
on
0 Posts
Brandon told me that the C1255 code means the EBCM is NFG and has an internal failure that he can't fix. They are not rebuildable electronics wise. Maybe you can add some components on the exposed side of the circuit card, but you can't take it further apart to service the back side.
The wiring harness looks good too. The unit was new but I think it is the wrong part number. It bolts up fine but I wonder if the FRC part of my car has some special options.
The wiring harness looks good too. The unit was new but I think it is the wrong part number. It bolts up fine but I wonder if the FRC part of my car has some special options.