
Cam/Header/CAI and other misc items install
 05-13-2010, 02:45 PM
#21
Instructor

Thread Starter
Member Since: Feb 2009
Location: Lockport IL
Posts: 177
Likes: 0
Received 0 Likes
on
0 Posts
To answer your question, honestly, I really don't know if its for the old or new style.
 05-13-2010, 03:07 PM
#22
Instructor
Thread Starter
Member Since: Feb 2009
Location: Lockport IL
Posts: 177
Likes: 0
Received 0 Likes
on
0 Posts
So I spoke to Jason at EnglandGreen and 81c3 hit it on the spot. Oil Pressure is normal, and the erratic behavior can simply been resolved by a tune. So this afternoon, I'll go back and start the break-in procedure with 30 minutes of varied 2000-2500rpm.
Thanks guys for answering my questions. Now I just have to wait for my LG Headers, schedule a tune, and post up some HP numbers.
So for my final thoughts on the cam install was tedious, fun, and time consuming. I've learned a lot throughout the whole process and its been pretty much a great experience. After getting the Harmonic Balancer installed, putting everything else on was just a reverse procedure of taking it off. I did have some corrosion and rust built up on some of my bolts, but thats nothing that PB blaster and a wire brush can't handle.
Thanks guys for answering my questions.
Now I just have to wait for my LG Headers, schedule a tune, and post up some HP numbers.So for my final thoughts on the cam install was tedious, fun, and time consuming. I've learned a lot throughout the whole process and its been pretty much a great experience. After getting the Harmonic Balancer installed, putting everything else on was just a reverse procedure of taking it off. I did have some corrosion and rust built up on some of my bolts, but thats nothing that PB blaster and a wire brush can't handle.
Last edited by mstrnad; 05-13-2010 at 03:10 PM.
05-14-2010, 08:53 AM
#23
Le Mans Master

Member Since: Dec 2005
Location: Where Woke Goes to Die
Posts: 8,194
Received 615 Likes
on
431 Posts

No need for a break in period. Roller cams and roller rockers are very hard steel. These arent like old school cam/lifters where the procedure you describe is protocol. Just warm up the engine to a reasonable temperature and drive. Before you hammer on it, be sure its up to full temperature. The valve springs will thank you for it.
05-15-2010, 10:17 AM
#25
Instructor
Thread Starter
Member Since: Feb 2009
Location: Lockport IL
Posts: 177
Likes: 0
Received 0 Likes
on
0 Posts
No need for a break in period. Roller cams and roller rockers are very hard steel. These arent like old school cam/lifters where the procedure you describe is protocol. Just warm up the engine to a reasonable temperature and drive. Before you hammer on it, be sure its up to full temperature. The valve springs will thank you for it.
cant wait to see your numbers......Hurry up mike...LOL
 05-15-2010, 11:26 AM
#26
Le Mans Master
Member Since: Dec 2005
Location: Where Woke Goes to Die
Posts: 8,194
Received 615 Likes
on
431 Posts
[QUOTE=mstrnad;1574079906]Ah...cool. Just following directions from Comp Cams. I'm well aware that I'm not supposed to go WOT on cold springs, and definitely keep that in mind. Thanks
I should have said roller cams and roller lifters.... Anyway, theres no break in period for them.
I should have said roller cams and roller lifters....
Anyway, theres no break in period for them.
05-15-2010, 11:30 AM
#27
Instructor
Thread Starter
Member Since: Feb 2009
Location: Lockport IL
Posts: 177
Likes: 0
Received 0 Likes
on
0 Posts
This probably was the easiest of everything I've done so far. I cannot wait until the day were I can store pens in my center console without them bursting. 
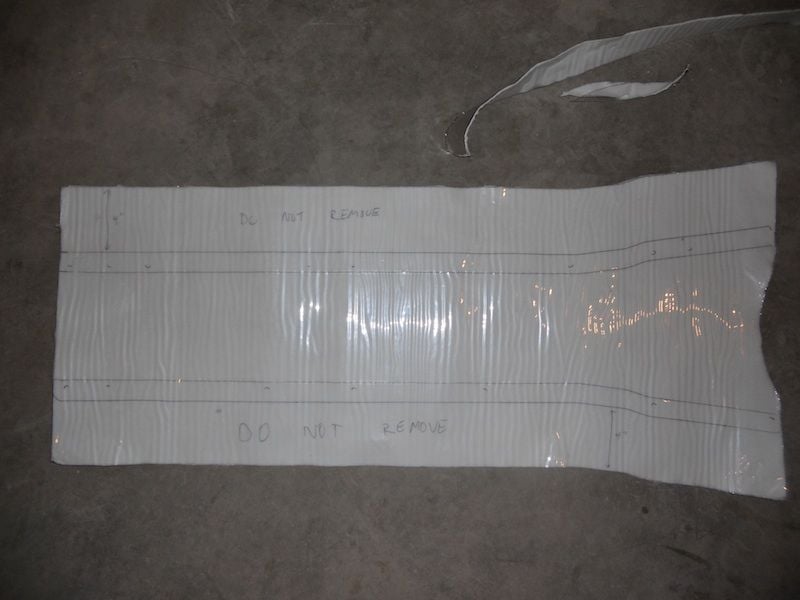
So what I've done first was clean the original heat shield for the C5. So I just used warm water and 0000 steal pads.

Then I started making a template and outlining where I'm going to cut. I just used the heat shield to trace the lines. To cover the sides of the tunnel, I just allocated 4" of space. To "flap down" the DEI heat shield to bolt the C5 heat shield back to the car, I probably left maybe 1 1/2" of space.

Now there is two areas were you DO NOT want to remove the plastic. If you do, prepare for some swearing and kicking yourself in the a$$ for doing so, this stuff is sticky! The area were you do not want to take the plastic off is where the bolts originally go to hold up the heat shield and the outside(sides) of the heat shield. The only area is the center of the DEI heat shield were the C5 heat shield will go. Just make sure you apply the DEI stuff on the correct side of the C5 heat shield. I just looked at the C5 heat shield for scuff marks made by the bolts to figure out which side it goes on, or its the lip side up.

Installed on the car:

So what I've done first was clean the original heat shield for the C5. So I just used warm water and 0000 steal pads.
Then I started making a template and outlining where I'm going to cut. I just used the heat shield to trace the lines. To cover the sides of the tunnel, I just allocated 4" of space. To "flap down" the DEI heat shield to bolt the C5 heat shield back to the car, I probably left maybe 1 1/2" of space.
Now there is two areas were you DO NOT want to remove the plastic. If you do, prepare for some swearing and kicking yourself in the a$$ for doing so, this stuff is sticky!
The area were you do not want to take the plastic off is where the bolts originally go to hold up the heat shield and the outside(sides) of the heat shield. The only area is the center of the DEI heat shield were the C5 heat shield will go. Just make sure you apply the DEI stuff on the correct side of the C5 heat shield. I just looked at the C5 heat shield for scuff marks made by the bolts to figure out which side it goes on, or its the lip side up. Installed on the car:
05-15-2010, 11:49 AM
#28
Instructor
Thread Starter
Member Since: Feb 2009
Location: Lockport IL
Posts: 177
Likes: 0
Received 0 Likes
on
0 Posts
This was also easy with the help of PB Blaster on the top bolts of the shocks. Sorry for the lack of pictures of this one. I went through 3 of the 4 shocks and have forgotten to take pictures. But here is a summary of what I did.
Rear Shocks
I don't know what people have done to get the rear shock off, but I use a tow strap to compress the shock and snake it out of place. Prior to that, I just removed the bottom bolt first, and then removed the top two. If you do it the opposite way(top first, then bottom), you run the risk of stripping your bolts against the top plate when you take off the tops. The a-arms will want to drop 2-3 inches when the top bolts are taken off. Or if you want to put a jack underneath the bottom a-arm to keep the a-arms in place. No removal of A-arms were required for the rears, and I used the original bushings for the Bilsteins. To take the bushings and plate off, I had to use two open ended wrenches, from memory I believe it was a 6mm and 16mm. 6mm was to keep the long bolt from spinning while taking the nut off with a 16mm wrench.
Front Shocks
This was even easier than the rears. First, I removed the bottom two bolts, and then removed the top bolt that holds the shock in place(same case with the rear shock, 6mm and 16mm open end wrenches). After that I took the top a-arms off and moved the shock out of place.
05-15-2010, 11:57 AM
#29
Instructor
Thread Starter
Member Since: Feb 2009
Location: Lockport IL
Posts: 177
Likes: 0
Received 0 Likes
on
0 Posts
I thought I would post a video of the car starting up. Now this car is still untuned, and my LT headers are still not on, and yes I know my rear exhaust tips are crooked and not on straight. They are coming back off anyways.
Last edited by mstrnad; 05-28-2010 at 02:50 PM. Reason: For some reason I uploaded it twice. Changed the link.
05-15-2010, 12:19 PM
#30
Drifting

Very nice mike. Sounds dam good. I already bought my 5/16 rod to hold up my lifters..LOL The wife said what are them for, and i told her. She said dan, you better not have bought that cam kit yet. You promised me that you would take me on vacation first.Which i did. But she dont know the little stach of $ i got saved for it. HEHE. I cant WAIT......
05-15-2010, 10:45 PM
#31
Race Director


Member Since: Sep 2003
Location: Now in God's Country, the Big Sky, Montana!
Posts: 13,550
Likes: 0
Received 4 Likes
on
4 Posts
Cruise-In 7-8-9-10 Veteran
St. Jude Donor '06-'07-'08-'09-'10-'11-'12

Hi Mike,
When you called I didn't realize the car was running without headers installed. Aside from the tune, yes, when the headers go on it is going to run different then it does now. Do not tune the car until you get the headers put on and call me if you have any more questions.
You are right about the springs. Don't do any WOT until your oil temp is roughly 140.
Jason
05-16-2010, 03:19 AM
#32
Instructor
Thread Starter
Member Since: Feb 2009
Location: Lockport IL
Posts: 177
Likes: 0
Received 0 Likes
on
0 Posts
Very nice mike. Sounds dam good. I already bought my 5/16 rod to hold up my lifters..LOL The wife said what are them for, and i told her. She said dan, you better not have bought that cam kit yet. You promised me that you would take me on vacation first.Which i did. But she dont know the little stach of $ i got saved for it. HEHE. I cant WAIT......
05-16-2010, 03:22 AM
#33
Instructor
Thread Starter
Member Since: Feb 2009
Location: Lockport IL
Posts: 177
Likes: 0
Received 0 Likes
on
0 Posts
Hi Mike,
When you called I didn't realize the car was running without headers installed. Aside from the tune, yes, when the headers go on it is going to run different then it does now. Do not tune the car until you get the headers put on and call me if you have any more questions.
You are right about the springs. Don't do any WOT until your oil temp is roughly 140.
Jason
When you called I didn't realize the car was running without headers installed. Aside from the tune, yes, when the headers go on it is going to run different then it does now. Do not tune the car until you get the headers put on and call me if you have any more questions.
You are right about the springs. Don't do any WOT until your oil temp is roughly 140.
Jason
Thanks for the post.
05-16-2010, 03:36 AM
#34
Instructor
Thread Starter
Member Since: Feb 2009
Location: Lockport IL
Posts: 177
Likes: 0
Received 0 Likes
on
0 Posts
Well, I didn't have a chance to put my C6Z51 sway bars on today. I took pics of them and wow, they are much beefier than the stocks.
What I did get to was installing the AEM UEGO partially. Thanks to lucky131969 in pointing me in the right direction, I ended up using the ASRY OFF circuit near the passenger fuse box. And the best thing is, there were 3 wires just sitting there waiting to be used. So my interior of my car is completely taken apart and I ran the wires from the pillar to my power and ground wires. I actually had to go to the hardware store and buy an extra 5 feet of wires to meet the run. The wideband wire was also ran from the UEGO unit, through the firewall, and is now sitting on top of my engine bay. I'll have some pictures put up tomorrow(today) showing the install. The UEGO powered up, so its just buttoning everything back up.
I also wanted to use the blue wire that can be used for data logging, so I'll have to MacGyver that up too. So my thoughts would be to run the blue(data) and black(ground) to a DB-9(just as it says in the instructions) and keep it in my glove box for future use.
05-16-2010, 04:14 PM
#35
Instructor
Thread Starter
Member Since: Feb 2009
Location: Lockport IL
Posts: 177
Likes: 0
Received 0 Likes
on
0 Posts
Ok guys...I'm going to spend some TLC on my B&B Bullets, obviously, looking at the pics of the exhaust they look old.
What do you guys typically do to restore it to almost brand new condition?'
What do you guys typically do to restore it to almost brand new condition?'
05-16-2010, 04:51 PM
#36
Race Director
As much as I love LG, I wouldn't wait two months for headers to become available. If what I've read is true, the "Superpro" model is made in China, and nowhere near the quality of their original "Pro", or "Street" models. They must be considerably cheaper than other models of LG, or competing brands that're %100 stainless construction, or you wouldn't have ordered them, right? Since the headers are such a holdup, why don't you cancel the order, and get something like OBX, which are SS, but still cheap. BTW, your console overheating problem will likely go away if you install a complete exhaust system that eliminates the factory cats. Either the O/R catless, or HF cats don't seem to radiate the heat like the factory cats, so the heatshield won't be needed.
05-16-2010, 08:45 PM
#37
Instructor
Thread Starter
Member Since: Feb 2009
Location: Lockport IL
Posts: 177
Likes: 0
Received 0 Likes
on
0 Posts
As much as I love LG, I wouldn't wait two months for headers to become available. If what I've read is true, the "Superpro" model is made in China, and nowhere near the quality of their original "Pro", or "Street" models. They must be considerably cheaper than other models of LG, or competing brands that're %100 stainless construction, or you wouldn't have ordered them, right? Since the headers are such a holdup, why don't you cancel the order, and get something like OBX, which are SS, but still cheap. BTW, your console overheating problem will likely go away if you install a complete exhaust system that eliminates the factory cats. Either the O/R catless, or HF cats don't seem to radiate the heat like the factory cats, so the heatshield won't be needed.
With regards to the head shield, its already on. Doesn't hurt to keep them on either. But its good to know that the catless or HF cats don't radiate as much heat as the stock ones do.
05-17-2010, 10:58 AM
#38
Burning Brakes

Member Since: Aug 2009
Location: Virginia Beach Virginia
Posts: 816
Received 0 Likes
on
0 Posts

Next week I will be swapping my 75k Z51 shocks out for a set of 16k 02 Z06 shocks. How long did this take you? I will have a lift and tools for the swap. I also need to swap out my Transaxle mount, I figure that while I have the rear shocks off I might as well do it then. any thoughts?
05-17-2010, 04:15 PM
#39
Instructor
Thread Starter
Member Since: Feb 2009
Location: Lockport IL
Posts: 177
Likes: 0
Received 0 Likes
on
0 Posts
Next week I will be swapping my 75k Z51 shocks out for a set of 16k 02 Z06 shocks. How long did this take you? I will have a lift and tools for the swap. I also need to swap out my Transaxle mount, I figure that while I have the rear shocks off I might as well do it then. any thoughts?
05-17-2010, 07:11 PM
#40
Race Director
