
ATI Super Damper install questions
 05-22-2010, 04:48 PM
#1
Instructor

Thread Starter

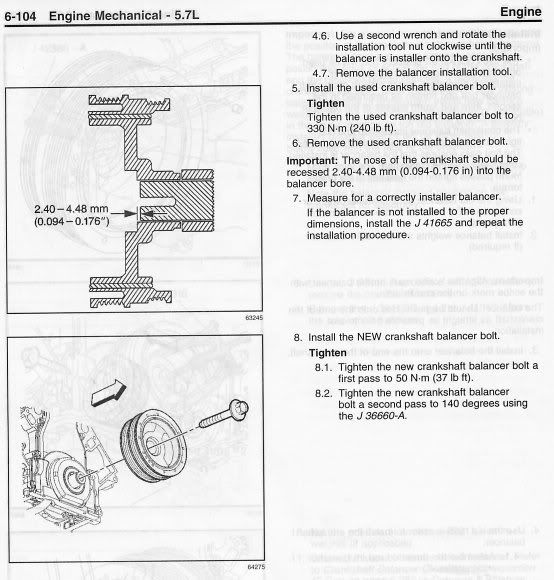
I am in the process of installing an ATI 917246 and noticed that the hub depth of the recess to the back of the hub (the end that goes through the front seal) is approximately 1/8" deeper than the stock balancer. If the crank snout is recessed .094-.176" on the factory damper per the manual, does that mean the crank snout will be recessed .219-.301 with the ATI damper? I know I can line it up by a straight edge, I just want to be sure.
Thanks.
Steve
Thanks.
Steve

 05-22-2010, 08:53 PM
#3
Team Owner


I did the depth measurement per the manual but re-calculated the numbers based on the ATI measurements. According to what I wrote in my manual, I came up with a depth between 0.202"-0.284". The drawing of the ATI showed the distance from the back of the hub to the end as 1.520". I measured the stock unit as 1.412" making the difference 0.108". I added the 0.108" to the distances in the manual (0.094"-0.176") and came up with my numbers.
05-22-2010, 10:38 PM
#4
Instructor
Thread Starter
I did the depth measurement per the manual but re-calculated the numbers based on the ATI measurements. According to what I wrote in my manual, I came up with a depth between 0.202"-0.284". The drawing of the ATI showed the distance from the back of the hub to the end as 1.520". I measured the stock unit as 1.412" making the difference 0.108". I added the 0.108" to the distances in the manual (0.094"-0.176") and came up with my numbers.
Thanks - I just wanted to make sure I wasn't doing something wrong. I want to button this thing back up.

Steve
05-22-2010, 10:44 PM
#5
Pro


Member Since: Mar 2004
Posts: 653
Likes: 0
Received 0 Likes
on
0 Posts

If yours is a 2-piece design like the one I installed, heating up the steel hub (250degF in the oven for ~20 minutes) makes installation a snap. With a thick leather glove, I was able to slide it nearly all the way into place by hand. After it cools, the balancer ring bolts on easily.
05-23-2010, 10:14 AM
#6
Instructor
Thread Starter
Mine is actually the 3-piece design (hub, ac pulley, and balancer). I was planning on heating the hub with a heat gun, but I may just put it in the oven.
The question I have is if the crank snout is recessed between approximately .25", then what prevents the ARP crank bolt from pulling the balancer on further during torquing? Also, I have looked for a strap wrench to hold the crank from spinning, but I haven't had much luck finding one locally. Apart from the flywheel locking tool, are there any other tricks to achieve 240lb-ft on that bolt?
The question I have is if the crank snout is recessed between approximately .25", then what prevents the ARP crank bolt from pulling the balancer on further during torquing? Also, I have looked for a strap wrench to hold the crank from spinning, but I haven't had much luck finding one locally. Apart from the flywheel locking tool, are there any other tricks to achieve 240lb-ft on that bolt?
05-23-2010, 06:39 PM
#10
Instructor
Thread Starter
I have another question - I can not find a 27mm 12 pt. impact socket anywhere locally. I have a Craftsman 12pt regular deep socket - do you think I can get 240ft-lbs out of it without breaking it?
Steve
Steve
06-12-2012, 09:47 AM
#12
Drifting


Is that what I need a standard 27mm deep socket?? I have an ATI on my CTSV 6.0 IRON BLOCK with a Callies crank...it has the air cond. pulley attached to it...MY freakin builder did NOT put any blue loctite on the 9 bolts and the other day I heard a noise and noticed a bolt was hanging out............Come to realize 3 of the long bolts have broken off in the pulley and one of the 3 small bolts..i guess these small ones are for a pulley tool...I have 3 long bolt with blue loctite in the Balancer and 1 small bolt...The 3 small bolts are really not that important are they..aren't they for use with a puller tool only....I am just concerned about the balance might be thrown off due to not all the bolts in the pully..plus could they break....b/4 i call ATI any advice would be appreciated.....
ps: sorry for the hijack, but i could not sto typeing
and one of the 3 small bolts..i guess these small ones are for a pulley tool...I have 3 long bolt with blue loctite in the Balancer and 1 small bolt...The 3 small bolts are really not that important are they..aren't they for use with a puller tool only....I am just concerned about the balance might be thrown off due to not all the bolts in the pully..plus could they break....b/4 i call ATI any advice would be appreciated.....ps: sorry for the hijack, but i could not sto typeing
06-12-2012, 12:17 PM
#13
Instructor
Member Since: Jun 2006
Location: Siloam Springs AR
Posts: 107
Likes: 0
Received 0 Likes
on
0 Posts
If you are using the ARP crank bolt, I used a 1 1/16 standard 12 point deep socket. Using a metric 27mm is close though and should be ok but I believe it is not really a metric sized head.

06-12-2014, 09:16 AM
#14
Cruising

Member Since: Apr 2014
Posts: 11
Likes: 0
Received 0 Likes
on
0 Posts
I am in the process of installing an ATI 917246 and noticed that the hub depth of the recess to the back of the hub (the end that goes through the front seal) is approximately 1/8" deeper than the stock balancer. If the crank snout is recessed .094-.176" on the factory damper per the manual, does that mean the crank snout will be recessed .219-.301 with the ATI damper? I know I can line it up by a straight edge, I just want to be sure.
Thanks.
Steve
Thanks.
Steve
So I ordered the same damper and I have no idea what I am measuring. Also will I have to hone my crank snout, and is there a key in the stock crank on a C6 LS2 Z51? Anybody please help I am going to be doing a mountain of research before I start, again.
Thanks
06-12-2014, 02:24 PM
#15
Instructor
Member Since: Jun 2006
Location: Siloam Springs AR
Posts: 107
Likes: 0
Received 0 Likes
on
0 Posts
I think they were measuring the slight offset between the end of the crank and the seating surface of the pulley where the bolt tightens down. I do not recall mine having any tricks but it has been a while since I have done this.
You should not have to hone anything. Some people heat the balancer so the inside diameter expands to make it easier to install. You will need the ATI style pinning kit if you intend to do this (I recommend you do). You basically drill down through a fixture perpendicular to the crank. You ream the holes to a final diameter and insert a small cylindrical pin.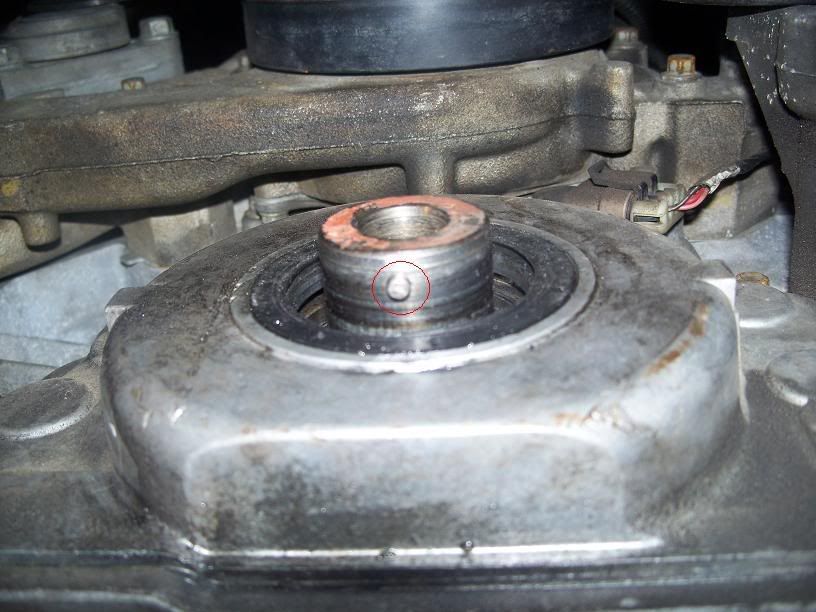
This pin lines up with a channel in the balancer to keep it from rotating as sometimes happens from an interference fit alone.
06-12-2014, 04:24 PM
#16
Team Owner
You don't hone the crank, you would hone the hub if required. Most don't even measure. Make sure you get a proper installation tool, don't follow ls1howto.com or you could have major issues. I would pin the crank while you are in there using the ATI kit. Very nice kit. Below is the measurement being discussed. It is out of the service manual and the numbers are different with the ATI hub.
06-12-2014, 05:35 PM
#17
Instructor
Member Since: Jun 2006
Location: Siloam Springs AR
Posts: 107
Likes: 0
Received 0 Likes
on
0 Posts
This measurement is mostly a sanity check to make sure the balancer is within spec that it will align with the other accessories. The balancer hub is going to butt up to the oil pump gear. They are calling out the fact that this measurement is going to be different than the OEM part.
One more thing I did remember having to do was to turn down the ARP washer to fit. It is one of those thick black oxidized beveled washers. Seems like it was a hair too large to fit inside the ATI part.
One more thing I did remember having to do was to turn down the ARP washer to fit. It is one of those thick black oxidized beveled washers. Seems like it was a hair too large to fit inside the ATI part.
06-13-2014, 11:58 AM
#18
Cruising
Member Since: Apr 2014
Posts: 11
Likes: 0
Received 0 Likes
on
0 Posts
I think they were measuring the slight offset between the end of the crank and the seating surface of the pulley where the bolt tightens down. I do not recall mine having any tricks but it has been a while since I have done this.
You should not have to hone anything. Some people heat the balancer so the inside diameter expands to make it easier to install. You will need the ATI style pinning kit if you intend to do this (I recommend you do). You basically drill down through a fixture perpendicular to the crank. You ream the holes to a final diameter and insert a small cylindrical pin.
This pin lines up with a channel in the balancer to keep it from rotating as sometimes happens from an interference fit alone.
You should not have to hone anything. Some people heat the balancer so the inside diameter expands to make it easier to install. You will need the ATI style pinning kit if you intend to do this (I recommend you do). You basically drill down through a fixture perpendicular to the crank. You ream the holes to a final diameter and insert a small cylindrical pin.
This pin lines up with a channel in the balancer to keep it from rotating as sometimes happens from an interference fit alone.
 06-13-2014, 01:11 PM
#20
Cruising
Member Since: Apr 2014
Posts: 11
Likes: 0
Received 0 Likes
on
0 Posts