
New Twin Post Lift Install - 9000 LB Capacity
 02-21-2011, 04:35 PM
#1
Safety Car

Thread Starter
Member Since: Nov 2000
Location: Shenandoah Valley Virginia
Posts: 4,549
Likes: 0
Received 27 Likes
on
24 Posts

Every one has probably dreamed of having your own lift in your garage. I finally got tired of crawling on my back to do the track maintenance on the Vette and my other vehicles. I researched several models of twin post lifts and decided on the 9000 LB Eagle model TP9F. It is a low overhead unit that will fit in many garages. The installation is not difficult and every one that is reasonably proficient with tools can do the install yourself. Cost is not huge, total project came in at just a touch under $2000. Lift was $1500, electrical $200, Transport cost $150 and misc for oil and tool rental $100. If you have all the tools ready and electrical work finished you can easily do the install in 7-8 hours.
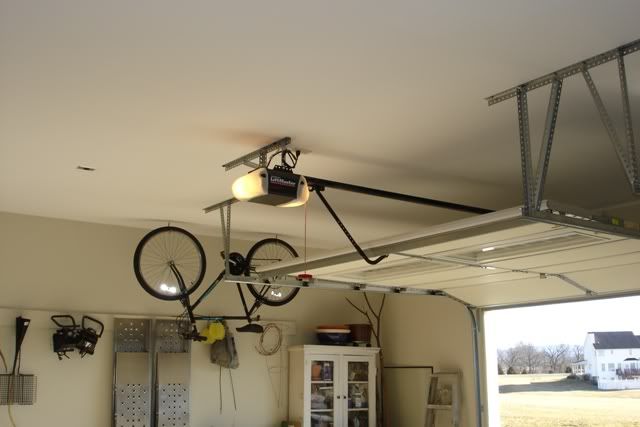
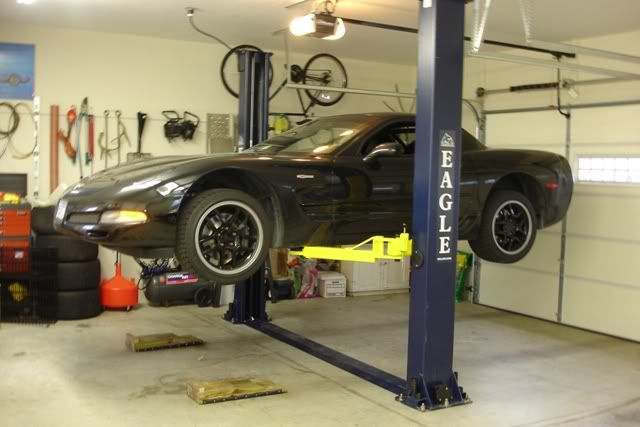
First off, I had to install a 30Amp 220V circuit for the pump motor. I also had to raise the garage door opener up to the roof for extra clearance. The original location would have limited rise on the lift and a side mount operator was very expensive for a swap out. I can get full lift of 75 inches on the car with the door closed so working under it is easy.
I drove the trailer to pick up the lift at the manufacturers location in Greensboro, NC. It was a bunch cheaper than having it shipped by the truck lines. A days worth of driving but two tanks of gas sure beats the $450 the truck lines wanted. The lift is heavy weighing over 1500 LBS. Here is it tied down on the trailer.

After unpacking the unit from the wrapping, you have to separate all of the small and medium parts to get ready for installation.

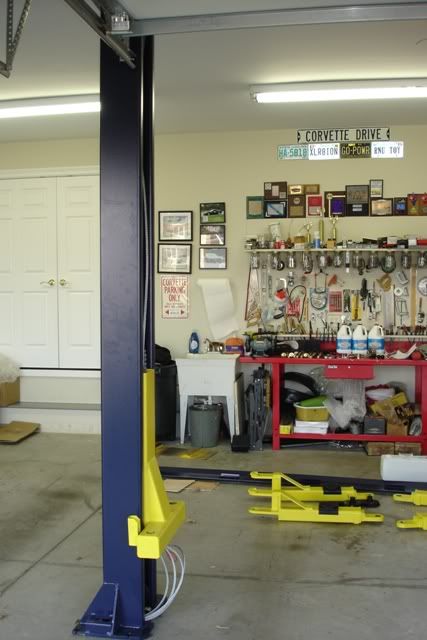
The next step was to bring in the towers and erect them. They are VERY heavy - about 450Lbs each and it took three good size guys to manhandle them since we did not have any power equipment. Layout is easy per the diagram furnished. If you have a tape measure, that's all you need.
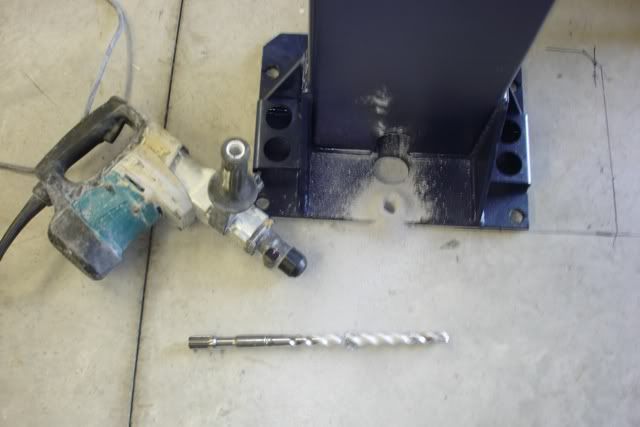
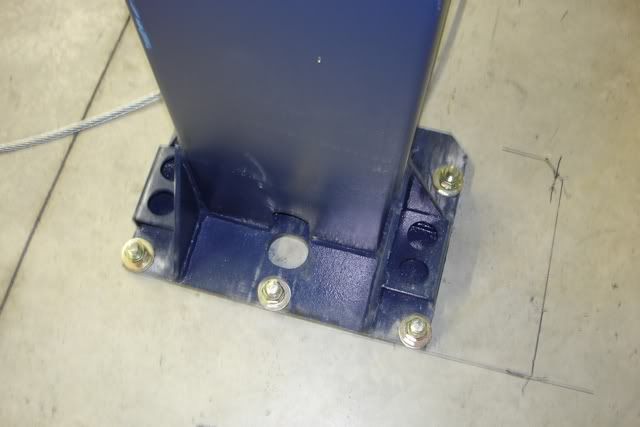
Securing the posts is next. A hammer drill is the only way to go. It took less than 20 minutes to drill the 10 holes for the anchors. A 6 inch deep 3/4" diameter hole is required. You could use a regular drill and masonry bit, but it would take hours. Spend the rental fee and get a hammer drill. There are a total of 10 anchors so the posts will not move or come loose.
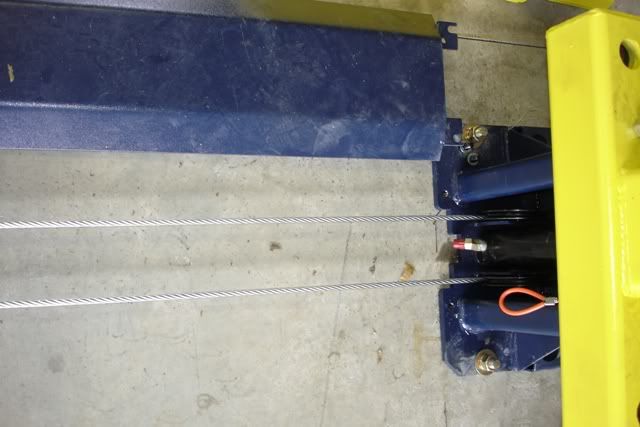
Once the posts were secured, the compensating cables are installed. They run to each tower and insure that each side of the lift moves direct relation with the other. They always maintain level operation from side to side. These are a pain to get equalized and required several tries before correct tension was achieved.
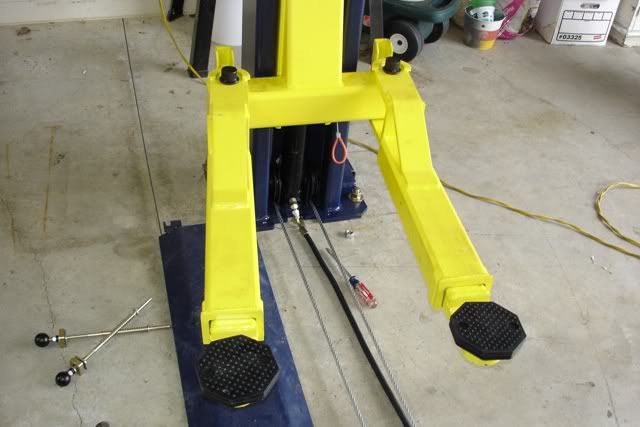
Next the swing arms are installed along with the safety retention clips. It is an easy job but is heavy lifting, each arm weighs over 100 LBS. The safeties keep the arms from moving once the lift is elevated.
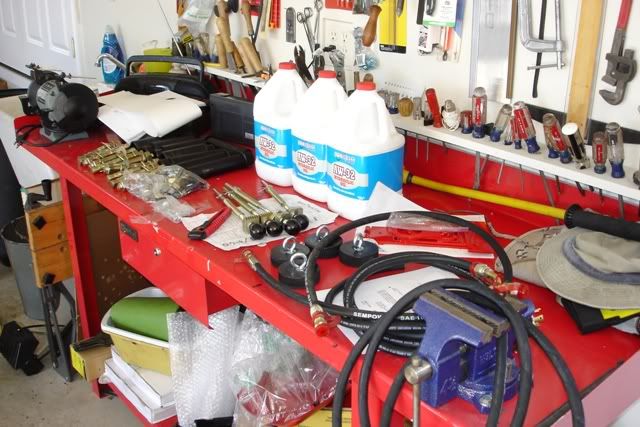
the next part of the install was wiring the electrical cable and plug into the pump motor. It comes with a foot long pigtail that is way too short for any type of connection. I used a 3 wire #10 multi cable because of the 30 AMP full load draw on the circuit.
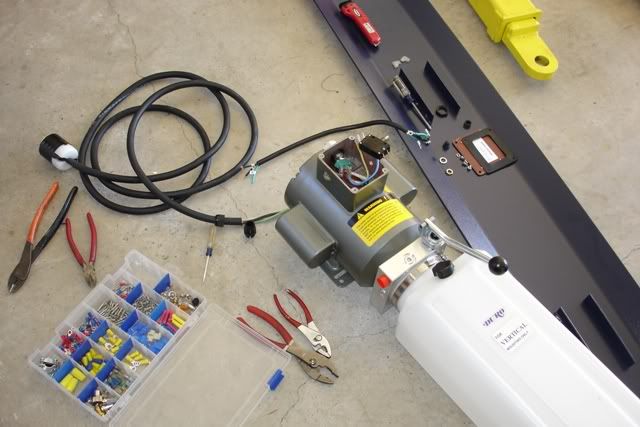
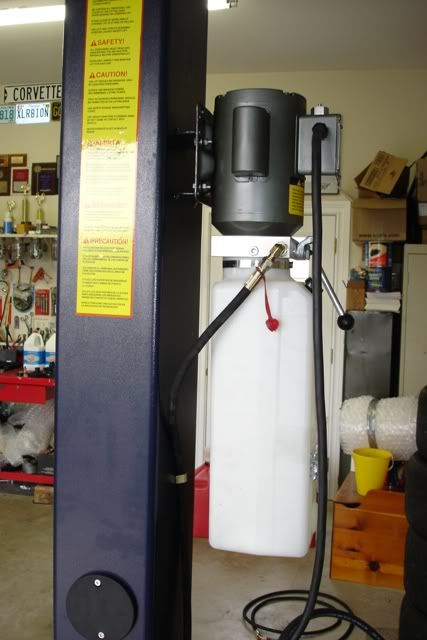
Next the pump assembly was mounted on the upright and the hydraulic lines installed. The tank took 3 gallons of AW32 hydraulic fluid. All the lines were pre cut with fittings attached. Install was easy without leaks the first time !! After lines are completed, the unit was powered up and tested.
[
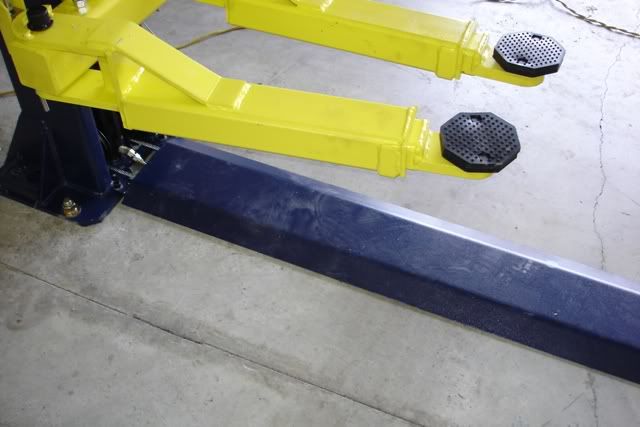
Finally the floor plate was installed to protect the cables and hydraulic lines as a car rolls in to the lift. It is a thick plate about 1/4" thick to withstand a heavy load. It runs between both towers and is secured by 4 bolts.
[
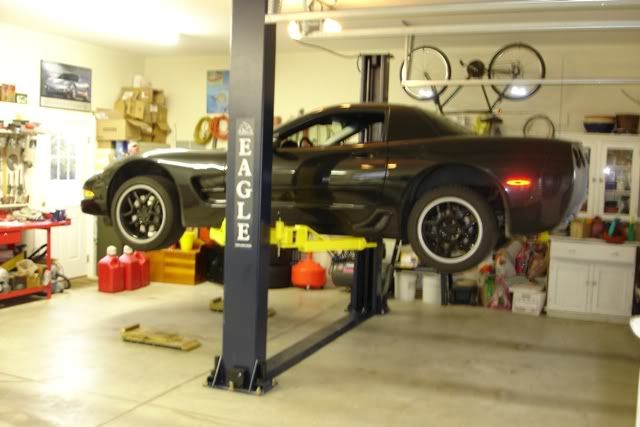
Finally the Vette up on the lift. No more crawling on my back with the car on jackstands.
Overall it was an easy install, well worth the time and effort. Don't think about it if you want one - just do it.
First off, I had to install a 30Amp 220V circuit for the pump motor. I also had to raise the garage door opener up to the roof for extra clearance. The original location would have limited rise on the lift and a side mount operator was very expensive for a swap out. I can get full lift of 75 inches on the car with the door closed so working under it is easy.
I drove the trailer to pick up the lift at the manufacturers location in Greensboro, NC. It was a bunch cheaper than having it shipped by the truck lines. A days worth of driving but two tanks of gas sure beats the $450 the truck lines wanted. The lift is heavy weighing over 1500 LBS. Here is it tied down on the trailer.
After unpacking the unit from the wrapping, you have to separate all of the small and medium parts to get ready for installation.
The next step was to bring in the towers and erect them. They are VERY heavy - about 450Lbs each and it took three good size guys to manhandle them since we did not have any power equipment. Layout is easy per the diagram furnished. If you have a tape measure, that's all you need.
Securing the posts is next. A hammer drill is the only way to go. It took less than 20 minutes to drill the 10 holes for the anchors. A 6 inch deep 3/4" diameter hole is required. You could use a regular drill and masonry bit, but it would take hours. Spend the rental fee and get a hammer drill. There are a total of 10 anchors so the posts will not move or come loose.
Once the posts were secured, the compensating cables are installed. They run to each tower and insure that each side of the lift moves direct relation with the other. They always maintain level operation from side to side. These are a pain to get equalized and required several tries before correct tension was achieved.
Next the swing arms are installed along with the safety retention clips. It is an easy job but is heavy lifting, each arm weighs over 100 LBS. The safeties keep the arms from moving once the lift is elevated.
the next part of the install was wiring the electrical cable and plug into the pump motor. It comes with a foot long pigtail that is way too short for any type of connection. I used a 3 wire #10 multi cable because of the 30 AMP full load draw on the circuit.
Next the pump assembly was mounted on the upright and the hydraulic lines installed. The tank took 3 gallons of AW32 hydraulic fluid. All the lines were pre cut with fittings attached. Install was easy without leaks the first time !! After lines are completed, the unit was powered up and tested.
[
Finally the floor plate was installed to protect the cables and hydraulic lines as a car rolls in to the lift. It is a thick plate about 1/4" thick to withstand a heavy load. It runs between both towers and is secured by 4 bolts.
[
Finally the Vette up on the lift. No more crawling on my back with the car on jackstands.
Overall it was an easy install, well worth the time and effort. Don't think about it if you want one - just do it.
Last edited by CHJ In Virginia; 02-21-2011 at 04:41 PM.
 02-21-2011, 05:20 PM
#2
Advanced


Member Since: Jun 2010
Location: North Mankato Minnesota
Posts: 95
Likes: 0
Received 0 Likes
on
0 Posts
Nice write up. What is the height of your garage from the cement floor to the ceiling?
Also, you mentioned the holes for the column anchors are 6" deep. How thick is you cement slab? I know mine is only 4".
Doug
Also, you mentioned the holes for the column anchors are 6" deep. How thick is you cement slab? I know mine is only 4".
Doug


 02-21-2011, 05:27 PM
#4
Safety Car
Thread Starter
Member Since: Nov 2000
Location: Shenandoah Valley Virginia
Posts: 4,549
Likes: 0
Received 27 Likes
on
24 Posts
The lift requires 112 " clear for installation. My roof is 13 ft tall so I have plenty of extra room. Manufacturer specifies a minimum slab thickness of 4" of 3000 Lb reinforced concrete. My slab was poured 6" thick in this bay when garage was built in anticipation of lift install.
02-21-2011, 05:28 PM
#5
Melting Slicks

 02-21-2011, 06:28 PM
#6
Burning Brakes

Nice job, that�s a good looking lift.  I hope to pick mine up this weekend from a place in Florence SC, I'm going with a direct lift overhead 2 post. What size anchor bolts did you use? This one comes with 4" anchors�, but I also have 6" concrete in the bays of my shop just for installing a lift. I called Fastenal a local bolt/hardware store and they said they have some 5.5" as you don�t want to breakthrough the concrete for around 40 bucks total, I believe I'll pick them up just to ease my mind.
I hope to pick mine up this weekend from a place in Florence SC, I'm going with a direct lift overhead 2 post. What size anchor bolts did you use? This one comes with 4" anchors�, but I also have 6" concrete in the bays of my shop just for installing a lift. I called Fastenal a local bolt/hardware store and they said they have some 5.5" as you don�t want to breakthrough the concrete for around 40 bucks total, I believe I'll pick them up just to ease my mind.

 02-21-2011, 07:00 PM
#8
"AlohaC5" Senior Member


Curtis, that lift looks AWESOME! Great job on the installation - very professional. I'm sure your back and neck will thank you - no longer crawling on the floor to get into tight places. A "must have" for doing HPDE sessions on a regular basis to keep up on your maintenance. Good luck with the new "toy". Looking forward to the 1st "Mod Party" at your place. Mike


 02-21-2011, 08:06 PM
#11
Safety Car
Thread Starter
Member Since: Nov 2000
Location: Shenandoah Valley Virginia
Posts: 4,549
Likes: 0
Received 27 Likes
on
24 Posts
[ What size anchor bolts did you use? This one comes with 4" anchors�, but I also have 6" concrete in the bays of my shop just for installing a lift. I called Fastenal a local bolt/hardware store and they said they have some 5.5" as you don�t want to breakthrough the concrete
The anchors I used were 5 1/2 " long. The floor plate is 1" thick and the anchor threads need to stick out 1" for the bolt and washer so that puts the grabbing area of the anchor squarely in the concrete. The shorter anchor would be correct for a 4" slab. You don't want to penetrate and have the anchor go all the way through, it will not hold !
The anchors I used were 5 1/2 " long. The floor plate is 1" thick and the anchor threads need to stick out 1" for the bolt and washer so that puts the grabbing area of the anchor squarely in the concrete. The shorter anchor would be correct for a 4" slab. You don't want to penetrate and have the anchor go all the way through, it will not hold !
02-21-2011, 10:18 PM
#13
Burning Brakes
The anchors I used were 5 1/2 " long. The floor plate is 1" thick and the anchor threads need to stick out 1" for the bolt and washer so that puts the grabbing area of the anchor squarely in the concrete. The shorter anchor would be correct for a 4" slab. You don't want to penetrate and have the anchor go all the way through, it will not hold ![/QUOTE]
Yea, the ones that come with are plenty long to go into the concrete as illustrated in their instruction manual, I just feel if there is 6'' there to cling to, why not go deep on it
Yea, the ones that come with are plenty long to go into the concrete as illustrated in their instruction manual, I just feel if there is 6'' there to cling to, why not go deep on it
02-22-2011, 08:04 AM
#15
Race Director


Good for you.........I have been loving my twin post for decades

02-22-2011, 09:39 AM
#16
Safety Car
Thread Starter
Member Since: Nov 2000
Location: Shenandoah Valley Virginia
Posts: 4,549
Likes: 0
Received 27 Likes
on
24 Posts
Nice! I've seen where some people add epoxy to the insert. Did you?
No - epoxy not used on these inserts. There are some types that use epoxy in addition to the mechanical binding action. The inserts used fit very tightly in a 3/4" hole and actually have to be driven in place with a large hammer. The bottom end has a cone shape that expands a collar against the concrete as the nut is tightened. Tightened down to 150 FT Lbs, there is no way it is going to come out !
No - epoxy not used on these inserts. There are some types that use epoxy in addition to the mechanical binding action. The inserts used fit very tightly in a 3/4" hole and actually have to be driven in place with a large hammer. The bottom end has a cone shape that expands a collar against the concrete as the nut is tightened. Tightened down to 150 FT Lbs, there is no way it is going to come out !

 03-22-2011, 06:12 PM
#18
Instructor

Nice lift! I just installed a Maxjax lift in my garage. How sweet it is! I got it for the portability, but after seeing how much room I have I kinda' wish I had bought the Eagle model you have.
Tim
Tim