
PCM removed- I have cleaning questions
 03-01-2011, 12:52 AM
#1
Drifting

Thread Starter
Hi all,
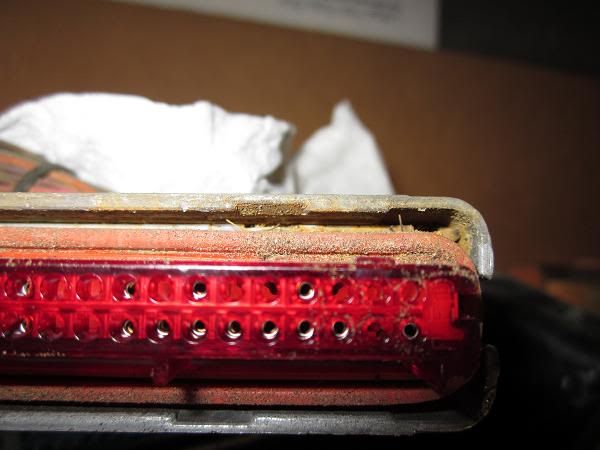
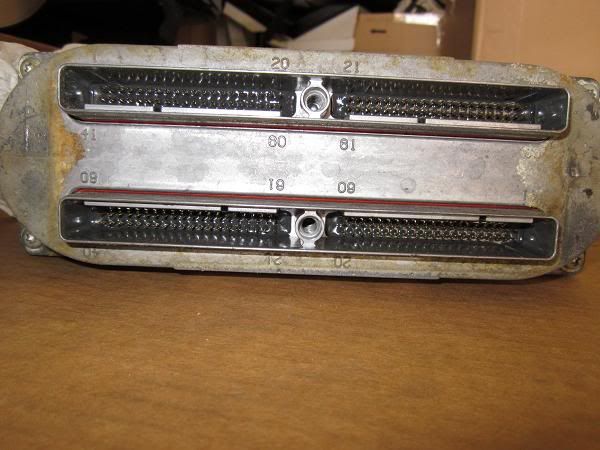
Finally got my PCM out and am in process of cleaning up the corrosion from the dreaded battery acid probs. I did not have any issues with any electrical, performance or anything, but just wanted to get this fixed up from dripping in the past. I have the QP off, PCM out and side of Vette is wide open for access now. My questions are about cleaning the PCM itself and the connectors associated with it. Hopefully, "the jedi vette master", Bill, will see this post and chime in for me Anyone else with suggestions, guidance, etc. as anything would be appreciated. I am leary of screwing anything up, concerning this whole PCM dealio. How should I clean the connector, specifically the orange rubber ringseal inside, with all the sand/gunk around it? Is it ok to spray everything with CRC Electronic cleaner and wipe off? Anything to watch out for? Thanks for any help.
Steve
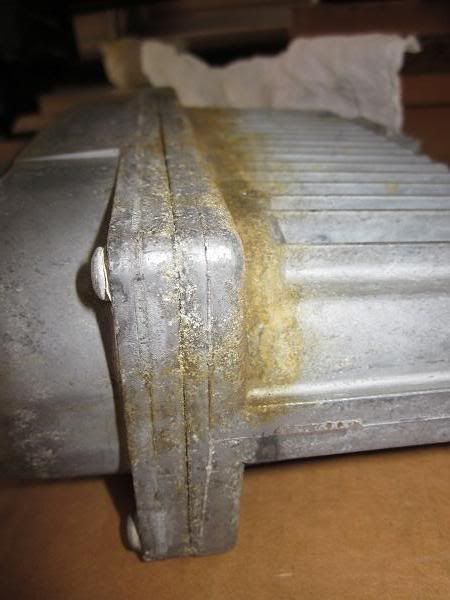
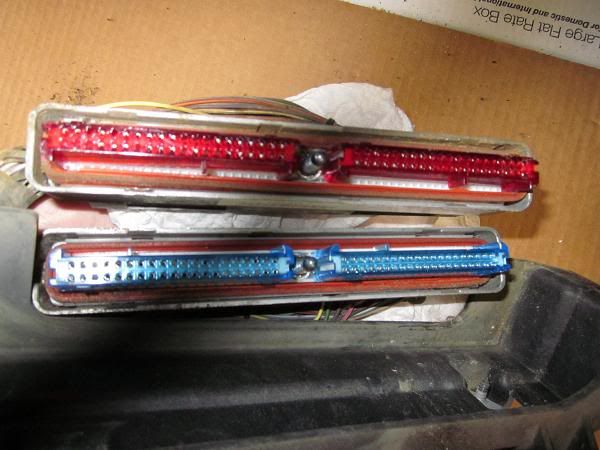
Finally got my PCM out and am in process of cleaning up the corrosion from the dreaded battery acid probs. I did not have any issues with any electrical, performance or anything, but just wanted to get this fixed up from dripping in the past. I have the QP off, PCM out and side of Vette is wide open for access now. My questions are about cleaning the PCM itself and the connectors associated with it. Hopefully, "the jedi vette master", Bill, will see this post and chime in for me
Anyone else with suggestions, guidance, etc. as anything would be appreciated. I am leary of screwing anything up, concerning this whole PCM dealio. How should I clean the connector, specifically the orange rubber ringseal inside, with all the sand/gunk around it? Is it ok to spray everything with CRC Electronic cleaner and wipe off? Anything to watch out for? Thanks for any help.Steve
Last edited by Blackjetvette97; 03-01-2011 at 12:56 AM. Reason: add more
 03-01-2011, 01:43 AM
#2
Tech Contributor


Member Since: Dec 1999
Location: Anthony TX
Posts: 32,736
Received 2,180 Likes
on
1,583 Posts
CI 6,7,8,9,11 Vet
St. Jude Donor '08

Looks like you are in fairly good shape. YES the electrical cleaner is fine. Just let it evaporate well and do a finial scrub with alcohol.
You can carefully remove the rubber seals, clean out all the dirt and use silicone dielectric grease on the SEALs ONLY and reinstall. As for the outside of the PCM, it doesn't look bad. Do not put Dielectric grease inside the connectors or on the pins, just on the seals..
PCM CASE: A little buff with a brass wire brush and clean the aluminum with BAKING SODA /WATER SOLUTION to make sure that all the acid is neutralized. If it doesn't foam, it good to go. Rinse and dry. Be careful not to get any water/thing in the connectors.
How does the frame look??
Did you replace the vacuum lines that are damaged??
BC
03-01-2011, 02:52 AM
#3
Drifting
Thread Starter
Bill,
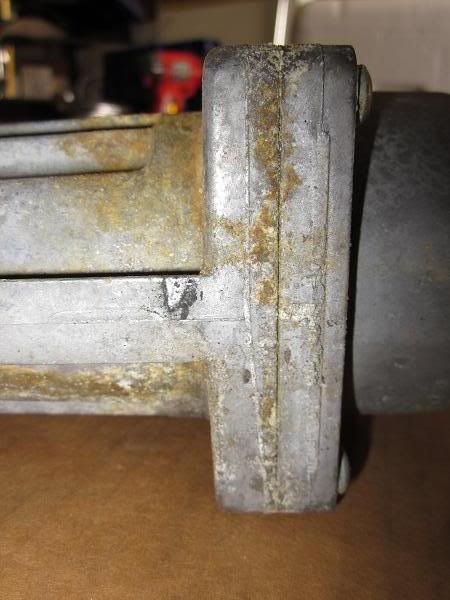
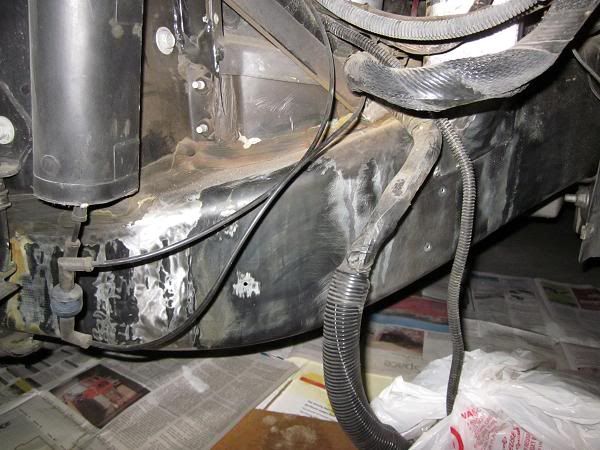
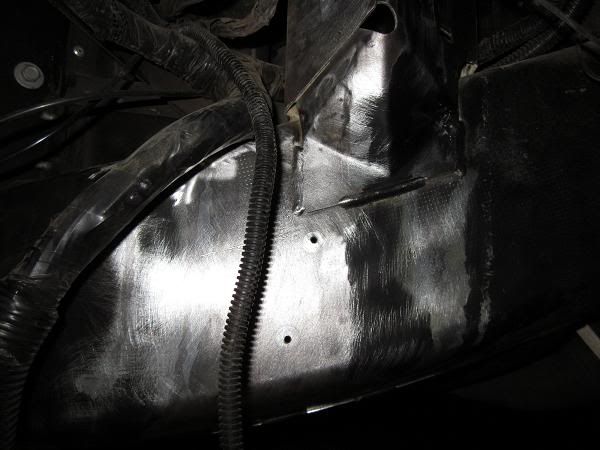
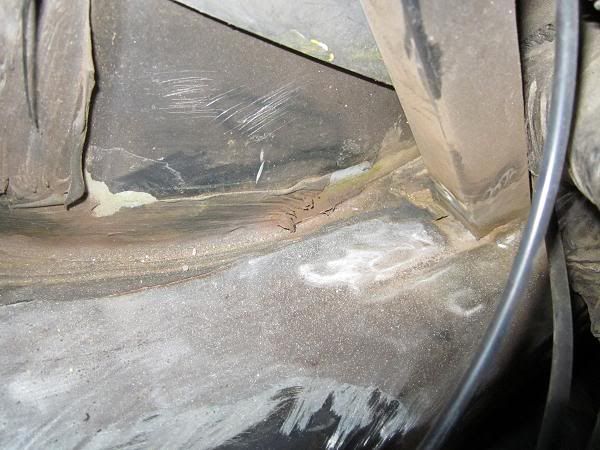
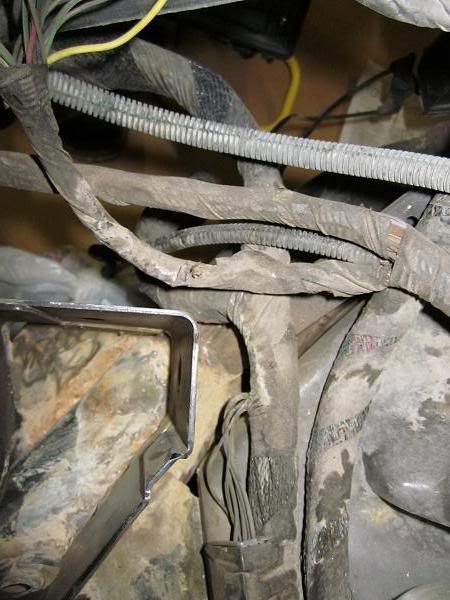
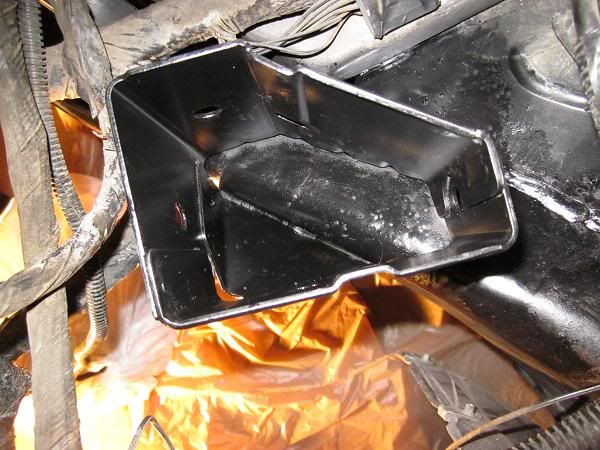
Thanks so much for all the help, I really appreciate it. I am in nervous territory when dealing with things like the PCM. My frame looks ok(see pics) and all the wiring, vac lines, etc. are in good shape. I think I am fortunate to live in a VERY dry climate such as Vegas(ave relative humidity is like 6% and down normally) and that I really stayed on top of the batt for most of the car's life with me(since '98). I obviously did have a few leaks and hit them with baking soda always, but never fully cleaned up the mess. So, I'm diving in head-long this time, to get her nice and dialed in. A few more questions for ya, if you don't mind.
1) So, I am good to spray the Elec cleaner on wires, tubing, DIRECTLY INTO connectors, etc. and it won't damage them at all?
2) How can I scrub the gunk off inside the individual connector pins if any?
3) How to chase the cleaner with Alcohol(what type....Isopropyl?)?
4) The PCM itself, can I spray CRC batt cleaner on it, especially around the joint area, where the 2 sides come together?
5) I assume I SHOULD NOT open up the PCM at all or break it down further?
I'm sure I'll have more Q's tomorrow, when I resume cleaning. I have hit all frame areas with CRC batt cleaner to neautralize acidic conditions. Some areas are gonna be tough to get into to sand(batt stand innards!)
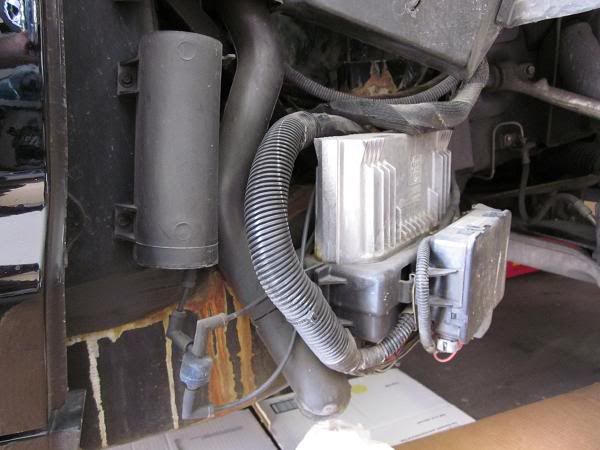
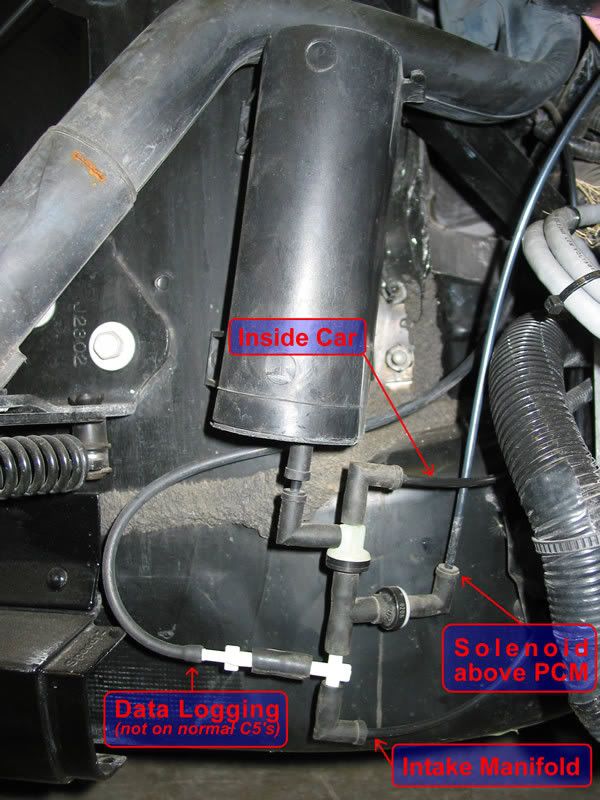
**On an unrelated matter, but possibly intertwined, I have an issue with my AIR pump turning on constantly, every 4-5 seconds when the car is running.........Is there something I can check while I have the QP off this side right now? I see the mess of tubes/elbows/check valve(?) near the pass door.
Anyway, THANK YOU SO MUCH for all you do to help us all on here. You are a good guy!!!!!!
Steve
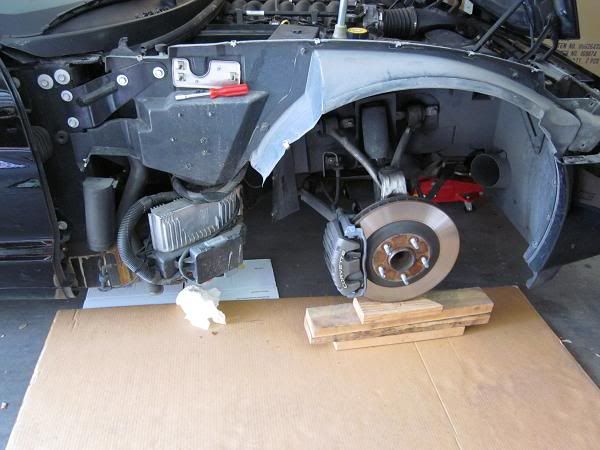

Thanks so much for all the help, I really appreciate it. I am in nervous territory when dealing with things like the PCM. My frame looks ok(see pics) and all the wiring, vac lines, etc. are in good shape. I think I am fortunate to live in a VERY dry climate such as Vegas(ave relative humidity is like 6% and down normally) and that I really stayed on top of the batt for most of the car's life with me(since '98). I obviously did have a few leaks and hit them with baking soda always, but never fully cleaned up the mess. So, I'm diving in head-long this time, to get her nice and dialed in. A few more questions for ya, if you don't mind.
1) So, I am good to spray the Elec cleaner on wires, tubing, DIRECTLY INTO connectors, etc. and it won't damage them at all?
2) How can I scrub the gunk off inside the individual connector pins if any?
3) How to chase the cleaner with Alcohol(what type....Isopropyl?)?
4) The PCM itself, can I spray CRC batt cleaner on it, especially around the joint area, where the 2 sides come together?
5) I assume I SHOULD NOT open up the PCM at all or break it down further?
I'm sure I'll have more Q's tomorrow, when I resume cleaning. I have hit all frame areas with CRC batt cleaner to neautralize acidic conditions. Some areas are gonna be tough to get into to sand(batt stand innards!)
**On an unrelated matter, but possibly intertwined, I have an issue with my AIR pump turning on constantly, every 4-5 seconds when the car is running.........Is there something I can check while I have the QP off this side right now? I see the mess of tubes/elbows/check valve(?) near the pass door.
Anyway, THANK YOU SO MUCH for all you do to help us all on here. You are a good guy!!!!!!
Steve
03-01-2011, 06:06 AM
#4
Racer


I just used this stuff the other day and it did a good job. But... I don't remember where I bought it. I had it on the shelf with a bunch of other cleaners and such.
HTH
HTH
03-01-2011, 10:40 AM
#5
Banned Scam/Spammer

Member Since: May 2007
Location: Machineguns, because I don�t compromise
Posts: 15,685
Received 1,319 Likes
on
788 Posts

I had the bracket stuck to the PCM body on my '01
Part of the bracket broke off stuck to the PCM.


Nothing on the frame though. All of the reaction was on the bracket only. Strange.

I just used a wire brush attached to a drill for the PCM, the connectors were perfect already.... glued the bracket back together after a cleaning.... It's all fixed and seems fine. I'm thinking it was from the last battery I had. It was sketchy for a couple months leading up to it's outright failure.
Part of the bracket broke off stuck to the PCM.
Nothing on the frame though. All of the reaction was on the bracket only. Strange.
I just used a wire brush attached to a drill for the PCM, the connectors were perfect already.... glued the bracket back together after a cleaning.... It's all fixed and seems fine. I'm thinking it was from the last battery I had. It was sketchy for a couple months leading up to it's outright failure.
03-01-2011, 12:29 PM
#6
Melting Slicks


Member Since: Jan 2007
Location: Oilerville Edmonton
Posts: 2,170
Likes: 0
Received 5 Likes
on
4 Posts
St. Jude Donor '08

great timing. just had ECS tune my pcm so it is ready to go back in. the pcm isn't bad but needs a bit of tlc. I'll have to check my frame and vacume lines. thanks for all the tips 

 03-01-2011, 03:46 PM
#8
Tech Contributor
Member Since: Dec 1999
Location: Anthony TX
Posts: 32,736
Received 2,180 Likes
on
1,583 Posts
CI 6,7,8,9,11 Vet
St. Jude Donor '08
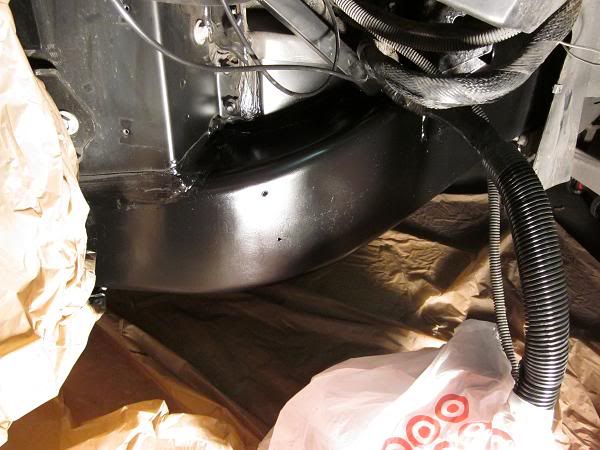
 BUD,,, you still have a tremendous ammount of work still left to accomplish. All that corrosion/rust/scale on the frame MUST be removed. That ENTIRE AREA needs to be scrubbed with baking soda water solution several times till you get NO MORE REACTION.
 The frame needs to be wire brushed, RUST CONVERTER needs to be applies and then it can be spray painted with KRYLON SEMIGLOSS whick will match fairly well. That frame neeeeeeeeeds lots of attention! If it were me, I would remove a lot more stuff and access the frame better.
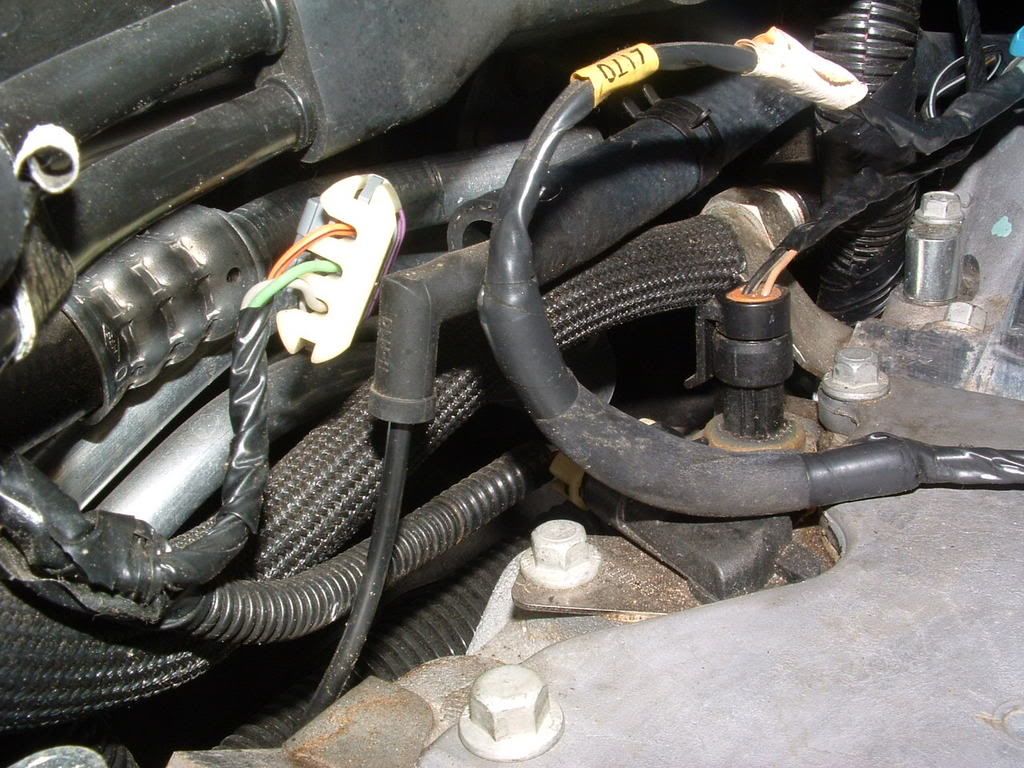
The harness covers need to be re=moved and wires/vacuum line inspected.
WHEW!
Bill
03-02-2011, 12:37 AM
#9
Drifting
Thread Starter
Hi all,
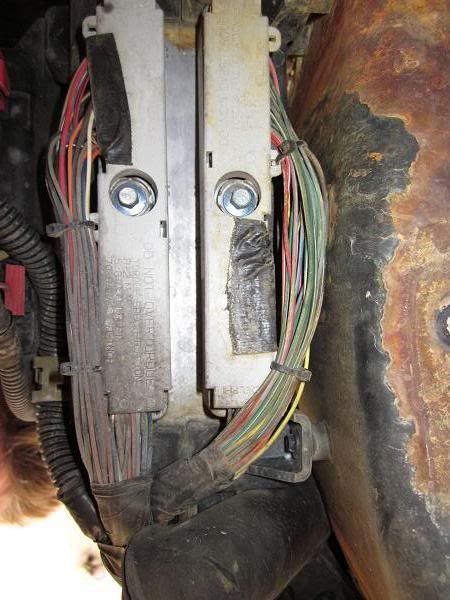
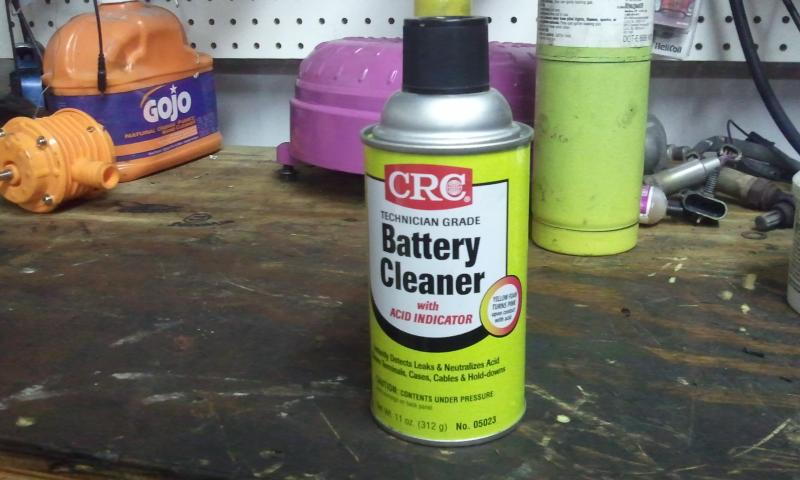
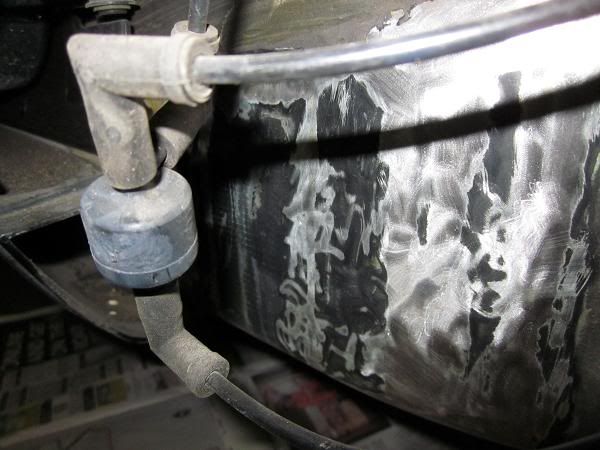
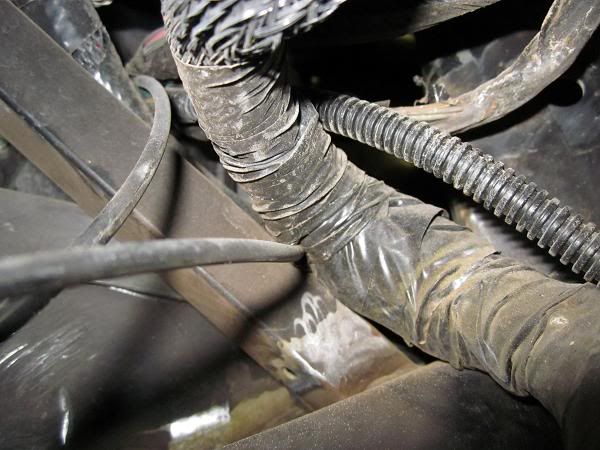
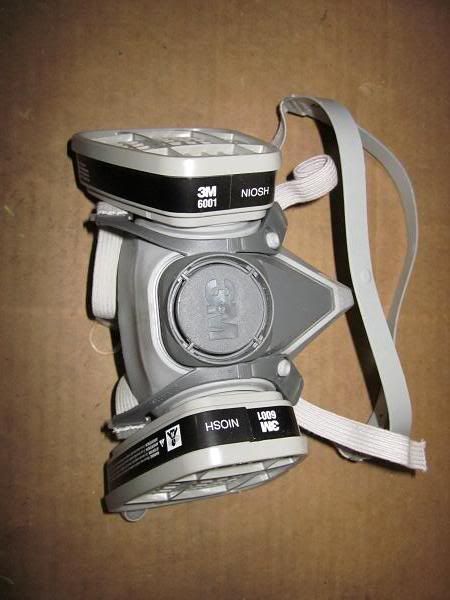
well, I've been hittin it hard today and it is comin' along. Bill, I hit it 2 days ago with CRC Batt Cleaner(same as in pic from other poster on here) and let it sit overnight. I then cleaned it up and hit it yesterday with a baking soda thick paste(which fizzed a little in some places) and let that sit overnight. Today, I started in on the wire-brushing(drill attachment) and stripping all the gunk(as well as paint) off the bad areas. It is looking WAY better and I am almost done with the entire area. The little nooks & crannies are hard to get at, but I'm doin pretty good with a dremel(coarse polishing bit-works GREAT!) going over areas. I had to stop a few times to go get more bits, pickup daughter from school, etc. Tomorrow, I will dig into it deeper and see about harnesses/vac lines, etc. What exactly am I looking for on the vac lines, hairline cracks, aging, etc? Do I still need to use a rust converter(what brand) if I've sanded off everything down to bare metal? All the vac lines appear to be in very good shape, as I inspected them very closely. It looks like no acid touched them or the wiring really. One thing I did notice is that there is a gum-like substance running down the seam area of the frame where it is a 90 degree angle. What is that stuff? I would like to go over it some more, cuz I took it back a hair to get at more rust incursion. Oh, one tip that is a MUST for anyone else doing this, MAKE SURE to buy a GOOD respirator(they're like $40 bucks at HD/Lowes, etc.) and WEAR IT, as well as goggles. There is major dust flying around that is not good to breathe in or get in eyes! I had the dremel goin', all the while holding my portable vacuum hose right there to suck up as much gunk as I could. It worked pretty good Any suggestions on what I could put around the batt stand to help stop this crap in future???? Somebody out there had to mod it up good n' tight somehow....Cmon now, give up the secrets! Almost there! 
well, I've been hittin it hard today and it is comin' along. Bill, I hit it 2 days ago with CRC Batt Cleaner(same as in pic from other poster on here) and let it sit overnight. I then cleaned it up and hit it yesterday with a baking soda thick paste(which fizzed a little in some places) and let that sit overnight. Today, I started in on the wire-brushing(drill attachment) and stripping all the gunk(as well as paint) off the bad areas. It is looking WAY better and I am almost done with the entire area. The little nooks & crannies are hard to get at, but I'm doin pretty good with a dremel(coarse polishing bit-works GREAT!) going over areas. I had to stop a few times to go get more bits, pickup daughter from school, etc. Tomorrow, I will dig into it deeper and see about harnesses/vac lines, etc. What exactly am I looking for on the vac lines, hairline cracks, aging, etc? Do I still need to use a rust converter(what brand) if I've sanded off everything down to bare metal? All the vac lines appear to be in very good shape, as I inspected them very closely. It looks like no acid touched them or the wiring really. One thing I did notice is that there is a gum-like substance running down the seam area of the frame where it is a 90 degree angle. What is that stuff? I would like to go over it some more, cuz I took it back a hair to get at more rust incursion. Oh, one tip that is a MUST for anyone else doing this, MAKE SURE to buy a GOOD respirator(they're like $40 bucks at HD/Lowes, etc.) and WEAR IT, as well as goggles. There is major dust flying around that is not good to breathe in or get in eyes! I had the dremel goin', all the while holding my portable vacuum hose right there to suck up as much gunk as I could. It worked pretty good
Any suggestions on what I could put around the batt stand to help stop this crap in future???? Somebody out there had to mod it up good n' tight somehow....Cmon now, give up the secrets! Almost there!
 03-02-2011, 01:04 AM
#11
Drifting
Thread Starter
Bill,
I'd love advice on diving into the wiring harnesses, etc. How do I get them back together or net/tape them up again? How do the vac lines look? Thanks.
Steve
I'd love advice on diving into the wiring harnesses, etc. How do I get them back together or net/tape them up again? How do the vac lines look? Thanks.
Steve
03-02-2011, 08:50 PM
#12
Tech Contributor
Member Since: Dec 1999
Location: Anthony TX
Posts: 32,736
Received 2,180 Likes
on
1,583 Posts
CI 6,7,8,9,11 Vet
St. Jude Donor '08
That Looks a LOT better. Theres ONE Vacuum line that comes from the BACK of the intake manifold and supplies vacuum to all the rest of the system.. If you can feel vacuum on that line when the engine is runnig, the vacuum line/s is most likely still in good shape. If you can draw a vacuum on the the rest of the system, i wouldnt worrry about the rest of the system.
Hope this helps.
Bill
Go to home depot and find any one of the name brand rust converters. Wipe the frame down with alcohol and apply a thin coat of converter. Any of the bare metal should turn BLACk. Once it cures, just spray the rest of the frame with a semi gloss black paint. BAM,,, Your DONE!
Hope this helps.
Bill
Go to home depot and find any one of the name brand rust converters. Wipe the frame down with alcohol and apply a thin coat of converter. Any of the bare metal should turn BLACk. Once it cures, just spray the rest of the frame with a semi gloss black paint. BAM,,, Your DONE!
03-04-2011, 01:33 PM
#13
Drifting
Thread Starter
Hi all,
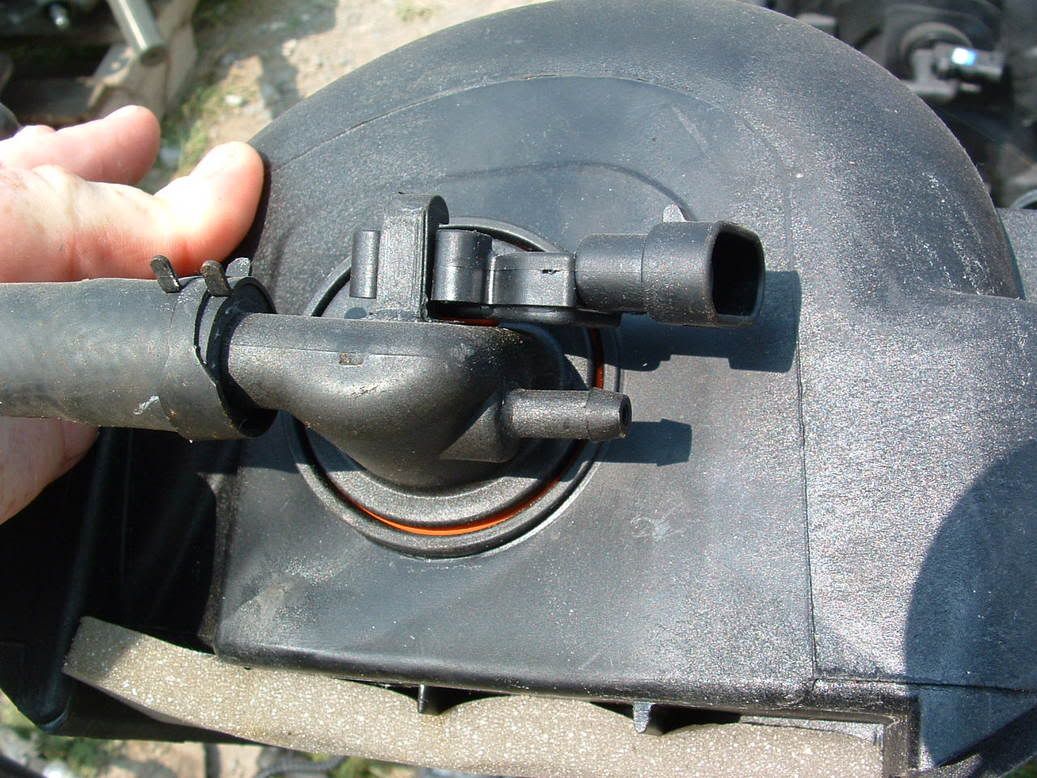
Bill, I'm ready to hit it with the paint after the Loctite rust converter treatment yesterday. I have a Rustoleum flat black protective enamel that I p/u at Wally World(all they had), since I read one of your posts about using a Rustoleum semi-flat black. Should I use this, get the semi or use the Krylon you mentioned? Also, when cleaning the rubber seals and general area on the PCM connectors attached to wiring harnesses, can you please offer advice on how to go about doing this CAREFULLY??? When I disconnected the harnesses from the PCM, I wiggled, ever so slightly, them to get them to come off and had to kind of help coax the rubber seals off at the same time(They were kinda sticking/grabbing the edge of the PCM). One more question.....On the vac lines, how do they disconnect from the check valve, elbows, etc.??? I tried to gently wiggle them to get them loose, but they didn't come and I did not want to bend them enough to break/crack them in any way. Thanks so much for all your help. It is looking so much better down there and I will be doing overkill on the batt tray to try and help stop ANY future probs. 
Steve
Bill, I'm ready to hit it with the paint after the Loctite rust converter treatment yesterday. I have a Rustoleum flat black protective enamel that I p/u at Wally World(all they had), since I read one of your posts about using a Rustoleum semi-flat black. Should I use this, get the semi or use the Krylon you mentioned? Also, when cleaning the rubber seals and general area on the PCM connectors attached to wiring harnesses, can you please offer advice on how to go about doing this CAREFULLY???
When I disconnected the harnesses from the PCM, I wiggled, ever so slightly, them to get them to come off and had to kind of help coax the rubber seals off at the same time(They were kinda sticking/grabbing the edge of the PCM). One more question.....On the vac lines, how do they disconnect from the check valve, elbows, etc.??? I tried to gently wiggle them to get them loose, but they didn't come and I did not want to bend them enough to break/crack them in any way. Thanks so much for all your help. It is looking so much better down there and I will be doing overkill on the batt tray to try and help stop ANY future probs. Steve
03-04-2011, 06:24 PM
#14
Tech Contributor
Member Since: Dec 1999
Location: Anthony TX
Posts: 32,736
Received 2,180 Likes
on
1,583 Posts
CI 6,7,8,9,11 Vet
St. Jude Donor '08
Answers are in the paragraph in BOLD
Hi all,
Bill, I'm ready to hit it with the paint after the Loctite rust converter treatment yesterday. I have a Rustoleum flat black protective enamel that I p/u at Wally World(all they had), since I read one of your posts about using a Rustoleum semi-flat black. Should I use this, get the semi or use the Krylon you mentioned? "Flat black will not match the OEM frame paint as well as simi gloss black, I like the Krylon product. Thats why I use it and recommended it " Also, when cleaning the rubber seals and general area on the PCM connectors attached to wiring harnesses, can you please offer advice on how to go about doing this CAREFULLY??? " Use a small metal pick and carefully work the seal off the connector. It should come off fairly easy" When I disconnected the harnesses from the PCM, I wiggled, ever so slightly, them to get them to come off and had to kind of help coax the rubber seals off at the same time(They were kinda sticking/grabbing the edge of the PCM). One more question.....On the vac lines, how do they disconnect from the check valve, elbows, etc.??? I tried to gently wiggle them to get them loose, but they didn't come and I did not want to bend them enough to break/crack them in any way. " TWIST the 90 deg rubber boot where it connects to the fitting and pull. It should come off" Thanks so much for all your help. It is looking so much better down there and I will be doing overkill on the batt tray to try and help stop ANY future probs.
Steve
Bill, I'm ready to hit it with the paint after the Loctite rust converter treatment yesterday. I have a Rustoleum flat black protective enamel that I p/u at Wally World(all they had), since I read one of your posts about using a Rustoleum semi-flat black. Should I use this, get the semi or use the Krylon you mentioned? "Flat black will not match the OEM frame paint as well as simi gloss black, I like the Krylon product. Thats why I use it and recommended it " Also, when cleaning the rubber seals and general area on the PCM connectors attached to wiring harnesses, can you please offer advice on how to go about doing this CAREFULLY???
" Use a small metal pick and carefully work the seal off the connector. It should come off fairly easy" When I disconnected the harnesses from the PCM, I wiggled, ever so slightly, them to get them to come off and had to kind of help coax the rubber seals off at the same time(They were kinda sticking/grabbing the edge of the PCM). One more question.....On the vac lines, how do they disconnect from the check valve, elbows, etc.??? I tried to gently wiggle them to get them loose, but they didn't come and I did not want to bend them enough to break/crack them in any way. " TWIST the 90 deg rubber boot where it connects to the fitting and pull. It should come off" Thanks so much for all your help. It is looking so much better down there and I will be doing overkill on the batt tray to try and help stop ANY future probs. Steve
03-05-2011, 11:49 PM
#15
Drifting
Thread Starter
Almost Done!
Looks 1000 times better than it did. I went overboard with the "getting in every nook & cranny" with the paint. I used a 1/2 inch foam brush with some paint on it and stuffed it in every little spot I couldn't spray. It is drying now and looking good.
Bill, what is the hard rubber, tar-like stuff along the weld channel there? Some of it came off and some I Dremeled away to get to some additional corrosion/rust penetration slightly under it. I would like to repair the areas missing some.
I'm feeling really good about what I have accomplished. Now, just have to clean the PCM harness connectors & rubber seals, then reinstall and pray it is all good.
03-06-2011, 09:43 AM
#16
Tech Contributor
Member Since: Dec 1999
Location: Anthony TX
Posts: 32,736
Received 2,180 Likes
on
1,583 Posts
CI 6,7,8,9,11 Vet
St. Jude Donor '08
Almost Done!
Looks 1000 times better than it did. I went overboard with the "getting in every nook & cranny" with the paint. I used a 1/2 inch foam brush with some paint on it and stuffed it in every little spot I couldn't spray. It is drying now and looking good.
Bill, what is the hard rubber, tar-like stuff along the weld channel there? Some of it came off and some I Dremeled away to get to some additional corrosion/rust penetration slightly under it. I would like to repair the areas missing some.
I'm feeling really good about what I have accomplished. Now, just have to clean the PCM harness connectors & rubber seals, then reinstall and pray it is all good.
Looks 1000 times better than it did. I went overboard with the "getting in every nook & cranny" with the paint. I used a 1/2 inch foam brush with some paint on it and stuffed it in every little spot I couldn't spray. It is drying now and looking good.
Bill, what is the hard rubber, tar-like stuff along the weld channel there? Some of it came off and some I Dremeled away to get to some additional corrosion/rust penetration slightly under it. I would like to repair the areas missing some.
I'm feeling really good about what I have accomplished. Now, just have to clean the PCM harness connectors & rubber seals, then reinstall and pray it is all good.
BC