When you click on links to various merchants on this site and make a purchase, this can result in this site earning a commission. Affiliate programs and affiliations include, but are not limited to, the eBay Partner Network.
Broke mine in my attempt to remove boot for cleaning. I've attempted a repair on the Red indicator. Also found a LED bulb at autozone. I'll post pictures soon.
Please do include the Auto Zone part # if possible. Thanks
Just finished replacing the auto trans lamp; sure am glad I checked the forum before starting, as I was able to do the 5 minute swap by popping off the indicator plastic vs pulling off the entire console cover. Only thing I had to do was increase the size of the cutout around the lamp to accommodate the bigger 194 LED. Thanks again, forum!
I have done it that way on 3 different c5's and also posted it a couple of times on the forum. Quite a few people replied that it worked great for them, takes all of 3 minutes, and no one broke anything. (learned it from a post here when I first signed up)
My light is out and the little red plastic is stuck in park.
Would you know if this post is still available?
I would rather do this than have to take off the council etc.
OK, this is what I did, but first let me explain my approach to this problem. Not very often you find a perfect swap when you get yourself in this kind of project, so you are left with basically two options: modify the car to accept whatever you are trying to install, or modify the new item to make it fit in the car without touching the latter. Whenever possible, I try to follow the second route
Keeping this in mind, this is the LED I used:
It is available in white, blue, red, amber and green and it's $5.99 here (scroll down until you find it).
According to its published dimensions it should be a direct swap for a 194 bulb:
But, although very close, that was not the case so I modified it slightly with a dremel as I'll show you below.
I did not take the console and radio bezel off to do this. Instead I followed these directions. It's a simple process where you only pry the PRND cover with a small flat tip screw driver. The only thing the original post did not have were pictures, but here they are:
This is where the 194 bulb was inserted:
Cover and Light-Guide with LED and 194 bulbs:
As I mentioned before, the LED was very close in dimensions to the 194 bulb, but when inserted in the socket it was not allowing the Light-Guide to fully seat in its place. Instead of modifying the Light-Guide, I took a dremel and went around the top edge of the LED bulb, rounding it off to approximate its shape to the 194 bulb as much as possible, as you can see in the following pictures (I polished it afterwards with the dremel to avoid any loss in light due to an opaque surface). I also reduced its bottom diameter to allow me to insert it in the socket a little further (you can see the "step" I created around its middle portion going all the way down to its bottom end).
The idea is to allow the Light-Guide to fully seat, but keeping the gap between the LED bulb and the light-guide as small as possible. This is needed in order to minimize propagation losses and to keep light distribution as homogeneous as we can, so the PRND321 characters could be illuminated with the same intensity.
And this is the final result:
Just swapped mine out tonight, but I removed my console and shifter boot for better access. I was very careful, but not careful enough and managed to break off the bottom two circular tabs on each side of the PRNDL top piece. I could not figure out how they were supposed to disengage from the mating lower piece. Everything else went fine. Removed the stock bulb without too much trouble, no socket damage, installed LED, red plastic indicator looked new. All back together, but hopefully the 4 good tabs I have left will hold the top piece on until I can locate a new one. Still don't know the "proper" way to remove it?
Just swapped mine out tonight, but I removed my console and shifter boot for better access. I was very careful, but not careful enough and managed to break off the bottom two circular tabs on each side of the PRNDL top piece. I could not figure out how they were supposed to disengage from the mating lower piece. Everything else went fine. Removed the stock bulb without too much trouble, no socket damage, installed LED, red plastic indicator looked new. All back together, but hopefully the 4 good tabs I have left will hold the top piece on until I can locate a new one. Still don't know the "proper" way to remove it?
These are the tabs I broke off (2 of the 6)...
I just pried carefully and "lightly" using a couple of small flat tip screwdrivers, beginning at the 6 o'clock position and then moving around until the black cover popped right off.
You broke the 2 little tabs at the 6 o'clock position at both sides, right? I'm really sorry... I feel your pain Are the remaining tabs able to hold the cover in place?
2000 w/106,000..... mines fine, never had an issue. For me, if it ain't broke, don't fix it. My luck, I'll go to change the bulb and the plastic pieces will be brittle and crack. Again that's my luck. Thanks for sharing though.
Next I carefully removed the white/clear "waveguide" by again lifting from the 6 o'clock position just enough to pull it directly back to clear the red plastic shift indicator. Be VERY CAREFUL here to not lift the white/clear "waveguide" straight up, as the 12 o"clock portion is under the red shift indicator and you could easily break the red plastic piece.
Thanks once again much simpler way that FSM! Another job crossed off the list!
Funny how the FSM suggests pulling the console for this when the cover has tension tabs. Like the rear side marker lights-why remove a taillight when you can reach up underneath the car and change?
Late this summer, I replaced the stock bulb with an LED on my C5 and my friends C5. I would not attempt to write a description on how to do it and I wish I had video captured the project. There are a couple of tricky issues with the plastic elements of the shifter assembly. I stalled a blue LED and it looks great.
You can also just take a small flathead screwdriver and carefully pry up the plastic PRND321 piece and remove the bulb with a pair of needlenose plyers.
Just changed my bulb with a LED (Autozone). Like he said, just used a small screwdriver to pop it off. Used a needle nose pliers with tape on the end to pull old bulb out and put new one in. Trick I learned from this site.
OK, this is what I did, but first let me explain my approach to this problem. Not very often you find a perfect swap when you get yourself in this kind of project, so you are left with basically two options: modify the car to accept whatever you are trying to install, or modify the new item to make it fit in the car without touching the latter. Whenever possible, I try to follow the second route
Keeping this in mind, this is the LED I used:
It is available in white, blue, red, amber and green and it's $5.99 here (scroll down until you find it).
According to its published dimensions it should be a direct swap for a 194 bulb:
But, although very close, that was not the case so I modified it slightly with a dremel as I'll show you below.
I did not take the console and radio bezel off to do this. Instead I followed these directions. It's a simple process where you only pry the PRND cover with a small flat tip screw driver. The only thing the original post did not have were pictures, but here they are:
This is where the 194 bulb was inserted:
Cover and Light-Guide with LED and 194 bulbs:
As I mentioned before, the LED was very close in dimensions to the 194 bulb, but when inserted in the socket it was not allowing the Light-Guide to fully seat in its place. Instead of modifying the Light-Guide, I took a dremel and went around the top edge of the LED bulb, rounding it off to approximate its shape to the 194 bulb as much as possible, as you can see in the following pictures (I polished it afterwards with the dremel to avoid any loss in light due to an opaque surface). I also reduced its bottom diameter to allow me to insert it in the socket a little further (you can see the "step" I created around its middle portion going all the way down to its bottom end).
The idea is to allow the Light-Guide to fully seat, but keeping the gap between the LED bulb and the light-guide as small as possible. This is needed in order to minimize propagation losses and to keep light distribution as homogeneous as we can, so the PRND321 characters could be illuminated with the same intensity.
And this is the final result:
I know this post is over 5 years old but it helped me today. Only glitch was the original bulb would NOT come out! No way for an adult to fit fingers in there. I ended up smashing the original bulb (accidentally), vacuuming up the pieces and going after the base with dental picks and needle nose pliers. If I did it again I'd put foam adhesive weatherstripping on the bulb....
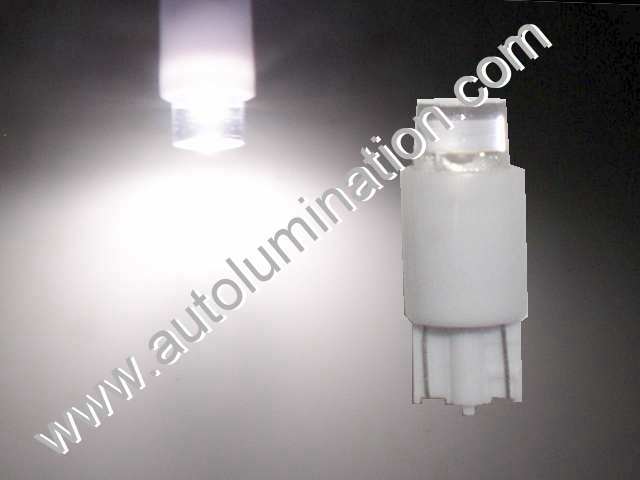
Fortunately the clear plastic was not burned like some shown in this thread. Used a modern 194 white LED from Amazon (shown below) and it works perfectly. No need for a strip IMHO. Also used those in other places in my '03. They're a bit smaller than the originals so will fit behind side markers, in license plate lights, etc.
I "may" swap it out at some future time for a blue 194 LED to match the T4 NEO bulbs in the window switches (and in future instrument panel updates).
I know that this is an old thread but it's still important for the A4 crowd.
Replaced the bulb in my '03 today. Used a #194 that I bought at O'Reilly Auto Parts, #SLY 194SLBP2 $15.78 for two bulbs plus tax.
Was rather hard to get the bulb out but used the tape procedure mentioned in these threads and everything worked out fine. No more worries about melting the plastic do-thingies.
The LED is twice the foot-candle brightness of the incandescent bulb that it replaced but cool to the touch.
Last edited by Tony S45; 03-31-2019 at 11:22 AM.
Reason: Corrected info

 09-17-2014, 06:31 PM


 Are the remaining tabs able to hold the cover in place?


