
[PROCEDURE] - C5 Corvette HVAC Dim Display Fix
 01-21-2012, 06:55 PM
#1
Tech Contributor
Thread Starter
Guys:
I know this has been written up before. I just did not have it on MY site yet with my pics from actually doing it.
My web page...
www.ToqueZ06.com
Scroll down to :
C5 Corvette HVAC Dim Display Fix:
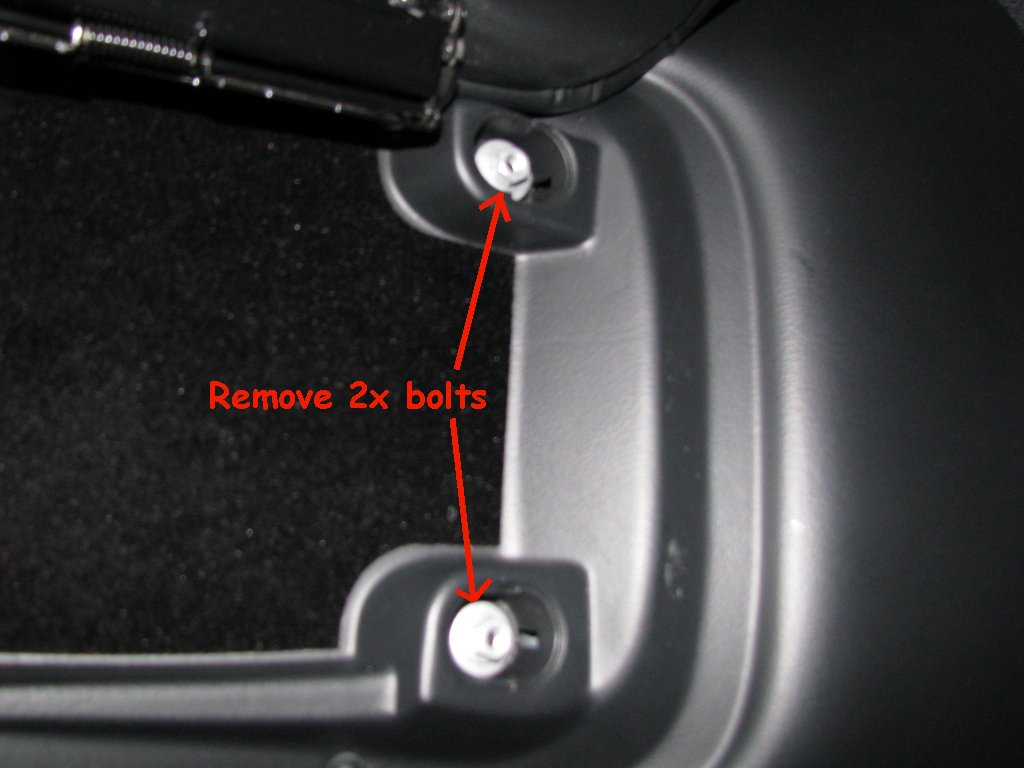
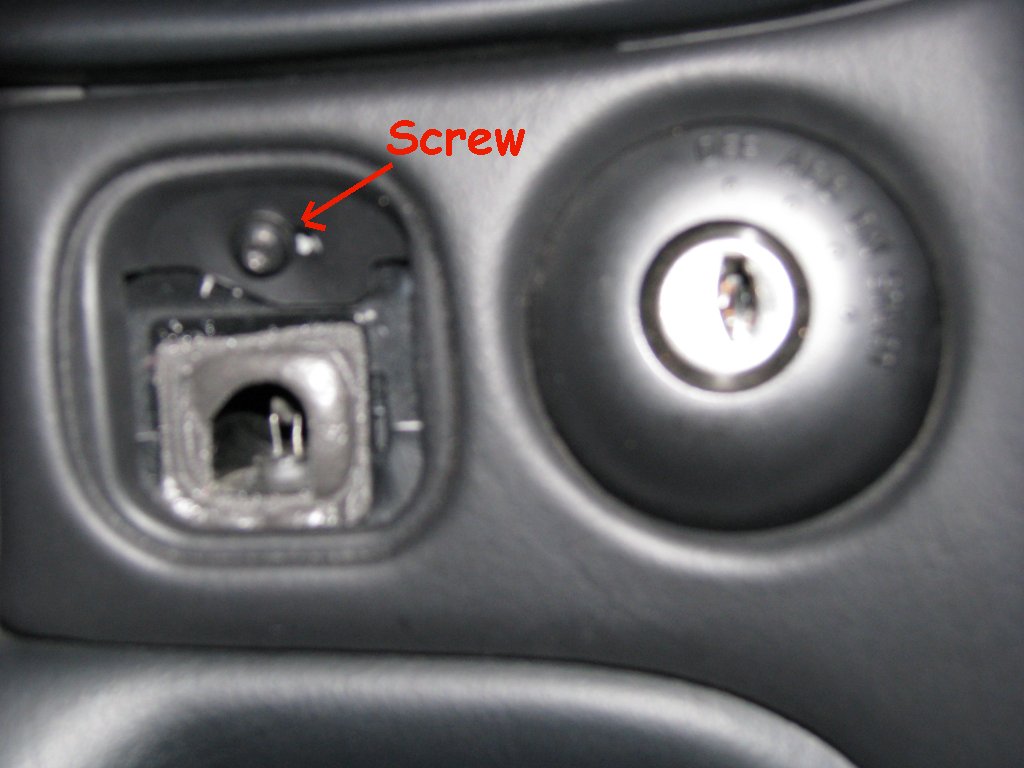
Here is how to remove the HVAC control unit from the C5 Corvette.
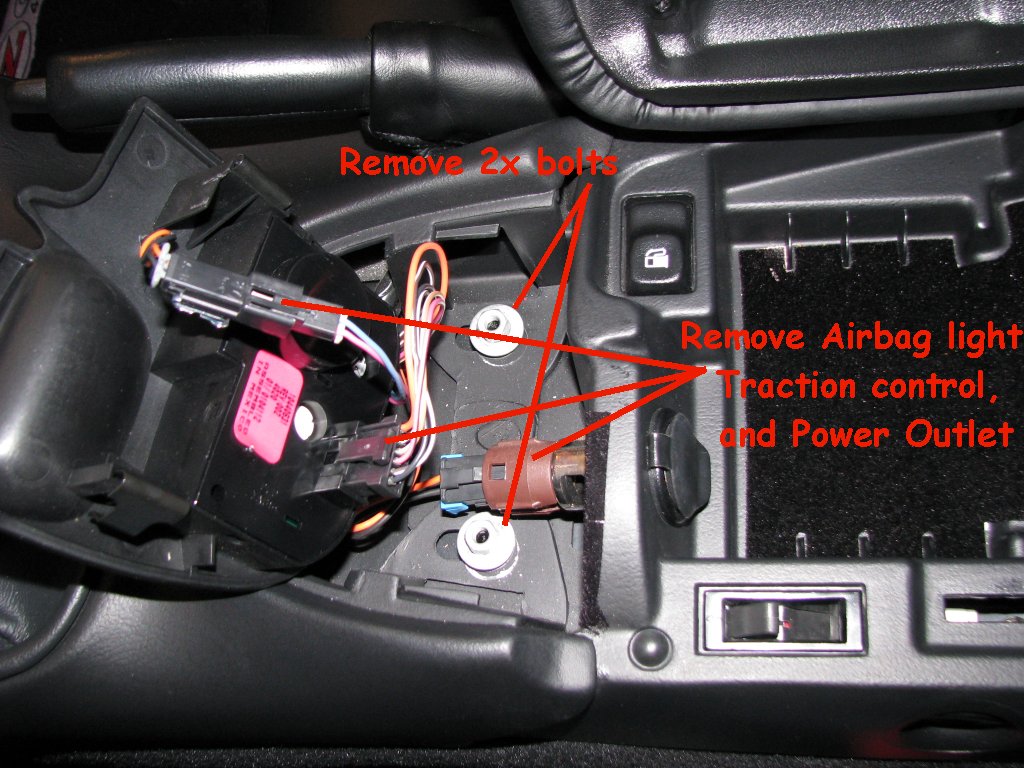


Remove the 4x screws in the HVAC cover (Circled in red).

Remove the 4x screws in the circuit card (Circled in red).

The surface mount resistors in the below picture (circled in red) need to have the solder re-flowed..
Be sure to solder on a flat surface as the surface mount resistors will move around if your circuit card is on an angle.
**NOTE** There is another HVAC board design out there.
The same 241 surface mount resistors need to be re-flowed.
They are on the same board, just not in the same position as my board below.


This is after I did the soldering work.
The HVAC display is back to standard brightness now.

Re-install the circuit card in the HVAC unit.
Test the HVAC in the car to make sure it works fine before final install.
Re-install the HVAC unit into the car.
Hope this helps someone out !
Toque
I know this has been written up before. I just did not have it on MY site yet with my pics from actually doing it.
My web page...
www.ToqueZ06.com
Scroll down to :
C5 Corvette HVAC Dim Display Fix:
Here is how to remove the HVAC control unit from the C5 Corvette.
Remove the 4x screws in the HVAC cover (Circled in red).
Remove the 4x screws in the circuit card (Circled in red).
The surface mount resistors in the below picture (circled in red) need to have the solder re-flowed..
Be sure to solder on a flat surface as the surface mount resistors will move around if your circuit card is on an angle.
**NOTE** There is another HVAC board design out there.
The same 241 surface mount resistors need to be re-flowed.
They are on the same board, just not in the same position as my board below.
This is after I did the soldering work.
The HVAC display is back to standard brightness now.
Re-install the circuit card in the HVAC unit.
Test the HVAC in the car to make sure it works fine before final install.
Re-install the HVAC unit into the car.
Hope this helps someone out !
Toque
Last edited by Toque; 01-21-2012 at 08:56 PM.

The following users liked this post:
Alley Oop (10-31-2022)
 01-21-2012, 08:57 PM
#3
Tech Contributor
Thread Starter
Thank you !


Toque
02-23-2012, 03:37 PM
#4
Pro

Member Since: Oct 2009
Location: Centennial Colorado
Posts: 560
Likes: 0
Received 2 Likes
on
2 Posts

Thanks Toque! Just did this today as I couldn't stand it any more. Took about an hour (with breaks), and as a side note, you may not have to disconnect the fuel door connector. Once I removed the nuts on the back of the aft console I was just able to move it back enough to remove the fwd piece out. Thin gauge solder, flux, and a medium temp iron made it a quick job. I had two 'floaters' that must have been the problem.
I've never seen the display this bright...ever!
Thanks again.
Thin gauge solder, flux, and a medium temp iron made it a quick job. I had two 'floaters' that must have been the problem.I've never seen the display this bright...ever!
Thanks again.
02-23-2012, 04:00 PM
#5
Tech Contributor
Thread Starter
Thanks Toque! Just did this today as I couldn't stand it any more. Took about an hour (with breaks), and as a side note, you may not have to disconnect the fuel door connector. Once I removed the nuts on the back of the aft console I was just able to move it back enough to remove the fwd piece out. Thin gauge solder, flux, and a medium temp iron made it a quick job. I had two 'floaters' that must have been the problem.
I've never seen the display this bright...ever!
Thanks again.
Thin gauge solder, flux, and a medium temp iron made it a quick job. I had two 'floaters' that must have been the problem.I've never seen the display this bright...ever!
Thanks again.
Congrats ! I'm glad it worked for you !
A guy locally just started to hang out at our weekly GTG and mentioned that he payed $400 for a new HVAC unit because of the Dim Display issue. He was not happy when I told him that I could fix it easily...
You saved yourself $400 !

Toque
02-24-2012, 10:23 AM
#6
Le Mans Master

Member Since: Sep 2003
Location: Farmington CT
Posts: 6,125
Received 160 Likes
on
125 Posts
Cruise-In VII Veteran

great write-up!!!
I fix quite a few of these hear in CT and on my Orlando FL trips each year
It's nice to know what your AC is doing
Toque, where did your sc come from?
Thanks, Steve
I fix quite a few of these hear in CT and on my Orlando FL trips each year
It's nice to know what your AC is doing
Toque, where did your sc come from?
Thanks, Steve
02-24-2012, 10:37 AM
#7
Tech Contributor
Thread Starter
03-11-2012, 12:08 PM
#8
Instructor

Member Since: Jan 2010
Location: Plano Texas
Posts: 240
Likes: 0
Received 10 Likes
on
6 Posts
Oldtimer
Between this writeup and the sticky http://forums.corvetteforum.com/c5-t...splay-fix.html
I had all the directions and tips to make this an easy project. Thanks to all the pathfinders. This forum removes most of the stress from owning a C5 (Imo, one of the top 10 best looking production cars ever made)
P.S. Any C5 owner in the North Dallas area that needs help on this, I would be glad to help out. Just shoot a PM my way to get the hook up started.
I had all the directions and tips to make this an easy project. Thanks to all the pathfinders.
This forum removes most of the stress from owning a C5 (Imo, one of the top 10 best looking production cars ever made)P.S. Any C5 owner in the North Dallas area that needs help on this, I would be glad to help out. Just shoot a PM my way to get the hook up started.
Last edited by PUMP03; 03-11-2012 at 12:15 PM.
03-11-2012, 12:33 PM
#9
Team Owner

Member Since: Mar 2004
Location: Oklahoma City OK
Posts: 58,258
Received 1,674 Likes
on
1,297 Posts
C6 of Year Finalist (appearance mods) 2019
Great write up!
03-11-2012, 12:40 PM
#10
Tech Contributor
Thread Starter
Between this writeup and the sticky http://forums.corvetteforum.com/c5-t...splay-fix.html
I had all the directions and tips to make this an easy project. Thanks to all the pathfinders. This forum removes most of the stress from owning a C5 (Imo, one of the top 10 best looking production cars ever made)
P.S. Any C5 owner in the North Dallas area that needs help on this, I would be glad to help out. Just shoot a PM my way to get the hook up started.
I had all the directions and tips to make this an easy project. Thanks to all the pathfinders.
This forum removes most of the stress from owning a C5 (Imo, one of the top 10 best looking production cars ever made)P.S. Any C5 owner in the North Dallas area that needs help on this, I would be glad to help out. Just shoot a PM my way to get the hook up started.
Your in our local area... why have I not seen you at our GTG on Sundays in Plano ?

http://forums.corvetteforum.com/sout...reas-viii.html
Hope to see you one evening you have free !
Toque
03-11-2012, 06:38 PM
#12
Tech Contributor
Thread Starter
 10-18-2012, 08:12 AM
#14
Tech Contributor
Thread Starter
07-25-2013, 04:26 PM
#15
Cruising

Member Since: Jul 2008
Posts: 10
Likes: 0
Received 0 Likes
on
0 Posts
Just finished replacing the shifter bulb, 5 minutes, emergency flasher, 30 minutes, and resoldering the HVAC resisters. What a great forum this is. Really appreciate the information that is provided for the do-it-your-selfer. I have had way too many bogus ideas as to what fixes would be needed to rectify issues on my 00' C5. My total parts cost was under $50 and a couple hours of my time.
08-13-2013, 09:44 PM
#16


Thanks Toque! Just did this today as I couldn't stand it any more. Took about an hour (with breaks), and as a side note, you may not have to disconnect the fuel door connector. Once I removed the nuts on the back of the aft console I was just able to move it back enough to remove the fwd piece out. Thin gauge solder, flux, and a medium temp iron made it a quick job. I had two 'floaters' that must have been the problem.
I've never seen the display this bright...ever!
Thanks again.
Thin gauge solder, flux, and a medium temp iron made it a quick job. I had two 'floaters' that must have been the problem.I've never seen the display this bright...ever!
Thanks again.
08-13-2013, 10:37 PM
#17
Tech Contributor
Thread Starter
I just used the regular stuff from Radio Shack though.
Its been good for years on my car so far.
Just add a little solder to the connections on both sides of each resistor.
Just be VERY careful to have the board on a flat surface. Those little suckers like to move around on you.

Toque
10-05-2013, 12:36 PM
#18
Cruising
Member Since: Jul 2013
Location: Frisco TX
Posts: 13
Likes: 0
Received 0 Likes
on
0 Posts
If the resistors don't seem loose at all is there something else causing the display screen not to come on? Does anyone know if there's someone in the frisco area that could fix it and maybe do the blue led bulbs?
10-06-2013, 02:38 PM
#19
Tech Contributor
Thread Starter
Its that the solder connection between the board and the resistor goes bad over time.
Thats why the display "fades" over time.
You just need to add new solder to the resistor points as in my procedure.
Toque
03-15-2014, 10:17 PM
#20
5th Gear

Member Since: Nov 2012
Posts: 5
Likes: 0
Received 0 Likes
on
0 Posts
Looking for help fixing my Hvac display in my C5. I'm all thumbs. Updated my radio to hands free model it may have caused an issue with Hvac display.  Any vett techs in washington dc area. Bill
Any vett techs in washington dc area. Bill