When you click on links to various merchants on this site and make a purchase, this can result in this site earning a commission. Affiliate programs and affiliations include, but are not limited to, the eBay Partner Network.
i need some advise before I mess up installing powerbond pully
I was trying to change the stock harmonic balancer to the powerpower bond and it wont go in the last stretch. And now I feel and see the threads from the bolt starting to get damaged from the tip. I need some advise before I mess up.
A "TAD" longer AINT going to cut it! If you believe that your damaging the threads, you most likely ARE!
Its a VERY VERY tight pressed machine fit. Remove the damper, inspect the crank threads. Go from there.
Recommend that you install a good bolt without the damper installed ALL the way in to the crank see if the threads are not damaged.
HELPING RECOMMENDATION.
When you figure out where you are at with the crank threads, HEAT UP the damper "HUB" to approx. 200-220 deg. I use a Wagner Professional Paint stripper Heat Gun or a propane torch.
Install the damper warm and it WILL go on MUCH MUCH easier. That low of a temp will not hurt the dampener. Obtain some metric ALL THREAD, thread it all the way into the crank and use nuts and washers to press it bak on. OR Purchase the correct Kent Moore tool and do it the correct way.
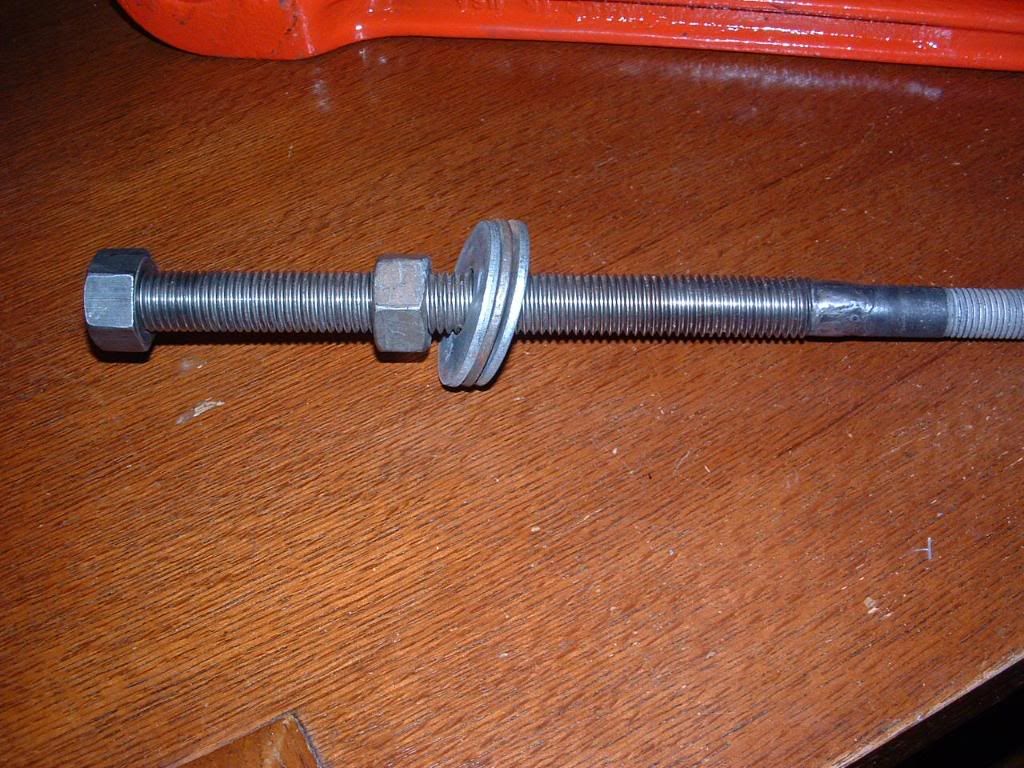
I made my own install tool using an old bolt and standard SAE thread. Cut off the bolt head. Weld them together and I use a BIG *** strap wrench to keep it from turning!
The Service manual states that,, the recess between the End of the Crank SNOUT and the top of the dampener is 0.094" - 0.176"
If you heat up the HUB and use the old bolt to torque it on fully at the correct seating torque, you should be able to acheive that measurement. It should slide on snug but shouldnt be impossible to seat. If not, something is way wrong.
Do you have a NEW Damper bolt and the correct torque procedure to torque the new TORQUE TO YEILD DAMPER BOLT??
I put mine on using heat and the bolt. It's not the recommended method but I went fast and was careful with the bolt torque so I didn't damage the threads. I wouldn't attempt installing one without heating it, even with the proper install tool.
That's the method I WAS trying. Now I have two problems. 1) My old man went to town on it with a impact wrench while I was gone.. Now I'm stuck looking for that 16x2 helicoil thread repair and can't find anywhere! Saw it on ebay but it ships out of Europe. I gotta find myself a crazy corvette tech for 500-$1000, to tackle the pulley install with or without my help in one day. 2) the ac belt is to loose and the main belt is to short..
I forgot about amazon, thanks ill check there soon. If anyone knows of a place please let me know. ill have to place an order by tonight. I wouldn't like to use carbon style inserts but as last resort I might.
I pulled my stock balancer using a balancer puller. I installed a powerbond balancer using the heating method along with a balancer installation tool. No problems. I also used a new balancer bolt and borrowed the torque wrench from auto zone to get the final torque. Auto zone will have the correct tools $100 deposit.
I pulled my stock balancer using a balancer puller. I installed a powerbond balancer using the heating method along with a balancer installation tool. No problems. I also used a new balancer bolt and borrowed the torque wrench from auto zone to get the final torque. Auto zone will have the correct tools $100 deposit.
It sounds like he already pulled the threads in the crank snout.
Probably too late now, but here is the correct service manual procedure and a photo of the tool I made for installation for less than $20. Also, if you went under drive you need new belts.

 11-25-2014, 01:04 PM