
Braided Stainless Steel Hoses - Written DIY
 09-05-2008, 10:48 AM
#1
Safety Car

Thread Starter
Member Since: Aug 2007
Location: Rushsylvania Ohio
Posts: 4,836
Likes: 0
Received 6 Likes
on
6 Posts

I have been reluctant to post my info on stainless hoses as the parts I bought are not from a forum vendor. I ordered from a major racing supply house.
A few things first. This is not something you need to wait for and call a winter project. You can do this in a day. The total investment in parts is going to be around $150.
All the parts I used are brand name Spectre. You can also order the Spectre brand from one of the major Auto Parts Stores if you have the part numbers and know their zone (get it?). There is no need to use high dollar braided hose like Aeroquip, Russell or Earl's. I looked at all these and they just do not serve the purpose well for the sizes used on the Corvette. No true "AN" fittings are needed at all. At least not the way I did it. As I said in the original post, the problem is the heater hose fittings down at the thermostat housing. These fittings are for 5/8 and 3/4 hose and are pressed into the block, since they are not threaded, you can not change them out to "AN" adapters to allow use of true "AN" fittings for the heater hoses. You could possibly use an "AN" tee-fitting where the heater hoses tee at the front connection on the passenger side, but you will also have to use a reducer as one of the heater hoses is 5/8 coming off the tee and the other is 3/4. These are inside diameter sizes.
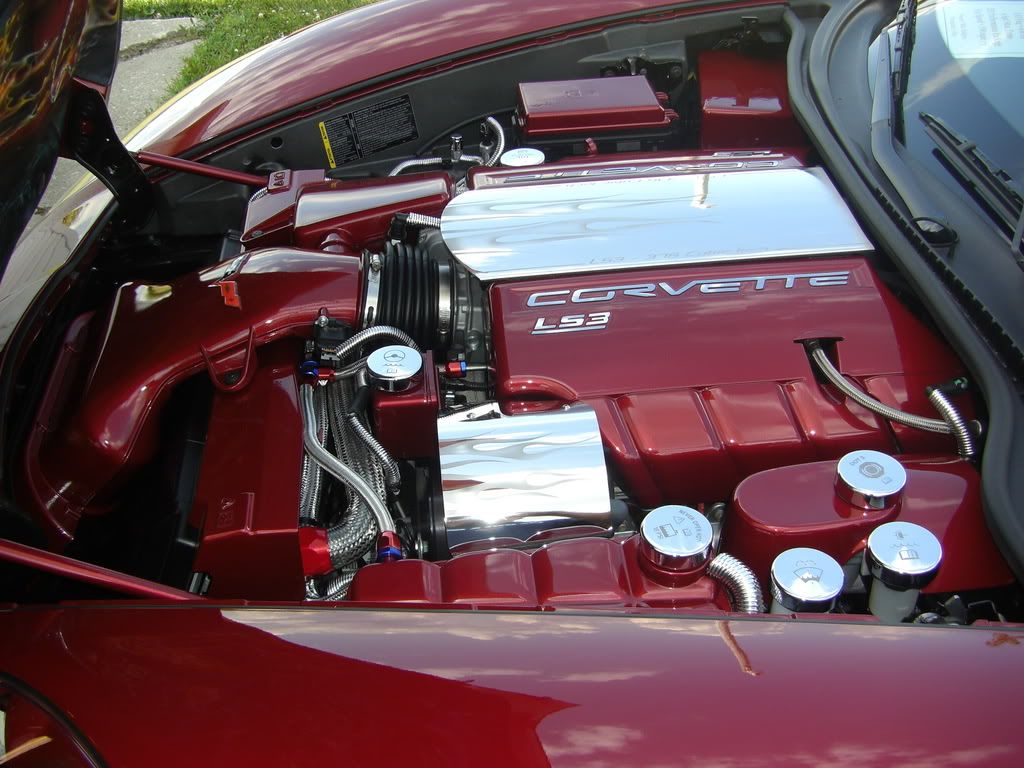
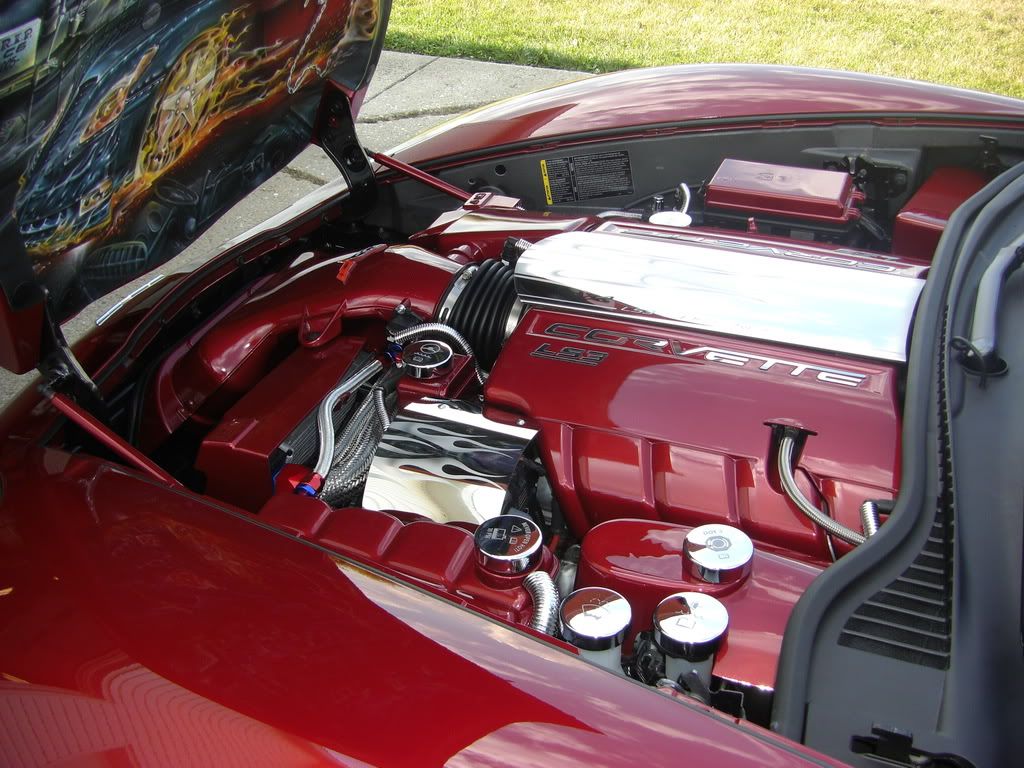
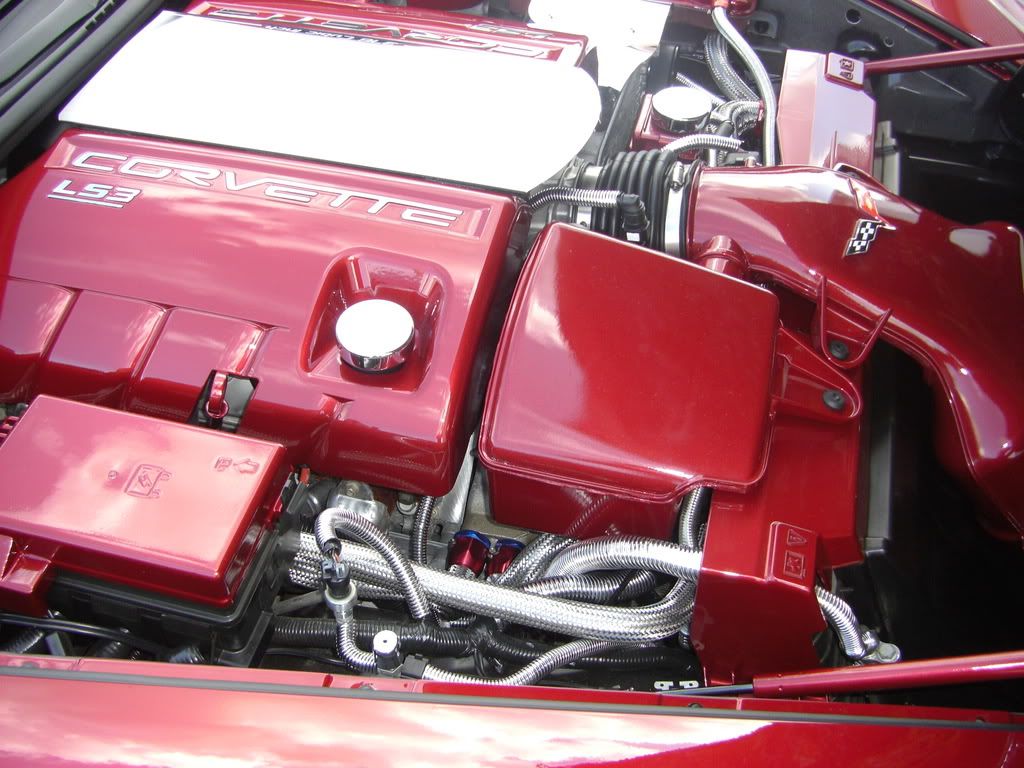
You need to take the time to study all the hose routing and sizes very carefully. The large hose on the bottom of the coolant tank is actually one of the heater hoses. It runs along the backside of the radiator to the molded tee fitting, then one leg of the tee goes down to the thermostat housing and the other leg runs along the passenger side back to the heater hose connection by the firewall. The other heater hose runs from the firewall connection down to the thermostat housing.
These heater hoses are the whole darn problem of not being able to use true "AN" hose and fittings. You can get braided stainless hose in the 5/8 and 3/4 sizes, but you can not get "AN" fittings or the "AN Style" clamps to fit these hose sizes. So, if you bought the 5/8 and 3/4 braided hose, you then could not buy an "AN" tee fitting for the heater hoses. Some of the "AN" hose sizes are "close" to the 5/8 and 3/4 heater hose sizes and you "might" get them to push over the nipples down at the thermostat housing, but then again, you might not. I had already spent enough trying to figure this all out and finally decided to take the route I did.
Ok, here is what I did:
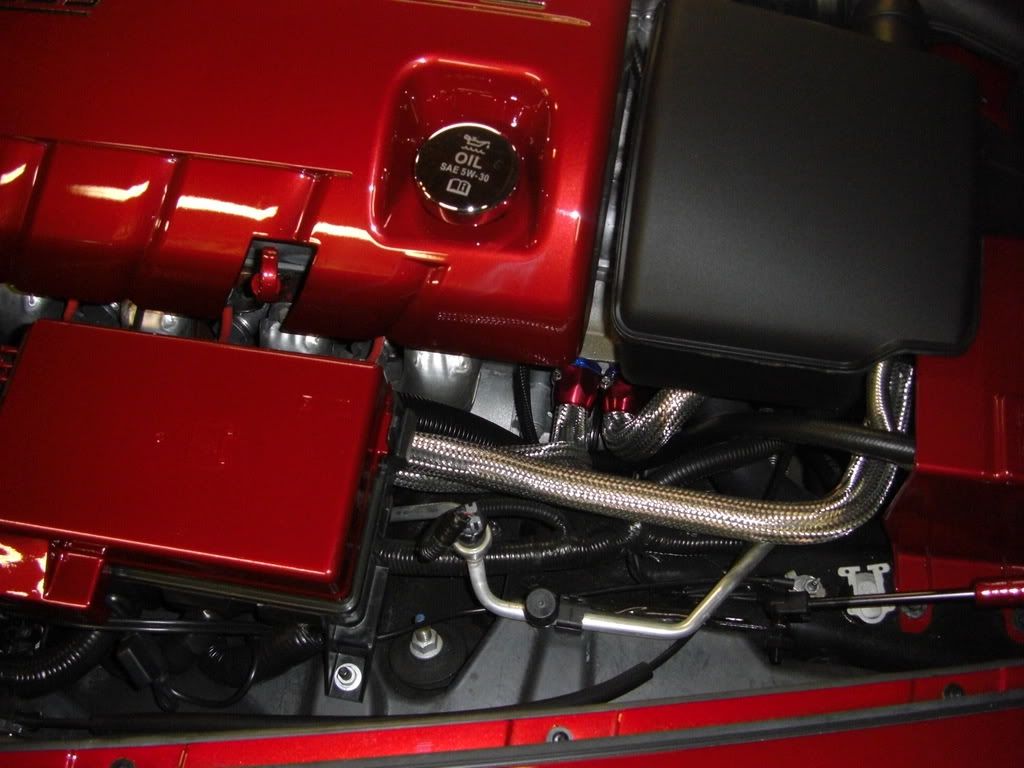
The biggest issue is the antifreeze mess you are going to have to contend with. Just draining the radiator is not good enough as when you pull off the heater hoses down at the thermostat housing, alot of antifreeze is going to run out. I used a hand sipon pump that I bought at Walmart for about $9 and stuck one end of the suction hose down inside one of the heater hoses after I took the heater hose loose at the side/firewall connection. I pushed the suction hose all the way down the heater hose to the thermostat. I then pump out as much fluid as I could get. Then, when I pulled the hoses off the thermostat housing, hardly any fluid at all came out. Keep all the fluid you get out in one bucket so you can be sure to at least put that much back in when you are done. If it all does not go back in, then you have a trapped air bubble and need to "burp" the system. I bought a gallon of the GM orange antifreeze to have on hand just in case.
The upper radiator hose is from CCA as is advertised here on the forum. I did not change out the lower hose as you can not hardly see it anyway. If I ever put in a 160 degree thermostat, I will probably change it out then. I just used a standard hose clamp where the upper hose attaches to the block as this connection is covered up by the air intake. Wrap the end of the hose with black electrical tape to keep the braid from fraying. On the radiator side, I used Spectre Clamp part no. SPE-4160. (these are red/blue anodized aluminum) (the SPE at the beginning of the part number is what Summit uses, just the number is the actual Spectre part number). You can get chrome also, but the size is 4160 for a 1" 1/4 i.d. hose. DO NOT put electrical tape on the end of the hose at the radiator connection or the clamp will be too tight and you can not get it over the nipple on the radiator. Also, make sure the clamp is all the way loose, then twist the clamp onto the hose and over the braid. Push onto the radiator nipple and tighten.
The small hose on the top of the coolant tank is 3/8 i.d. I used true braided hose for this. It runs to a plastic tee fitting on the backside of the radiator. The other side of the tee runs over to a connection at the top of the radiator on the passenger side. I took the radiator shroud off to get to this connection easier. Only 4 bolts hold the shroud on. At this radiator connection I again used only a standard hose clamp as the Spectre clamps are too big to fit and you can not see the clamp anyway. The other leg of the tee fitting uses a 1/4 i.d. hose that runs to the manifold. I again used true braided hose for this one also. You only need a short piece of the 1/4 i.d. hose for this. You have to use 5/16 hose clamps for the 1/4 hose as Summit does not stock the 1/4 size clamp and you will have to wait a few weeks to get it. The 5/16 size works just fine. You have to reuse this factory plastic tee fitting, so be very careful not to break it when you take the stock hoses off it. I just used the stock hoses to get the correct lengths of braided hose I needed. When you want to cut the hose, wrap the spot you want to cut with electrical tape and use a fine tooth hacksaw to cut it.
Spectre 1/4 braided hose part no. SPE-29204
Spectre 3/8 braided hose part no. SPE-29406
Spectre 5/16 clamps part no. SPE-2160
Spectre 3/8 clamps part no. SPE-2260
The 5/16 and 3/8 clamps come in a pack of two. Buy 2 packs so you have 4 clamps of each size. (you really only need 3 of the 3/8 size). I bought 1 piece each of the 1/4 (4 ft)and 3/8 (6 ft).This was plenty.
For the heater hoses I just used braided stainless steel sleeve/covers from Spectre. It is called Spectre Magna Braid Sleeving.The size I bought fits very well and works great. It fits hoses from 3/4 o.d to 1"1/4 o.d. It comes in a 6 ft length and you need to buy (2) 6 ft pieces. Take all the heater hoses off the car. The factory clamps back by the firewall can be a real pain depending on where the factory put the legs of the clamps at during assembly. Start sliding the braided sleeve over the heater hoses a little at a time until they are completely covered. Then wrap the ends with electrical tape. I head the sleeve in place by the molded tee fitting with plastic tie wraps. On the 08's and 09's, this area is covered up by the stock intake and you can not see the molded tee fitting. You can use the Spectre clamps at the bottom coolant tank connection, (2) down at the thermostat housing and (2) at the firewall connections.
Spectre Magna Braided Sleeving part no. SPE-4008B
Spectre 5/8 clamp part no. SPE-3260
Spectre 3/4 clamp part no. SPE-3360
Again, I bought (2) 6 ft pieces of the sleeving and (4) of each clamp size for the heater hoses.
Once everything is back together, fill the coolant tank and start the car. When the thermostat opens, the coolant level will go down. Just keep pouring the antifreeze in until you have all of what you drained back in the car. I had to rev the motor a few times to get all the air out. It took about half an hour to get all the coolant back in. Keep checking for leaks for a few days and keep an eye only the coolant temp. I had no leaks on the first try!
I know this is alot of information, but I wanted to be as complete as I could so you would get the full picture of what is involved. Though it is alot of info, it is very easy to perform this mod and your Corvette will look great when it is done. If you give yourself an entire weekend, that is more than enough time. It took me longer, but that is because i had to place orders for parts 3 different times until I was able to figure this all out.
A few things first. This is not something you need to wait for and call a winter project. You can do this in a day. The total investment in parts is going to be around $150.
All the parts I used are brand name Spectre. You can also order the Spectre brand from one of the major Auto Parts Stores if you have the part numbers and know their zone (get it?). There is no need to use high dollar braided hose like Aeroquip, Russell or Earl's. I looked at all these and they just do not serve the purpose well for the sizes used on the Corvette. No true "AN" fittings are needed at all. At least not the way I did it. As I said in the original post, the problem is the heater hose fittings down at the thermostat housing. These fittings are for 5/8 and 3/4 hose and are pressed into the block, since they are not threaded, you can not change them out to "AN" adapters to allow use of true "AN" fittings for the heater hoses. You could possibly use an "AN" tee-fitting where the heater hoses tee at the front connection on the passenger side, but you will also have to use a reducer as one of the heater hoses is 5/8 coming off the tee and the other is 3/4. These are inside diameter sizes.
You need to take the time to study all the hose routing and sizes very carefully. The large hose on the bottom of the coolant tank is actually one of the heater hoses. It runs along the backside of the radiator to the molded tee fitting, then one leg of the tee goes down to the thermostat housing and the other leg runs along the passenger side back to the heater hose connection by the firewall. The other heater hose runs from the firewall connection down to the thermostat housing.
These heater hoses are the whole darn problem of not being able to use true "AN" hose and fittings. You can get braided stainless hose in the 5/8 and 3/4 sizes, but you can not get "AN" fittings or the "AN Style" clamps to fit these hose sizes. So, if you bought the 5/8 and 3/4 braided hose, you then could not buy an "AN" tee fitting for the heater hoses. Some of the "AN" hose sizes are "close" to the 5/8 and 3/4 heater hose sizes and you "might" get them to push over the nipples down at the thermostat housing, but then again, you might not. I had already spent enough trying to figure this all out and finally decided to take the route I did.
Ok, here is what I did:
The biggest issue is the antifreeze mess you are going to have to contend with. Just draining the radiator is not good enough as when you pull off the heater hoses down at the thermostat housing, alot of antifreeze is going to run out. I used a hand sipon pump that I bought at Walmart for about $9 and stuck one end of the suction hose down inside one of the heater hoses after I took the heater hose loose at the side/firewall connection. I pushed the suction hose all the way down the heater hose to the thermostat. I then pump out as much fluid as I could get. Then, when I pulled the hoses off the thermostat housing, hardly any fluid at all came out. Keep all the fluid you get out in one bucket so you can be sure to at least put that much back in when you are done. If it all does not go back in, then you have a trapped air bubble and need to "burp" the system. I bought a gallon of the GM orange antifreeze to have on hand just in case.
The upper radiator hose is from CCA as is advertised here on the forum. I did not change out the lower hose as you can not hardly see it anyway. If I ever put in a 160 degree thermostat, I will probably change it out then. I just used a standard hose clamp where the upper hose attaches to the block as this connection is covered up by the air intake. Wrap the end of the hose with black electrical tape to keep the braid from fraying. On the radiator side, I used Spectre Clamp part no. SPE-4160. (these are red/blue anodized aluminum) (the SPE at the beginning of the part number is what Summit uses, just the number is the actual Spectre part number). You can get chrome also, but the size is 4160 for a 1" 1/4 i.d. hose. DO NOT put electrical tape on the end of the hose at the radiator connection or the clamp will be too tight and you can not get it over the nipple on the radiator. Also, make sure the clamp is all the way loose, then twist the clamp onto the hose and over the braid. Push onto the radiator nipple and tighten.
The small hose on the top of the coolant tank is 3/8 i.d. I used true braided hose for this. It runs to a plastic tee fitting on the backside of the radiator. The other side of the tee runs over to a connection at the top of the radiator on the passenger side. I took the radiator shroud off to get to this connection easier. Only 4 bolts hold the shroud on. At this radiator connection I again used only a standard hose clamp as the Spectre clamps are too big to fit and you can not see the clamp anyway. The other leg of the tee fitting uses a 1/4 i.d. hose that runs to the manifold. I again used true braided hose for this one also. You only need a short piece of the 1/4 i.d. hose for this. You have to use 5/16 hose clamps for the 1/4 hose as Summit does not stock the 1/4 size clamp and you will have to wait a few weeks to get it. The 5/16 size works just fine. You have to reuse this factory plastic tee fitting, so be very careful not to break it when you take the stock hoses off it. I just used the stock hoses to get the correct lengths of braided hose I needed. When you want to cut the hose, wrap the spot you want to cut with electrical tape and use a fine tooth hacksaw to cut it.
Spectre 1/4 braided hose part no. SPE-29204
Spectre 3/8 braided hose part no. SPE-29406
Spectre 5/16 clamps part no. SPE-2160
Spectre 3/8 clamps part no. SPE-2260
The 5/16 and 3/8 clamps come in a pack of two. Buy 2 packs so you have 4 clamps of each size. (you really only need 3 of the 3/8 size). I bought 1 piece each of the 1/4 (4 ft)and 3/8 (6 ft).This was plenty.
For the heater hoses I just used braided stainless steel sleeve/covers from Spectre. It is called Spectre Magna Braid Sleeving.The size I bought fits very well and works great. It fits hoses from 3/4 o.d to 1"1/4 o.d. It comes in a 6 ft length and you need to buy (2) 6 ft pieces. Take all the heater hoses off the car. The factory clamps back by the firewall can be a real pain depending on where the factory put the legs of the clamps at during assembly. Start sliding the braided sleeve over the heater hoses a little at a time until they are completely covered. Then wrap the ends with electrical tape. I head the sleeve in place by the molded tee fitting with plastic tie wraps. On the 08's and 09's, this area is covered up by the stock intake and you can not see the molded tee fitting. You can use the Spectre clamps at the bottom coolant tank connection, (2) down at the thermostat housing and (2) at the firewall connections.
Spectre Magna Braided Sleeving part no. SPE-4008B
Spectre 5/8 clamp part no. SPE-3260
Spectre 3/4 clamp part no. SPE-3360
Again, I bought (2) 6 ft pieces of the sleeving and (4) of each clamp size for the heater hoses.
Once everything is back together, fill the coolant tank and start the car. When the thermostat opens, the coolant level will go down. Just keep pouring the antifreeze in until you have all of what you drained back in the car. I had to rev the motor a few times to get all the air out. It took about half an hour to get all the coolant back in. Keep checking for leaks for a few days and keep an eye only the coolant temp. I had no leaks on the first try!
I know this is alot of information, but I wanted to be as complete as I could so you would get the full picture of what is involved. Though it is alot of info, it is very easy to perform this mod and your Corvette will look great when it is done. If you give yourself an entire weekend, that is more than enough time. It took me longer, but that is because i had to place orders for parts 3 different times until I was able to figure this all out.
Last edited by Swiftrider08; 09-05-2008 at 10:54 AM.


 09-05-2008, 02:33 PM
#4
Safety Car
Thread Starter
Member Since: Aug 2007
Location: Rushsylvania Ohio
Posts: 4,836
Likes: 0
Received 6 Likes
on
6 Posts
I guess if what I posted is too much info for some, then this mod is not for you. Thought I would share my experience with this mod, but I guess I just wasted mine and your time with the typing.
Last edited by Swiftrider08; 09-05-2008 at 06:37 PM.
09-05-2008, 02:47 PM
#5
Race Director


Thanks for the write up, Mike! 
I've been thinking of doing the same. I may get in touch with you for more details.
To the post about too much info.....I don't understand your complaint about taking too long to read. It probably took more time to respond to it than it did to read Mike's post.

Mike took alot of time to post the details of the install. I appreciate anyone who would take the time for that, even if it wasn't for me.
I've been thinking of doing the same. I may get in touch with you for more details.
To the post about too much info.....I don't understand your complaint about taking too long to read. It probably took more time to respond to it than it did to read Mike's post.
Mike took alot of time to post the details of the install. I appreciate anyone who would take the time for that, even if it wasn't for me.
Last edited by RadarP3C; 09-05-2008 at 03:08 PM.
09-05-2008, 03:00 PM
#6
Drifting

Good info and looks great. I could do that to my 71. You might have to make a house call to help with my C6


 09-05-2008, 03:24 PM
#8
Le Mans Master


THANK YOU for taking the time to write it up!!! If it is too much for some people they can apply for a click credit.
Looks awesome. I've wanted to do that treatment to mine but never investigated far enough to find out it wasn't outrageously expensive. $150 is well within the range of possibility. Thanks again!
Looks awesome. I've wanted to do that treatment to mine but never investigated far enough to find out it wasn't outrageously expensive. $150 is well within the range of possibility. Thanks again!


 Thanks again for taking the time!
 09-05-2008, 06:36 PM
#12
Safety Car
Thread Starter
Member Since: Aug 2007
Location: Rushsylvania Ohio
Posts: 4,836
Likes: 0
Received 6 Likes
on
6 Posts
Thanks guys! These are the kind of responses I was thinking you guys might post when I took the time to write this all up. The write-up actually came from a PM I responded to last week from a fellow forum member. Wanted to share the info with the rest of the forum, so I changed it up a bit to keep the names of non-forum vendors out of it.
If ANYONE needs any help or further info, please send me a PM and I will do whatever I can to help.
These are the kind of responses I was thinking you guys might post when I took the time to write this all up. The write-up actually came from a PM I responded to last week from a fellow forum member. Wanted to share the info with the rest of the forum, so I changed it up a bit to keep the names of non-forum vendors out of it.If ANYONE needs any help or further info, please send me a PM and I will do whatever I can to help.
09-05-2008, 06:38 PM
#13
Safety Car
Thread Starter
Member Since: Aug 2007
Location: Rushsylvania Ohio
Posts: 4,836
Likes: 0
Received 6 Likes
on
6 Posts
Thanks for the write up, Mike!
I've been thinking of doing the same. I may get in touch with you for more details.
To the post about too much info.....I don't understand your complaint about taking too long to read. It probably took more time to respond to it than it did to read Mike's post.
Mike took alot of time to post the details of the install. I appreciate anyone who would take the time for that, even if it wasn't for me.

 and your engine bay looks great. I will have some questions for you when i get ready to do mine
 09-05-2008, 06:50 PM
#16
Safety Car
Thread Starter
Member Since: Aug 2007
Location: Rushsylvania Ohio
Posts: 4,836
Likes: 0
Received 6 Likes
on
6 Posts
Thanks Rich! If you ever decide to do this, let me know if you need any help.
Good news is that I had my car at the dealership yesterday and Service Manager & Service Tech both said that nothing I have done has any effect on my factory warranty.
Good news is that I had my car at the dealership yesterday and Service Manager & Service Tech both said that nothing I have done has any effect on my factory warranty.
09-05-2008, 07:29 PM
#19
Safety Car

no waste of time for sure - I read the whole thing and filed it for future reference. engine bay looks super too may want to consider posting this in FAQ as a sticky for other mod minded indivdauls,
may want to consider posting this in FAQ as a sticky for other mod minded indivdauls,
