
MGW shifter install on 2010 - Pics and instructions
 11-29-2009, 10:36 PM
#1
Tech Contributor

Thread Starter
I know there have been some great threads on this that helped me greatly in my install. I just wanted to add another one that may be helpful to someone wanting to do this.
Be sure to put the parking brake on and CHOCK the wheels for added safety.
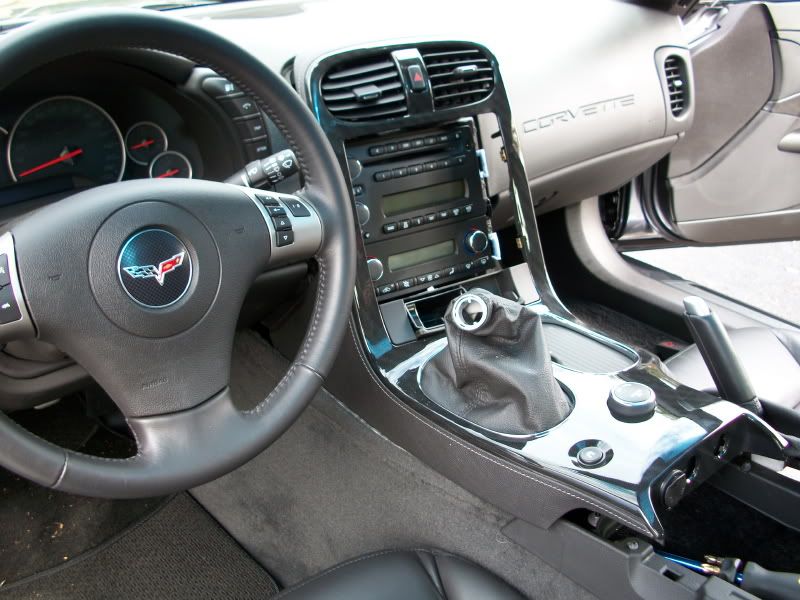
First on I had to turn the chrome ring under the stock shifter **** and then slide the boot down to expose the tork screw that secures the shifter ****.
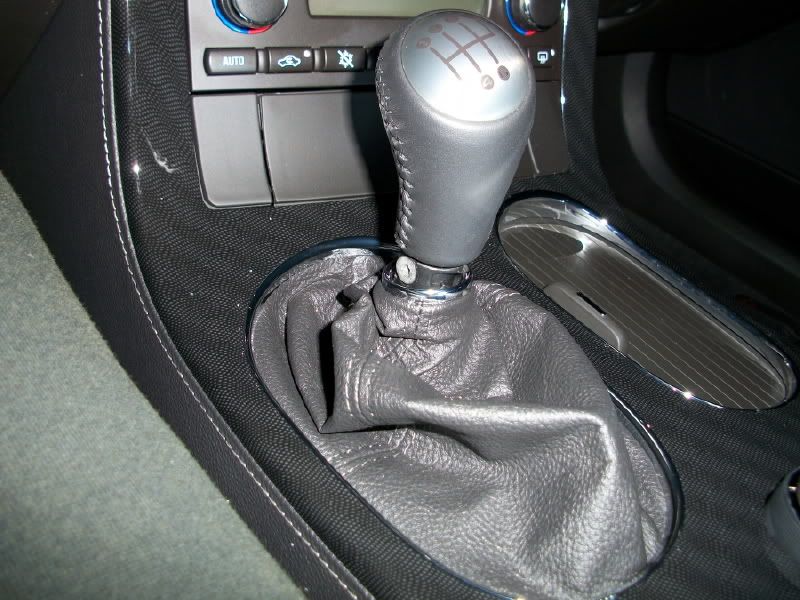
Then you can remove the **** using a T-15 tork screw driver.
Next open up the center console lid and remove the 2 quarter size covers at the front to expose 2 tork screws and remove them.
Next remove the console cover by removing the 4 screws on the hinge.
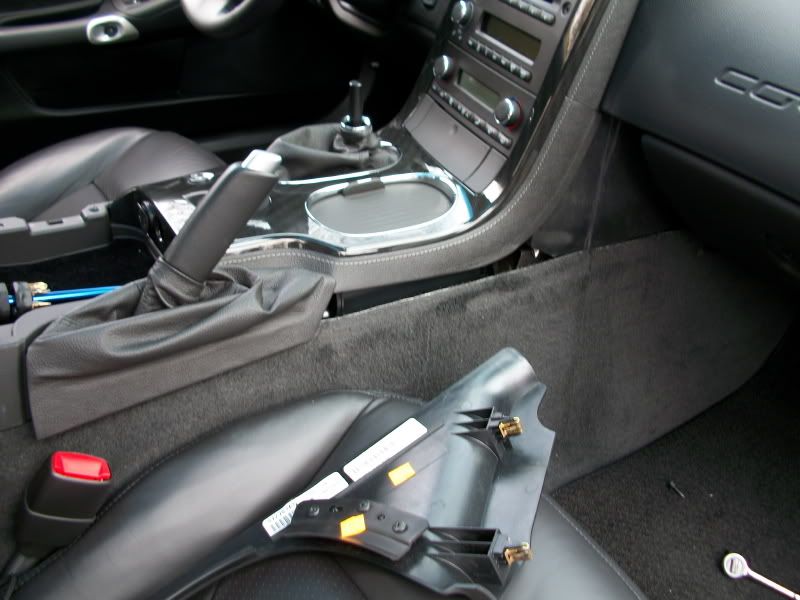
Next, loosen the brake handle boot by pulling up on it. There are 4 'clips' that hold it in place. Two on the outer part and two more on the inner part. Once you have them all disconnected you will be able to lift up the brake boot. This will expose 2 screws that hold the passenger side panel. Once you take those out, you will be able to take off the panel by pulling up and back on the panel. The panel is held in place by 2 clip2 up under the dash. Pull hard, it will come loose.

You can see the 2 clips on the panel in the passengers seat.
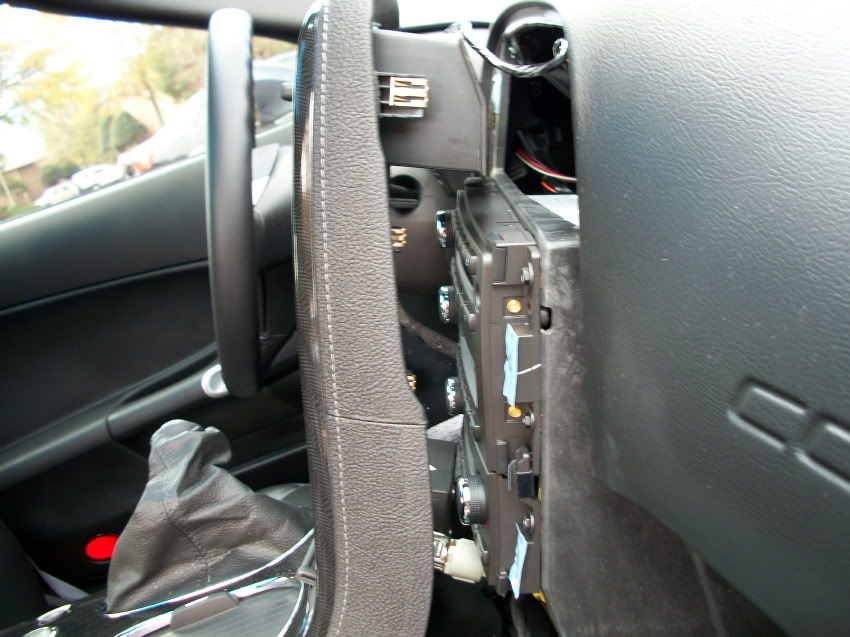
Now comes the really FUN part, tearing out the center console trim. working from the rear, lift up on the console trim and start pulling it back, starting on the passenger side. The trim is held in place by clips and you need to pull it fairly hard to get the clips to come out. Work you way counter clockwise around the console trim pulling it out. Note that the driver's side panel is attached to the console trim, unlike the passenger side which comes out seperately.
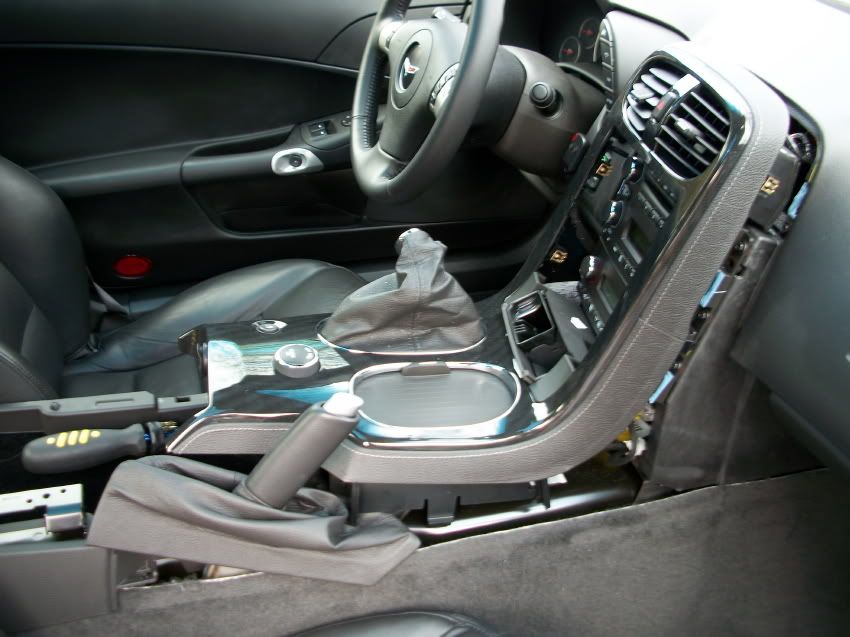
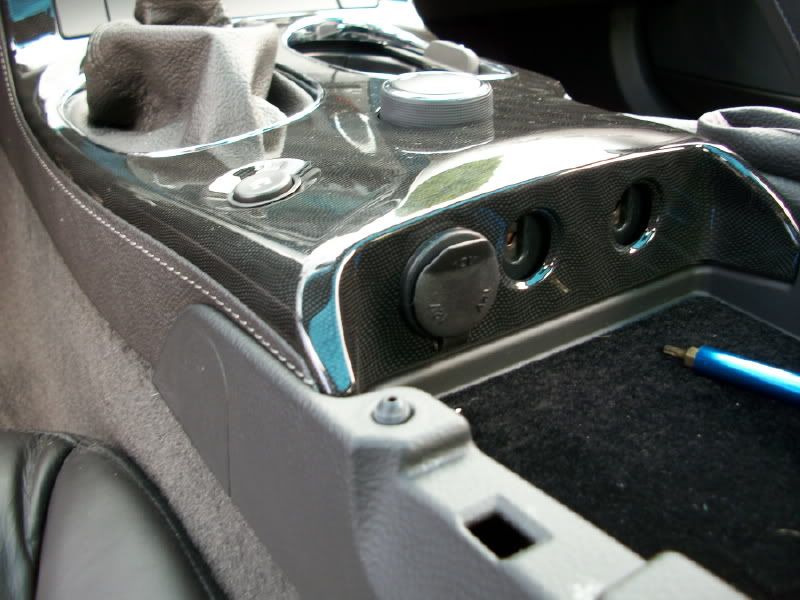
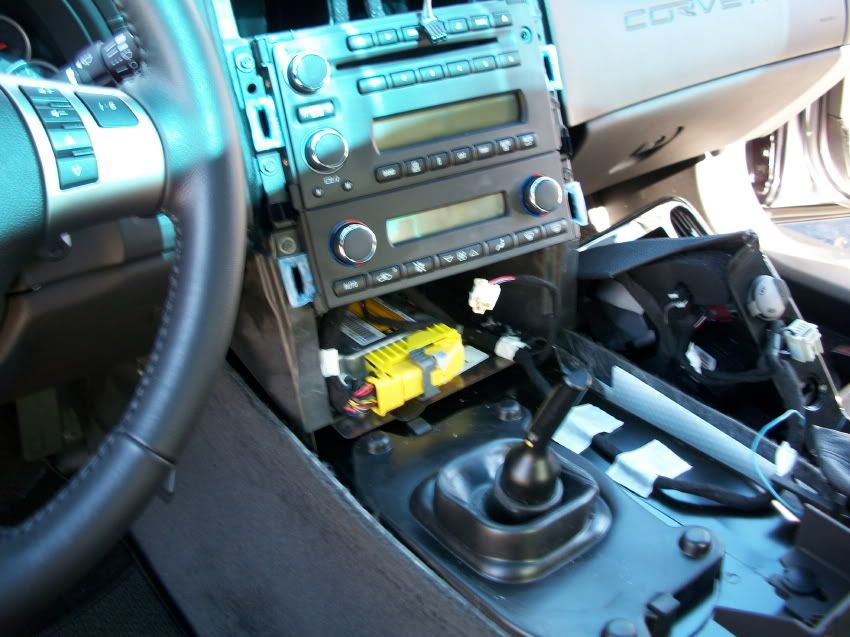
Once you get it loose you will have to disconnect a few electrical connections before taking the console trim out too far. I have the 2LT trim package with the Magnetic Selective ride control package so you may have more or less connections than I did. The connection for the Magnetic Selective ride is towards the back of the console and I had to disconnect this first. It had the shortest wire so I couldn't lift the console up much before I had to disconnect this. Next there is a connection for the Emergency flasher lights switch towards the top of the console and also there is a connection for the cigarette lighter towards the bottom of the console. You need to unhook both of these. Once I had those 3 connection unhooked I was able to manure the whole console over to the passenger side WITHOUT disconnecting the other 2 connections under the console. You can see them in the photo but I'm not sure what they are for.
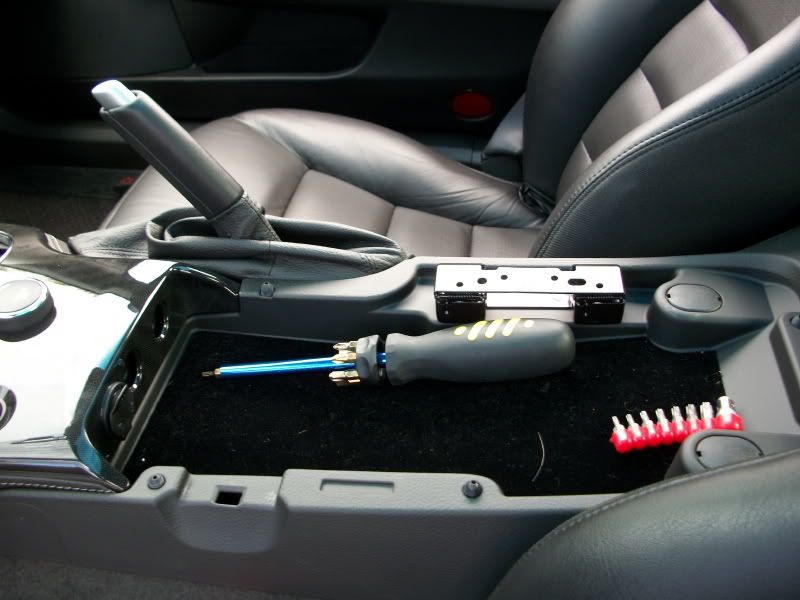
Here it is with the console trim taken out and moved over to the passenger side. (Note 2 wires are still connected to the console.)
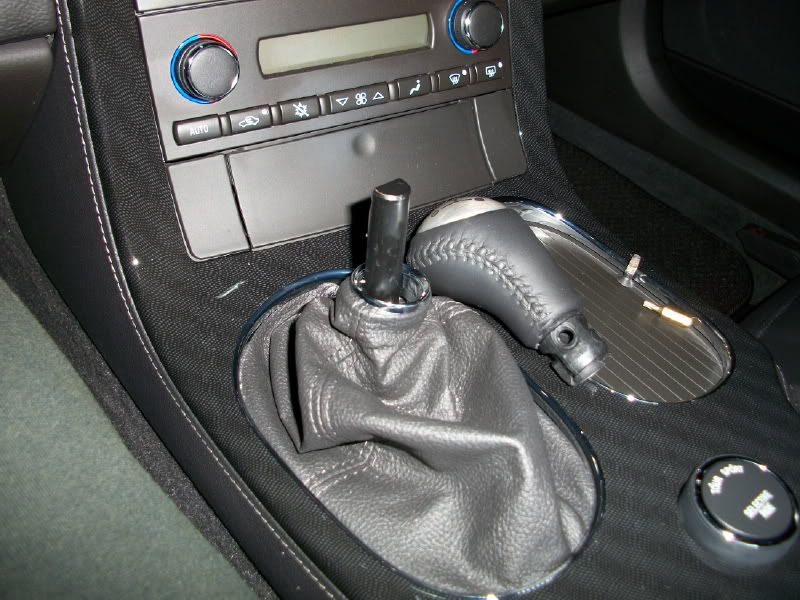
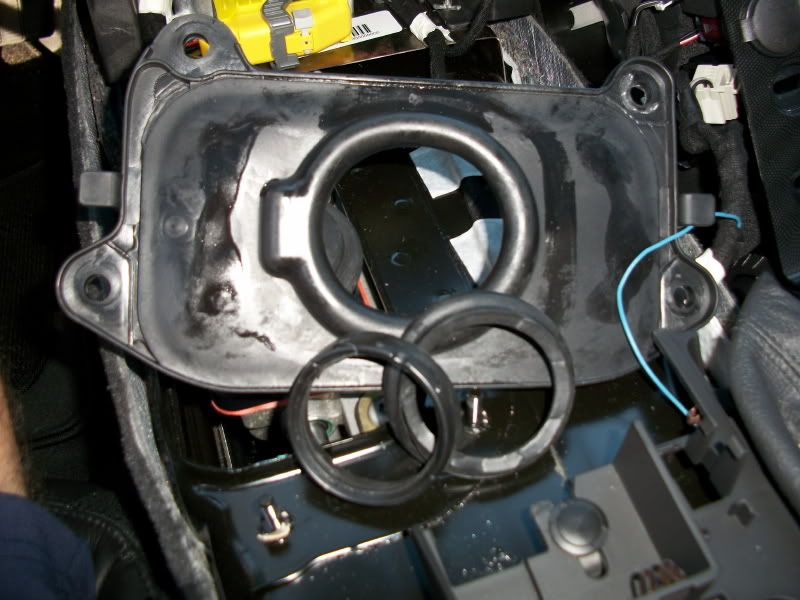
Now you can get to the shifter. First, take off the exterior shifter cover.
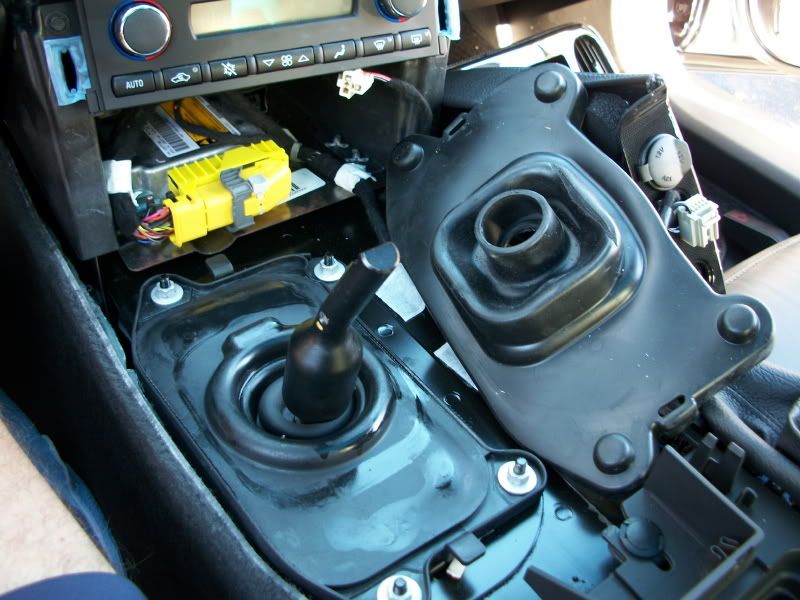
Next take off the interior shifter cover.
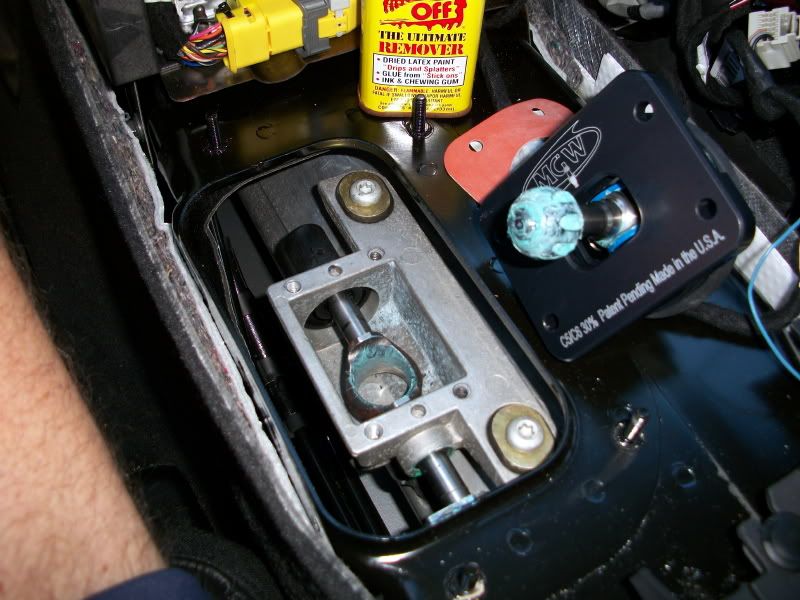
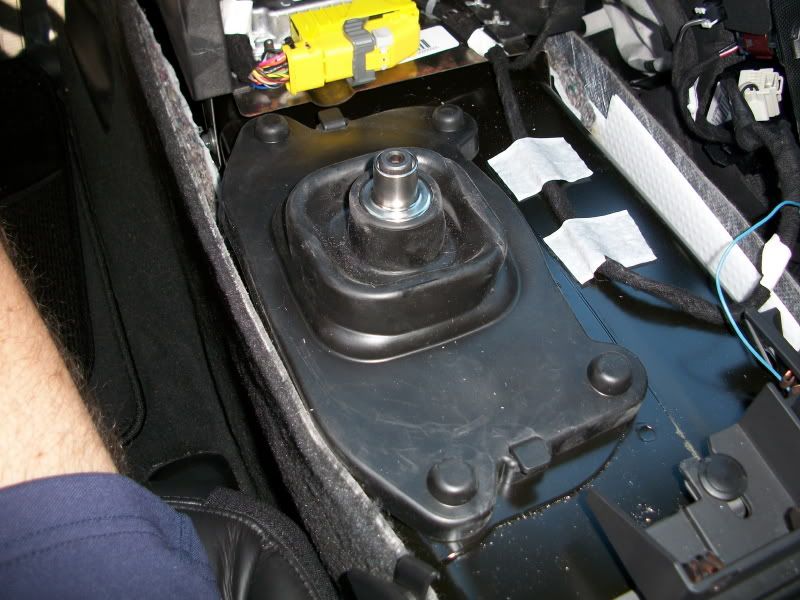
Next, take off the stock shifter. After you take out the 4 bolts holding the shifter, you'll need to pry up on it with something as the gasket is a little sticky.
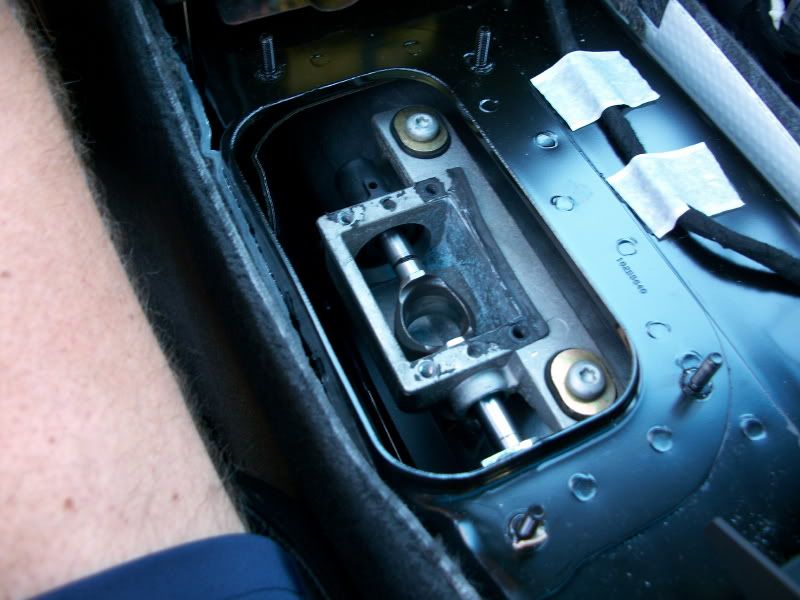
Next, clean off the old gasket with a screwdriver and some GOOF OFF or something similar. Also, spread a little of the lubricant from the bag that was around the ball of the MGW shifter to the 'receiving' socket.
Next, place the gasket in place (or alternatively spread out the Ultra Black silicone around the edge of the opening.)
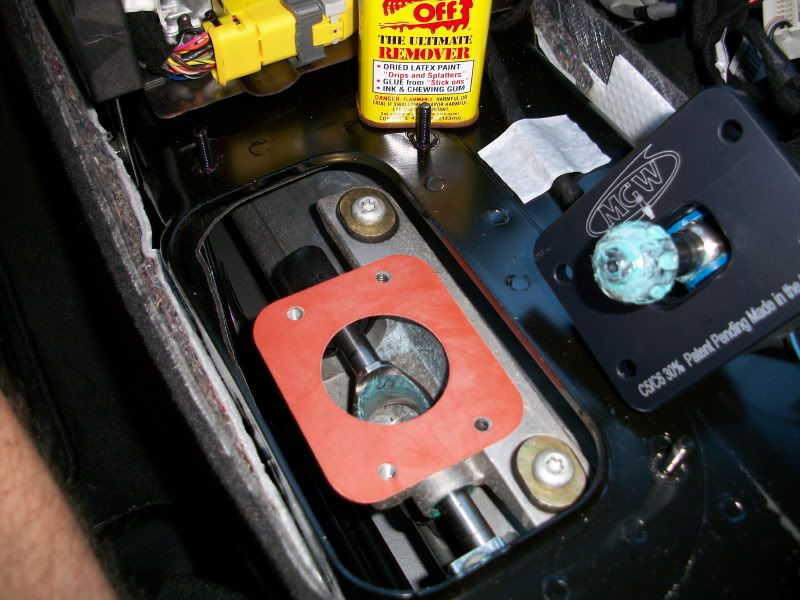
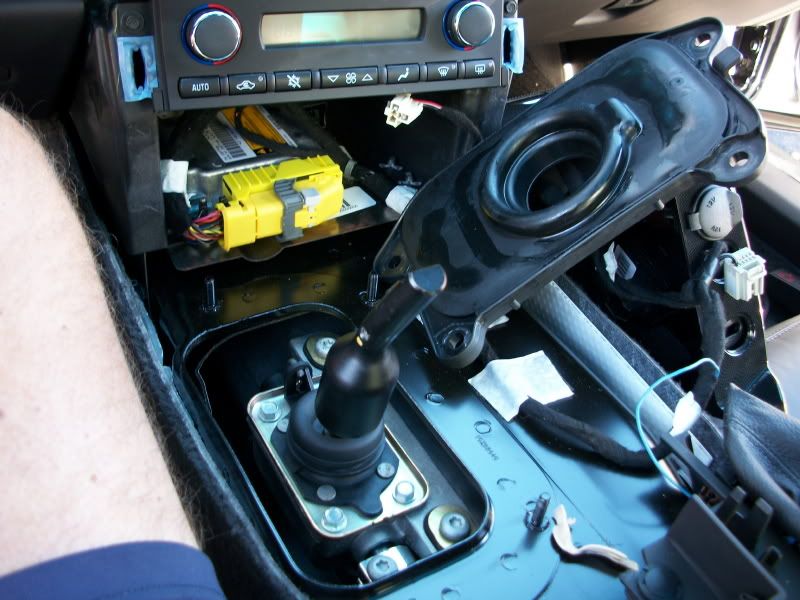
Next, install the MGW shifter. Then, you will need to trim the 'inner' shifter cover so it will fit over the MGW shifter. I had to trim it twice to get it to the correct size opening. See photo.
Install the inner shifter cover.
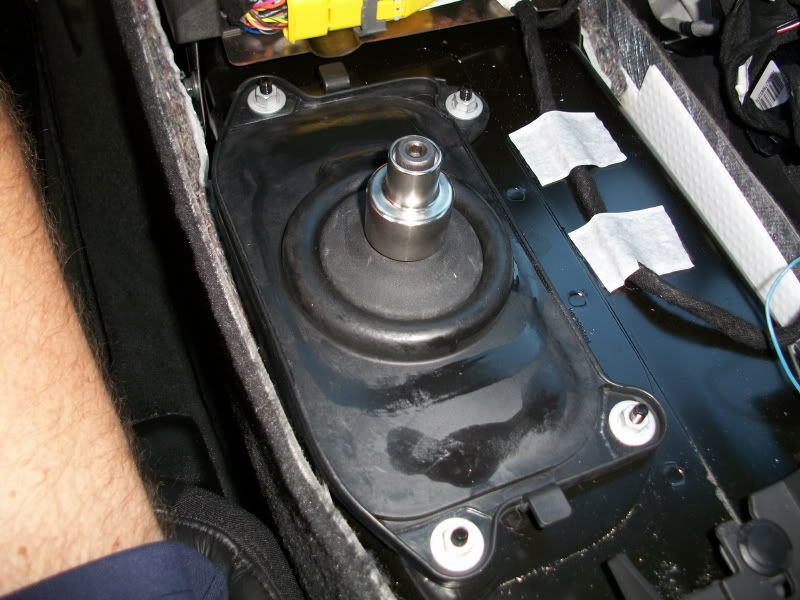
Install the outer shifter cover.
Mount the MGW shifter extension.
The rest is basically just reversing the previous steps.
Hope this proves to be helpful to someone.
Oh, my initial impression of the shifter: It's much more precise in it's shifts. The stock shifter felt it had a lot more 'play' as you shifted it. You can definitely tell there is a difference in the 2 shifters. After I brake it in a little and get used to it (the MGW), I'll post more of my impressions of it.
Be sure to put the parking brake on and CHOCK the wheels for added safety.
First on I had to turn the chrome ring under the stock shifter **** and then slide the boot down to expose the tork screw that secures the shifter ****.
Then you can remove the **** using a T-15 tork screw driver.
Next open up the center console lid and remove the 2 quarter size covers at the front to expose 2 tork screws and remove them.
Next remove the console cover by removing the 4 screws on the hinge.
Next, loosen the brake handle boot by pulling up on it. There are 4 'clips' that hold it in place. Two on the outer part and two more on the inner part. Once you have them all disconnected you will be able to lift up the brake boot. This will expose 2 screws that hold the passenger side panel. Once you take those out, you will be able to take off the panel by pulling up and back on the panel. The panel is held in place by 2 clip2 up under the dash. Pull hard, it will come loose.
You can see the 2 clips on the panel in the passengers seat.
Now comes the really FUN part, tearing out the center console trim. working from the rear, lift up on the console trim and start pulling it back, starting on the passenger side. The trim is held in place by clips and you need to pull it fairly hard to get the clips to come out. Work you way counter clockwise around the console trim pulling it out. Note that the driver's side panel is attached to the console trim, unlike the passenger side which comes out seperately.
Once you get it loose you will have to disconnect a few electrical connections before taking the console trim out too far. I have the 2LT trim package with the Magnetic Selective ride control package so you may have more or less connections than I did. The connection for the Magnetic Selective ride is towards the back of the console and I had to disconnect this first. It had the shortest wire so I couldn't lift the console up much before I had to disconnect this. Next there is a connection for the Emergency flasher lights switch towards the top of the console and also there is a connection for the cigarette lighter towards the bottom of the console. You need to unhook both of these. Once I had those 3 connection unhooked I was able to manure the whole console over to the passenger side WITHOUT disconnecting the other 2 connections under the console. You can see them in the photo but I'm not sure what they are for.
Here it is with the console trim taken out and moved over to the passenger side. (Note 2 wires are still connected to the console.)
Now you can get to the shifter. First, take off the exterior shifter cover.
Next take off the interior shifter cover.
Next, take off the stock shifter. After you take out the 4 bolts holding the shifter, you'll need to pry up on it with something as the gasket is a little sticky.
Next, clean off the old gasket with a screwdriver and some GOOF OFF or something similar. Also, spread a little of the lubricant from the bag that was around the ball of the MGW shifter to the 'receiving' socket.
Next, place the gasket in place (or alternatively spread out the Ultra Black silicone around the edge of the opening.)
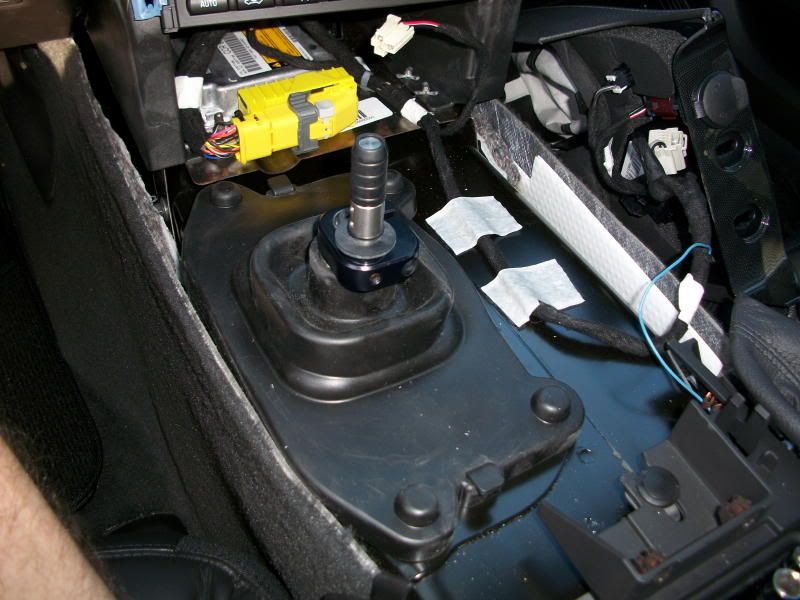
Next, install the MGW shifter. Then, you will need to trim the 'inner' shifter cover so it will fit over the MGW shifter. I had to trim it twice to get it to the correct size opening. See photo.
Install the inner shifter cover.
Install the outer shifter cover.
Mount the MGW shifter extension.
The rest is basically just reversing the previous steps.
Hope this proves to be helpful to someone.
Oh, my initial impression of the shifter: It's much more precise in it's shifts. The stock shifter felt it had a lot more 'play' as you shifted it. You can definitely tell there is a difference in the 2 shifters. After I brake it in a little and get used to it (the MGW), I'll post more of my impressions of it.
Last edited by ncvette_1FUNRIDE; 11-30-2009 at 09:25 AM.


 11-30-2009, 11:49 AM
#7
Safety Car

 11-30-2009, 12:10 PM
#8
Tech Contributor
Thread Starter

I was just trying to expand on George's instructions. I got those instructions and still had to figure some things out for myself.
Sorry for trying to be helpful.
 12-05-2009, 11:46 PM
#9
Team Owner


I know there have been some great threads on this that helped me greatly in my install. I just wanted to add another one that may be helpful to someone wanting to do this.
Be sure to put the parking brake on and CHOCK the wheels for added safety.
First on I had to turn the chrome ring under the stock shifter **** and then slide the boot down to expose the tork screw that secures the shifter ****.
Then you can remove the **** using a T-15 tork screw driver.
Next open up the center console lid and remove the 2 quarter size covers at the front to expose 2 tork screws and remove them.
Next remove the console cover by removing the 4 screws on the hinge.
Next, loosen the brake handle boot by pulling up on it. There are 4 'clips' that hold it in place. Two on the outer part and two more on the inner part. Once you have them all disconnected you will be able to lift up the brake boot. This will expose 2 screws that hold the passenger side panel. Once you take those out, you will be able to take off the panel by pulling up and back on the panel. The panel is held in place by 2 clip2 up under the dash. Pull hard, it will come loose.
You can see the 2 clips on the panel in the passengers seat.
Now comes the really FUN part, tearing out the center console trim. working from the rear, lift up on the console trim and start pulling it back, starting on the passenger side. The trim is held in place by clips and you need to pull it fairly hard to get the clips to come out. Work you way counter clockwise around the console trim pulling it out. Note that the driver's side panel is attached to the console trim, unlike the passenger side which comes out seperately.
Once you get it loose you will have to disconnect a few electrical connections before taking the console trim out too far. I have the 2LT trim package with the Magnetic Selective ride control package so you may have more or less connections than I did. The connection for the Magnetic Selective ride is towards the back of the console and I had to disconnect this first. It had the shortest wire so I couldn't lift the console up much before I had to disconnect this. Next there is a connection for the Emergency flasher lights switch towards the top of the console and also there is a connection for the cigarette lighter towards the bottom of the console. You need to unhook both of these. Once I had those 3 connection unhooked I was able to manure the whole console over to the passenger side WITHOUT disconnecting the other 2 connections under the console. You can see them in the photo but I'm not sure what they are for.
Here it is with the console trim taken out and moved over to the passenger side. (Note 2 wires are still connected to the console.)
Now you can get to the shifter. First, take off the exterior shifter cover.
Next take off the interior shifter cover.
Next, take off the stock shifter. After you take out the 4 bolts holding the shifter, you'll need to pry up on it with something as the gasket is a little sticky.
Next, clean off the old gasket with a screwdriver and some GOOF OFF or something similar. Also, spread a little of the lubricant from the bag that was around the ball of the MGW shifter to the 'receiving' socket.
Next, place the gasket in place (or alternatively spread out the Ultra Black silicone around the edge of the opening.)
Next, install the MGW shifter. Then, you will need to trim the 'inner' shifter cover so it will fit over the MGW shifter. I had to trim it twice to get it to the correct size opening. See photo.
Install the inner shifter cover.
Install the outer shifter cover.
Mount the MGW shifter extension.
The rest is basically just reversing the previous steps.
Hope this proves to be helpful to someone.
Oh, my initial impression of the shifter: It's much more precise in it's shifts. The stock shifter felt it had a lot more 'play' as you shifted it. You can definitely tell there is a difference in the 2 shifters. After I brake it in a little and get used to it (the MGW), I'll post more of my impressions of it.
Billet plus 35 percent short throw. Unreal how much better it is with no noise. Yes I took it up to 6500 rpm with dead quite.
 12-06-2009, 12:02 AM
#10
Race Director

I'll finally be doing mine when my DSVettes "stuff" comes in. What did you use to trim the shifter cover? Scissors, razer knife??
12-06-2009, 12:15 AM
#11
Tech Contributor
Thread Starter
http://www.amazon.com/gp/product/B00..._ya_oh_product
but you can use any good strong shears. If you don't have any. HOME DEPOT probably has something that would work fine.
12-06-2009, 08:03 AM
#12
Melting Slicks

Member Since: Nov 2004
Location: Northcentral, Pennsylvania
Posts: 2,383
Received 135 Likes
on
81 Posts
St. Jude Donor '09-'11

Hey did you ever think that some of us might want an idea of what's involved to install one of these before purchasing. The OP went out of his way to provide information for some of us. He deserves some thanks for that.
12-12-2009, 05:31 AM
#13
Race Director
This is what I used:
http://www.amazon.com/gp/product/B00..._ya_oh_product
but you can use any good strong shears. If you don't have any. HOME DEPOT probably has something that would work fine.
http://www.amazon.com/gp/product/B00..._ya_oh_product
but you can use any good strong shears. If you don't have any. HOME DEPOT probably has something that would work fine.
 Just now getting back to this thread.
12-12-2009, 07:15 AM
Just now getting back to this thread.
12-12-2009, 07:15 AM
#14
Safety Car
Member Since: Nov 2007
Location: Tarpon Springs FL
Posts: 4,446
Received 308 Likes
on
198 Posts
FL Events Coordinator

Thanks for a Great post!!!! I have a A6 but plan on installing the one of those insulation kits and your DETAILED instruction on removal the top of the console will help me. This is what this forum is about. Thanks Again...
12-13-2009, 09:44 AM
#17
Le Mans Master


Member Since: Jan 2001
Location: Maryville TN
Posts: 6,093
Received 245 Likes
on
177 Posts
St. Jude Donor '06-13,'16-'17, '19
 12-13-2009, 12:29 PM
#18
Advanced

Member Since: Aug 2006
Location: ATL
Posts: 77
Likes: 0
Received 0 Likes
on
0 Posts
Now I just have to do a little research to see why this shifter is better than ohter's :cheers
12-13-2009, 02:10 PM
#19
Safety Car
12-13-2009, 02:47 PM
#20
Burning Brakes

Nicely done. When I did mine this past summer, I left the upper electrical connecters on the facia connected and swung it out of the way. I wonder which took you longer, changing the shifter or posting the pics on hosting site, then copying the links to this one. You have great patience and zeal to help others. Thanks.
John
John