
Powder Coating Grand Sport Calipers
 02-06-2012, 04:03 PM
#1
Burning Brakes

Thread Starter
I have documented the process to take off the calipers for powder coat and sent them to (click hyperlink for info) Mike The Powder Coater.
This process should get you through the job with basic shop hand tools.
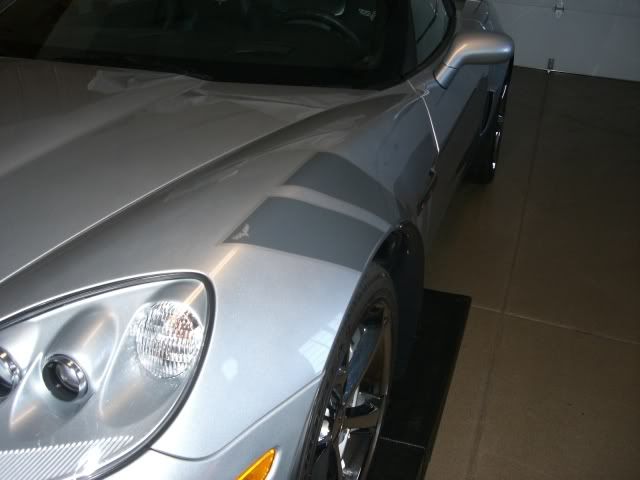
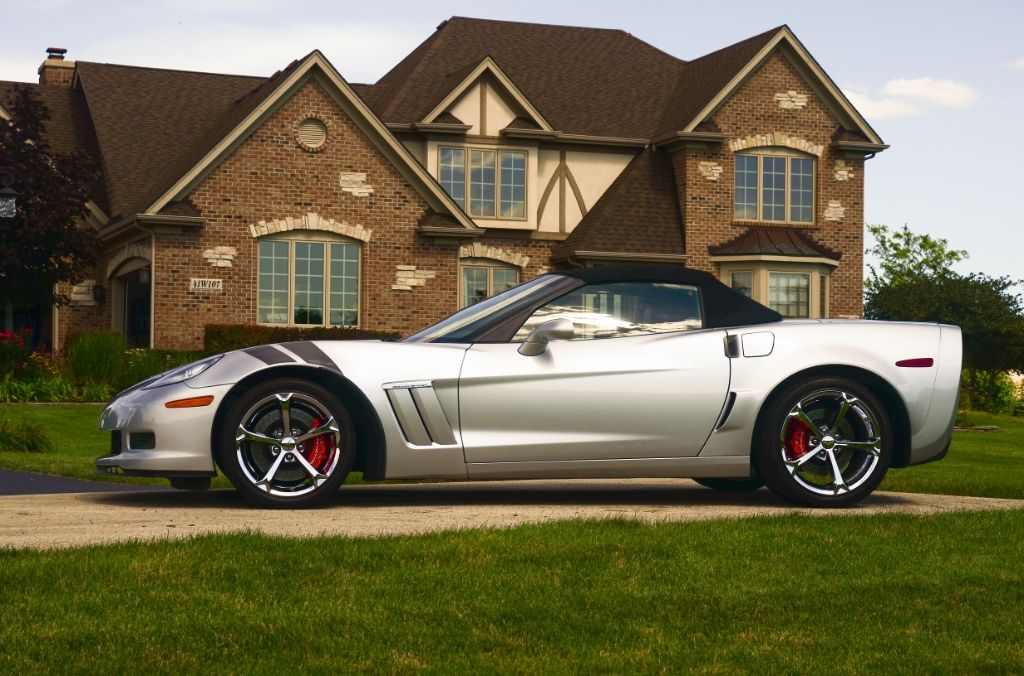
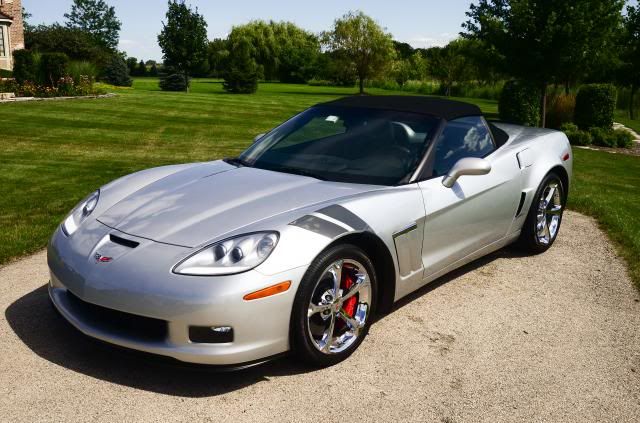
This is at your own risk, please use jack stands, common sense, and be careful. I believe these process notes can get anyone through start to finish. Once you have the car in the air it's pretty straight forward, not too much more involved than any other maintenance a home mechanic will perform. I really disliked the dull silver color of the brakes on my Grand Sport and being it's the middle of winter I have nothing but time on my hands when I am not traveling.
If you see anything I missed or neglected please send me an email or p/m to correct this thread to keep it useful for future use.
(hyperlink to my photo album for this task)
Tools I used:
4 jack stands
2 floor jacks
1/2" breaker bar
1/2" ratchet
21mm 1/2" drive socket
misc 1/2" extensions
1/2" drive torque wrench ft lbs
3/8" drive torque wrench ft lbs
11mm box end wrench
3/8" ratchet
3/8" 11mm socket
Summary of part numbers and misc info:
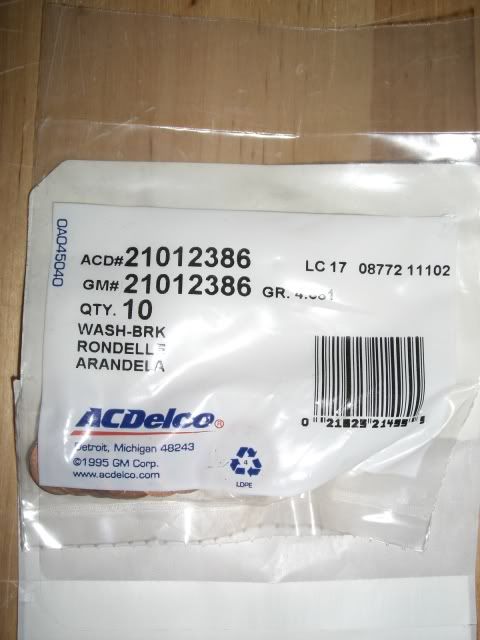
Crush gasket for brake lines: GM part number 21012386
The banjo bolt GM part number is 11569590 (old p/n 11570052)
(repair manual install torque is 30 ft-lbs - this is too much, hand tight snug is all that is needed!)
Caliper bolts (2 that hold the caliper to the knuckle) M14 x 2 x 47 GM part number 14084051
(repair manual install torque is 129 ft-lbs)
Rubber bleeder dust caps: GM part number 14089150
Hose to bleed the brakes needs to have an inside diameter of 1/4"
Directions:
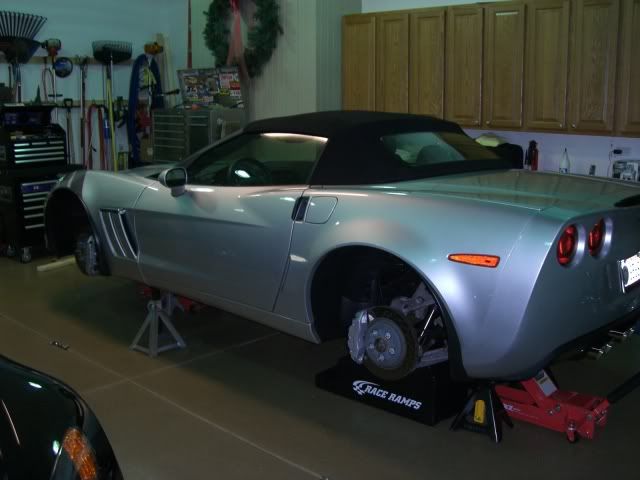
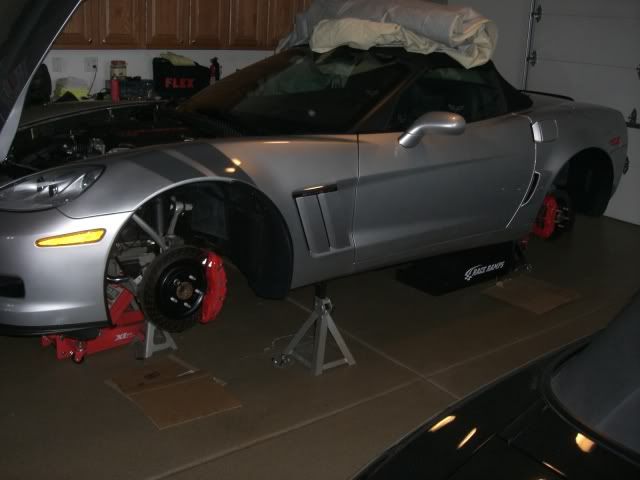
1. First step is to get the car in the air and secure it on jack stands. (So far the most painful step, I hate jacking this car, I’d think GM could have put some jack pads in the cradle castings, end rant)
2. Remove wheels once car is secured on jack stands in the air. The jack stands under the front frame rails in the photo are not touching; I have extra stands and put them there since I had them just in case the worst happens since I work while no one is home the majority of the time.
3. It might not hurt to take pictures of the caliper orientation as well as how the brake lines route off the caliper backsides based on your memory retention (mine is terrible) or mechanical capability (this makes up for poor memory).
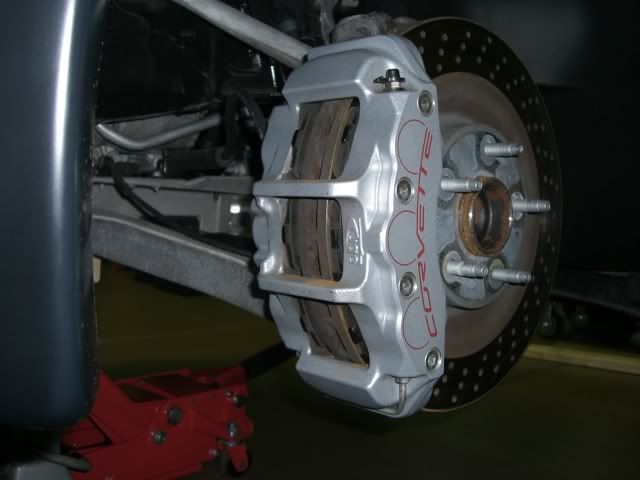
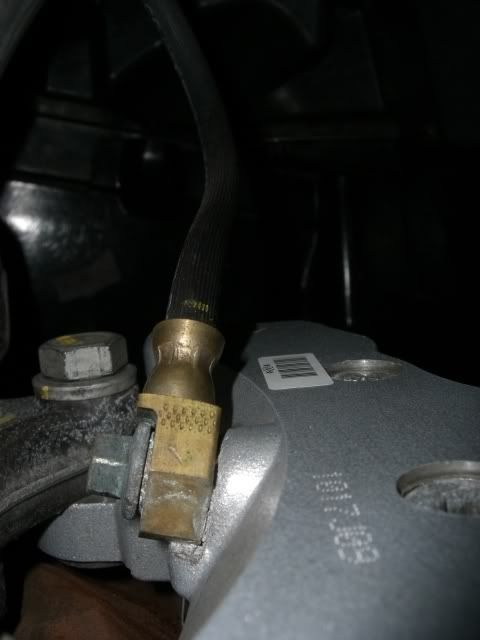
Rear caliper line is perpendicular to caliper:
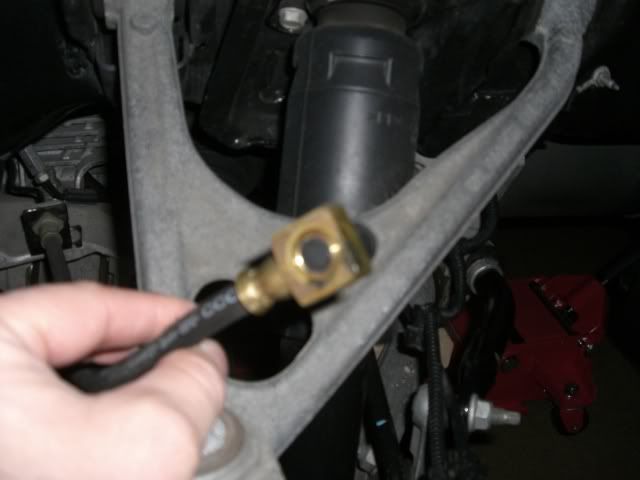
Front caliper line is on a slight angle:
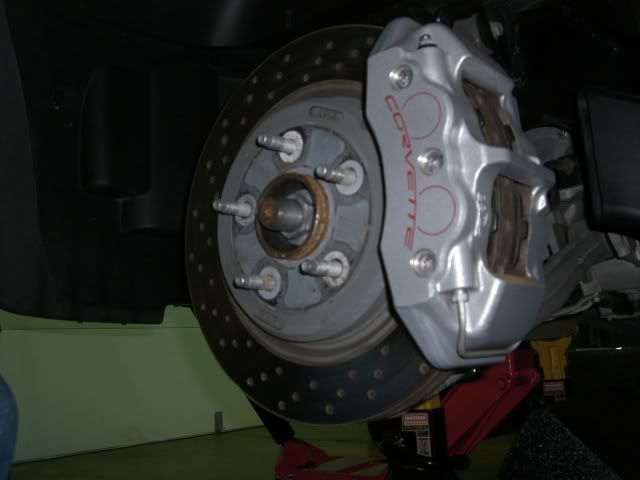
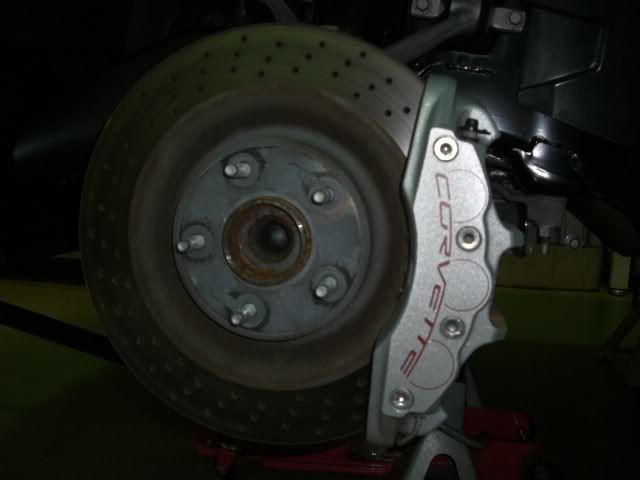
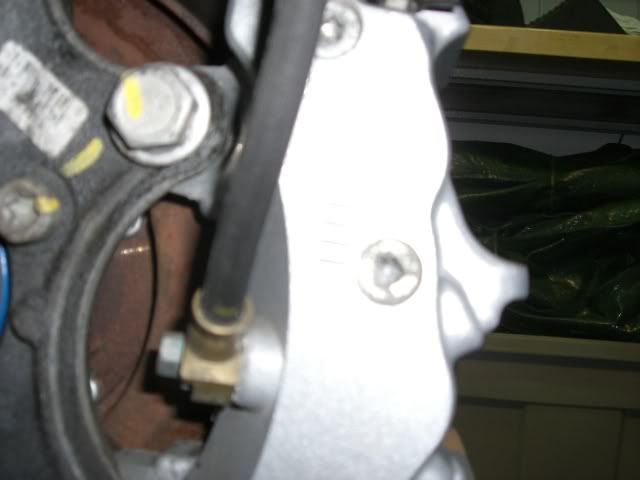
4. I went to each location and broke the torx head (T45) pad guide pins loose because I didn’t want them coated the base coat color. I want my calipers to look OEM like the red Z06 or GS 2012 option and the pins are not coated any color nor are the brake crossover tubes.
5. I went ahead and broke the 2 caliper bolts (21mm) loose at each corner behind the calipers, do not remove them at this time and just get them loose. It took a pretty long 1/2" breaker bar but they eventually gave it up, I won.
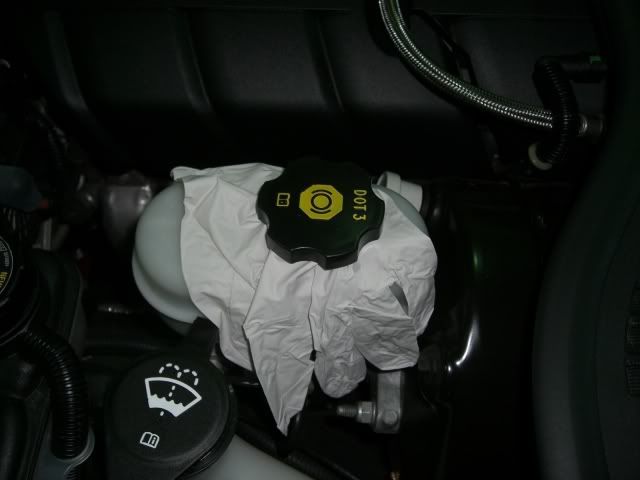
6. Next I put a rubber glove over the master cylinder fill opening and put the cap back on to help hold the fluid in the system once I start undoing brake lines. (good tip Mike)
7. Go to any corner to start and grab your rubber stoppers suggested OR an M10 bolt and nut to put through the end of the brake line with the old used crush washers. (Rubber stopper/plug measurements are 9/16" x 3/8" x 1" - Lowes part number 881321)
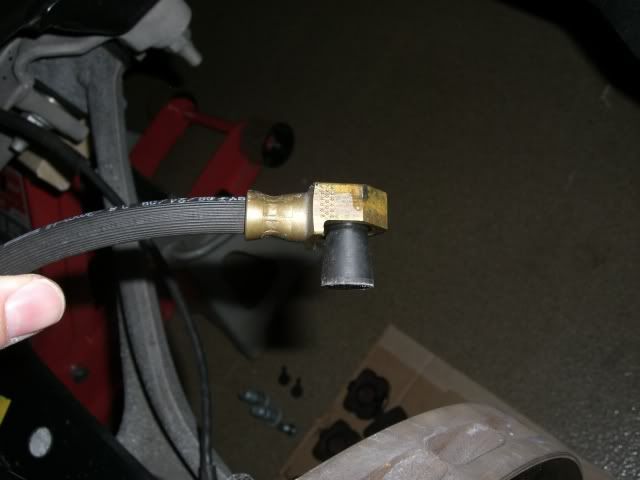
8. I removed the brake line bolt (11mm box end wrench) and kept a drain pan under the fitting to catch fluid that would come out of the caliper and end of the brake line. Once removed I then inserted a rubber plug into the fitting to stop any further fluid loss from the system while unhooked. (Thanks Snakeman, great idea, plug seems to work perfect)
9. With the brake line out of the way I continued to remove the 2 large caliper mount bolts completely. These bolts will probably need a socket or wrench until they are all the way out since they have loctite from the factory and they do not screw out easily. Be careful to keep a hand on the caliper while removing the last bolt so the caliper doesn’t fall to the ground which could mar it.
10. With the caliper off I held the open port on the caliper where the line screwed in over the drain pan getting as much fluid as I could out of the caliper. Note: a leaking box will more than likely get quarantined by whichever shipper you chose, get as much brake fluid as you can out. I then took a vacuum plug and inserted it into the open port. (Just thought of it now naturally, but I would have put the calipers in zip-locks if I thought of it before packing them up, easy solution)
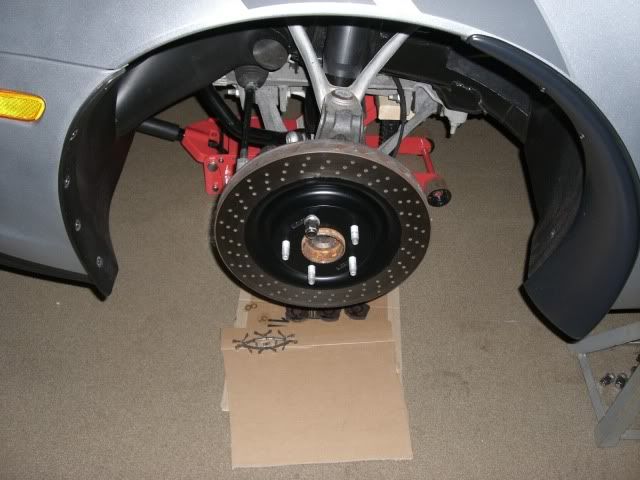
11. If you are not removing the rotors to paint the hats and the factory retention clips have been removed, I would hand thread one lug nut on any of the 5 studs to keep the rotor from falling off while the calipers are out for powder coating. The calipers and lug nuts are what hold the rotors on this type of design.
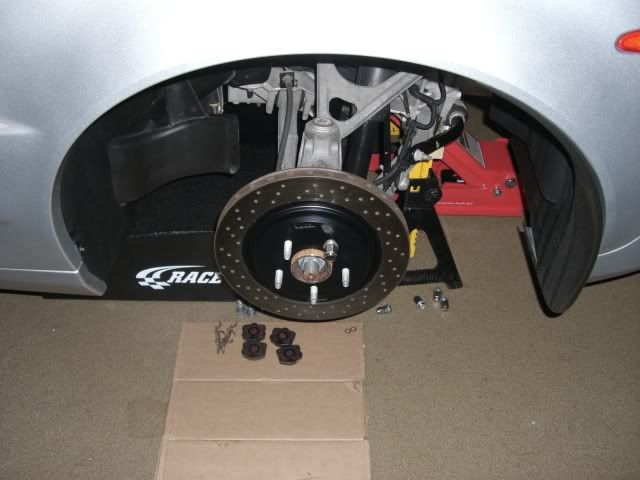
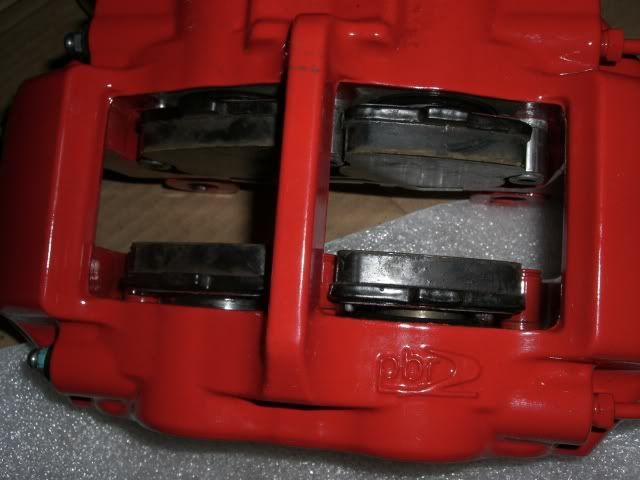
12. Once I had the caliper off I set it on a piece of cardboard and removed the brake pads, pad clips, bleeder rubber caps.
13. I thoroughly wiped my hand prints off the caliper and set it aside on my workbench and moved on to the next corner.
14. I repeated this process 3 more times until complete.
15. Box them up and make sure you use some sort of packing in the box to protect them from banging around in the box on the way to the powder coater.
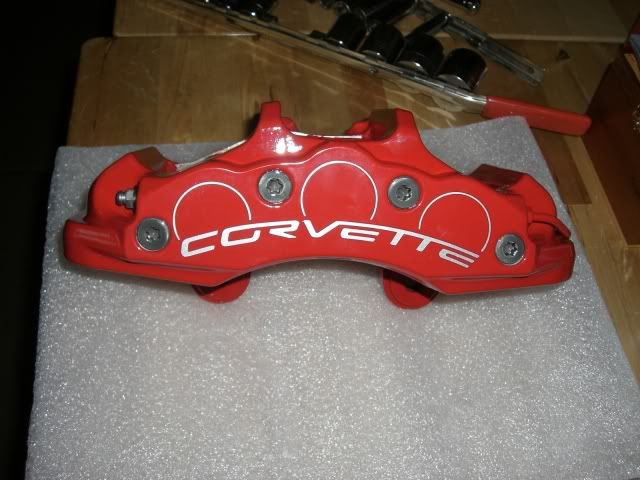
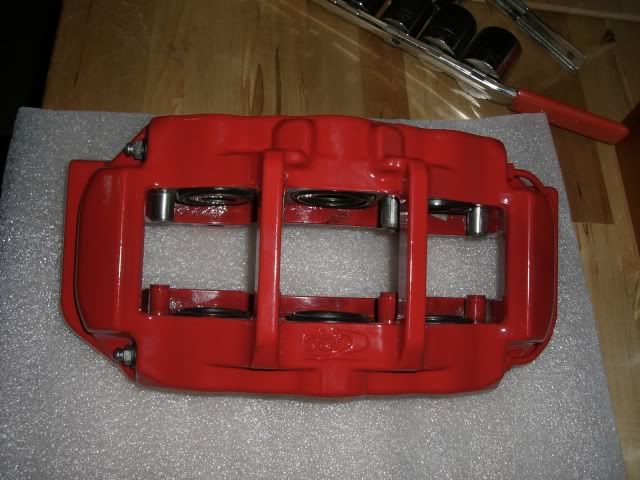
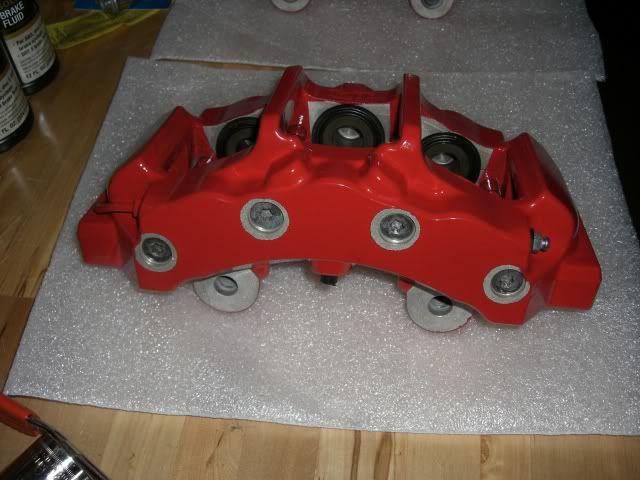
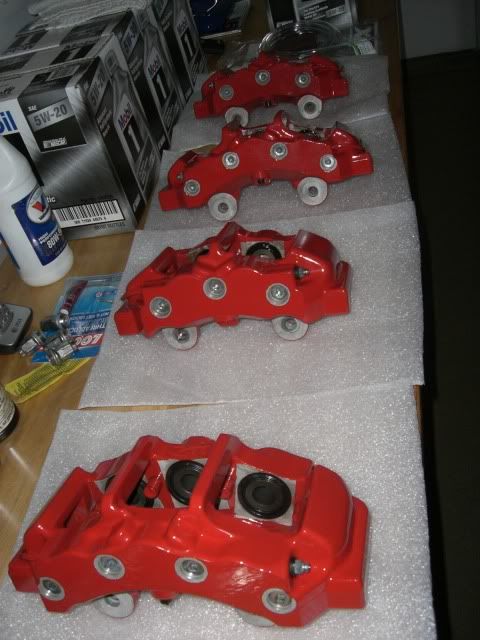
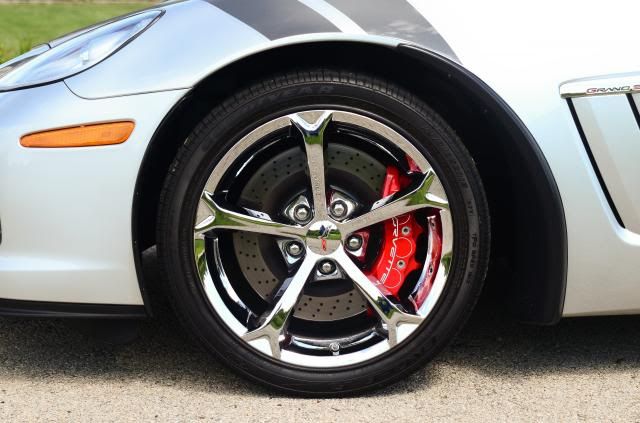
16. I am using Mike Golding for mine and once I secured a tracking number I forwarded it to him via email. He is one patient guy, he helped me clarify what and how I wanted these coated along with some recommendations he has picked up over the years. I chose to have them done in a stock Z06 red finish scheme. Here are the after photo's:
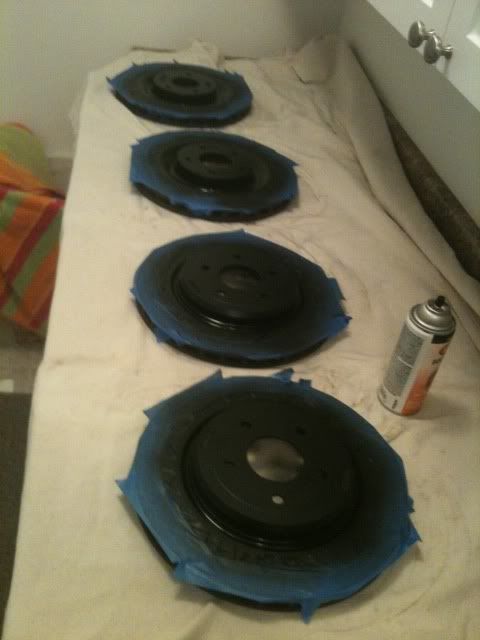
17. While I had easy access to the rotors I one by one began to scuff (with a red 3M pad) the rotor hats. This is the area the pads don’t ride on and the studs pass through and are a silver color. Mine were showing all sorts of pad dust stains from the original pads before I went to ceramics and some moderate rust.
18. I scuffed them until they were clean and then wiped them down with a clean rag.
19. I masked off any area I didn’t want painted with blue 3M painters tape.
20. I chose to use some Krylon high heat BBQ paint I had left over from my last car that I actually did the same process on.
21. In very light multiple coats I painted the hats. I put this on as light as possible to prevent any drips.
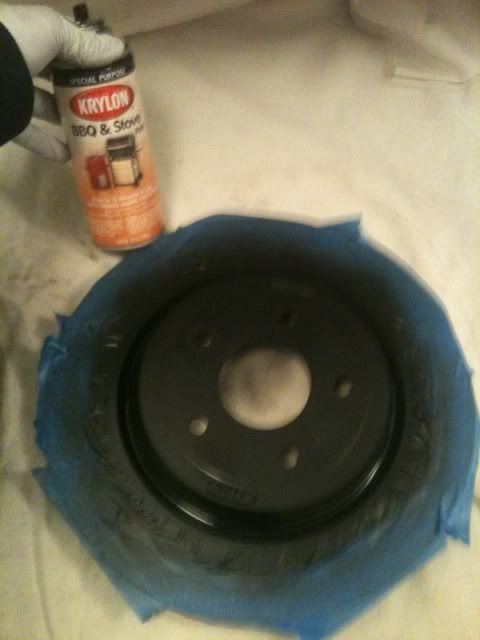
22. This finish dries relatively quickly, in about an hour I put them back on the car and secured with a single hand tightened lug nut.
Install:
23. Re-grease the backside of the pads before inserting into calipers
24. Insert pads with the tab facing up towards top of caliper
(This is an opportune time to switch to ceramic type pads if dusting of the aggressive factory pads is a concern. I use hawk ceramic pads with great results for street and occassional drag race track time. Open track or auto-cross will require applicable track pads as cermaics will quickly fade since not made for that type of extreme conditions.)
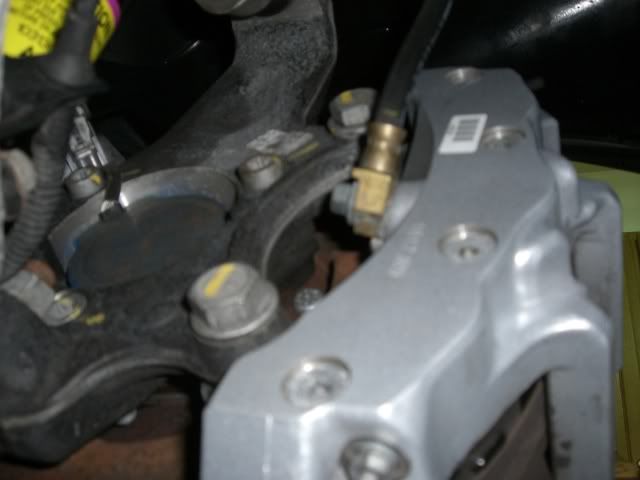
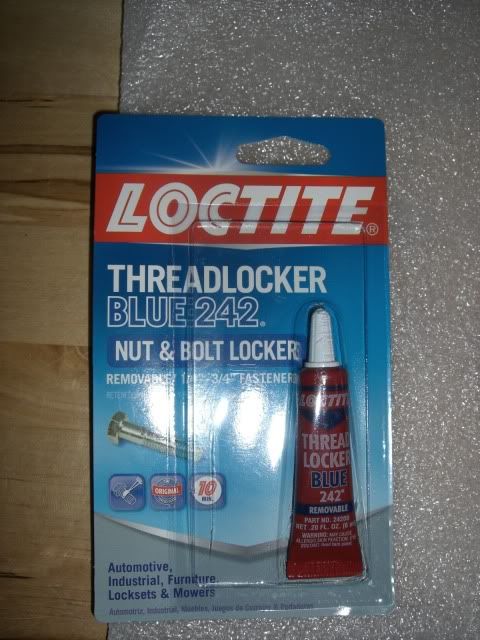
25. Mount calipers on to the car. Make sure crossover line on the caliper is at the bottom of the car and the bleeders are located on the top so not to mix up the right side from the left. I will be re-using the stock bolts with some blue loctite on them and proper torque of 129 ft-lbs.
26. Next I mounted the banjo bolt with 2 new crush washers, one on each side, GM p/n 21012386. Torque per manual is 30 ft-lbs, it is the spec in the book, you will damage the threads at that torque!!! (steel bolt in aluminum caliper) I suggest a light snug with wrench or rachet and check for leaks when bleeding the brakes. If still leaking tighten a little bit each time until leaks are gone, this is how professionals do it. Bottom line 30 ft lbs will wreck the caliper threads.
Note your brake line orientation from your removal notes. The rear lines were mounted perpendicular to the calipers and the front lines were fastened on a slight angle back to the stock locations. The caliper has a raised lip by the brake line port and the shape of the brake line fitting will hold the line in the correct orientation while you run the bolt tight.
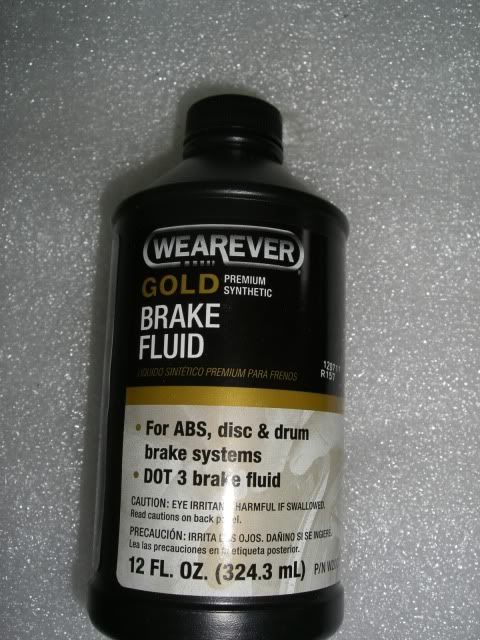
27. Next I bled the brakes with the simple one person in the car working the brake pedal and one person working the bleeder screw into a container until all air was removed from the system. Per the service manual sequence RR, LF, then LR, RF. I used Wearever synthetic DOT 3 as it was what was on sale and I do not track the car so it will be more than sufficient. The clear tubing I picked up from Lowes has an inner diameter or 1/4" per recommendation from other board members. I went around the car twice since brake fluid is cheap and I had the time to ensure air was out. This made a complete mess by the time I was done. Once done I went to each caliper with a bucket of dawn and hot water and thoroughly washed down each caliper followed by a thorough rinse and towel dry.

28. Attach wheels and torque to factory specification
29. Lower car to the ground
30. Admire your new caliper color with the benefits of OEM powder coat durability and appearance.


This process should get you through the job with basic shop hand tools.
This is at your own risk, please use jack stands, common sense, and be careful. I believe these process notes can get anyone through start to finish. Once you have the car in the air it's pretty straight forward, not too much more involved than any other maintenance a home mechanic will perform. I really disliked the dull silver color of the brakes on my Grand Sport and being it's the middle of winter I have nothing but time on my hands when I am not traveling.
If you see anything I missed or neglected please send me an email or p/m to correct this thread to keep it useful for future use.
(hyperlink to my photo album for this task)
Tools I used:
4 jack stands
2 floor jacks
1/2" breaker bar
1/2" ratchet
21mm 1/2" drive socket
misc 1/2" extensions
1/2" drive torque wrench ft lbs
3/8" drive torque wrench ft lbs
11mm box end wrench
3/8" ratchet
3/8" 11mm socket
Summary of part numbers and misc info:
Crush gasket for brake lines: GM part number 21012386
The banjo bolt GM part number is 11569590 (old p/n 11570052)
(repair manual install torque is 30 ft-lbs - this is too much, hand tight snug is all that is needed!)
Caliper bolts (2 that hold the caliper to the knuckle) M14 x 2 x 47 GM part number 14084051
(repair manual install torque is 129 ft-lbs)
Rubber bleeder dust caps: GM part number 14089150
Hose to bleed the brakes needs to have an inside diameter of 1/4"
Directions:
1. First step is to get the car in the air and secure it on jack stands. (So far the most painful step, I hate jacking this car, I’d think GM could have put some jack pads in the cradle castings, end rant)
2. Remove wheels once car is secured on jack stands in the air. The jack stands under the front frame rails in the photo are not touching; I have extra stands and put them there since I had them just in case the worst happens since I work while no one is home the majority of the time.
3. It might not hurt to take pictures of the caliper orientation as well as how the brake lines route off the caliper backsides based on your memory retention (mine is terrible) or mechanical capability (this makes up for poor memory).
Rear caliper line is perpendicular to caliper:
Front caliper line is on a slight angle:
4. I went to each location and broke the torx head (T45) pad guide pins loose because I didn’t want them coated the base coat color. I want my calipers to look OEM like the red Z06 or GS 2012 option and the pins are not coated any color nor are the brake crossover tubes.
5. I went ahead and broke the 2 caliper bolts (21mm) loose at each corner behind the calipers, do not remove them at this time and just get them loose. It took a pretty long 1/2" breaker bar but they eventually gave it up, I won.
6. Next I put a rubber glove over the master cylinder fill opening and put the cap back on to help hold the fluid in the system once I start undoing brake lines. (good tip Mike)
7. Go to any corner to start and grab your rubber stoppers suggested OR an M10 bolt and nut to put through the end of the brake line with the old used crush washers. (Rubber stopper/plug measurements are 9/16" x 3/8" x 1" - Lowes part number 881321)
8. I removed the brake line bolt (11mm box end wrench) and kept a drain pan under the fitting to catch fluid that would come out of the caliper and end of the brake line. Once removed I then inserted a rubber plug into the fitting to stop any further fluid loss from the system while unhooked. (Thanks Snakeman, great idea, plug seems to work perfect)
9. With the brake line out of the way I continued to remove the 2 large caliper mount bolts completely. These bolts will probably need a socket or wrench until they are all the way out since they have loctite from the factory and they do not screw out easily. Be careful to keep a hand on the caliper while removing the last bolt so the caliper doesn’t fall to the ground which could mar it.
10. With the caliper off I held the open port on the caliper where the line screwed in over the drain pan getting as much fluid as I could out of the caliper. Note: a leaking box will more than likely get quarantined by whichever shipper you chose, get as much brake fluid as you can out. I then took a vacuum plug and inserted it into the open port. (Just thought of it now naturally, but I would have put the calipers in zip-locks if I thought of it before packing them up, easy solution)
11. If you are not removing the rotors to paint the hats and the factory retention clips have been removed, I would hand thread one lug nut on any of the 5 studs to keep the rotor from falling off while the calipers are out for powder coating. The calipers and lug nuts are what hold the rotors on this type of design.
12. Once I had the caliper off I set it on a piece of cardboard and removed the brake pads, pad clips, bleeder rubber caps.
13. I thoroughly wiped my hand prints off the caliper and set it aside on my workbench and moved on to the next corner.
14. I repeated this process 3 more times until complete.
15. Box them up and make sure you use some sort of packing in the box to protect them from banging around in the box on the way to the powder coater.
16. I am using Mike Golding for mine and once I secured a tracking number I forwarded it to him via email. He is one patient guy, he helped me clarify what and how I wanted these coated along with some recommendations he has picked up over the years. I chose to have them done in a stock Z06 red finish scheme. Here are the after photo's:
17. While I had easy access to the rotors I one by one began to scuff (with a red 3M pad) the rotor hats. This is the area the pads don’t ride on and the studs pass through and are a silver color. Mine were showing all sorts of pad dust stains from the original pads before I went to ceramics and some moderate rust.
18. I scuffed them until they were clean and then wiped them down with a clean rag.
19. I masked off any area I didn’t want painted with blue 3M painters tape.
20. I chose to use some Krylon high heat BBQ paint I had left over from my last car that I actually did the same process on.
21. In very light multiple coats I painted the hats. I put this on as light as possible to prevent any drips.
22. This finish dries relatively quickly, in about an hour I put them back on the car and secured with a single hand tightened lug nut.
Install:
23. Re-grease the backside of the pads before inserting into calipers
24. Insert pads with the tab facing up towards top of caliper
(This is an opportune time to switch to ceramic type pads if dusting of the aggressive factory pads is a concern. I use hawk ceramic pads with great results for street and occassional drag race track time. Open track or auto-cross will require applicable track pads as cermaics will quickly fade since not made for that type of extreme conditions.)
25. Mount calipers on to the car. Make sure crossover line on the caliper is at the bottom of the car and the bleeders are located on the top so not to mix up the right side from the left. I will be re-using the stock bolts with some blue loctite on them and proper torque of 129 ft-lbs.
26. Next I mounted the banjo bolt with 2 new crush washers, one on each side, GM p/n 21012386. Torque per manual is 30 ft-lbs, it is the spec in the book, you will damage the threads at that torque!!! (steel bolt in aluminum caliper) I suggest a light snug with wrench or rachet and check for leaks when bleeding the brakes. If still leaking tighten a little bit each time until leaks are gone, this is how professionals do it. Bottom line 30 ft lbs will wreck the caliper threads.
Note your brake line orientation from your removal notes. The rear lines were mounted perpendicular to the calipers and the front lines were fastened on a slight angle back to the stock locations. The caliper has a raised lip by the brake line port and the shape of the brake line fitting will hold the line in the correct orientation while you run the bolt tight.
27. Next I bled the brakes with the simple one person in the car working the brake pedal and one person working the bleeder screw into a container until all air was removed from the system. Per the service manual sequence RR, LF, then LR, RF. I used Wearever synthetic DOT 3 as it was what was on sale and I do not track the car so it will be more than sufficient. The clear tubing I picked up from Lowes has an inner diameter or 1/4" per recommendation from other board members. I went around the car twice since brake fluid is cheap and I had the time to ensure air was out. This made a complete mess by the time I was done. Once done I went to each caliper with a bucket of dawn and hot water and thoroughly washed down each caliper followed by a thorough rinse and towel dry.
28. Attach wheels and torque to factory specification
29. Lower car to the ground
30. Admire your new caliper color with the benefits of OEM powder coat durability and appearance.
Last edited by Red89gt; 03-17-2014 at 10:05 AM.

 02-07-2012, 05:27 PM
#3
Burning Brakes
Thread Starter
Crush gasket for brake lines: GM part number 21012386 - even at list price all 8 are only $5 from the dealer.
Other members have broke the banjo bolt so I will just post it up on here for info only.
The banjo bolt GM part number is 11569590 (old p/n 11570052)
(repair manual install torque is 30 ft-lbs - this is too much, hand tight snug is all that is needed!)
Caliper bolts (2 that hold the caliper to the knuckle) M14 x 2 x 47 GM part number 14084051
(repair manual install torque is 129 ft-lbs)
Rubber bleeder dust caps: GM part number 14089150
$5 each GM retail, thanks Chevy for that $0.12 cost part, I have one missing. Anyone knows a good alternative I am all ears.
Hose to bleed the brakes needs to have an inside diameter of 1/4". I found 10' roll of clear vinyl at Lowes for about $3, not expensive at all.
Last edited by Red89gt; 06-29-2012 at 11:26 AM. Reason: updated banjo bolt p/n, GM replaced.


 02-08-2012, 02:13 PM
#8
Burning Brakes
Thread Starter
02-13-2012, 01:47 PM
#9
Burning Brakes
Thread Starter
The calipers were delivered today.
I will try to get these mounted tonight and finish the write up and photos.
They are definitely a bright performance red now and should add some bling to my silver car this summer.
I will try to get these mounted tonight and finish the write up and photos.
They are definitely a bright performance red now and should add some bling to my silver car this summer.
02-13-2012, 06:06 PM
#11
Advanced

Great posting! I'm sure many forum members will get help from the detail and pictures.
Couldn't agree more about Mike's outstanding customer service and quality. He did mine a couple of years ago and they still look as good as the day I took them out of the box.
Couldn't agree more about Mike's outstanding customer service and quality. He did mine a couple of years ago and they still look as good as the day I took them out of the box.

 now you need some ceramic pads, so they stay clean.
02-13-2012, 10:00 PM
now you need some ceramic pads, so they stay clean.
02-13-2012, 10:00 PM
#15
Burning Brakes
Thread Starter
I considered other colors but red seemed like the way to go and something I hopefully won't get tired of.
Yep, car has Hawk ceramics on it already, put them on a couple months after I bought the car. Stock pads worked great but weren't realistic for the driving I do and trying to keep the rims and car clean.
Too cold to get the girlfriend in the garage to bleed the brakes tonight. Maybe she will appreciate it more if we do it tomorrow for valentines day? She did say she wanted to do something special..... Working on the car is something different and special in my book
Still have to hook up the brake lines and see if I can get a torque wrench in there since after doing the caliper bolts my arm seems to be out of calibration. No way I cranked the caliper bolts down that tight last time I did the pad change. Hopefully after this I will never have to go in there again.
02-14-2012, 08:37 AM
#16
Drifting


I considered other colors but red seemed like the way to go and something I hopefully won't get tired of.
Yep, car has Hawk ceramics on it already, put them on a couple months after I bought the car. Stock pads worked great but weren't realistic for the driving I do and trying to keep the rims and car clean.
Too cold to get the girlfriend in the garage to bleed the brakes tonight. Maybe she will appreciate it more if we do it tomorrow for valentines day? She did say she wanted to do something special..... Working on the car is something different and special in my book
Still have to hook up the brake lines and see if I can get a torque wrench in there since after doing the caliper bolts my arm seems to be out of calibration. No way I cranked the caliper bolts down that tight last time I did the pad change. Hopefully after this I will never have to go in there again.
Yep, car has Hawk ceramics on it already, put them on a couple months after I bought the car. Stock pads worked great but weren't realistic for the driving I do and trying to keep the rims and car clean.
Too cold to get the girlfriend in the garage to bleed the brakes tonight. Maybe she will appreciate it more if we do it tomorrow for valentines day? She did say she wanted to do something special..... Working on the car is something different and special in my book
Still have to hook up the brake lines and see if I can get a torque wrench in there since after doing the caliper bolts my arm seems to be out of calibration. No way I cranked the caliper bolts down that tight last time I did the pad change. Hopefully after this I will never have to go in there again.
02-14-2012, 09:08 AM
#17
Le Mans Master

I considered other colors but red seemed like the way to go and something I hopefully won't get tired of.
Yep, car has Hawk ceramics on it already, put them on a couple months after I bought the car. Stock pads worked great but weren't realistic for the driving I do and trying to keep the rims and car clean.
Too cold to get the girlfriend in the garage to bleed the brakes tonight. Maybe she will appreciate it more if we do it tomorrow for valentines day? She did say she wanted to do something special..... Working on the car is something different and special in my book
Still have to hook up the brake lines and see if I can get a torque wrench in there since after doing the caliper bolts my arm seems to be out of calibration. No way I cranked the caliper bolts down that tight last time I did the pad change. Hopefully after this I will never have to go in there again.
Yep, car has Hawk ceramics on it already, put them on a couple months after I bought the car. Stock pads worked great but weren't realistic for the driving I do and trying to keep the rims and car clean.
Too cold to get the girlfriend in the garage to bleed the brakes tonight. Maybe she will appreciate it more if we do it tomorrow for valentines day? She did say she wanted to do something special..... Working on the car is something different and special in my book
Still have to hook up the brake lines and see if I can get a torque wrench in there since after doing the caliper bolts my arm seems to be out of calibration. No way I cranked the caliper bolts down that tight last time I did the pad change. Hopefully after this I will never have to go in there again.
02-14-2012, 09:45 AM
#18
Instructor
Member Since: Feb 2005
Location: Mechanicsville Virginia
Posts: 225
Received 0 Likes
on
0 Posts

Great write up! Did something similar on my '05. Yep, pain in the butt to torque the caliper bolts.... not a lot of room in there. Glad the option is being offered on the 2012 GS (red calipers). I guess GM finally got the message. Can't wait until my car comes in!!
02-14-2012, 10:35 AM
#19
Burning Brakes
Thread Starter
RobLo - the pads worked out great. Dust was cut down considerably, money and time well spent. I haven't had any brake noise since I put them on about 3,000 miles ago. I did scuff the rotors and followed hawks bed in process.
Speed raider - what's up with the brake likes? Something I should be forewarned about? If not tonight I will hopefully get this buttoned up Wednesday. Probably bleed them and leave in air with wheels off until the weekend to check for leaks before mounting wheels and putting it back into hibernation.
Speed raider - what's up with the brake likes? Something I should be forewarned about? If not tonight I will hopefully get this buttoned up Wednesday. Probably bleed them and leave in air with wheels off until the weekend to check for leaks before mounting wheels and putting it back into hibernation.
02-14-2012, 10:39 AM
#20
Burning Brakes
Thread Starter
Stock red calipers would have been too easy. Kind of frustrating they made it an option a year later. They are making bank on this option I am guessing since I haven't met too many owners that were happy with the dull grey. No turning back for me, calipers are fire engine red now. They really turned out nice but would have been happier with oem red and zero screwing around.