
2012 Seat Conversion DIY thread with LOTS of PICS!
 02-19-2012, 02:41 AM
#1
Tech Contributor

Thread Starter

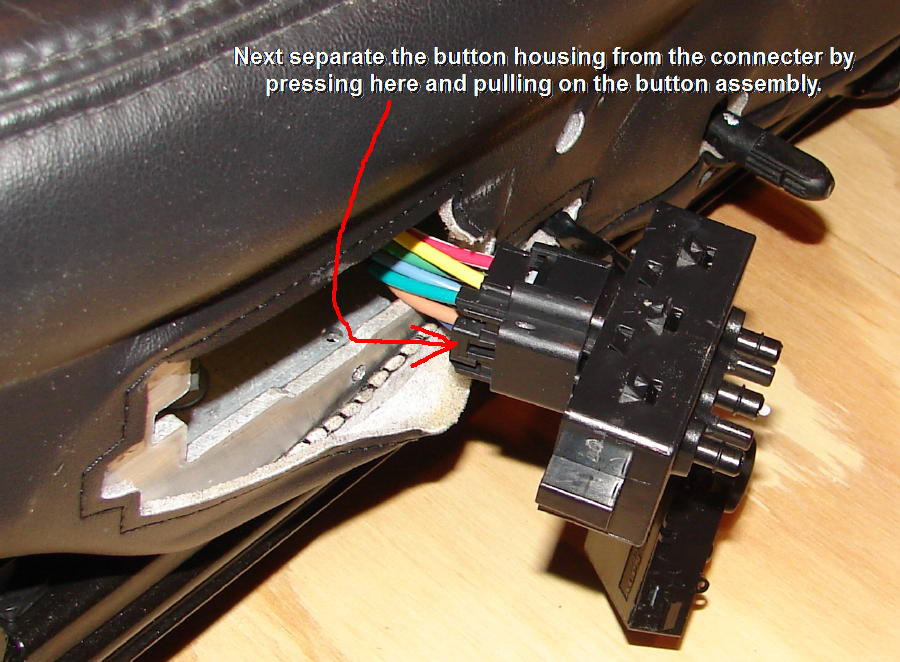
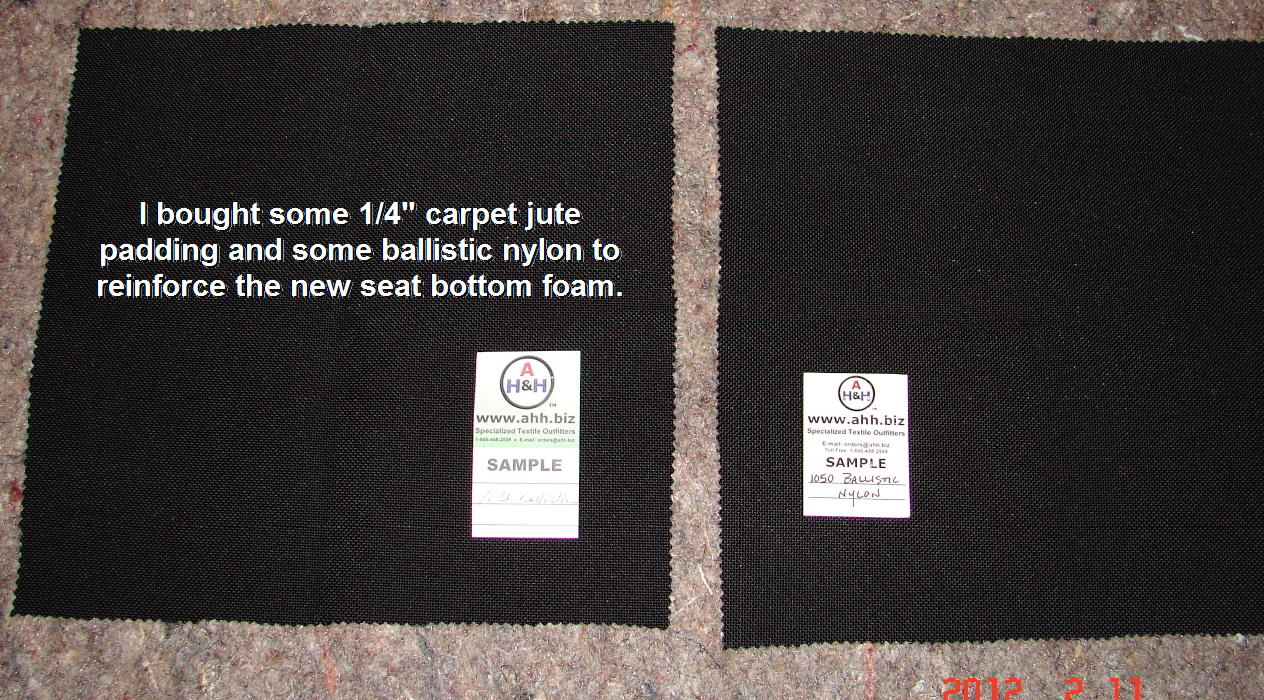
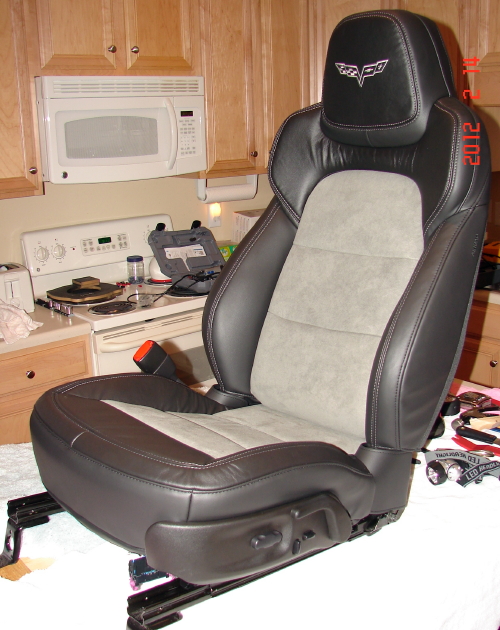
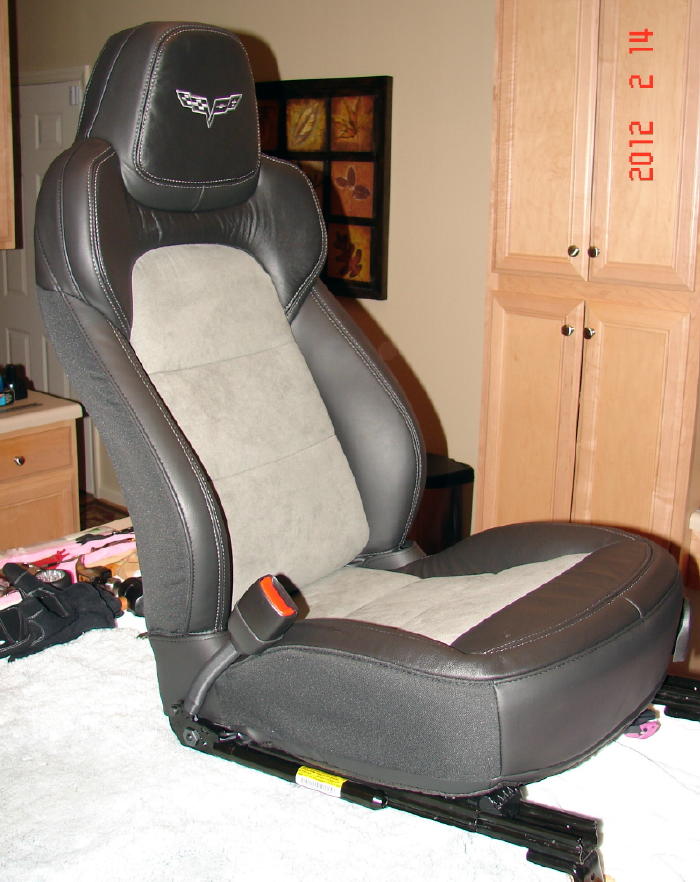
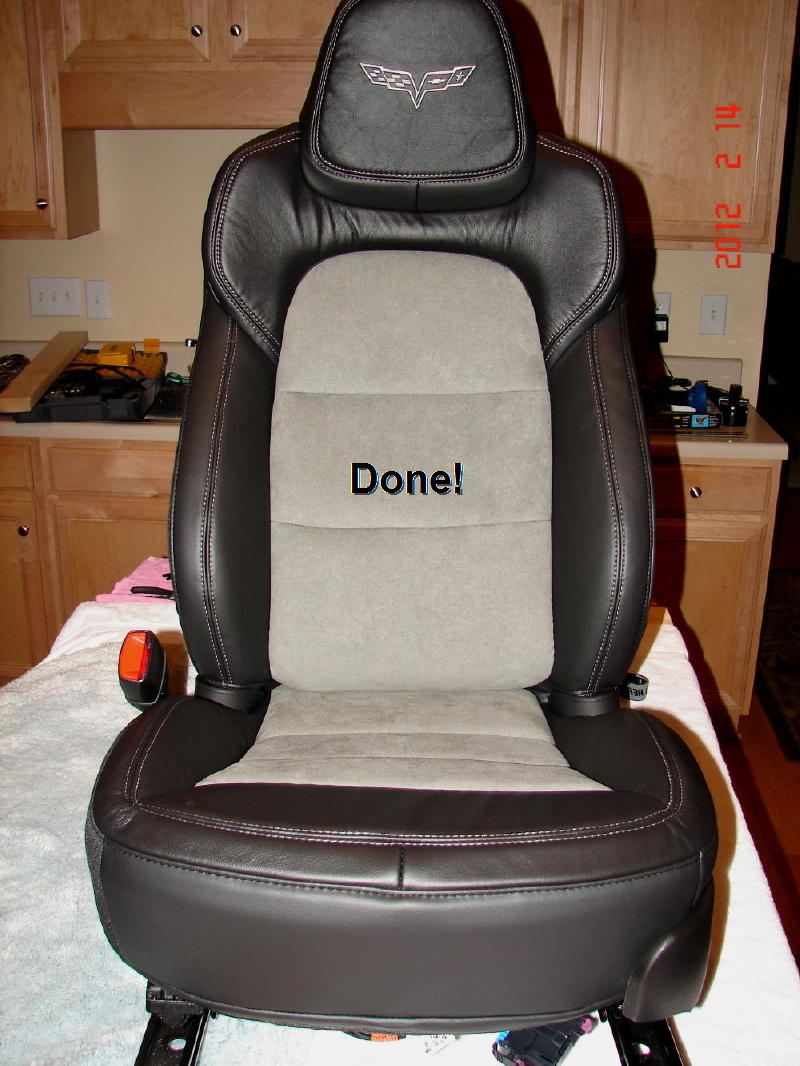
Well I finally got around to doing my 2012 4LT seat conversion from my 2010 seats. Here are some pics along with some very helpful tips, some of which were my idea and some borrowed from some other forum members who have done this before me.
Special thanks to 'isnider' and 'XZR1' for their help and ideas that they provided.
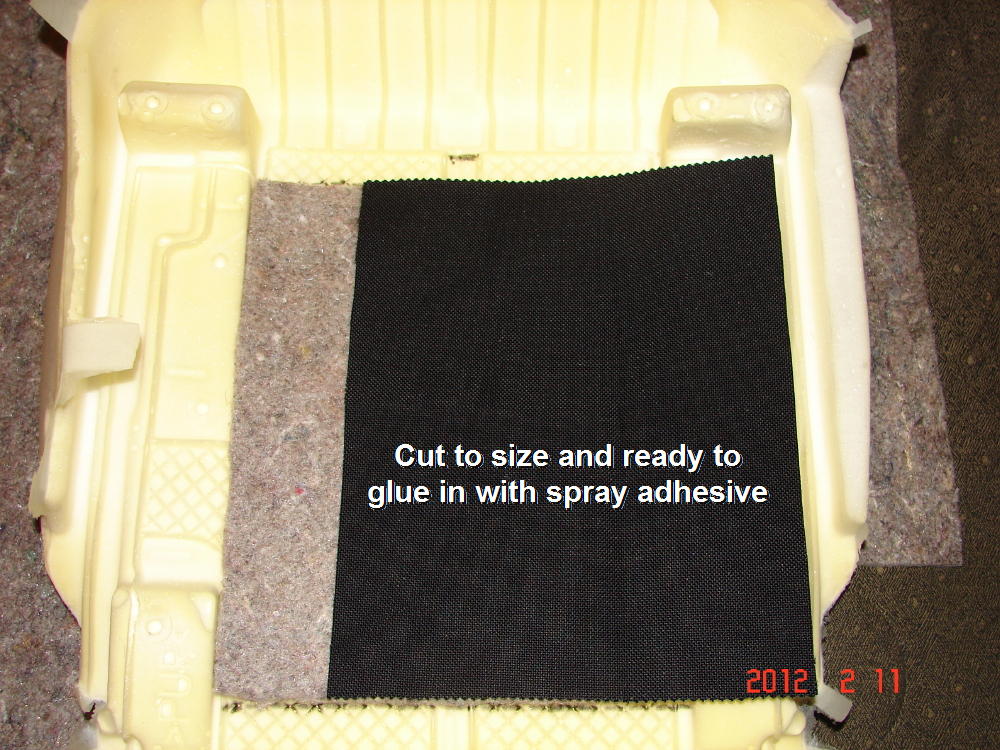
The first step, before removing the seats from the car would be to let the air out of the lumbar supports. I forgot this step and I was able to do the conversion anyway but this is a good idea.
Next, get the seats out of the car. Plenty of threads on here about how to do that.
The rest of the steps are explained with photos and notes. If you are doing this and have any questions, feel free to call me on my cell phone at 336-210-7607 (during reasonable hours - EST).
**************************************** *******
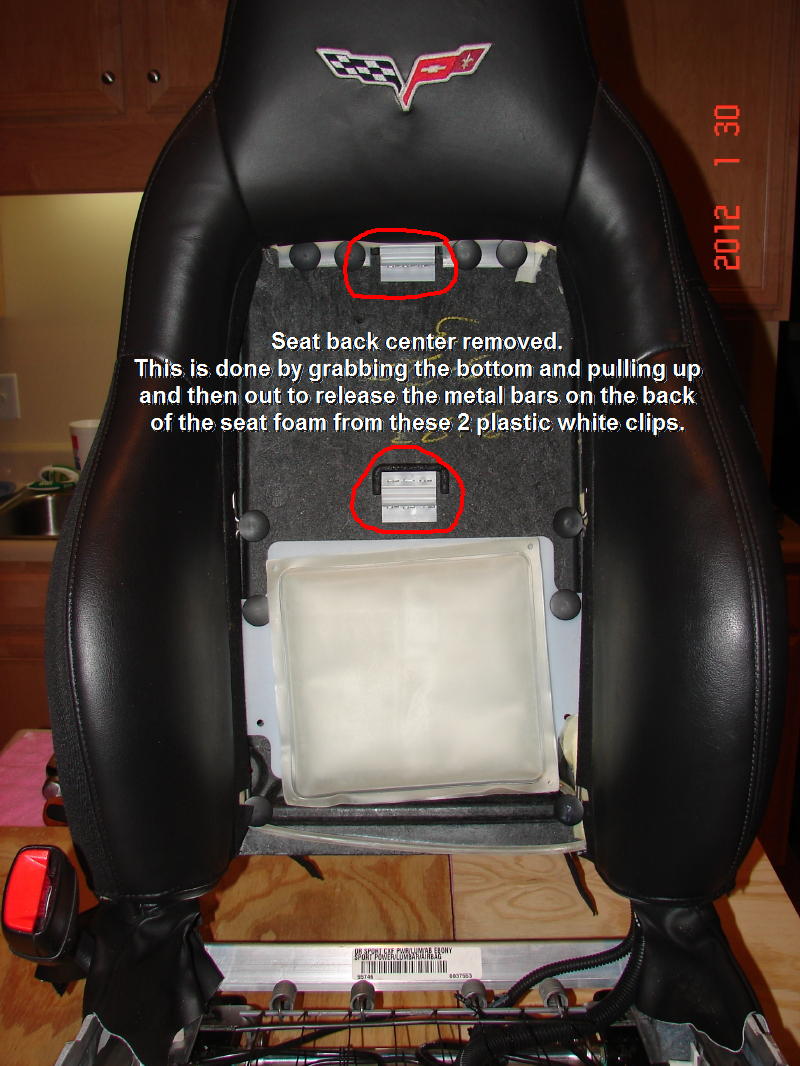
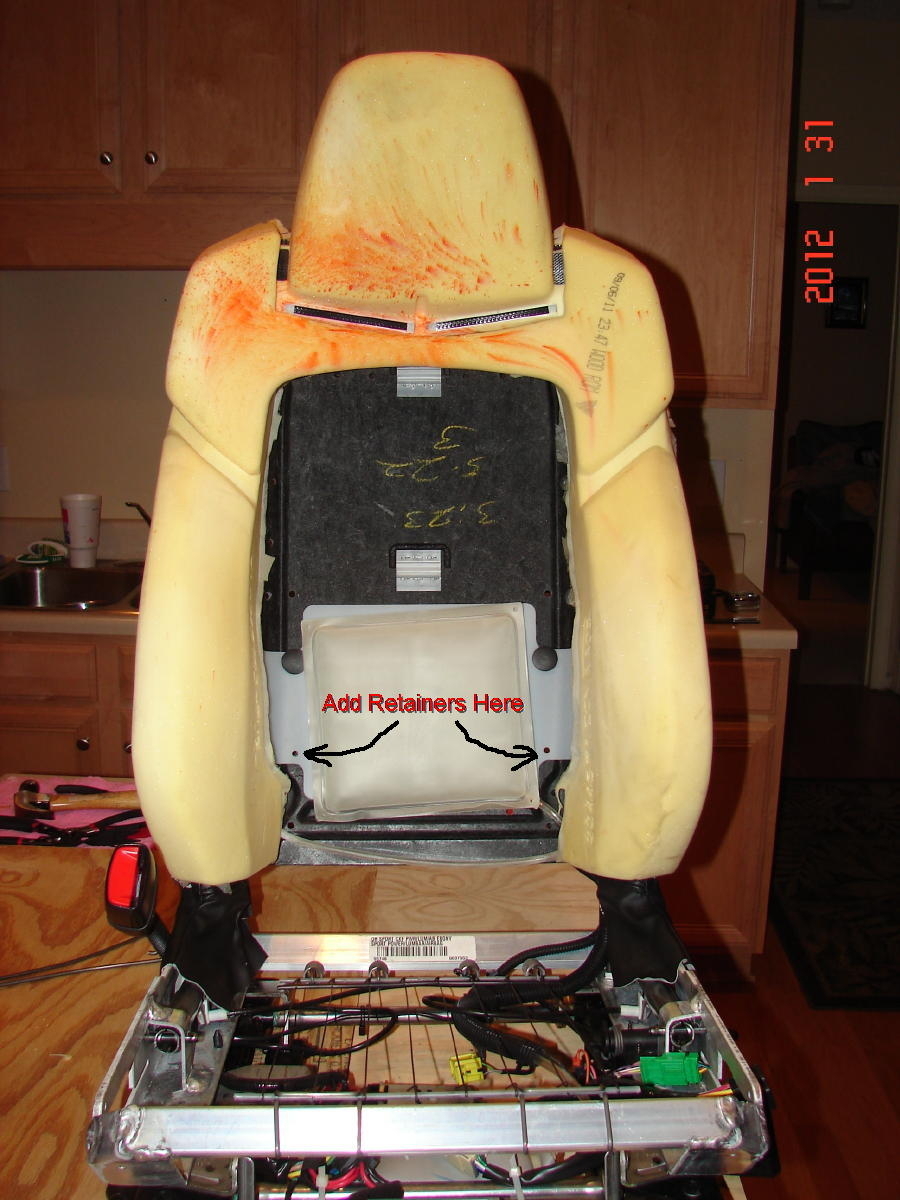
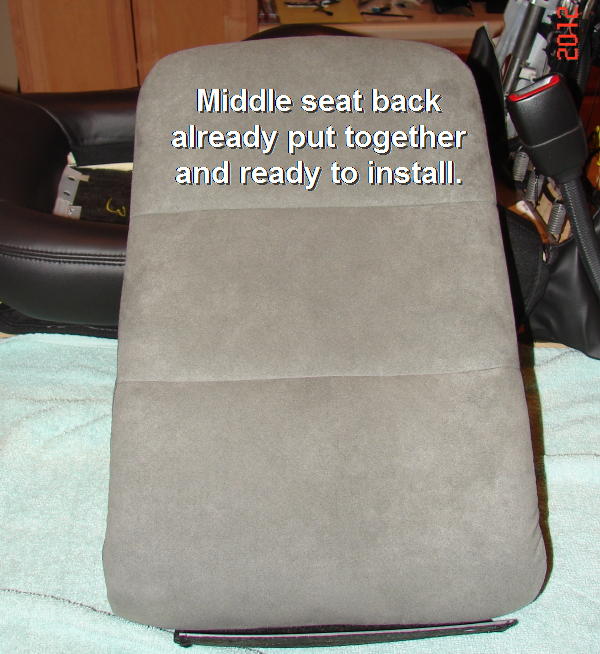
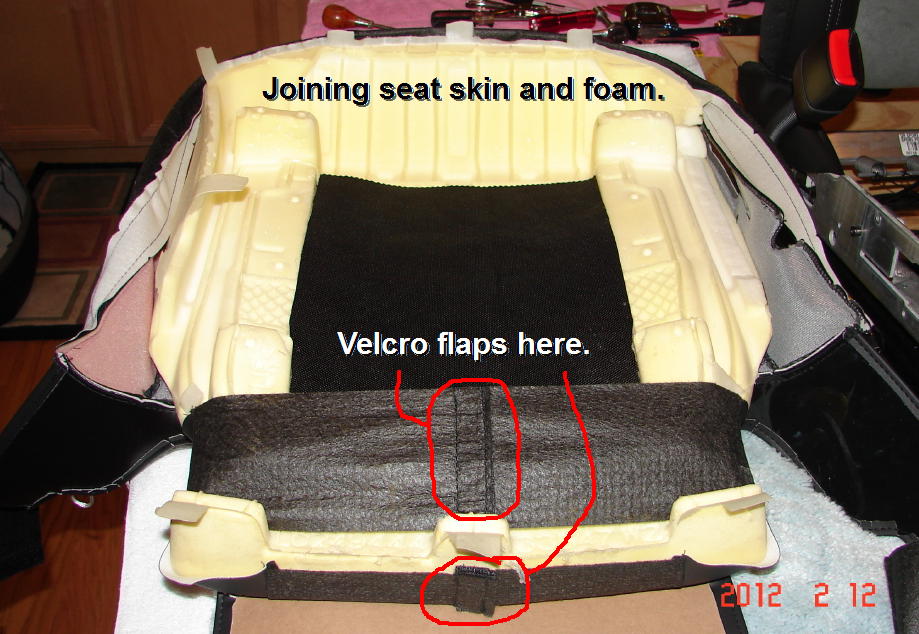
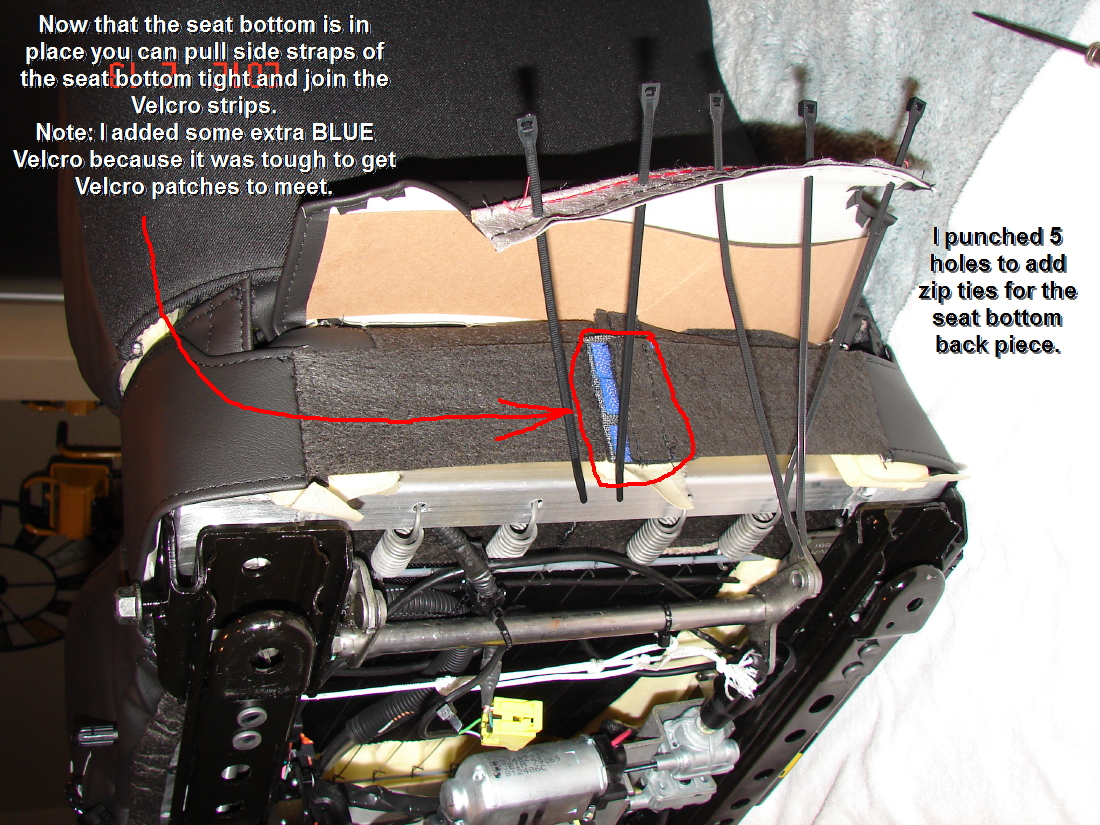
NOTE: There is one VERY important tip that I learned from ISNIDER. When it is time to install the CENTER seat back cushion you need to use a putty knife to assist in this process. It makes it SO MUCH EASIER to do. As a matter of fact, I'm not sure I could have done it without this tip.
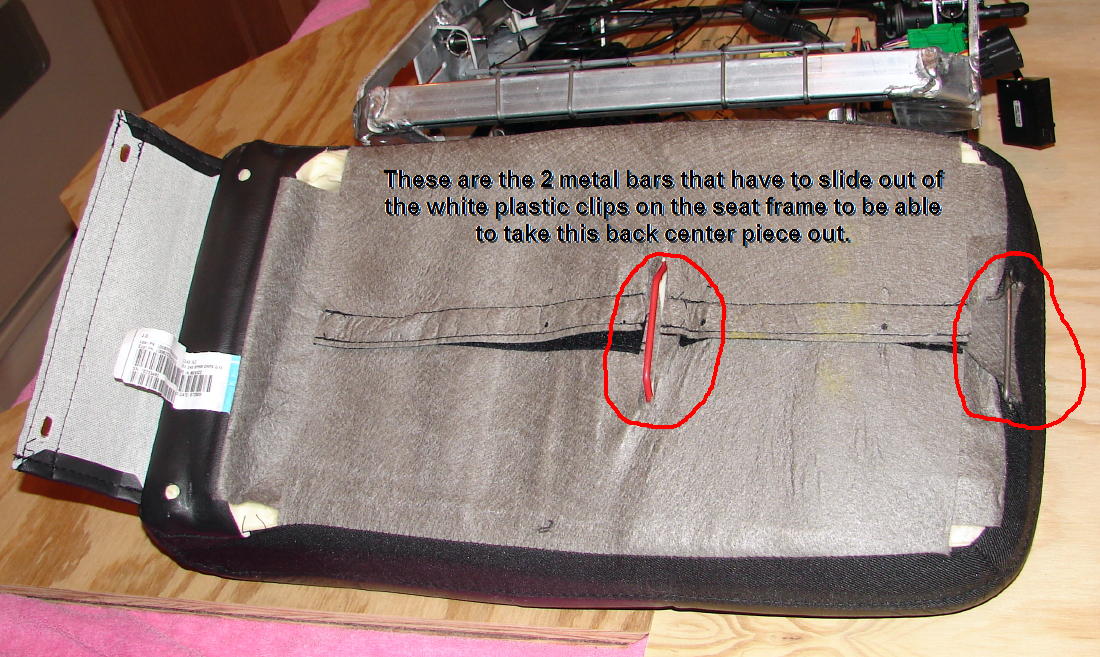
*** You need to slide the putty knife into the top opening where the metal bar is going to slide into the top white plastic clip on the seat frame. (there is also a white plastic clip for the middle of the seat back)
You use the putty knife to slide the metal bar down and into the plastic clip. It will snap right into place. Then you can reach up under the center of the seat back and use your hand to push up on the center metal bar so that you can slip it into the middle white plastic clip on the seat frame. See the pics, I'll make a note before the pic that shows what I am explaining here.
**************************************** *******
TOOLS
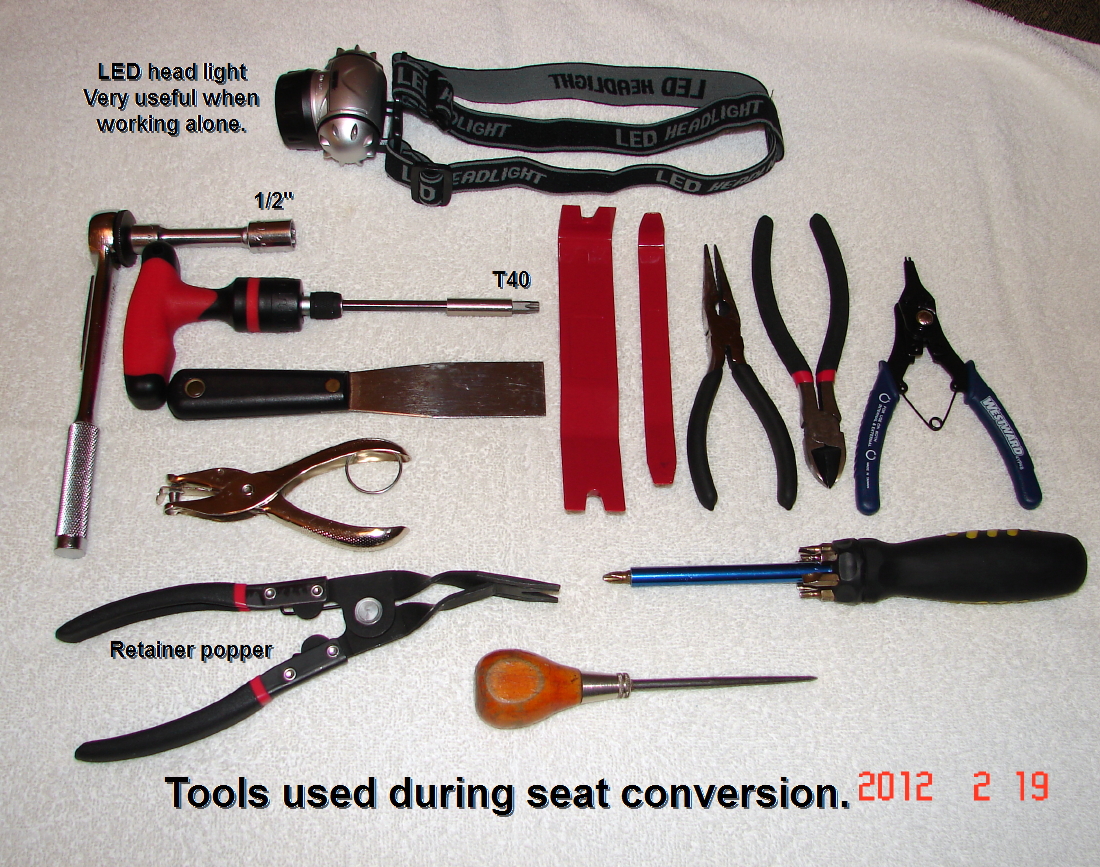
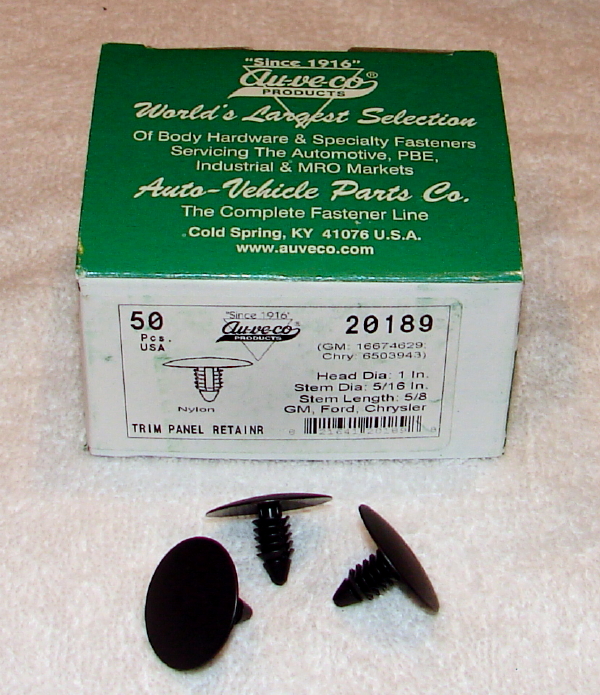
Also, you can find these 1" retainers online for about $10 delivered for 50 of them. Cheap insurance if you end up having to redo something or need extras.
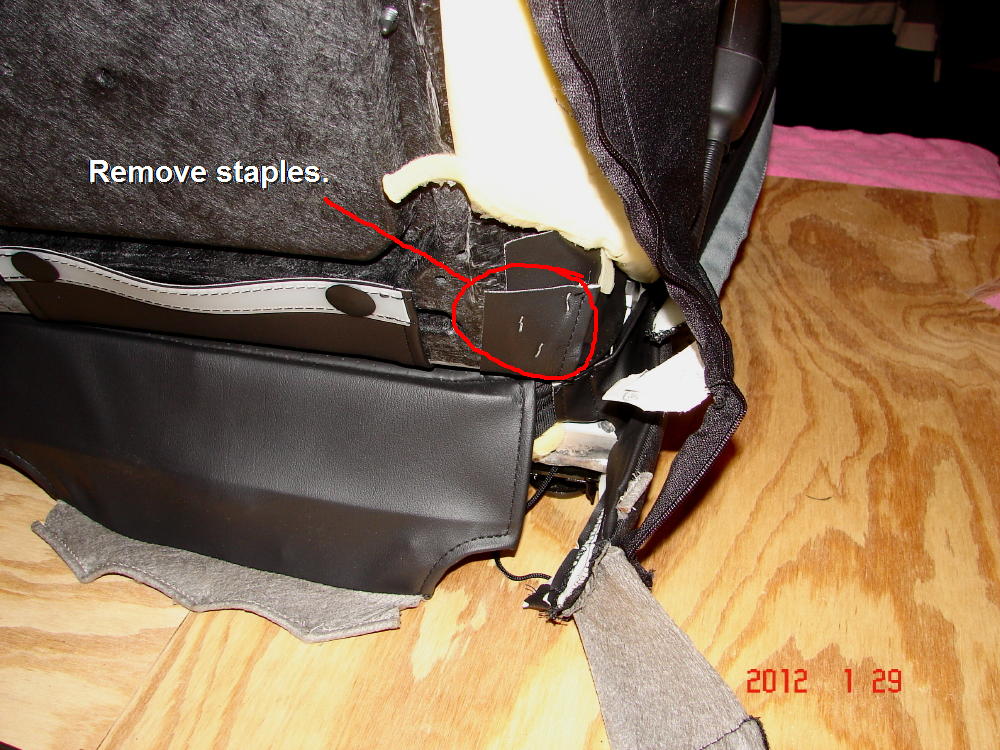
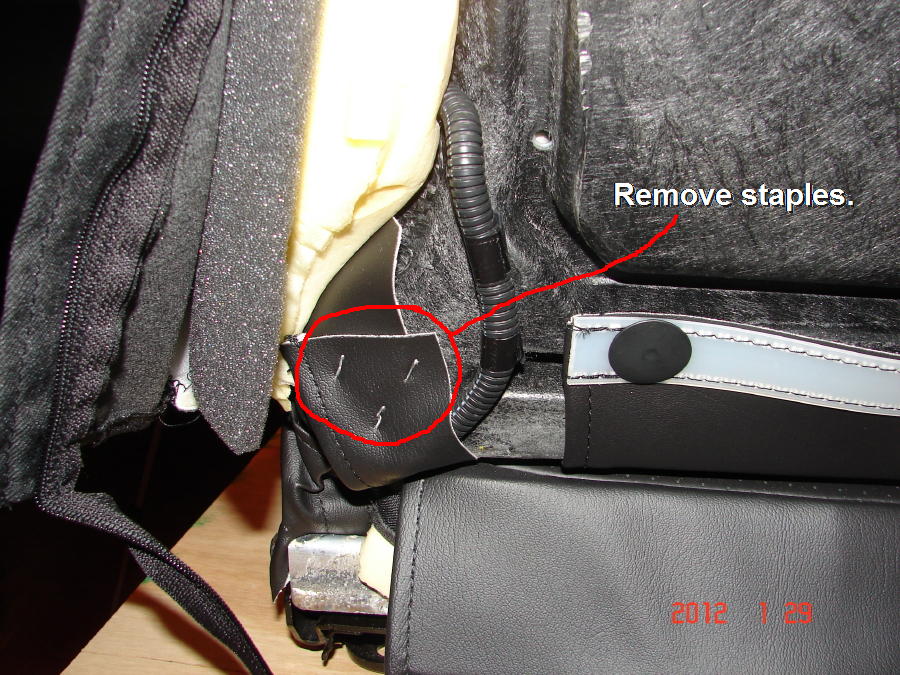
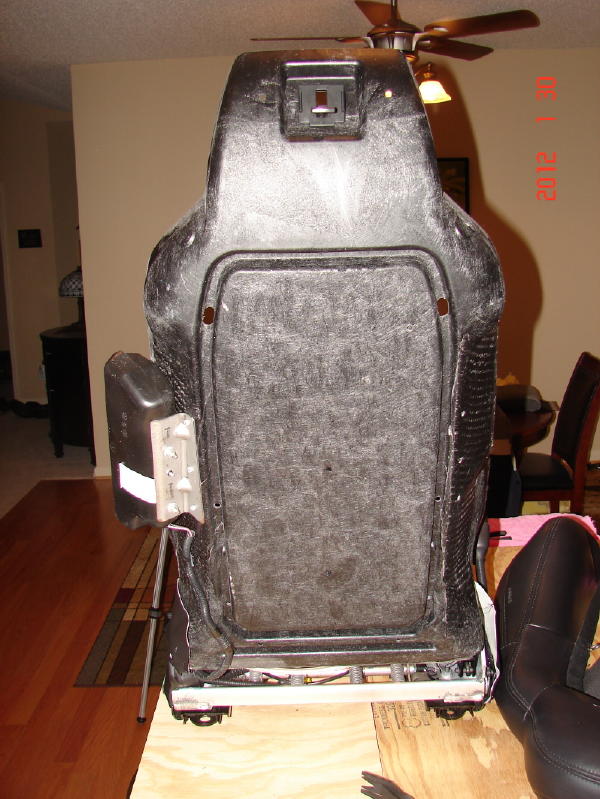
TAKING OUT OLD SEATS
**************************************** ************
INSTALLING NEW SEATS
NOTE: Here is another very good idea.
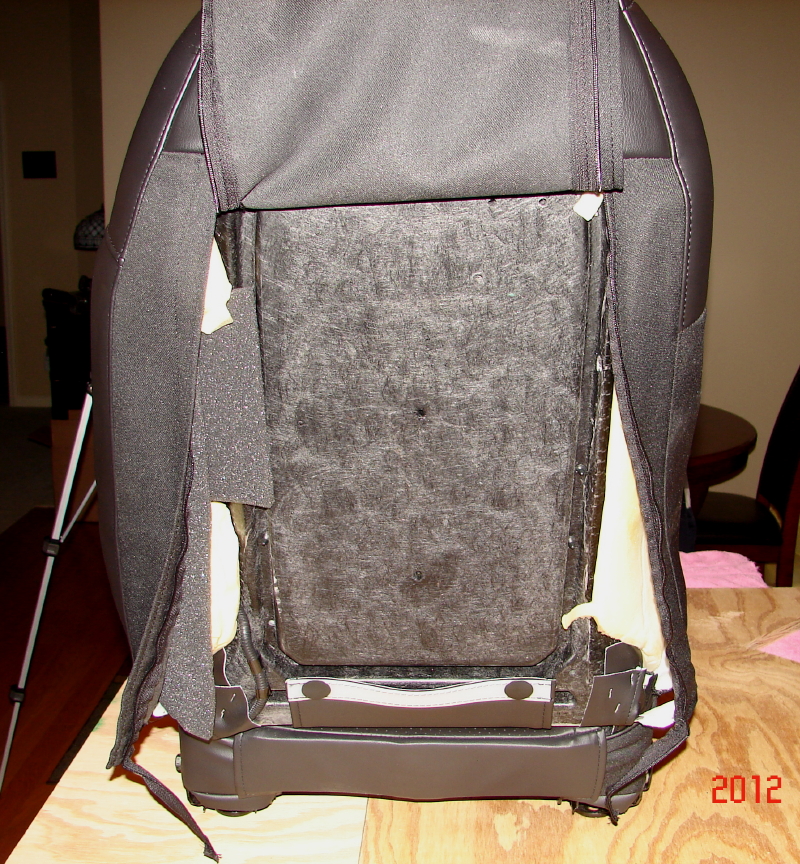
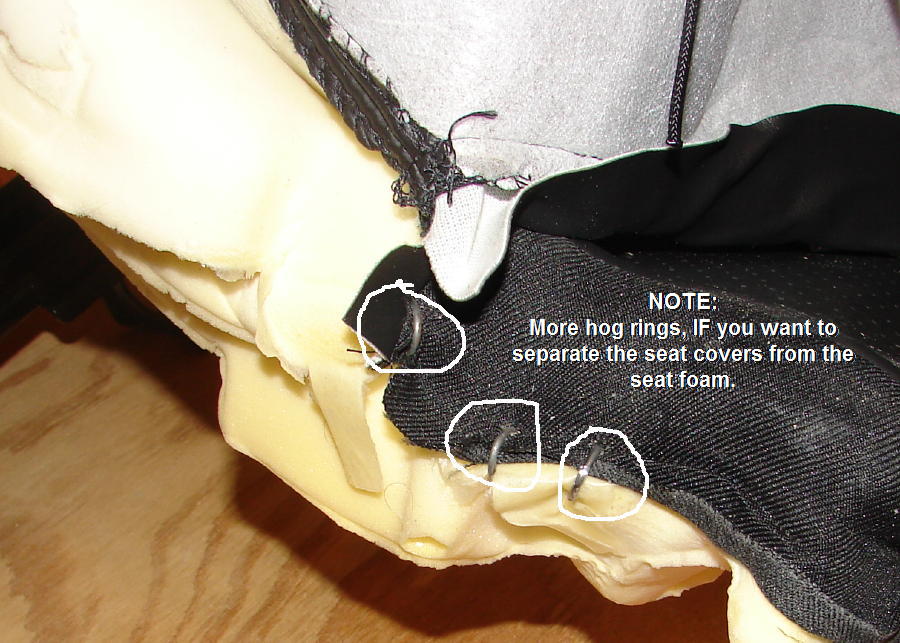
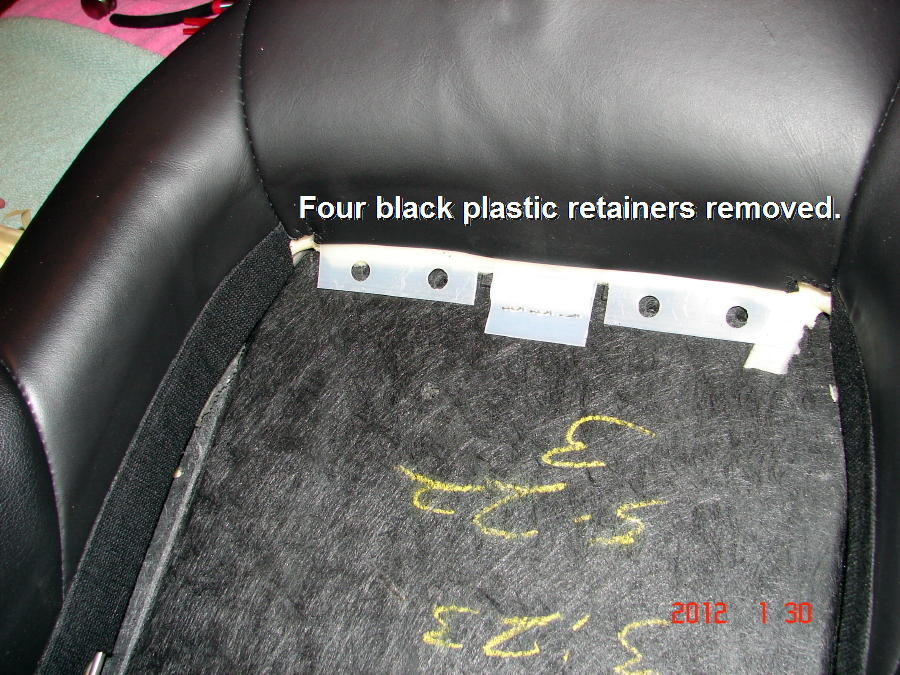
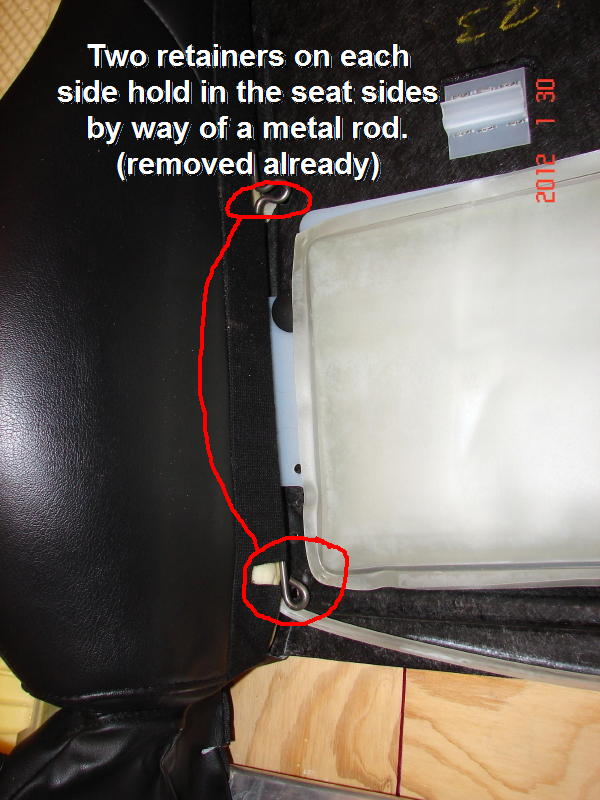
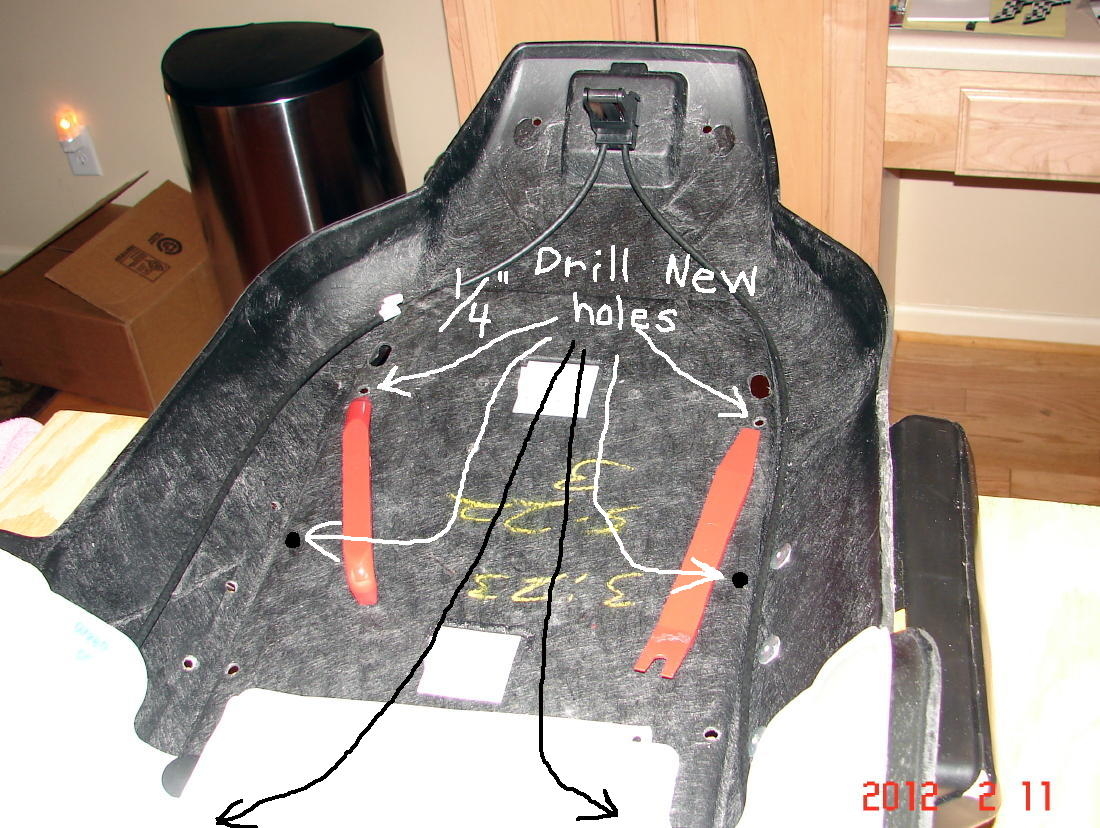
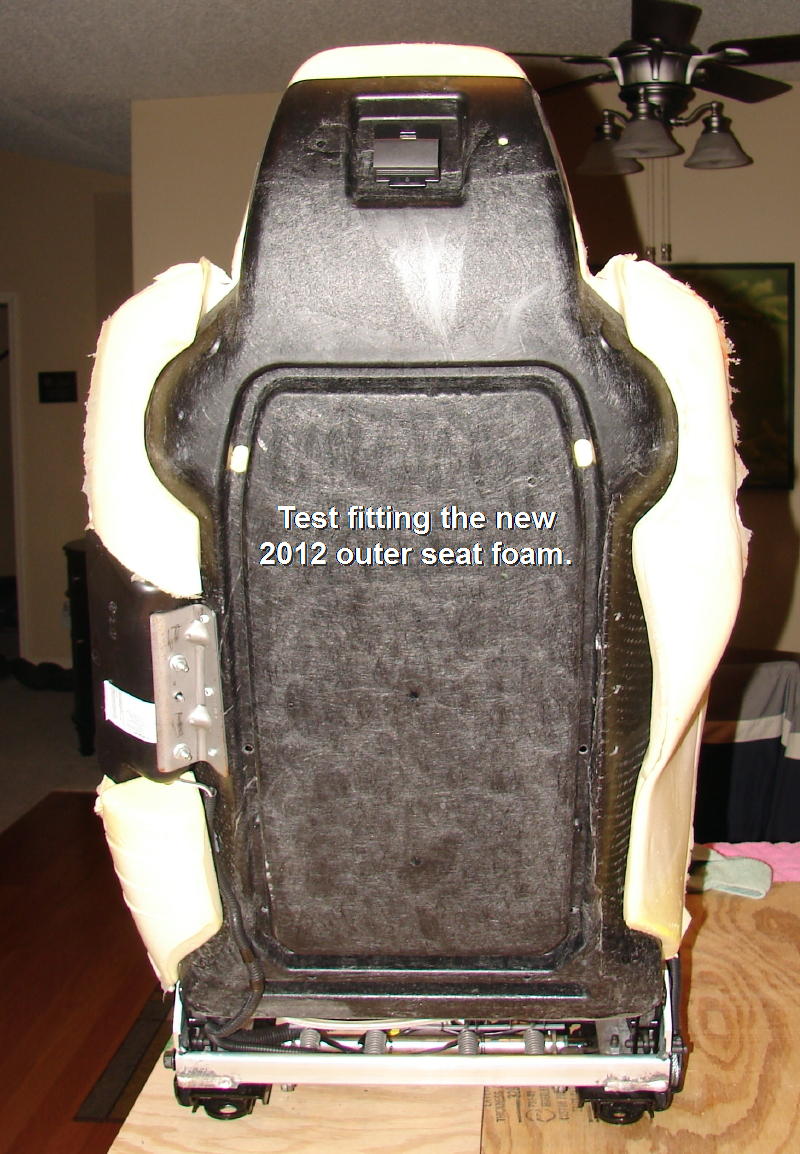
The new 2012 seat back outer skins/foam is held in place by black plastic runners that have 3 holes (per side) for retainers, instead of the wire rods that were threaded into the older seats.
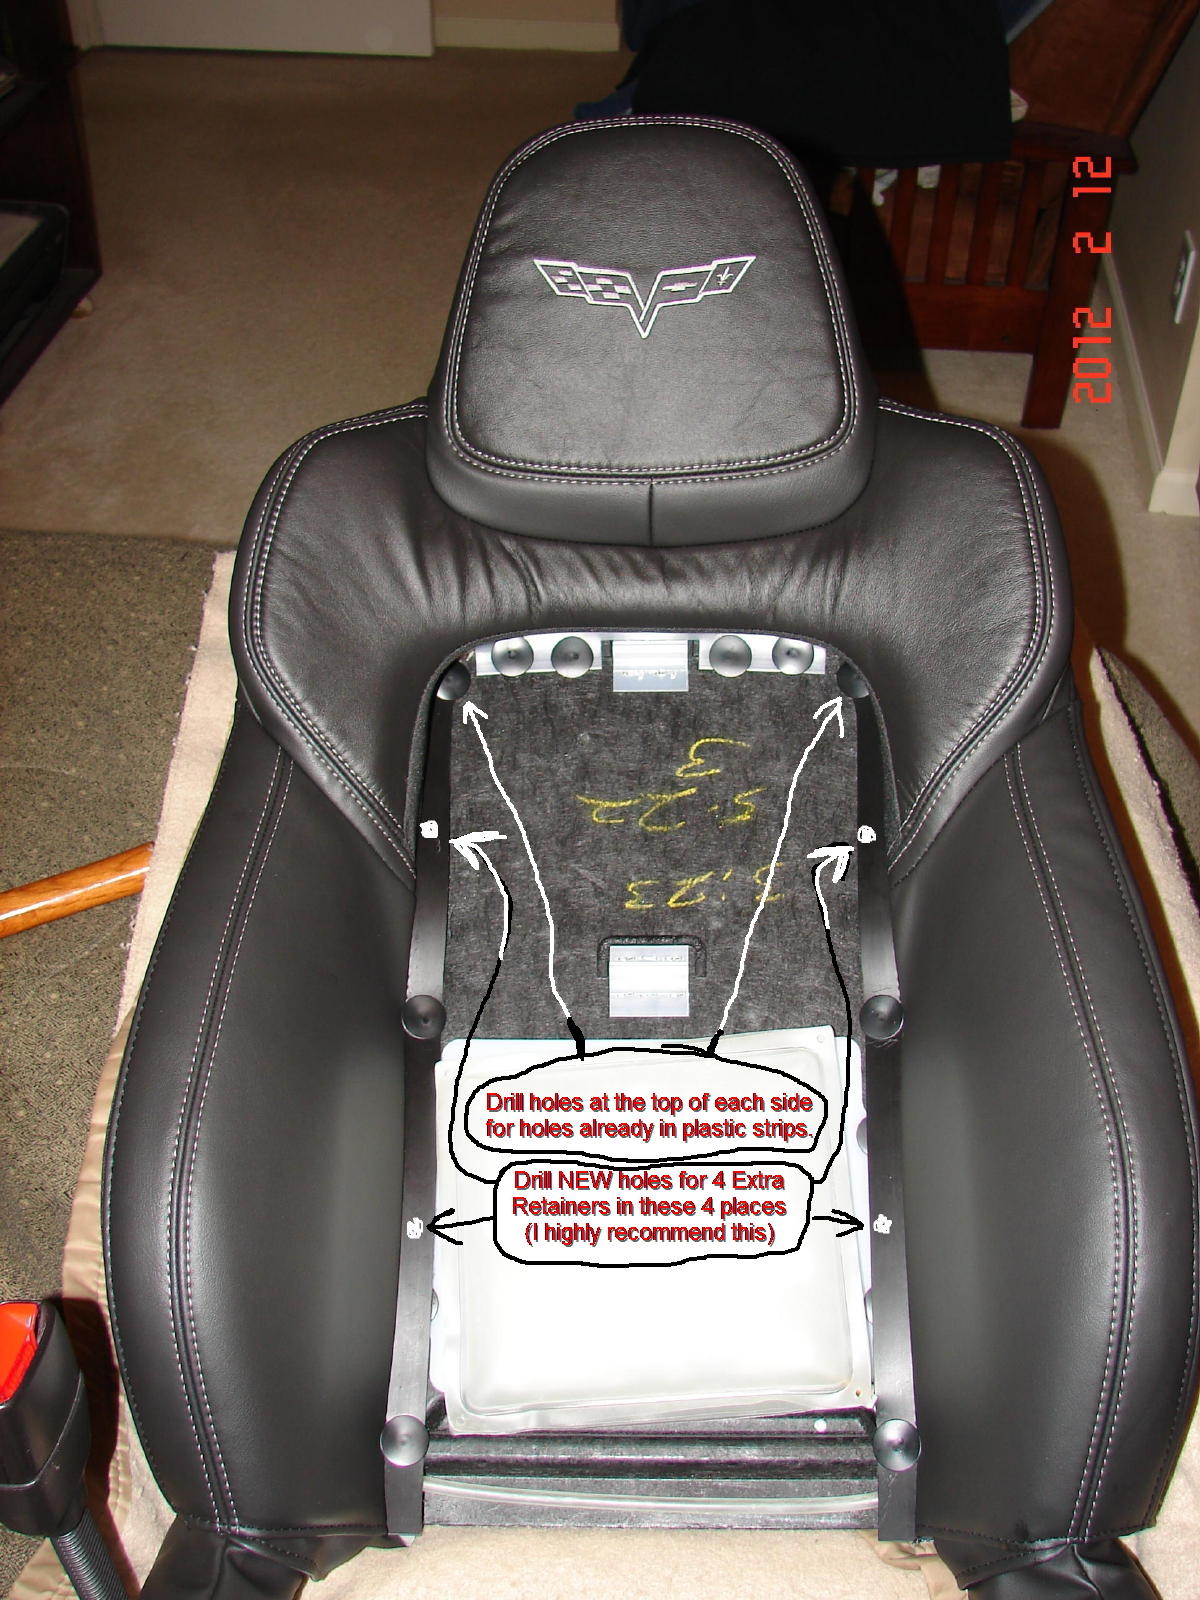
I highly recommend that you add 2 more holes on each side (evenly spaced). It will help hold the side bolsters much more securely because there will be a lot of pressure to pop out those retainers.
Also, there is no hole in the seat back for the highest holes on those runners anyway, so you will be drilling at least two holes so why not do 4 more holes, for a total of 6 holes (3 per side) that you would need to drill in the seat back for retainers to hold the black plastic runners.
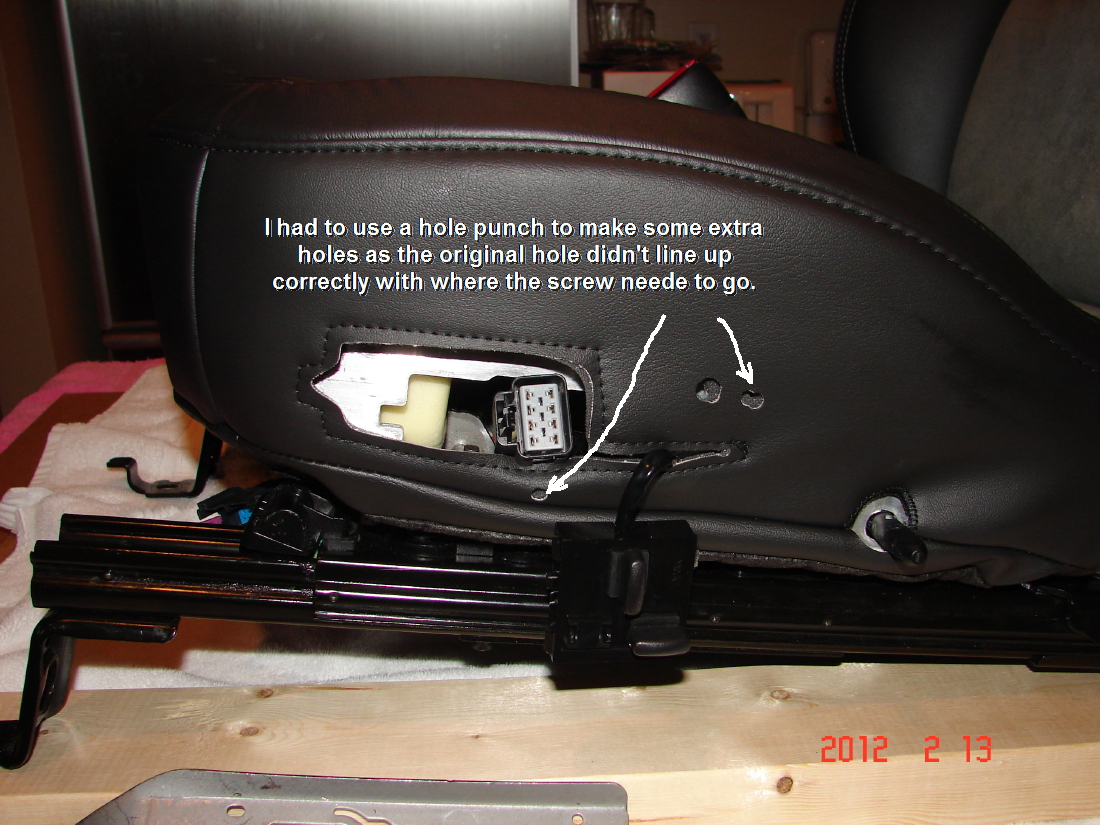
Before you do anything pertaining to installing the new seats, you use a hole punch to add two more holes on each side of the black plastic runner that will hold the outer skins in place. (see photos for locations) You can thank me later for this tip.
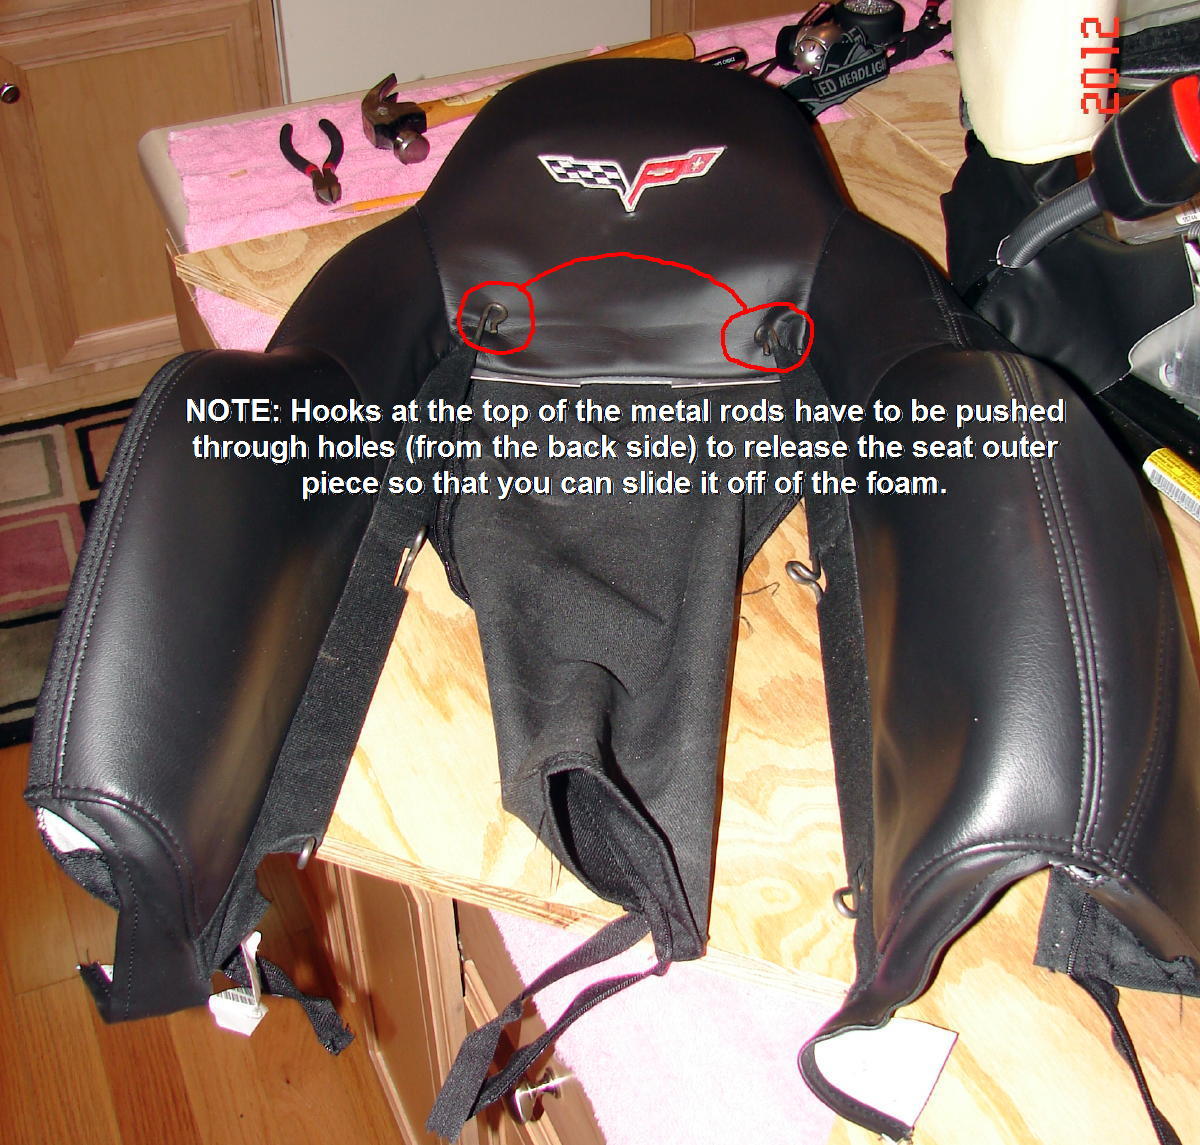
After you have made the extra holes, you need to put the seat back outer skins (not the foam) on the seat back frame and use some of the old plastic retainers to hold the runners in place so that you can mark the seat back for locations of the 6 holes that you will need to drill. After marking the holes, TAKE THE SEAT SKINS OFF, before you drill the holes. You DO NOT want to try to drill the holes while the seat skins are on the seat frame or you will be buying new seat skins more than likely.
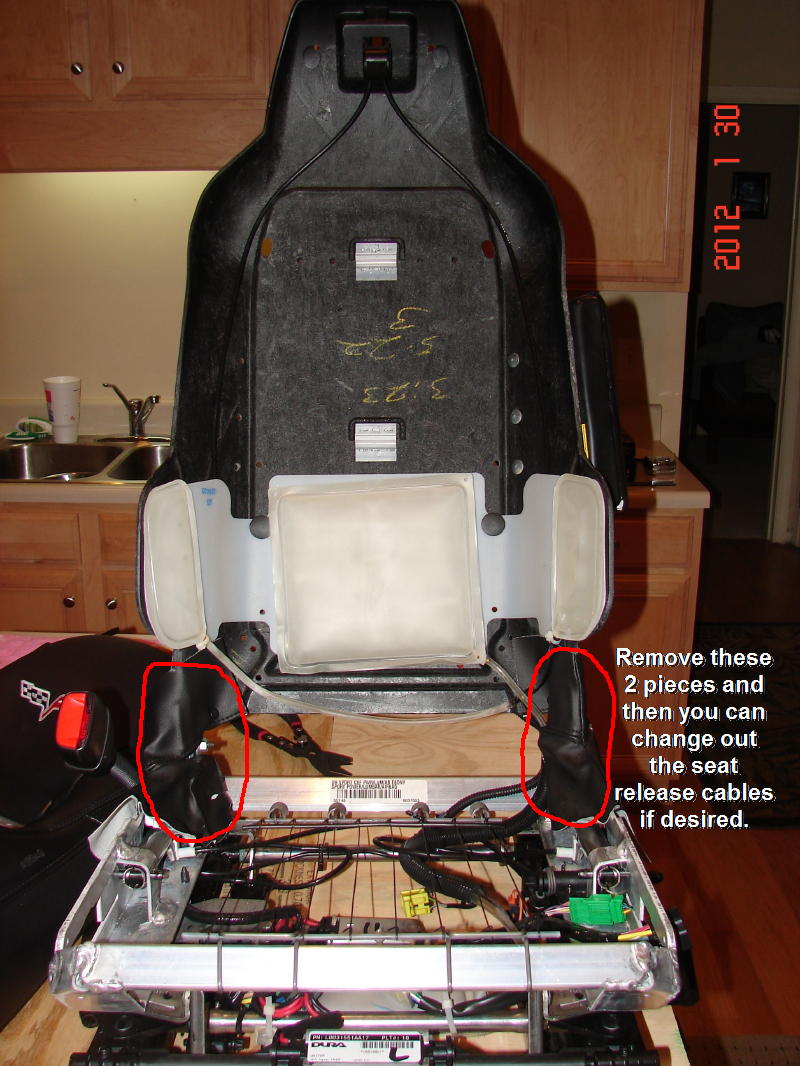
Another note: If you want to change the seat release buttons on the back of the seat headrest to the 2012 version, you need to do that NOW! You will need a T40 and a 1/2" socket or adjustable wrench. It's very easy to do so I won't try to explain it here.


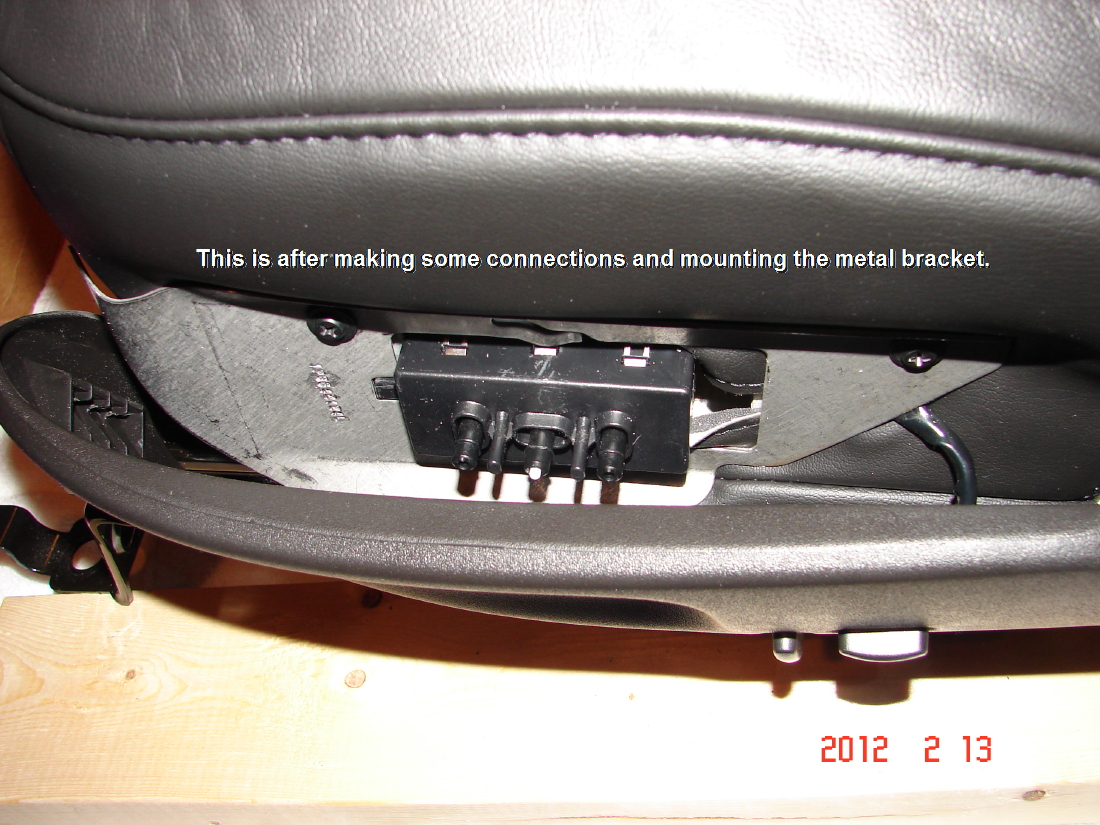
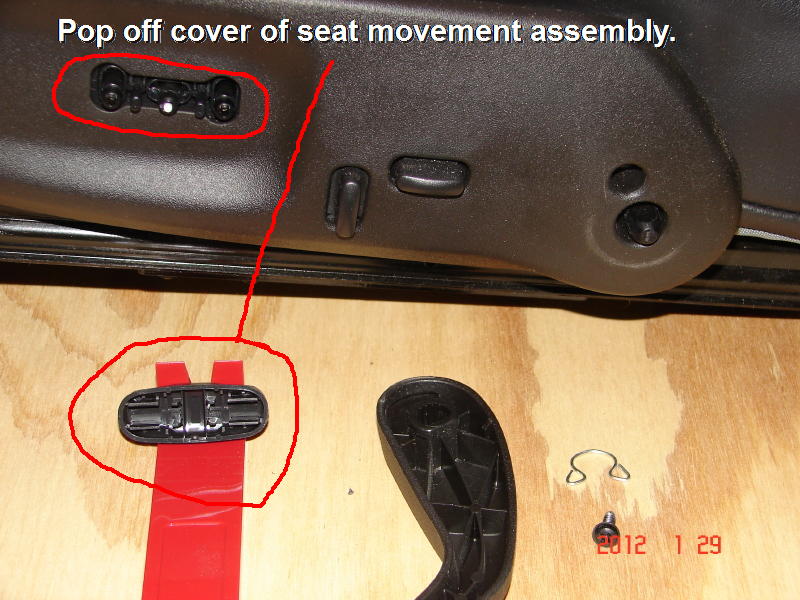
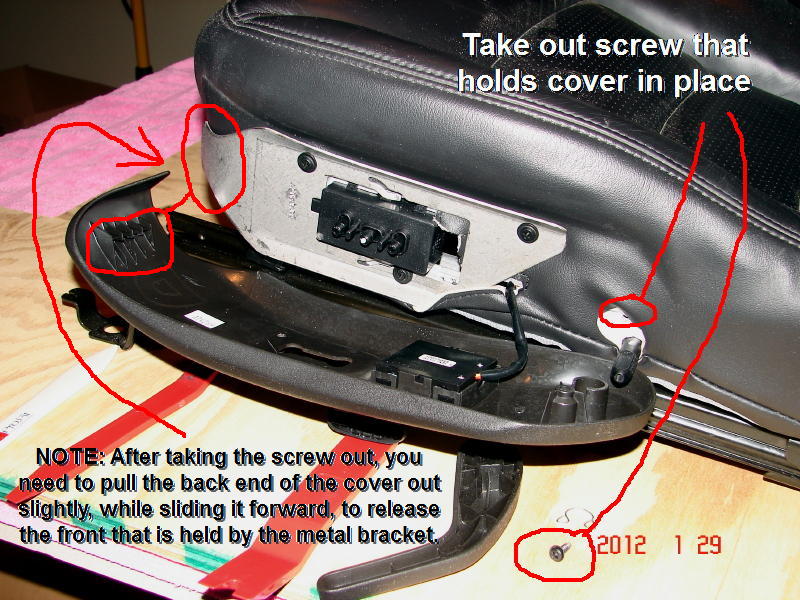
Next, screw the plastic cover in place, pop the seat movement button back on, and install the seat recliner handle.
Special thanks to 'isnider' and 'XZR1' for their help and ideas that they provided.
The first step, before removing the seats from the car would be to let the air out of the lumbar supports. I forgot this step and I was able to do the conversion anyway but this is a good idea.
Next, get the seats out of the car. Plenty of threads on here about how to do that.
The rest of the steps are explained with photos and notes. If you are doing this and have any questions, feel free to call me on my cell phone at 336-210-7607 (during reasonable hours - EST).
**************************************** *******
NOTE: There is one VERY important tip that I learned from ISNIDER. When it is time to install the CENTER seat back cushion you need to use a putty knife to assist in this process. It makes it SO MUCH EASIER to do. As a matter of fact, I'm not sure I could have done it without this tip.
*** You need to slide the putty knife into the top opening where the metal bar is going to slide into the top white plastic clip on the seat frame. (there is also a white plastic clip for the middle of the seat back)
You use the putty knife to slide the metal bar down and into the plastic clip. It will snap right into place. Then you can reach up under the center of the seat back and use your hand to push up on the center metal bar so that you can slip it into the middle white plastic clip on the seat frame. See the pics, I'll make a note before the pic that shows what I am explaining here.
**************************************** *******
TOOLS
Also, you can find these 1" retainers online for about $10 delivered for 50 of them. Cheap insurance if you end up having to redo something or need extras.
TAKING OUT OLD SEATS
**************************************** ************
INSTALLING NEW SEATS
NOTE: Here is another very good idea.
The new 2012 seat back outer skins/foam is held in place by black plastic runners that have 3 holes (per side) for retainers, instead of the wire rods that were threaded into the older seats.
I highly recommend that you add 2 more holes on each side (evenly spaced). It will help hold the side bolsters much more securely because there will be a lot of pressure to pop out those retainers.
Also, there is no hole in the seat back for the highest holes on those runners anyway, so you will be drilling at least two holes so why not do 4 more holes, for a total of 6 holes (3 per side) that you would need to drill in the seat back for retainers to hold the black plastic runners.
Before you do anything pertaining to installing the new seats, you use a hole punch to add two more holes on each side of the black plastic runner that will hold the outer skins in place. (see photos for locations) You can thank me later for this tip.
After you have made the extra holes, you need to put the seat back outer skins (not the foam) on the seat back frame and use some of the old plastic retainers to hold the runners in place so that you can mark the seat back for locations of the 6 holes that you will need to drill. After marking the holes, TAKE THE SEAT SKINS OFF, before you drill the holes. You DO NOT want to try to drill the holes while the seat skins are on the seat frame or you will be buying new seat skins more than likely.
Another note: If you want to change the seat release buttons on the back of the seat headrest to the 2012 version, you need to do that NOW! You will need a T40 and a 1/2" socket or adjustable wrench. It's very easy to do so I won't try to explain it here.
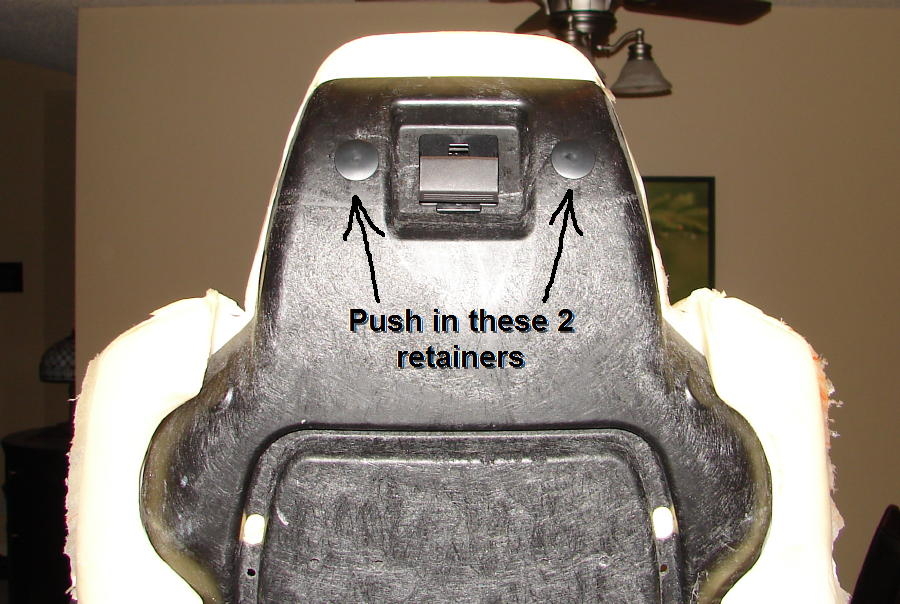
Next, screw the plastic cover in place, pop the seat movement button back on, and install the seat recliner handle.
Last edited by ncvette_1FUNRIDE; 02-19-2012 at 04:14 PM.

The following 5 users liked this post by ncvette_1FUNRIDE:
BrknWndC6 (05-03-2016),
Detn8or (03-15-2018),
Herbertjan (03-22-2020),
mikeCsix (05-15-2016),
SteveDoten (03-19-2017)
02-19-2012, 02:50 AM
#2
Moderator

Member Since: Dec 2002
Location: Lakewood Ranch, FL
Posts: 40,065
Received 3,578 Likes
on
1,619 Posts

Sweet
02-19-2012, 03:10 AM
#4
Tech Contributor
Thread Starter
02-19-2012, 03:14 AM
#5
Advanced

Member Since: Jan 2012
Location: Melbourne
Posts: 68
Likes: 0
Received 0 Likes
on
0 Posts
Nice job Randy
I suggest others also read my thread which was a precursor to Randy's, there is some addditional information in there that may be useful.
My thread is here
I suggest others also read my thread which was a precursor to Randy's, there is some addditional information in there that may be useful.
My thread is here
Last edited by XZR1; 02-19-2012 at 03:44 AM.
02-19-2012, 07:41 AM
#6
Le Mans Master


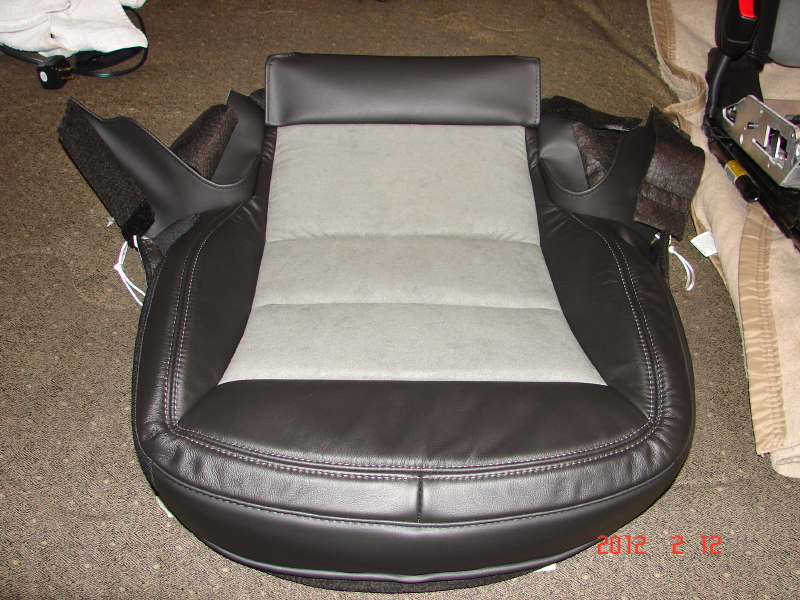
Looks damn good randy! If you want to get those few wrinkles out of top halo use either steam or heat and work the leather on the winglets around to rear of seat by pulling, stretching, and slapping with your hand. (old upholstery trick!)


 02-19-2012, 01:11 PM
#14
Le Mans Master
Member Since: Mar 2000
Location: Pottsville, PA. USA Home Of America's Oldest Brewery Yuengling
Posts: 9,063
Received 2,239 Likes
on
1,033 Posts
Great story!!!

 02-19-2012, 01:30 PM
#17
Racing
Man! That is the most thorough and detailed walk through I have ever seen on any part for this forum. I LOVE those seats too....I just feel bad that now you have to do another one. I'm sure the end result is going to look perfect though. Congrats!!! When your car is complete it's going to look rediculous!!!!


