
photos of ECS Alky Control Meth kit install
 08-17-2012, 02:02 AM
#1
Safety Car

Thread Starter


When I was looking for a DIY, I couldn't really find anything for a C6 that showed blown out pictures to get a good perspective for where everything went. I snapped a few pictures while I installed my kit in case they'd be helpful for anyone else.
I'm doing a Z06 front conversion, so I had the fender off already. It wasn't hard to take off and I highly recommend it for this job. I really can't imagine trying to do it while the fender is still in place.
Here is a wide shot of where the pump and washer tank go:

Here are the holes you drill for the pump. I couldn't figure out how to get it positioned right so all 4 screws are used. You can see my first attempt where there is a low hole on the bottom left, and another hole on the upper right. Both of these holes mounted the pump too low, so I had to drill new holes higher up and skip the screw in the top right position:

Even in the 2nd, higher position (which was the absolute highest the screw in the top left could go as the frame rail curved), this is how close the pump is to the bottom of the fender (watch out for speed bumps if you're lowered):

In order to mount the pump this high, you'll have to reposition the washer fluid tank. There is a weird 'tab' at the top of the neck that gets caught on misc. lines around the clutch fluid reservoir. I trimmed it off. (btw, to remove the washer tank you'll need to unbolt the clutch fluid reservoir and move it up and away):

While you have the tank out, drill your 7/8" hole in the bottom. Make sure to mock up your meth feed line while bolting in the pump to get a general idea for where to drill. I ended up drilling in the furthest corner from the pump where there was still flat material to help seal better:

Now reinstall the washer fluid tank and attach it with self tapping screws like you did with the pump. You can only attach it at 2 points, the 3rd hole is now in open space. Run all your lines and electrical connections:

Even with the washer fluid tank moved up and over, the neck still fits ok in the engine bay:

All the other instructions from ECS or whever else for the nozzles and wiring seem to work ok between the C5 and C6, so that's all I took pictures of. Hopefully somebody finds it helpful
I'm doing a Z06 front conversion, so I had the fender off already. It wasn't hard to take off and I highly recommend it for this job. I really can't imagine trying to do it while the fender is still in place.
Here is a wide shot of where the pump and washer tank go:
Here are the holes you drill for the pump. I couldn't figure out how to get it positioned right so all 4 screws are used. You can see my first attempt where there is a low hole on the bottom left, and another hole on the upper right. Both of these holes mounted the pump too low, so I had to drill new holes higher up and skip the screw in the top right position:
Even in the 2nd, higher position (which was the absolute highest the screw in the top left could go as the frame rail curved), this is how close the pump is to the bottom of the fender (watch out for speed bumps if you're lowered):
In order to mount the pump this high, you'll have to reposition the washer fluid tank. There is a weird 'tab' at the top of the neck that gets caught on misc. lines around the clutch fluid reservoir. I trimmed it off. (btw, to remove the washer tank you'll need to unbolt the clutch fluid reservoir and move it up and away):
While you have the tank out, drill your 7/8" hole in the bottom. Make sure to mock up your meth feed line while bolting in the pump to get a general idea for where to drill. I ended up drilling in the furthest corner from the pump where there was still flat material to help seal better:
Now reinstall the washer fluid tank and attach it with self tapping screws like you did with the pump. You can only attach it at 2 points, the 3rd hole is now in open space. Run all your lines and electrical connections:
Even with the washer fluid tank moved up and over, the neck still fits ok in the engine bay:
All the other instructions from ECS or whever else for the nozzles and wiring seem to work ok between the C5 and C6, so that's all I took pictures of. Hopefully somebody finds it helpful
 08-17-2012, 06:42 AM
#2
Burning Brakes


Thanks for posting. These are great pictures and will make my install easier. Now, if I could just get off my lazy azz and install the kit I've had for a couple months now...
Last edited by wallyj; 08-18-2012 at 08:58 AM.
 08-17-2012, 08:47 AM
#4
Intermediate


Member Since: Aug 2012
Location: Elkgrove il
Posts: 37
Likes: 0
Received 0 Likes
on
0 Posts
When I was looking for a DIY, I couldn't really find anything for a C6 that showed blown out pictures to get a good perspective for where everything went. I snapped a few pictures while I installed my kit in case they'd be helpful for anyone else.
I'm doing a Z06 front conversion, so I had the fender off already. It wasn't hard to take off and I highly recommend it for this job. I really can't imagine trying to do it while the fender is still in place.
Here is a wide shot of where the pump and washer tank go:
Here are the holes you drill for the pump. I couldn't figure out how to get it positioned right so all 4 screws are used. You can see my first attempt where there is a low hole on the bottom left, and another hole on the upper right. Both of these holes mounted the pump too low, so I had to drill new holes higher up and skip the screw in the top right position:
Even in the 2nd, higher position (which was the absolute highest the screw in the top left could go as the frame rail curved), this is how close the pump is to the bottom of the fender (watch out for speed bumps if you're lowered):
In order to mount the pump this high, you'll have to reposition the washer fluid tank. There is a weird 'tab' at the top of the neck that gets caught on misc. lines around the clutch fluid reservoir. I trimmed it off. (btw, to remove the washer tank you'll need to unbolt the clutch fluid reservoir and move it up and away):
While you have the tank out, drill your 7/8" hole in the bottom. Make sure to mock up your meth feed line while bolting in the pump to get a general idea for where to drill. I ended up drilling in the furthest corner from the pump where there was still flat material to help seal better:
Now reinstall the washer fluid tank and attach it with self tapping screws like you did with the pump. You can only attach it at 2 points, the 3rd hole is now in open space. Run all your lines and electrical connections:
Even with the washer fluid tank moved up and over, the neck still fits ok in the engine bay:
All the other instructions from ECS or whever else for the nozzles and wiring seem to work ok between the C5 and C6, so that's all I took pictures of. Hopefully somebody finds it helpful
08-17-2012, 09:00 AM
#5
Le Mans Master

Nice write up. The only thing I will add is that if you are not removing the fender for other reason as the op was, there is plenty of room for the install by just undoing the bottom and pulling it outwards to make room. I did my alky kit this way with no issues.
The box my kit came in was the perfect size.
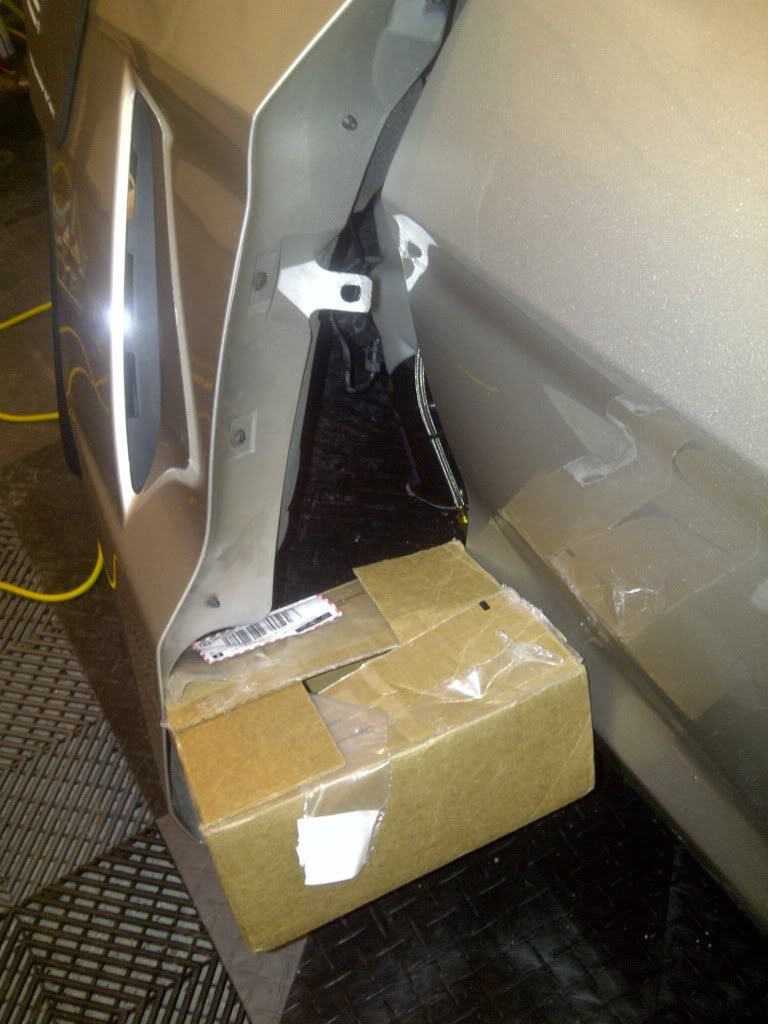

The box my kit came in was the perfect size.
08-17-2012, 12:59 PM
#7
Le Mans Master

 08-17-2012, 02:55 PM
#10
Safety Car
Thread Starter
You leave your MAF, then add a generic IAT sensor along w/ a harness to plug into both the MAF and the IAT sensor.
I haven't gotten to installing them in the charge pipe yet, but I'll take pics of that too.
08-17-2012, 04:55 PM
#11
Le Mans Master


 08-18-2012, 12:33 AM
#14
Instructor

Member Since: Mar 2012
Posts: 178
Likes: 0
Received 0 Likes
on
0 Posts
What are the benefits of having a separate IAT sensor for the meth to be seen? Does it make more power? I realize the computer can now sense the meth but how does it benefit the car/power?
08-18-2012, 12:50 AM
#15
Safety Car
Thread Starter
08-18-2012, 12:53 AM
#16
Safety Car
Thread Starter
Right now if you don't have that and are running 28* or whatever you mentioned earlier and the pump fails or there's an issue with the meth, you're probably going to be in trouble, especially if you're relying on it for fuel too.
I didn't get a chance to work on the car much today, but I'll mock mine up and snap a pic real quick to show you how to set it up on a procharger charge pipe.
08-18-2012, 01:13 AM
#17
Safety Car
Thread Starter
Here's the inside of the charge pipe. Meth nozzles are mounted at '2' and '10' o'clock. The IAT is mounted at '9' o'clock (ignore that the IAT sensor isn't secured, need to get a washer and nut from the hardware store tomorrow). It does make me a bit nervous mounting something like this in the intake of the motor, but I haven't read much about meth nozzles falling out and killing motors, so I'm probably ok.

Here's the break out kit from casper electronics. It retains the MAF functions, but splits the IAT wire out to get a signal from your new stand alone IAT sensor:

Here is everything installed. MAF > meth > IAT. The meth nozzles are mounted through both the coupler and the charge pipe and the IAT is mounted only in the silicone coupler:

The SS line in the ECS kit is sized well to do a pretty clean install:

Here's the break out kit from casper electronics. It retains the MAF functions, but splits the IAT wire out to get a signal from your new stand alone IAT sensor:
Here is everything installed. MAF > meth > IAT. The meth nozzles are mounted through both the coupler and the charge pipe and the IAT is mounted only in the silicone coupler:
The SS line in the ECS kit is sized well to do a pretty clean install:
08-18-2012, 02:49 AM
#18
Burning Brakes

Nice write up. The only thing I will add is that if you are not removing the fender for other reason as the op was, there is plenty of room for the install by just undoing the bottom and pulling it outwards to make room. I did my alky kit this way with no issues.
The box my kit came in was the perfect size.
The box my kit came in was the perfect size.

In order to mount the pump this high, you'll have to reposition the washer fluid tank. There is a weird 'tab' at the top of the neck that gets caught on misc. lines around the clutch fluid reservoir. I trimmed it off. (btw, to remove the washer tank you'll need to unbolt the clutch fluid reservoir and move it up and away):
Last edited by Dragracer_Art; 08-18-2012 at 02:52 AM.
08-18-2012, 06:29 AM
#19
Safety Car
Thread Starter
I did mine also without removing the fender... and propped it out exactly the same way, with a cardboard box.
There is no need to cut the upper mounting tab off the reservoir. Just poke a new hole through the fender liner and put a bolt and flat washer through it. It adds much needed support to an already flimsy gooseneck filler pipe.
There is no need to cut the upper mounting tab off the reservoir. Just poke a new hole through the fender liner and put a bolt and flat washer through it. It adds much needed support to an already flimsy gooseneck filler pipe.
08-18-2012, 07:39 AM
#20
Le Mans Master
Contact Julio at Alky control and get the rubber condom for it. It prevents issues with water possibly getting into the pump and causing issues.