When you click on links to various merchants on this site and make a purchase, this can result in this site earning a commission. Affiliate programs and affiliations include, but are not limited to, the eBay Partner Network.
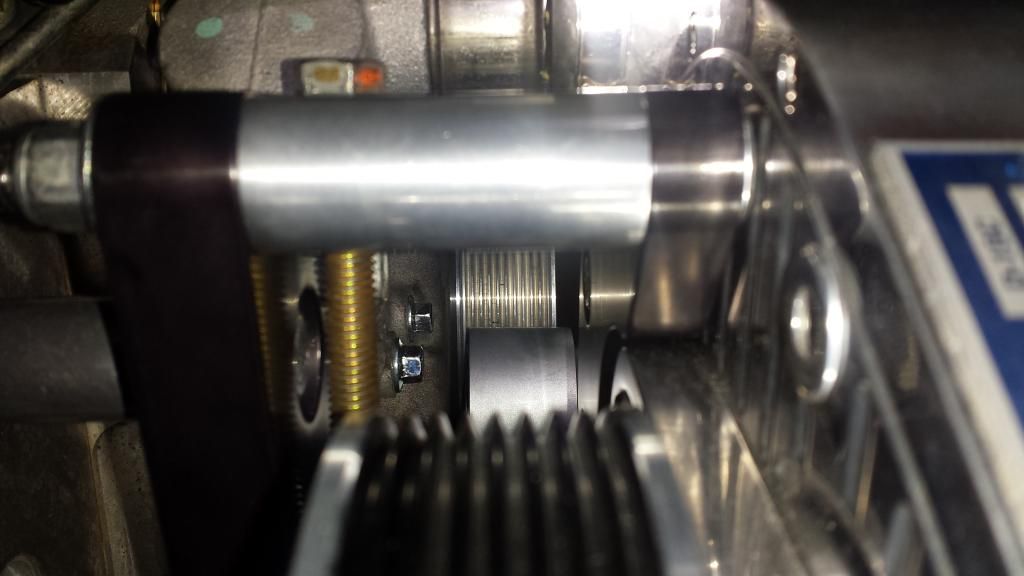
Installing the ECS set up on my 06 Z. Not sure if this tension pulley should be sitting back about 0.150 more or not. It looks like the belt will ride off the pulley a little bit.
Did any one else notice this? Have any issues?
Installing the ECS set up on my 06 Z. Not sure if this tension pulley should be sitting back about 0.150 more or not. It looks like the belt will ride off the pulley a little bit.
Did any one else notice this? Have any issues?
I had that concern with mine, but mine was worse.. In my case it ended up being that the balancer was coming apart (the outer half had slid backwards). With that the belt actually WAS hanging off the back, probably 1/8" or so.
I think yours will be dead even with the back edge once a belt is on. It can be a little deceiving looking. Check out the balancer first. Did it wobble at all prior to taking it apart?
After I replaced my balancer my belt now rides on the verrrrry back edge of that pulley, but it's not hanging off the back anymore.
I can try to get some pictures if it would help
edit: the pullies that come with the ECS kit must already be for an 8 rib setup. That's the only reason I can think of as to why they are that wide but the belt rides on the very back. I should probably look that up
Balancer looks to be good. Car has 10,000 miles on it but It could still be bad. I don't know if I should replace the balancer or just ride it out. Not sure how long I will go with out doing a cam but I'm going to try and keep the stock one as long as I can.
Balancer looks to be good. Car has 10,000 miles on it but It could still be bad. I don't know if I should replace the balancer or just ride it out. Not sure how long I will go with out doing a cam but I'm going to try and keep the stock one as long as I can.
You might could wrap the belt around the accessories/pullies that you do have on right now just to see how it lines up with an actual belt. Obviously will have to clamp it or have someone hold it or something to pull it tight around what you have.. but still may be worth trying. Obviously doesn't have to be the right belt routing, just something to check alignment
Check to make sure that isn't on backwards. That pulley has an offset. Swapping it 180 could make it line up. I cut 2 ribs off by riding on the edge, so I would fix it, either spacer it out, or adjust it so it is in the middle. You don't want it running on the edge.
Check to make sure that isn't on backwards. That pulley has an offset. Swapping it 180 could make it line up. I cut 2 ribs off by riding on the edge, so I would fix it, either spacer it out, or adjust it so it is in the middle. You don't want it running on the edge.
I will have to put a belt on and see where it ends up at. The pully cam mounted so I'd hope they put in on right.
Not sure
Takes 30 seconds to check and see. Mistakes happen, at least worth undoing 1-2 bolts and checking.
Also, it maybe fine. One of the good things about ECS kits is they are ready for 8 rib from the start, so the belt is offset, and it has room for the 2 extra ribs up front of an 8 rib. Just make sure it isn't riding off the back of the pulley. The bottom threaded bolt on the tensioner has some adjustment too that I found can be used to line that up better.
All of our idlers are 8 rib compatible so if you chose to upgrade later there is less additional expense. The rear side of the idler should be right at the rear edge of the last balancer groove. leaving the unused portion of the idler being forward, which is where the two ribs would be added when going to an eight rib set up.
The lower spacer of the tensioner bracket is adjustable so if the AC bracket which it mounts too is a little off it can be adjusted accordingly. It looks in your case you would want to adjust the lower idler out a little to bring the top of the tensioner idler towards the engine block.
The spacer is threaded with a lock nut on it, loosen the lock nut and adjust it as necessary.
An easy way to know if the bracket is adjusted correctly is to stand over the head unit looking down, you can see the bottom side of the belt coming up from the balancer/tensioner area and the flat side of the belt coming off of the head unit pulley itself. As you look down on it they should cover each other evenly. If you see belt ribs are not even with the top belt then the tensioner bracket needs to be adjusted.
I hope I didn't just make that sound more complicated then it is, but if you have any questions feel free to ask away!
Sounds good.
Do you think this is best to do with the head unit in place and put the belt on and take a took at it? Remove belt and adjust as needed. Or do I need to fine tune it before the head unit is on.
Any thing has to be easy after the rack job. Man if they would have just keyed the crank...
Originally Posted by DOUG @ ECS
All of our idlers are 8 rib compatible so if you chose to upgrade later there is less additional expense. The rear side of the idler should be right at the rear edge of the last balancer groove. leaving the unused portion of the idler being forward, which is where the two ribs would be added when going to an eight rib set up.
The lower spacer of the tensioner bracket is adjustable so if the AC bracket which it mounts too is a little off it can be adjusted accordingly. It looks in your case you would want to adjust the lower idler out a little to bring the top of the tensioner idler towards the engine block.
The spacer is threaded with a lock nut on it, loosen the lock nut and adjust it as necessary.
An easy way to know if the bracket is adjusted correctly is to stand over the head unit looking down, you can see the bottom side of the belt coming up from the balancer/tensioner area and the flat side of the belt coming off of the head unit pulley itself. As you look down on it they should cover each other evenly. If you see belt ribs are not even with the top belt then the tensioner bracket needs to be adjusted.
I hope I didn't just make that sound more complicated then it is, but if you have any questions feel free to ask away!
Any thing has to be easy after the rack job. Man if they would have just keyed the crank...
I'm going to ruin your night... you didn't HAVE to pull the rack
By unbolting the engine mounts and raising the engine, while loosening the cradle bolts and lowering the cradle, it buys just enough room to pin the crank with the rack still in place.
It's a bastard to get to like that, but is how I did mine (the first time)
That rack is a beast. I had a really tough time getting it off because of the brake lines. Going on wasn't much easier. Def. would have been better as a 2 man job to help guide it through from both sides
Well.. to make you feel better, just remember I ended up having to do it BOTH ways in the end... haha
I'm still trying to get the bottom half of my tune figured out. Think I had some jacked up knock sensor settings. Keeping this thing under like 35% throttle and 2500 RPM's is killing me.
Good now. Rack is back in. Waiting on the heads to come back. I sent them out to get ported, valves, guides and springs. I can do a few odd and ends untill then.
Theremostate dosent fit the housing? It's 0.170 larger in the flange OD. I will figure it out.
Good now. Rack is back in. Waiting on the heads to come back. I sent them out to get ported, valves, guides and springs. I can do a few odd and ends untill then.
Theremostate dosent fit the housing? It's 0.170 larger in the flange OD. I will figure it out.
Gotcha. At least the hard part is done.
Not sure on the thermostat. Mine was a tight fit but went in OK
2020 Corvette of the Year Finalist (performance mods)
C5 of Year Winner (performance mods) 2019
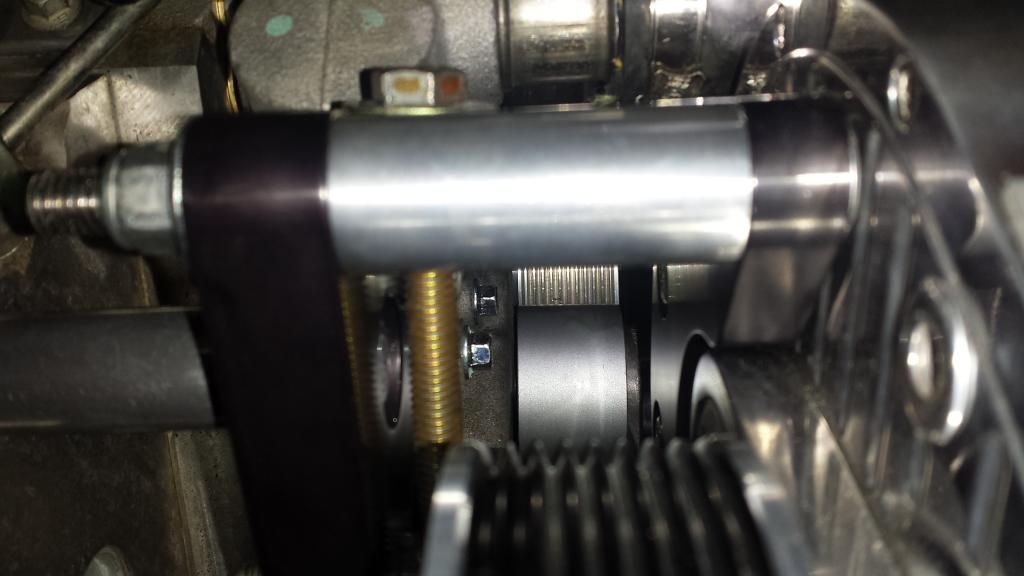
I had the same problem after buying parts to upgrade to 10 rib... I have an overdrive balancer and needed the overdrive tensioner bracket so the idler won't hit the balancer if the belt breaks... I guess my original tensioner bracket was an older design because it had regular non-adjustable spacers and the new one had a longer upper spacer and adjustable lower spacer... I installed the new one as it was supplied to me and the lower adjustable spacer was at the end of it's travel to get the plate straight so I really had no adjustment left in it... now I didn't have any clearance between the plate and my rack for the tensioner tabs to seat in the plate, I ended up having to jack the motor up to get it to seat the tabs then bolted it down and I was good... well at least I thought, when I was trying to size up a new belt I noticed my idler looked just like yours, spaced out too far forward (see pic below)... I tried turning the idler around thinking it was offset but ended up with the same results:
I was at a loss, after waiting months for these parts I think I'm making progress only to find out I'm taking a few steps backwards... since my original upper spacer was shorter and the new lower one is adjustable I decided to try it using the old shorter spacer up top and adjusting the bottom spacer farther in to line it up and it seems to have worked... but in your case if you don't have a grab bag of parts then you may not be able to fix it as easily... you might possibly have to get the upper spacer shaved down a bit or use a new shorter spacer and adjust the bottom one in like I did to get it lined up... I also have plenty of clearance for my tensioner to fit between the rack without having to jack the motor up (basically the same way it was before I upgraded this stuff)... here is what I ended up with:
I can make and or shorten the spacer if needed. I will try and adjust it at the bottom and if it's not enought, I will make a new one at work. I don't want to mod the stock one. Yours looks better now. Do you know how much to took off or what the OAL of the spacer is now?
2020 Corvette of the Year Finalist (performance mods)
C5 of Year Winner (performance mods) 2019
Originally Posted by GeneSch
I can make and or shorten the spacer if needed. I will try and adjust it at the bottom and if it's not enought, I will make a new one at work. I don't want to mod the stock one. Yours looks better now. Do you know how much to took off or what the OAL of the spacer is now?
you CAN shorten it but you shouldn't have to in my opinion... it should have came right in the first place, for as many kits as they make and the amount of supercharged cars they "produce every week" there shouldn't be any errors... I should have measured that spacer before I put it back on, I didn't because I thought this was just an isolated problem in my case as it has been nothing but issues from the get go but apparently it is more common than I thought... if I have to tear it down again I will definitely measure that spacer for you
I still think he should put a belt on everything he can first just to see how it lines up.. then adjust the bottom pulley if needed (as it is made as an adjustable piece..) prior to shortening anything.. THEN think about grinding if necessary
It just doesn't look that far off to me.. most of the pictures look like they are at a slight angle, so that is making it look worse
But I've had a supercharger for a grand total of about two weeks now, so I'm sure a lot of you guys know a lot more than me
Also, even in the ECS belt swap video, if you look really close you can see what they have the belt on the very back of that idler pulley (the spring loaded one)

 12-21-2014, 01:46 PM