
Carbon Fiber Vinyl Wrap
 05-28-2010, 10:21 PM
#1
Pro

Thread Starter
Member Since: Jan 2006
Location: Toronto Ontario
Posts: 645
Likes: 0
Received 0 Likes
on
0 Posts

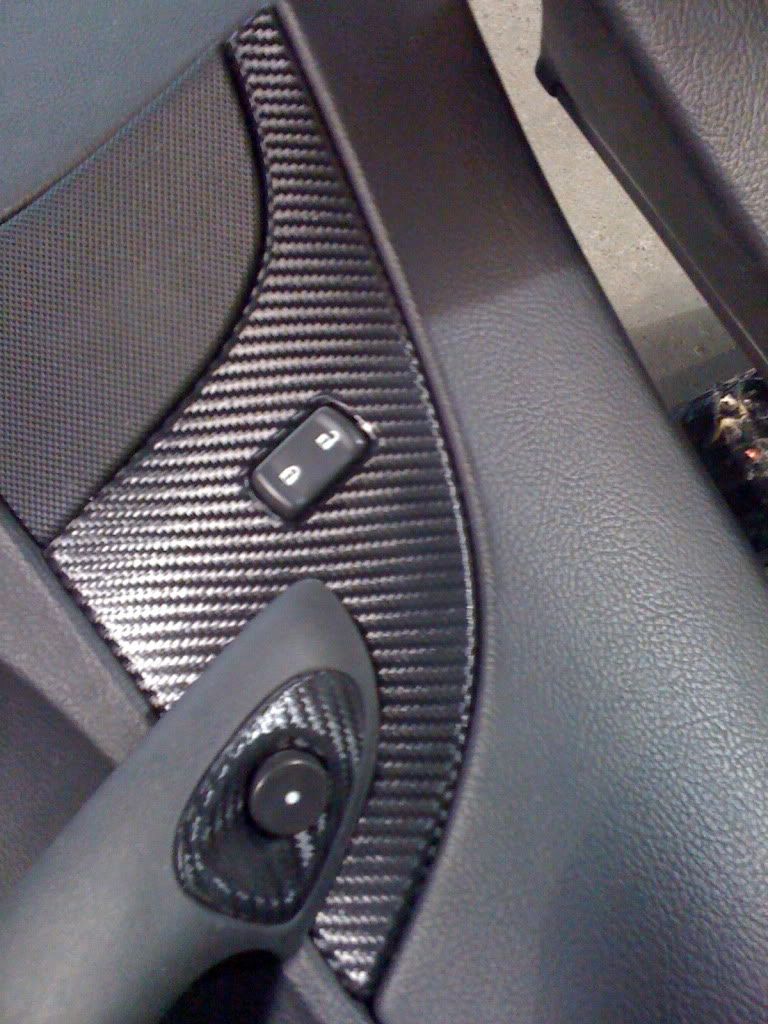
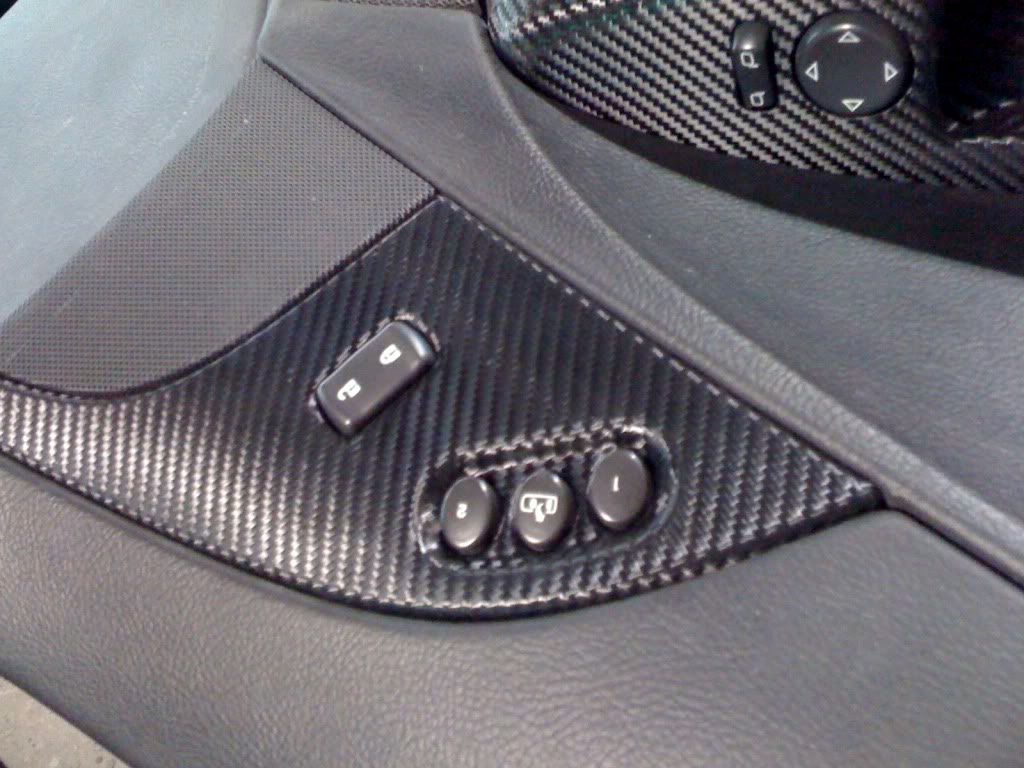
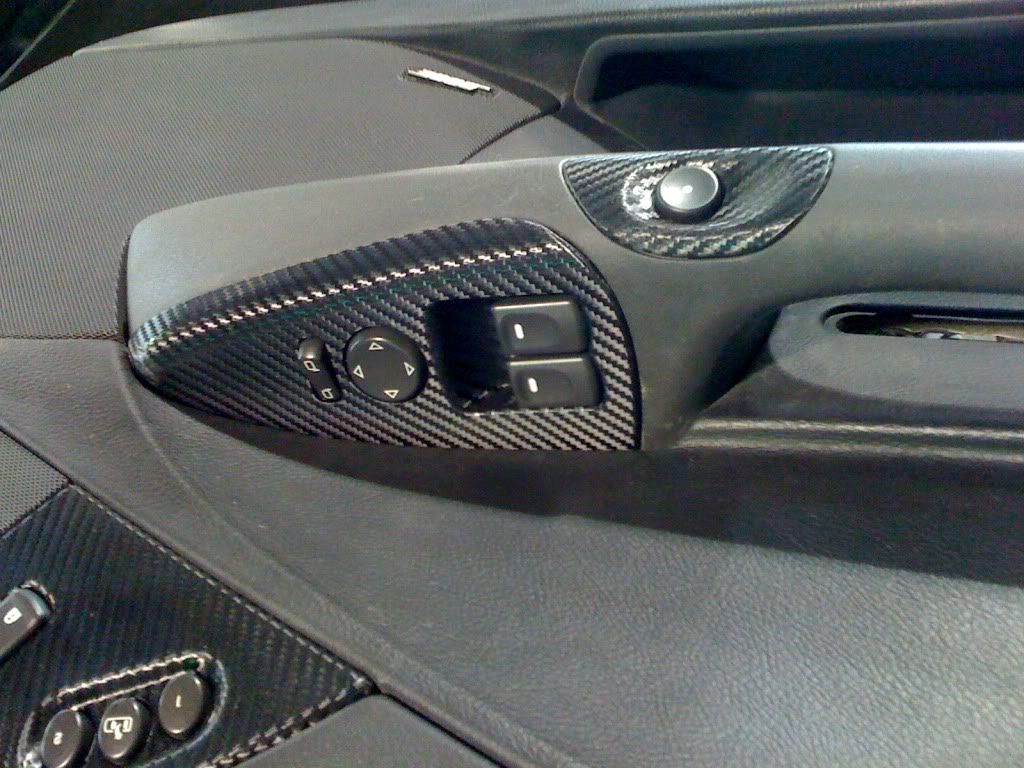
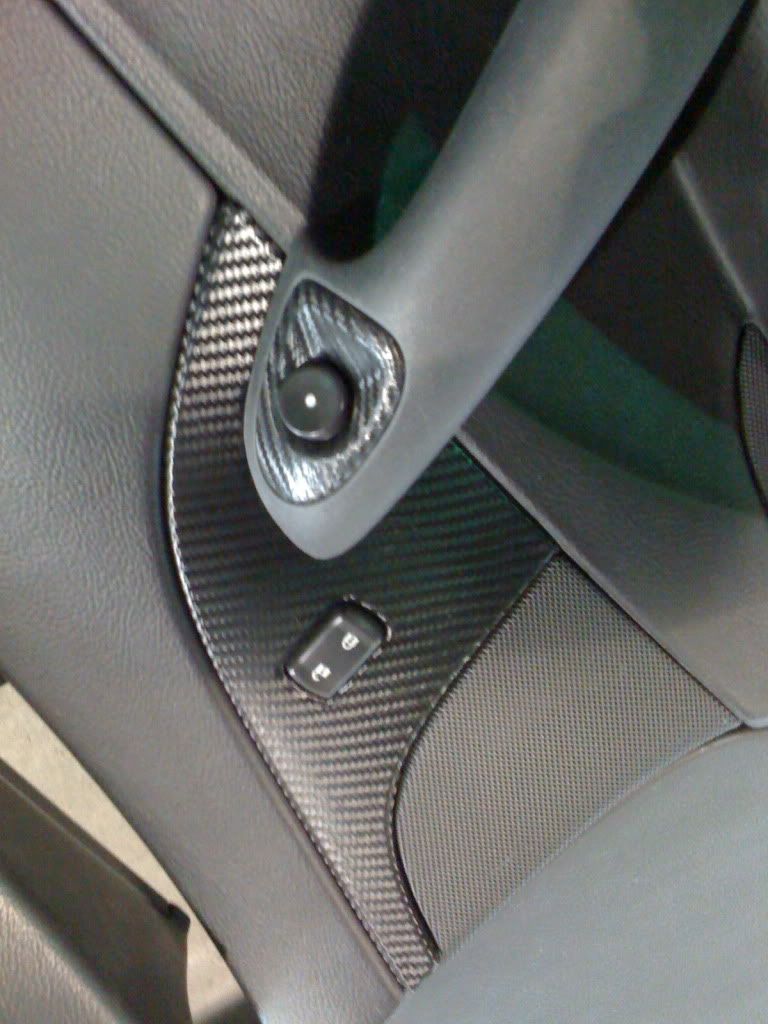
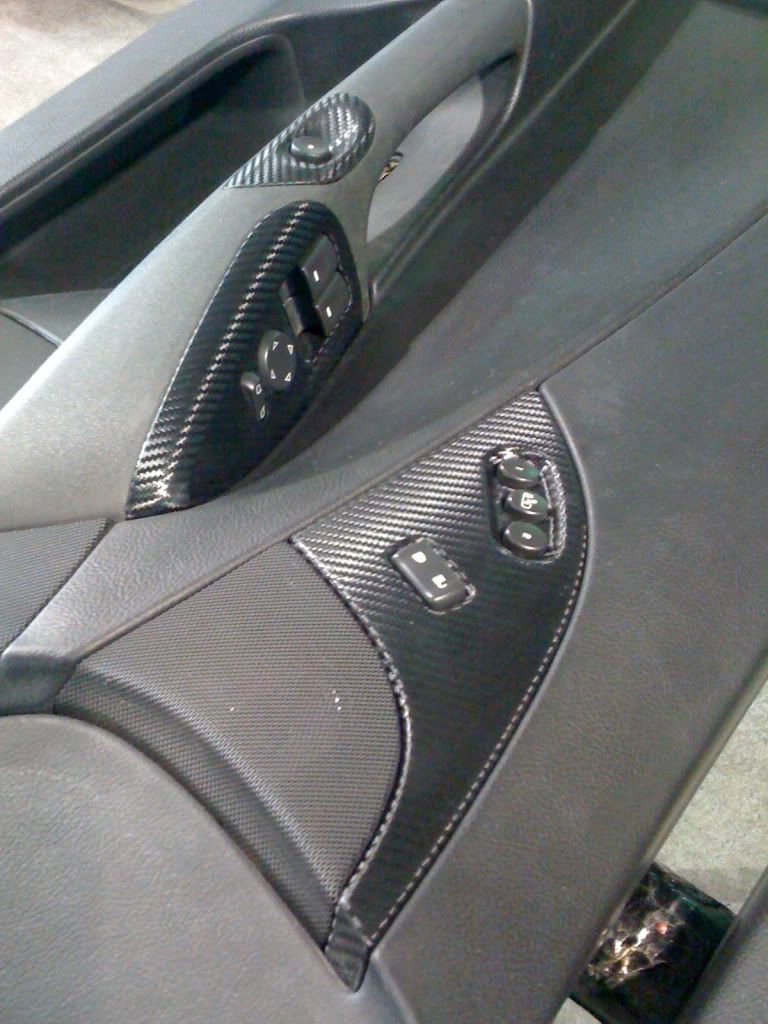
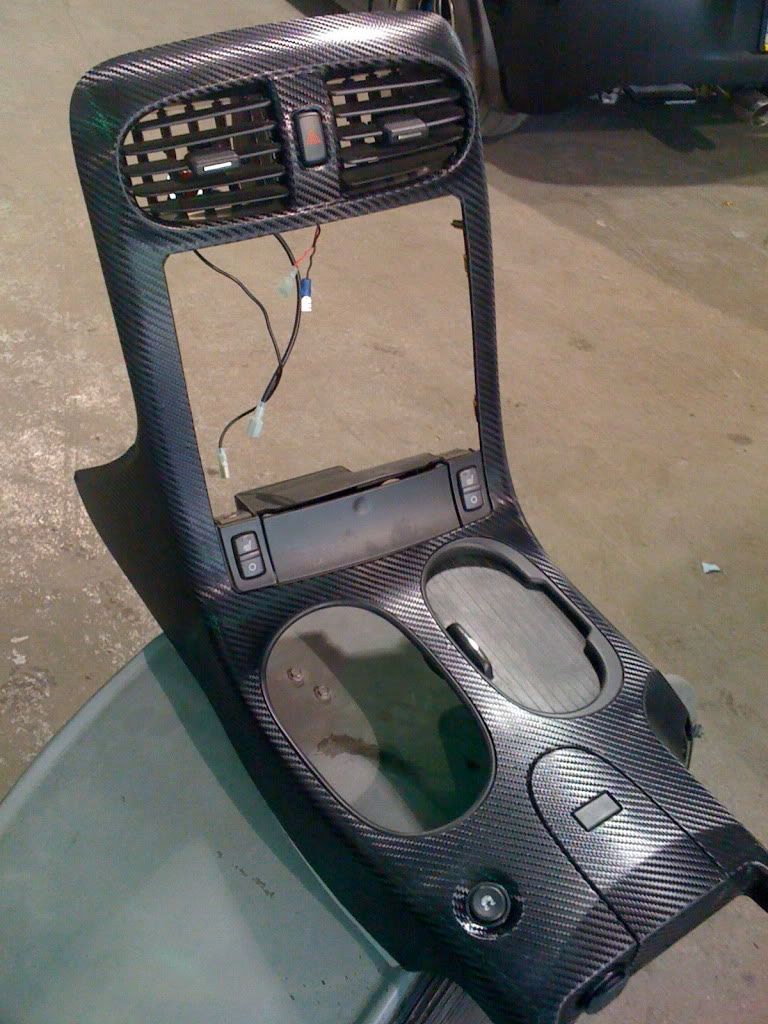
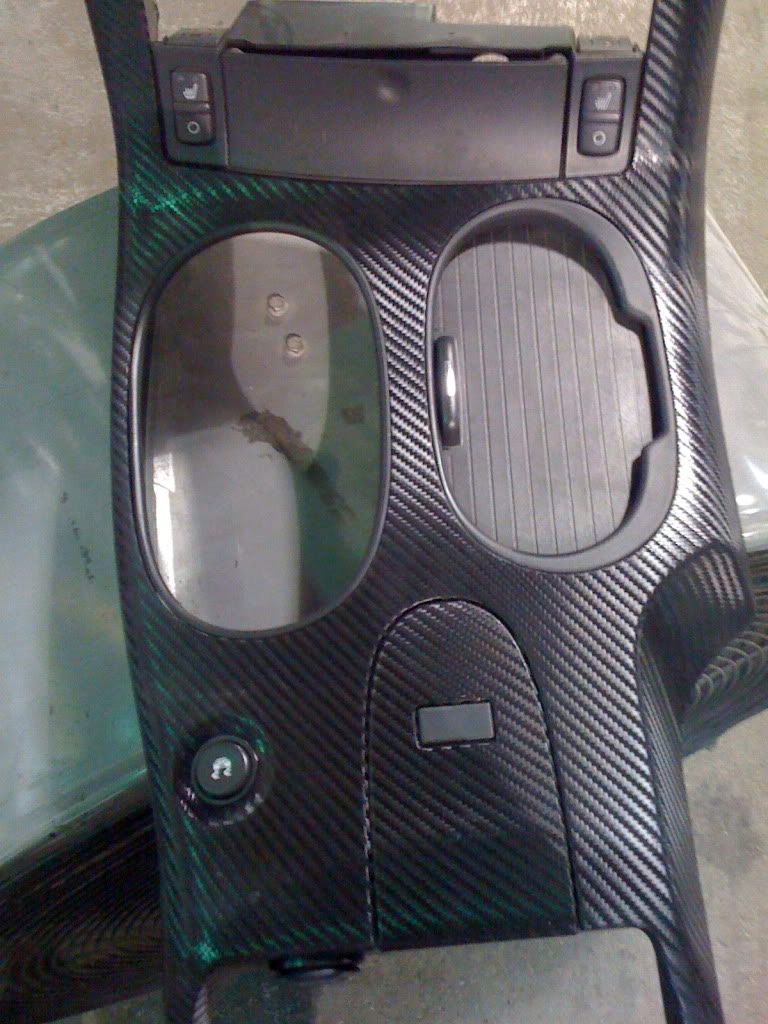
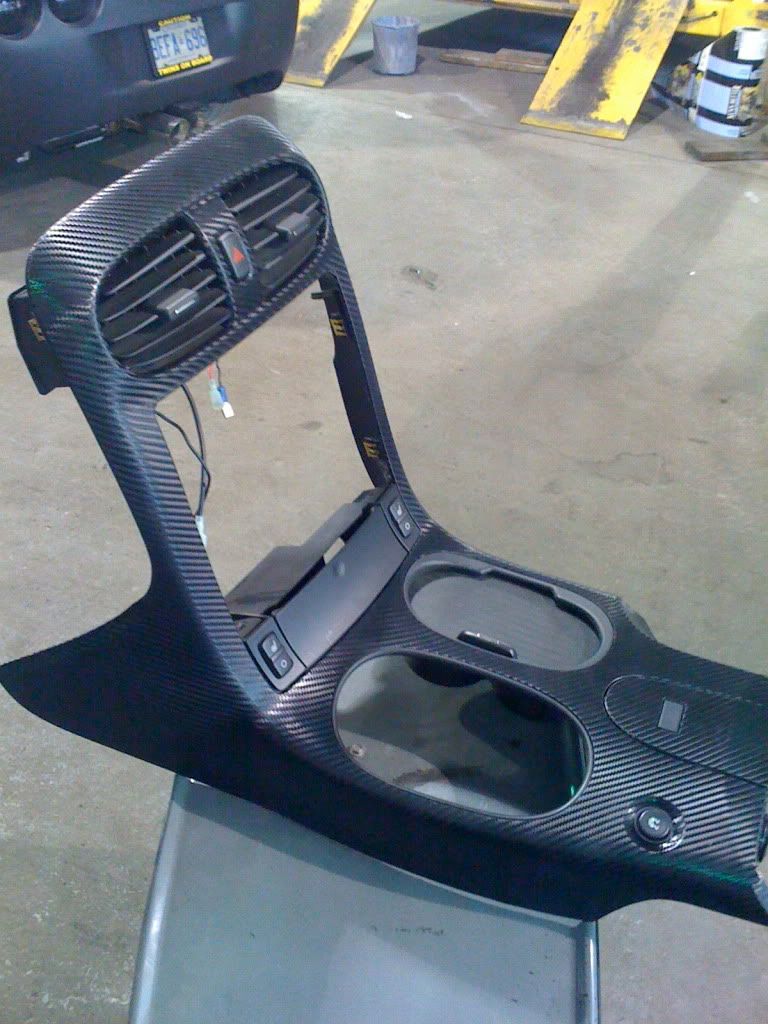
Wow, just got my interior pieces wrapped in Imitation Carbon Fiber Vinyl wrap.
I was surprised how well they turned out.
Heres some pics.

I was surprised how well they turned out.
Heres some pics.


 Just got my 3M carbon vinyl in a few days ago.
 05-29-2010, 12:58 AM
#3
_Sloth Whisperer_

Member Since: Jul 2008
Location: Malaysia Air Flight 370
Posts: 3,372
Likes: 0
Received 9 Likes
on
6 Posts
Actually, as opposed as I am to faux-fiber anything, I have to say that looks pretty well done. Hell of a lot better than any of this absolutely horrible hydrographic carbon film nonsense that's being sold.
Thanks for sharing the pictures. Looks clean.
Thanks for sharing the pictures. Looks clean.
05-29-2010, 06:44 PM
#4
Instructor


Member Since: Mar 2001
Location: Metairie LA
Posts: 209
Likes: 0
Received 0 Likes
on
0 Posts

NICE!, let us know how they hold up(wear over time)
 05-29-2010, 09:47 PM
#6
Pro
Thread Starter
Member Since: Jan 2006
Location: Toronto Ontario
Posts: 645
Likes: 0
Received 0 Likes
on
0 Posts
Well to 'fess up...I cannot totally take credit since I did not do it completely myself, I was going to attempt this by myself with the help of some friends, but in the end after trying a small piece on my own I opted to use a professional installer for the vinyl.
Don't get me wrong this definately can be done on your own, but it does require an immense amount of attention and patience (the second which I am short on!) because I stood by and watched and assisted with most of the pieces as it was being applied and depending your ability, expectation or standards you may be repeating some of pieces quite a few times before you get the results that you want. (you should also keep in mind that this vinyl is more expensive than your average common one colour vinyl.)
What I suggest is that you try a piece at a time meaning don't strip your whole interior! (or you may be out of a car) since this is harder than applying mac tac to your kitchen cabinets! I did everything at once since my interior is currently totally apart due to my extended winter project... lol,
The pieces you see in the pics are the easier pieces to do.
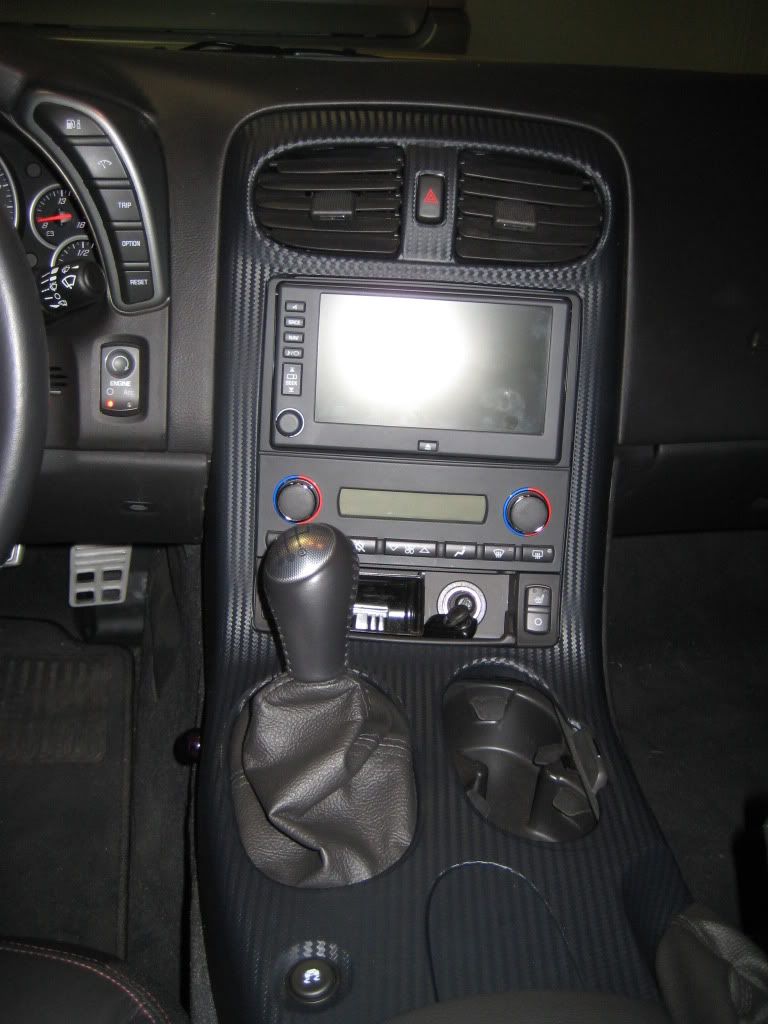
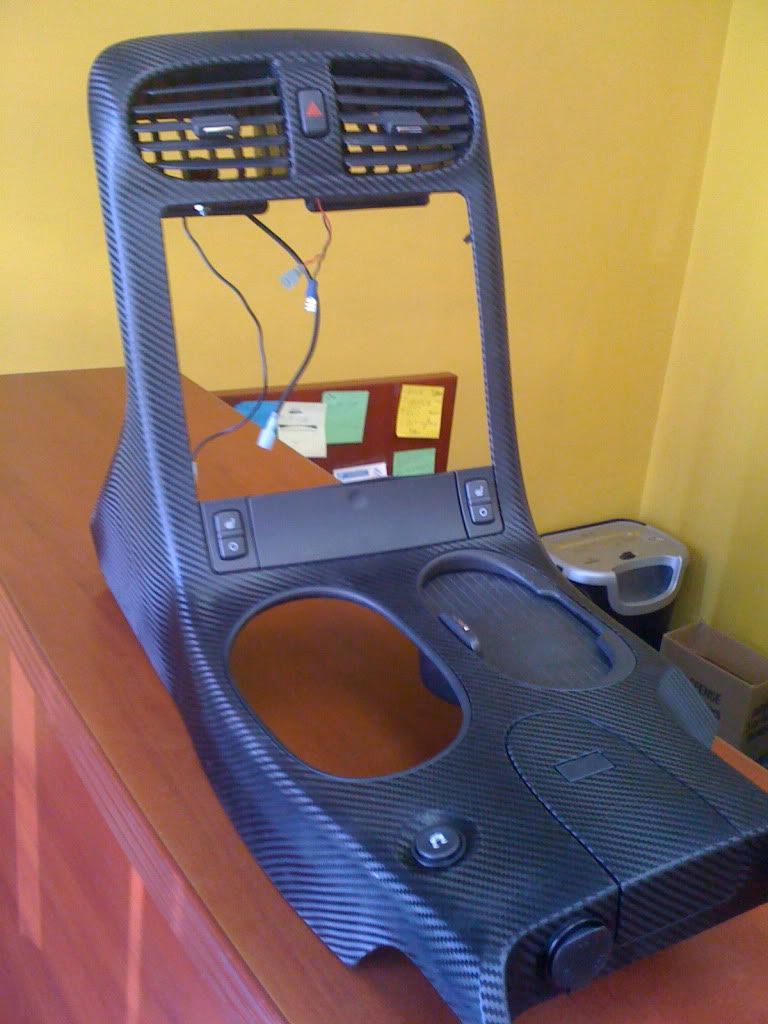
The hard pieces are the Console cover (if you want to do it in 1 piece,or seamless) the guy that did mine required several tries since it does have some pretty complicated contours in addition to the large piece of material (approx, 2' x 2 1/2') requiring some skillful stretching for the material to sit correctly.
I can post pics of the console completed, but forgot to take some pics yesterday when I was at the shop (Champion Motors)
The console turned out incredible.
The other spot that took many tries is the "ears" on either side of the gauge suround (since it is actually part of the suround and cannot be removed)
If you want to DYI heres a few points to keep in mind:
- set aside a weekend
- get a case of beer
- get a friend to help and keep you company (need more beer)
- take plenty of breaks (you will go nuts if your attempt is rushed without time in between to reset your brain!)
- set up a clean work area
- clean each piece front and back (where vinyl will wrap around and adhere to back surface) with isopropyl alcohol (40 - 60 %)
- get very comfortable
- use a good heat gun
- use a small and sharp x-acto knife with extra blades
- start with the difficult contour first, since you do not want to overstretch that area.
- apply many applications of suitable heat with heat gun (since this material is very pliable with heat, but "beware of overheating and overstretching")
- you can lift and reset pieces many times till you get your desired results.
- use thumbs to smooth out bubbles.
- if you do get a bubble make a small incision along the pattern and heat and smooth out.
- keep clean, including area, pieces being covered and hands! (try to keep hands clean)
contamination will spoil end result
- if you make a mistake and the material sticks together DO NOT scrunch the sheet up and toss out since once removed from the item being covered you can apply heat to the seemingly ruined sheet of material and it will totally straighten out magically as if it was before the attempted application unless you have put alot of stretches into it.
- keep in mind the console area in the car (while running) does get incredibly hot so make sure you leave enough material to fold over and anchor to the backside of each piece.
- keep in mind that vinyl may stretch or "let go" slightly after install due to the heat inside the vehicle interior (operating tempature, and heat from hot sunny days with windows closed) make sure all vinyl is grabbing securely on the backside and due not overstretch!
- good luck!
When you complete all the pieces you will be very impressed with end results and what this product can do.
Or you can get a professional to do the install!
If you are near Toronto, Canada I got mine done at Champion Motors
call Rob for information (416) 751-8047 or email at championmotors@rogers.com
Don't get me wrong this definately can be done on your own, but it does require an immense amount of attention and patience (the second which I am short on!) because I stood by and watched
and assisted with most of the pieces as it was being applied and depending your ability, expectation or standards you may be repeating some of pieces quite a few times before you get the results that you want. (you should also keep in mind that this vinyl is more expensive than your average common one colour vinyl.)What I suggest is that you try a piece at a time meaning don't strip your whole interior! (or you may be out of a car) since this is harder than applying mac tac to your kitchen cabinets! I did everything at once since my interior is currently totally apart due to my extended winter project... lol,
The pieces you see in the pics are the easier pieces to do.
The hard pieces are the Console cover (if you want to do it in 1 piece,or seamless) the guy that did mine required several tries since it does have some pretty complicated contours in addition to the large piece of material (approx, 2' x 2 1/2') requiring some skillful stretching for the material to sit correctly.
I can post pics of the console completed, but forgot to take some pics yesterday when I was at the shop (Champion Motors)
The console turned out incredible.
The other spot that took many tries is the "ears" on either side of the gauge suround (since it is actually part of the suround and cannot be removed)
If you want to DYI heres a few points to keep in mind:
- set aside a weekend
- get a case of beer
- get a friend to help and keep you company (need more beer)
- take plenty of breaks (you will go nuts
if your attempt is rushed without time in between to reset your brain!)- set up a clean work area
- clean each piece front and back (where vinyl will wrap around and adhere to back surface) with isopropyl alcohol (40 - 60 %)
- get very comfortable
- use a good heat gun
- use a small and sharp x-acto knife with extra blades
- start with the difficult contour first, since you do not want to overstretch that area.
- apply many applications of suitable heat with heat gun (since this material is very pliable with heat, but "beware of overheating and overstretching")
- you can lift and reset pieces many times till you get your desired results.
- use thumbs to smooth out bubbles.
- if you do get a bubble make a small incision along the pattern and heat and smooth out.
- keep clean, including area, pieces being covered and hands! (try to keep hands clean)
contamination will spoil end result
- if you make a mistake and the material sticks together DO NOT scrunch the sheet up and toss out since once removed from the item being covered you can apply heat to the seemingly ruined sheet of material and it will totally straighten out magically as if it was before the attempted application unless you have put alot of stretches into it.
- keep in mind the console area in the car (while running) does get incredibly hot so make sure you leave enough material to fold over and anchor to the backside of each piece.
- keep in mind that vinyl may stretch or "let go" slightly after install due to the heat inside the vehicle interior (operating tempature, and heat from hot sunny days with windows closed) make sure all vinyl is grabbing securely on the backside and due not overstretch!
- good luck!
When you complete all the pieces you will be very impressed with end results and what this product can do.
Or you can get a professional to do the install!
If you are near Toronto, Canada I got mine done at Champion Motors
call Rob for information (416) 751-8047 or email at championmotors@rogers.com
Last edited by CDN Vette; 05-30-2010 at 02:39 AM.
05-30-2010, 02:32 AM
#8
Pro
Thread Starter
Member Since: Jan 2006
Location: Toronto Ontario
Posts: 645
Likes: 0
Received 0 Likes
on
0 Posts
05-30-2010, 11:26 PM
#12
Pro
Thread Starter
Member Since: Jan 2006
Location: Toronto Ontario
Posts: 645
Likes: 0
Received 0 Likes
on
0 Posts
Hope this was helpful.
Last edited by CDN Vette; 05-31-2010 at 12:01 AM.
05-31-2010, 12:43 PM
#13
Instructor
Member Since: Feb 2009
Location: orange county ca
Posts: 104
Likes: 0
Received 0 Likes
on
0 Posts
here is mine done about 2 weeks ago with help of my friend. it wasn't easy or perfect, but looks good to me[IMG]http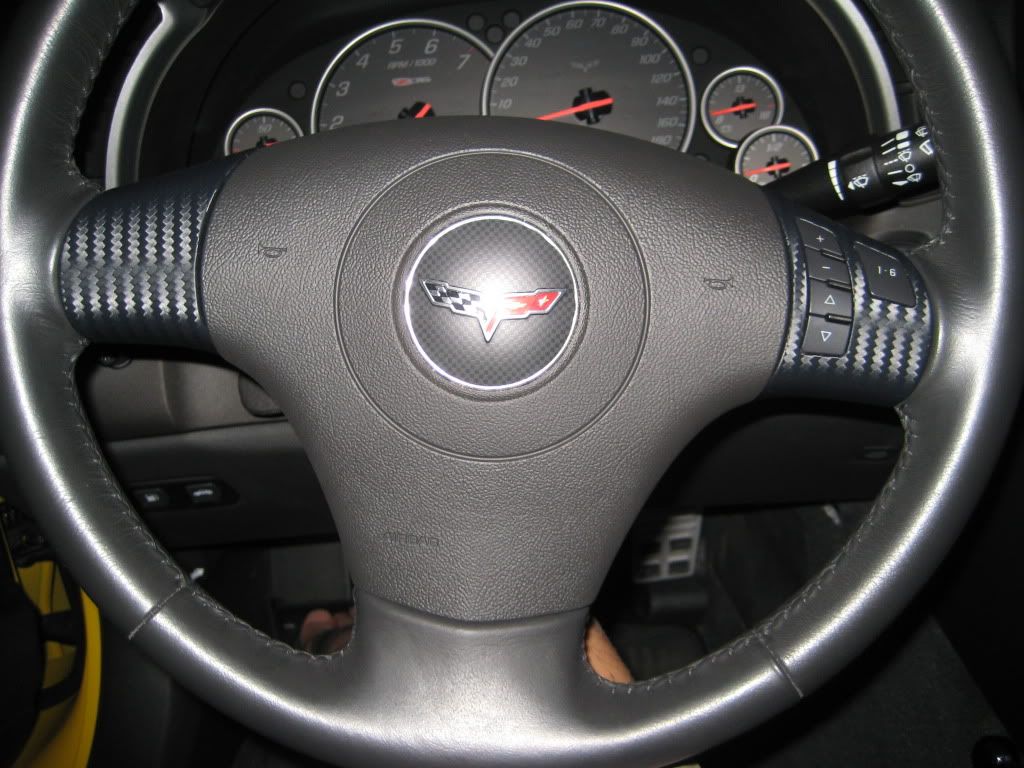 ://i998.photobucket.com/albums/af109/golf925/002.jpg[/IMG]
://i998.photobucket.com/albums/af109/golf925/002.jpg[/IMG]
 05-31-2010, 09:30 PM
#16
Safety Car

Put a pocket screwdriver tip underneath the speed nut and apply pressure while backing off the speed nut.
05-31-2010, 09:43 PM
#17
Safety Car
Those both look good.
I am undecided on the color, either the silver or light pewter.
How much material did you need for all the pieces?
thx
I am undecided on the color, either the silver or light pewter.
How much material did you need for all the pieces?
thx
05-31-2010, 10:36 PM
#18
Pro
Thread Starter
Member Since: Jan 2006
Location: Toronto Ontario
Posts: 645
Likes: 0
Received 0 Likes
on
0 Posts
good luck with that method.
05-31-2010, 10:40 PM
#19
Pro
Thread Starter
Member Since: Jan 2006
Location: Toronto Ontario
Posts: 645
Likes: 0
Received 0 Likes
on
0 Posts
Two yards should be enough to do all pieces depending on your persnal standards and how many times you would retry to get out imperfections.
good luck
Last edited by CDN Vette; 05-31-2010 at 10:48 PM.
06-11-2010, 02:12 AM
#20
Pro
Thread Starter
Member Since: Jan 2006
Location: Toronto Ontario
Posts: 645
Likes: 0
Received 0 Likes
on
0 Posts
Installed wrapped console yesterday.
here are a couple of pics.
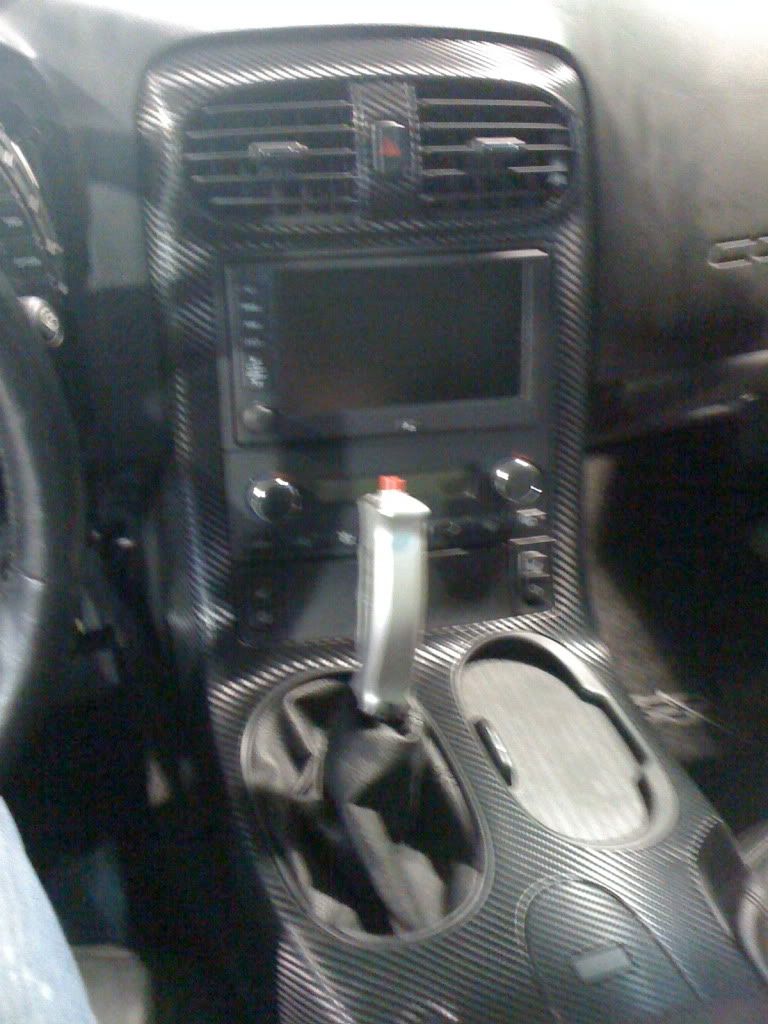
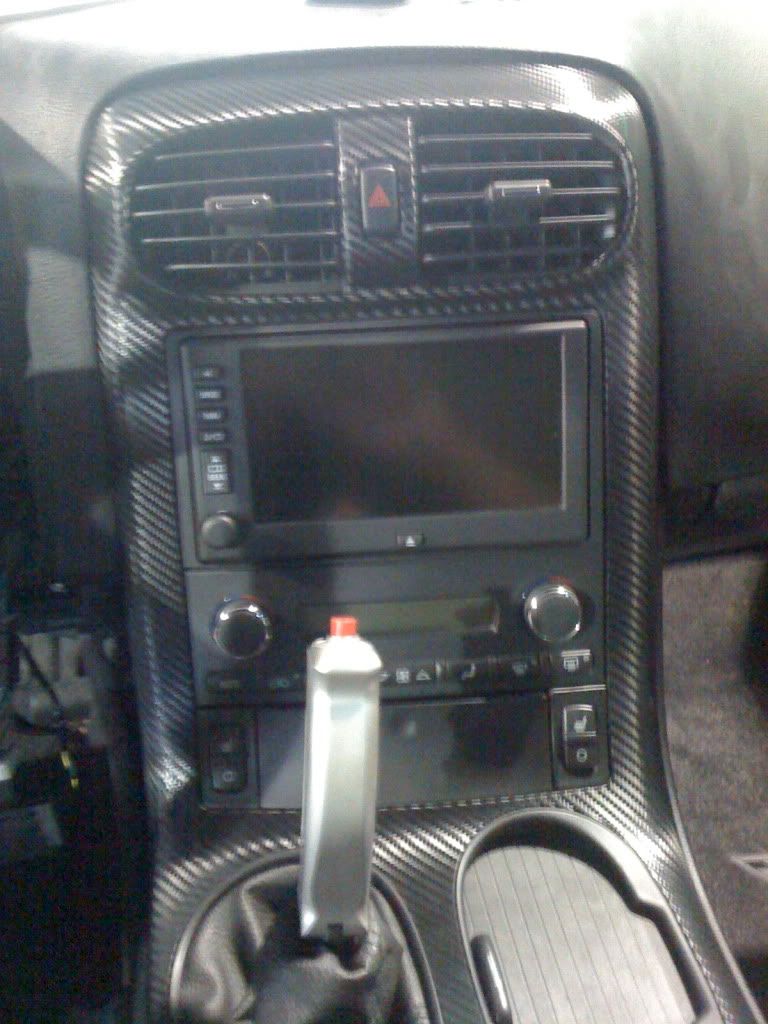
sorry the pics were of such low quality (interior still a mess since car is in a bodyshop), will re-shoot and post better ones later.
here are a couple of pics.
sorry the pics were of such low quality (interior still a mess since car is in a bodyshop), will re-shoot and post better ones later.
Last edited by CDN Vette; 06-11-2010 at 09:03 AM.

