
Third Brake Light Troubles
 02-02-2014, 11:46 PM
#1
Instructor

Thread Starter

Member Since: Mar 2009
Location: Battle Ground, Wa
Posts: 115
Likes: 0
Received 0 Likes
on
0 Posts
So I have done a search to check and see if anyone has had the same issue on a C6 and couldn't find too much that was helpful. My brake lights work perfectly, but my third brake light never comes on. It is hooked up and the connection is good, but it doesn't turn on. I haven't hooked a multi-meter to it to see if any readings come out when I hit the brakes, but I was hoping there was a common issue that someone knew of that could save me some time tracking down an electrical gremlin.


 02-06-2014, 12:58 PM
#6
Team Owner

 Use a meter at the light and if it is getting power then replace the light. Until you confirm that the problem is indeed the light itself, you will just be throwing parts at it...which can get expensive and have no results. The light is solid state...just a bit of circuitry and some LEDs, so it is unusual to have problems with it.
 02-23-2014, 05:42 PM
#8
Instructor
Thread Starter
Member Since: Mar 2009
Location: Battle Ground, Wa
Posts: 115
Likes: 0
Received 0 Likes
on
0 Posts
So I replaced the third brake light, and I am still not getting anything out of it. I will hook up a multi meter and see, but I think it is not the light now. I noticed on a few other threads that some people had an issue with the connector that has all the tail lights on it. Corrosion. I will try and get to that plug, which is behind the pass. tail lights and clean it out and see if that helps. Fingers crossed.
02-23-2014, 06:36 PM
#9
Instructor
Thread Starter
Member Since: Mar 2009
Location: Battle Ground, Wa
Posts: 115
Likes: 0
Received 0 Likes
on
0 Posts
Okay, so I got to the connector that has all the tail lights in one plug. The corrosion was unbelievable. That being said, I cleaned it all up, but still no luck. One thing I sadly noticed, was that there are about 7 wires going into the body side of the connector, but when you disconnect the plugs, there are only 5 pins. I think the corrosion was so bad, it may have worked its way through some of the pins, and when I disconnected it, they may be lodged in the other connector that is connected to the tail light harness. What a nightmare. I am pretty sure they should be about 7 pins on the one side, because there seven wires. Perhaps I am wrong, anyone with a wiring diagram of the tail lights? I wonder if this is related to my rear trunk release not working as well. Button doesn't work, even when replaced. I swapped the button for a new one as they are super cheap, but still no luck. Perhaps it routes through the same harness?
02-23-2014, 07:04 PM
#10
Team Owner

Here's one from another site. And yes, you can see that the trunk lid release is in the same connector.
Wiring harness
Rather than hack up my wiring harness, I made a short adapter and inserted it at connector C455 which is located behind the right tail lamp assembly. This is the junction that connects the I/P harness to the deck lid harness and it provided access to all of the relevant tail light circuits; here's the pinout of connector (Rear body harness to I/P harness).
Pin......Wire color.....Function
A........BK................Ground
B........L-BU.............Stop lamp supply voltage
C........L-GN.............Backup lamp supply voltage
D........YE................Left rear stop/turn lamp supply voltage
E........BN................Park lamp supply voltage
F........TN................Rear compartment lock actuator unlock
G........D-GN............Right rear stop/turn lamp supply voltage
03-15-2014, 01:27 AM
#11
Instructor
Thread Starter
Member Since: Mar 2009
Location: Battle Ground, Wa
Posts: 115
Likes: 0
Received 0 Likes
on
0 Posts
Okay, so I finally got around to fixing this problem. Just verified it with the wife, so I had an extra set of eyes to double check and make sure it was really working. I was also having a problem with my rear trunk release button, which made me think of the commonly corroded connector inside the bumper. Well, I took it apart, each terminal inside of the connector that is, and I found the terminals were corroded and falling apart, literally. 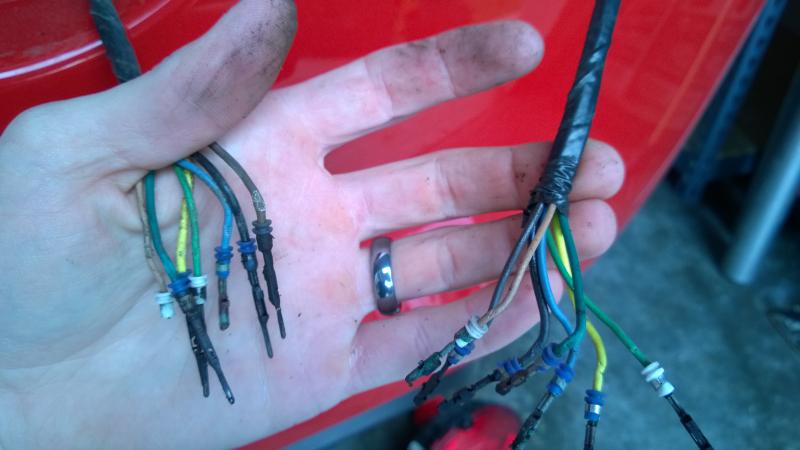
So I purchased an 8-pin MSD Deutsch connector.
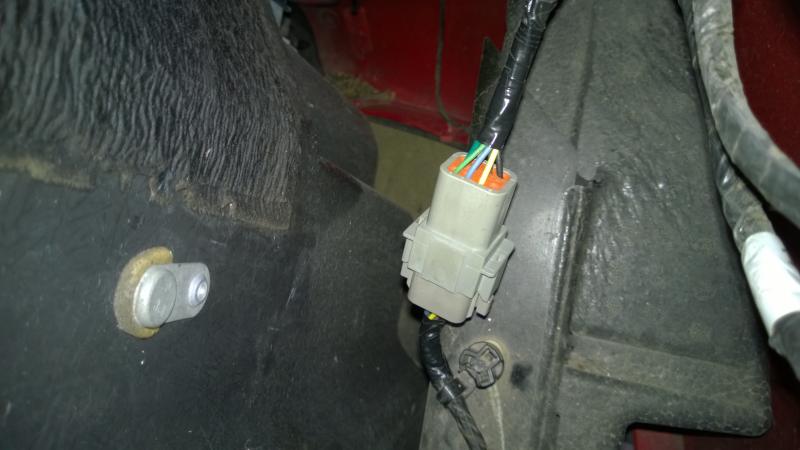
I then cut all the ends, put them in the new connector, matched the colors on each side to one another, plugged it in, and bam! Fixed! Thought this may help someone else someday.
So I purchased an 8-pin MSD Deutsch connector.
I then cut all the ends, put them in the new connector, matched the colors on each side to one another, plugged it in, and bam! Fixed! Thought this may help someone else someday.
03-15-2014, 12:47 PM
#13
Race Director

Member Since: Sep 2007
Location: Peoria/Phoenix AZ
Posts: 16,555
Received 2,060 Likes
on
1,505 Posts
C6 of Year Finalist (performance mods) 2019

Was this on your '07? Did you buy it new? Is it parked outside near the ocean regularly?
Just asking and trying to determine a cause.
Just asking and trying to determine a cause.
 03-15-2014, 04:13 PM
#15
Melting Slicks


that is some SERIOUS corrosion.. That looks like something I would expect to see on a boat that hasn't been taken care of (not trying to imply anything OP).. I'm just a bit shocked that enough moisture got into that location to cause that. I've taken a number of these style of connectors on the car apart (mine is a garage kept 2007 but I drive it a lot and take it to the track in the rain, etc).. I've just never seen anything like that in the connectors I've opened up. Good find OP and now we know that the trunk release switch shares that connector with the tails.
03-16-2014, 06:26 PM
#17
Instructor
Thread Starter
Member Since: Mar 2009
Location: Battle Ground, Wa
Posts: 115
Likes: 0
Received 0 Likes
on
0 Posts
I did not buy this '07 new. It has been in the Northwest for most of its life, and the previous owner, knowing the area they lived in, probably parked it inside their most likely 10 car garage up on richy rich mountain. I myself park it inside as well. I went through the extra effort to protect the new plug with some lithium grease around the seal and some WD-40 as well. I was a little upsetting to see a "weatherproof" plug with that much corrosion in it. I would normally just chalk it up to life in the NorthWest, but seeing as how other people in different states have a similar issue, though not as bad, I think it is a defect in some of their connectors. It was an annoying lesson to learn, but now I know what to look for, and putting the new connector together was straight forward and simple. Hope this can help someone else out. I also hope the new MSD connector will be a bit higher quality and block out some of that moisture too.
 04-06-2015, 10:30 AM
#19
Okay, so I finally got around to fixing this problem. Just verified it with the wife, so I had an extra set of eyes to double check and make sure it was really working. I was also having a problem with my rear trunk release button, which made me think of the commonly corroded connector inside the bumper. Well, I took it apart, each terminal inside of the connector that is, and I found the terminals were corroded and falling apart, literally. Attachment 47775714
So I purchased an 8-pin MSD Deutsch connector.http://www.amazon.com/gp/product/B00...?ie=UTF8&psc=1
Attachment 47775716
I then cut all the ends, put them in the new connector, matched the colors on each side to one another, plugged it in, and bam! Fixed! Thought this may help someone else someday.
So I purchased an 8-pin MSD Deutsch connector.http://www.amazon.com/gp/product/B00...?ie=UTF8&psc=1
Attachment 47775716
I then cut all the ends, put them in the new connector, matched the colors on each side to one another, plugged it in, and bam! Fixed! Thought this may help someone else someday.
04-06-2015, 12:28 PM
#20
Team Owner
By removing the passenger side taillight(s). Whether you remove one or both lights, be careful. There is only one tiny screw at the top of each light. That screw goes into a clip that just slides over the edge of the panel, nothing holds it in place other than friction. So, just take it slow, careful and gentle as you remove the screw and the light. Then check the clip to see how secure it is. You could accidentally knock it off the car and into the abyss inside the rear fascia.
Look in here for a pic of the offending connector we are talking about:
https://www.corvetteforum.com/forums...post1587469894
Look in here for a pic of the offending connector we are talking about:
https://www.corvetteforum.com/forums...post1587469894