
Jacking and jack stands
 12-09-2012, 10:33 AM
#1
Race Director

Thread Starter
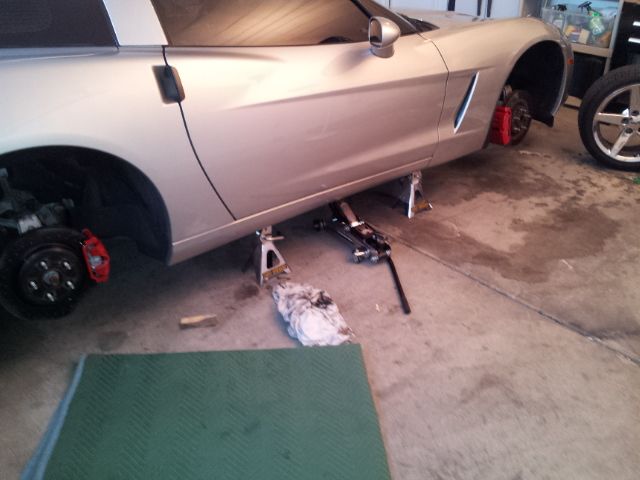
To raise my 2006 convertible with Z51 (if that matters) at stock height, I'm planning to drive up on some 2 x 12's, or whatever it takes to get my jack under there. Then, I will use my floor jack with a piece of 2 x 4 on top to span the crossmember ribs, as specified in the owner's manual.
I need two jacking locations, really. One for the jack, and a different spot for the jack stand.
My question is, how to get a jack stand under there? The location for jacking seems to be pretty limited; is there room for another piece of 2 x 4 with a jack stand under it? I'm just wondering how people normally get jack stands under there.
Can I jack it from the center, and then put the jack stands on the sides? From the manual, there appears to be some crossmember ribs in the center I could use, but I don't want to do any damage.
I know ramps are an option, too, but let's limit this thread to jacking up the car, please.
Thanks in advance!


 12-09-2012, 12:05 PM
#3
Race Director
Thread Starter
So it is ok to span a couple of crossmember ribs, and it doesn't matter which ones? I was just concerned because the owner's manual was so specific about where to put the jack.
 12-09-2012, 05:39 PM
#6
Burning Brakes

Member Since: Nov 2005
Location: Georgetown TX
Posts: 815
Likes: 0
Received 0 Likes
on
0 Posts

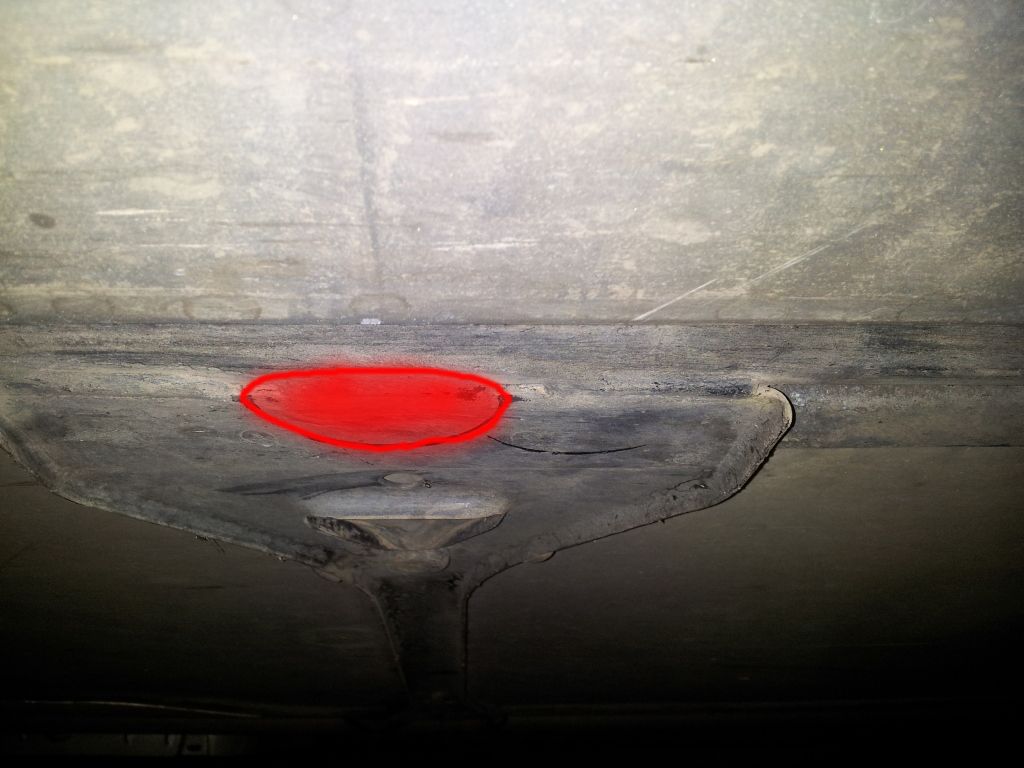
Just take your jack and put the 2x4 on top of it horizontally, and place it under either the front or rear aluminum subframe. Can't miss it. You can then put the stands either on each end of the 2x4, or use any of the 4 spots (2 on each side) to put your stands.
Jack and stands under rear subframe is an option. You can do the same on the front.
Front location for jackstands. There's a spot on each side in front of the rear wheel for a stand, too. Just look under there and you'll see where there's sort of a cutout for the body panels and you'll see the frame area.
12-09-2012, 05:49 PM
#7
Race Director
Thread Starter
Thanks for all the input. The 2 x 4 looks like a good idea across the front and back, and then I can put the stands under each end.
For changing the oil, I think I'll jack up the front, put the stands in place, and then jack up the back just to get it level.
For changing the oil, I think I'll jack up the front, put the stands in place, and then jack up the back just to get it level.
12-09-2012, 06:32 PM
#8
Race Director
I have two low profile jacks and metal adapters I purchased from Mid America that fit in the jack. I jack the car at the front jack points and lift the front end up. This allows ample room to perform most maintence on the engine and suspension. I place blocks under the wheels to prevent the car from lowering, for safety.
12-10-2012, 02:54 PM
#9
Team Owner


Member Since: Sep 2000
Location: Far NW 'burbs of Chicago
Posts: 23,937
Received 2,051 Likes
on
1,362 Posts
St. Jude Donor '13

I prefer a 2 x 6 for jacking on the front or rear crossmember, less flex and nicely spans the ribs front to back.
For the front, there are actually two "front' crossmembers, I'm not sure of their official names. The rearward of the two is just behind the oil pan, very difficult to reach, and easy to hit the pan instead. Be careful...
For the front, there are actually two "front' crossmembers, I'm not sure of their official names. The rearward of the two is just behind the oil pan, very difficult to reach, and easy to hit the pan instead. Be careful...
12-11-2012, 03:20 PM
#10
The old saying "Steel Is For Real"!
Without drive up ramps, without scratching oem frame rail paint and all at oem recommended jacking points. Two methods I have adapted:-
---
My "old" method:-
This is one option when using OEM Cross member. Just picture this home made 316 marine grade cres balance beam + milled T6 jacking pads, without the drive up's in picture and one end at a time, w/jack stands either under balanced beam or jacking puck slot to support:
http://i896.photobucket.com/albums/a...6/P1010157.jpg
---
"New" method w/galvanized steel + Delrin:-
Using jacking puck of your choice (mine is home made delrin - to eliminate damaging paint) from behind either front side, the whole side will go up at high enough to put these on, depending on work to be done:
A. Under tire patch - All work other than suspension:
http://i896.photobucket.com/albums/a...6/P1010005.jpg
B. Under Frame Rail Shipping Point (Jacking Puck Slot) for all work - using combination of spreader bar with Delrin Jacking puck:
http://i896.photobucket.com/albums/a...6/P1010004.jpg
Just to show elevated position under tire patch, you can picture stands under Frame Rail Shipping Slot (Jacking Puck Slot):
http://i896.photobucket.com/albums/a...6/P1010002.jpg
---
Jacking option still evolving...Might yet come up with simpler set up...Stay tune....
01-06-2013, 08:45 PM
#11
Melting Slicks

Member Since: Dec 2006
Location: Orange County California
Posts: 2,249
Received 90 Likes
on
71 Posts
Victorf...I'm still wanting to get around to building some stands like yours. One of the safest methods I've seen. Some questions:
- Does the silver version have a cross member connecting the two short sides so they don't "splay out?"
- Welded or bolted?
- Care to provide the dimensions? I mean, it's fairly obvious but I wouldn't mind knowing what you've done.
- And, what type of steel did you use?
Thanks.
- Does the silver version have a cross member connecting the two short sides so they don't "splay out?"
- Welded or bolted?
- Care to provide the dimensions? I mean, it's fairly obvious but I wouldn't mind knowing what you've done.
- And, what type of steel did you use?
Thanks.
Last edited by IAIA; 01-07-2013 at 02:03 AM.
01-07-2013, 04:17 PM
#12
Victorf...I'm still wanting to get around to building some stands like yours. One of the safest methods I've seen. Some questions:
- Does the silver version have a cross member connecting the two short sides so they don't "splay out?"
- Welded or bolted?
- Care to provide the dimensions? I mean, it's fairly obvious but I wouldn't mind knowing what you've done.
- And, what type of steel did you use?
Thanks.
- Does the silver version have a cross member connecting the two short sides so they don't "splay out?"
- Welded or bolted?
- Care to provide the dimensions? I mean, it's fairly obvious but I wouldn't mind knowing what you've done.
- And, what type of steel did you use?
Thanks.
2. Seal welded
3. "U" channel is 1 1/2" x 3" x 1/4" thick - saved a little weight.
"Box" tube is 2" x 3" x 1/8" thick.
Finished size:8"x12"x14" Spreader Bar: 3 1/4" total
Working height under tire contact patch without Spreader Bar:
@8"=14"
@12"=28"
@14"=20"
Working height under fram with Spreader Bar: add 3 1/4" to above.
4. Both type steel are cold galvanized structural steel.
---
If you feel more comfortable, use all "Box" steel to completely eliminate "splay out" concerns.
If I'd left over T6 "Box" structural material, that would have been my choice - whole lot lighter and without corrosion issue.
HTHs your future planning.
01-07-2013, 10:28 PM
#14
I have always lifted my Vette from the middle front and rear cross-members with zero issue. I used a piece of 2x4 to leave no marks on the aluminum cross-member, and quickly after lifting the car, put it either on Rhino ramps or jack stands right under the suspension lower arm pivot point, which is the 'preferred' jacking location. The bulky brace some folks like to use is overkill IMO, since it's never a good idea to leave a jack loaded for any length of time. To jack up the front, I drive the car over 2 2x6s and then use my racing aluminum jack to raise it from the front. And if the car is cold, I raise it simultaneously from both front jack puck positions with 2 jacks, obviously with the appropriate BMW jack pucks, which fit perfectly. I have both kinds, since for my jack kit, I have to use the rectangular ones. And I have permanently installed the round ones. I can do almost anything with no new tools. Works for me  . Oh, and I have to say I'd NEVER support my car as suggested on post #5, but to each his own.
. Oh, and I have to say I'd NEVER support my car as suggested on post #5, but to each his own.
01-08-2013, 03:31 PM
#15
Drifting

I have one HF 2-ton aluminum race jack, & 4 HF 1.5 ton aluminum jack stands & will be swapping out exhaust manifolds...a used LS7 system or LT headers on my '12 GS...(still can't decide which, & I'm in CA.).
My first go at putting it on all 4 stands wasn't good, so I'll try this method; Lifting each front side at the frame pucks & putting my plastic ramps under the tires (can't drive up on them b/c they slip forward on my epoxy floor...grrr), then jacking up the rear w/ a 4x4 under the rear crossmember, putting 2 jack stands under it, then lifting more at the front crossmember & 2 jack stands there, then getting all 4 jackstands up to their max 16" height. I'll leave the ramps underneath the tires for added safety.
If anyone's got a better/quicker/safer method given my current tools, I'm all ears.
01-08-2013, 04:00 PM
#16
Melting Slicks
Member Since: Dec 2006
Location: Orange County California
Posts: 2,249
Received 90 Likes
on
71 Posts
I have one HF 2-ton aluminum race jack, & 4 HF 1.5 ton aluminum jack stands & will be swapping out exhaust manifolds...a used LS7 system or LT headers on my '12 GS...(still can't decide which, & I'm in CA.).
My first go at putting it on all 4 stands wasn't good, so I'll try this method; Lifting each front side at the frame pucks & putting my plastic ramps under the tires (can't drive up on them b/c they slip forward on my epoxy floor...grrr), then jacking up the rear w/ a 4x4 under the rear crossmember, putting 2 jack stands under it, then lifting more at the front crossmember & 2 jack stands there, then getting all 4 jackstands up to their max 16" height. I'll leave the ramps underneath the tires for added safety.
If anyone's got a better/quicker/safer method given my current tools, I'm all ears.
My first go at putting it on all 4 stands wasn't good, so I'll try this method; Lifting each front side at the frame pucks & putting my plastic ramps under the tires (can't drive up on them b/c they slip forward on my epoxy floor...grrr), then jacking up the rear w/ a 4x4 under the rear crossmember, putting 2 jack stands under it, then lifting more at the front crossmember & 2 jack stands there, then getting all 4 jackstands up to their max 16" height. I'll leave the ramps underneath the tires for added safety.
If anyone's got a better/quicker/safer method given my current tools, I'm all ears.
01-09-2013, 07:18 AM
#17
Race Director
I prefer a 2 x 6 for jacking on the front or rear crossmember, less flex and nicely spans the ribs front to back.
For the front, there are actually two "front' crossmembers, I'm not sure of their official names. The rearward of the two is just behind the oil pan, very difficult to reach, and easy to hit the pan instead. Be careful...
For the front, there are actually two "front' crossmembers, I'm not sure of their official names. The rearward of the two is just behind the oil pan, very difficult to reach, and easy to hit the pan instead. Be careful...
 I also use pressure treated pine (outdoor grade) rather than plain yellow pine for extra toughness.
01-09-2013, 07:23 AM
I also use pressure treated pine (outdoor grade) rather than plain yellow pine for extra toughness.
01-09-2013, 07:23 AM
#18
Race Director
I have been lifting C5 and C6 gen vettes this way for 12 years with no issues. Just have to drive the car's four wheels onto appropriated sized wooden ramps to gain enough ground clearance for my 3.5 ton standard Sears floor jack. Then place regular ramps and/or jack stands as needed for what I plan to do after the car has been lifted.
01-09-2013, 04:21 PM
#19
Melting Slicks
Member Since: Dec 2006
Location: Orange County California
Posts: 2,249
Received 90 Likes
on
71 Posts
I have been lifting C5 and C6 gen vettes this way for 12 years with no issues. Just have to drive the car's four wheels onto appropriated sized wooden ramps to gain enough ground clearance for my 3.5 ton standard Sears floor jack. Then place regular ramps and/or jack stands as needed for what I plan to do after the car has been lifted.
01-09-2013, 04:51 PM
#20
I have been lifting C5 and C6 gen vettes this way for 12 years with no issues. Just have to drive the car's four wheels onto appropriated sized wooden ramps to gain enough ground clearance for my 3.5 ton standard Sears floor jack. Then place regular ramps and/or jack stands as needed for what I plan to do after the car has been lifted.IMO, however, if doing things the usual way and not thinking outside the box - nothing good or efficient will come of it.
On my earlier post #10, I revealed my former method and concluded with my present set up without multiple inefficient positioning with ramps, jack stands and such - to be simple and efficient.
But, we all have limitation and capability.
Whatever turn you on.

I do that too, but for oil changes I found that I prefer to let the oil drain without turning on the engine (some like to drain while the oil is very hot, I know, but oil has an amazing ability to flow downward at any temperature). So I've been jacking from the side pucks and putting the jack stands under the cross members. No driving necessary, even using a similar, 4 ton standard heavy mother jack.
Different story with single viscosity and thick dino oil.