
DIY swapping new rear rotors onto Z06/GS (pics)
 03-27-2013, 09:10 AM
#1
Race Director


Thread Starter
I changed the rear rotors on my Z06 yesterday, and took a few pics to show how easy it is to work on the brakes of a Z06 or GS. A base or ZR1 is essentially identical - just a different caliper. The ZR1 has some special precautions to take to avoid damaging the expensive carbon ceramic rotor discs.
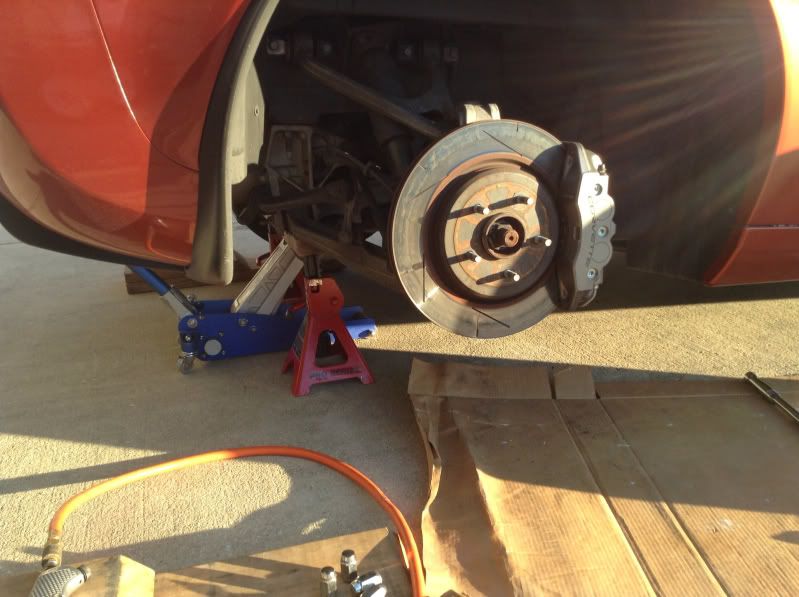
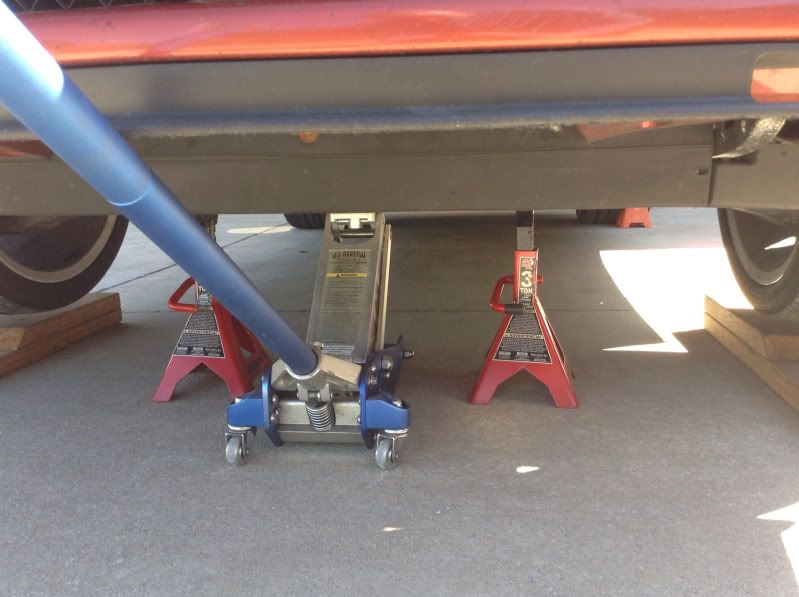
I first raised the rear end with my jack and put jackstands under it so it's safely in the air. I have chocks on the left front wheel. DO NOT set the parking brake when working with the rear rotors!! The parking brake is a shoe/drum type brake with the drum being the rear brake rotor, so the parking brake needs to be off in order to remove the rotor:
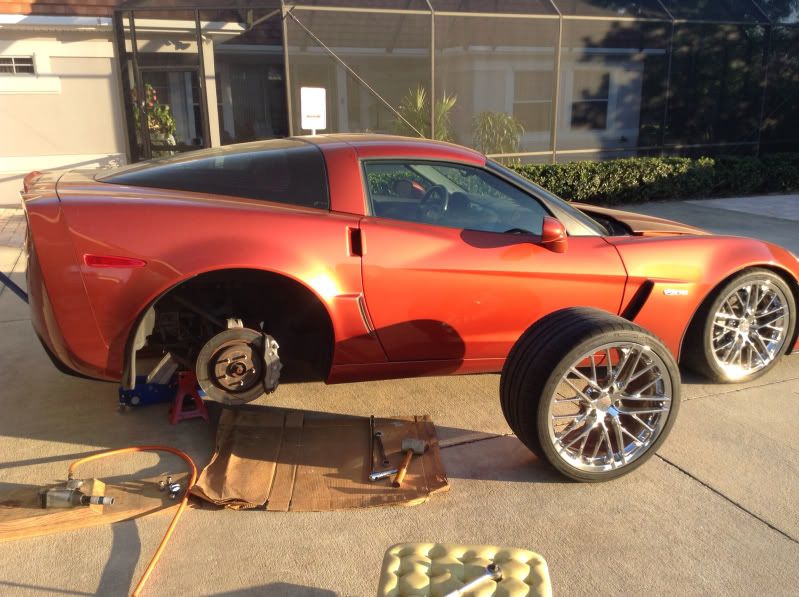
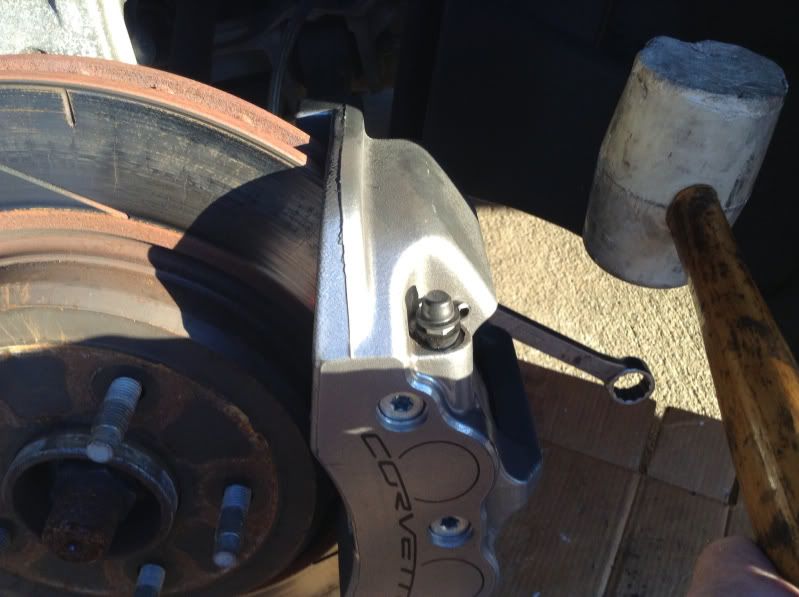
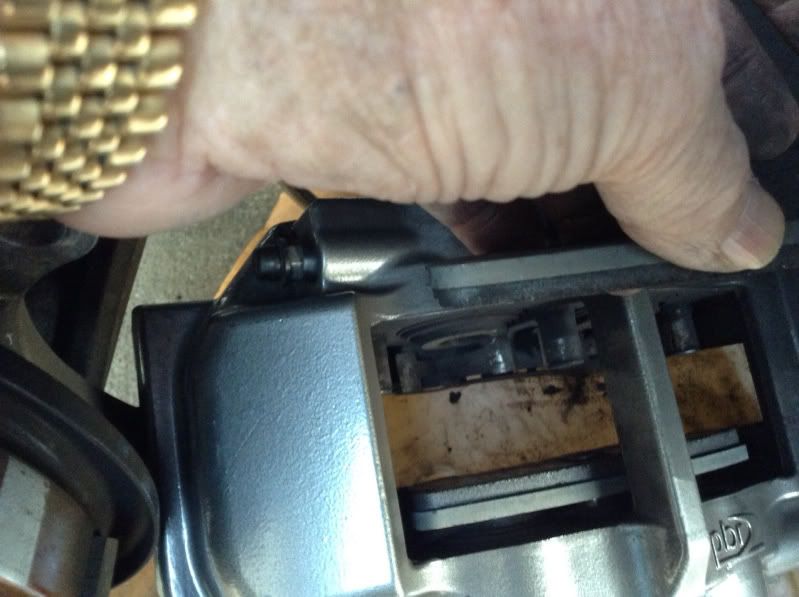
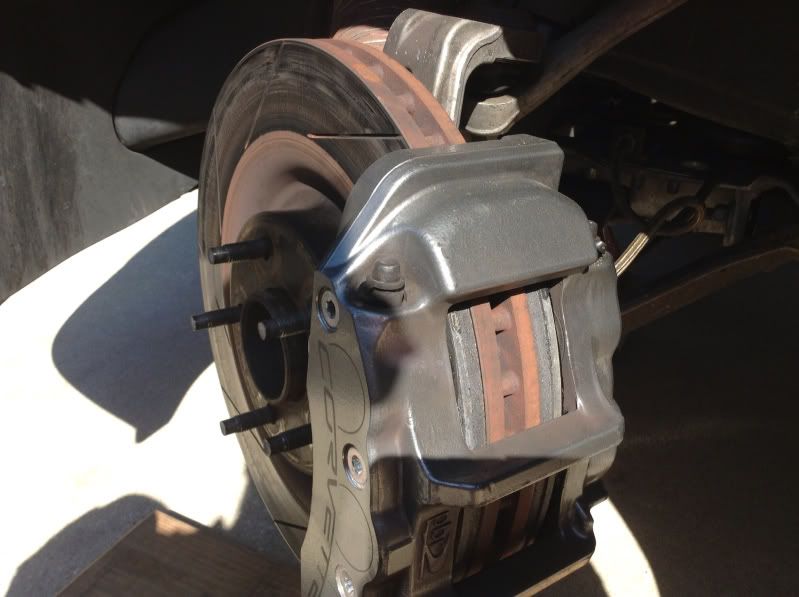
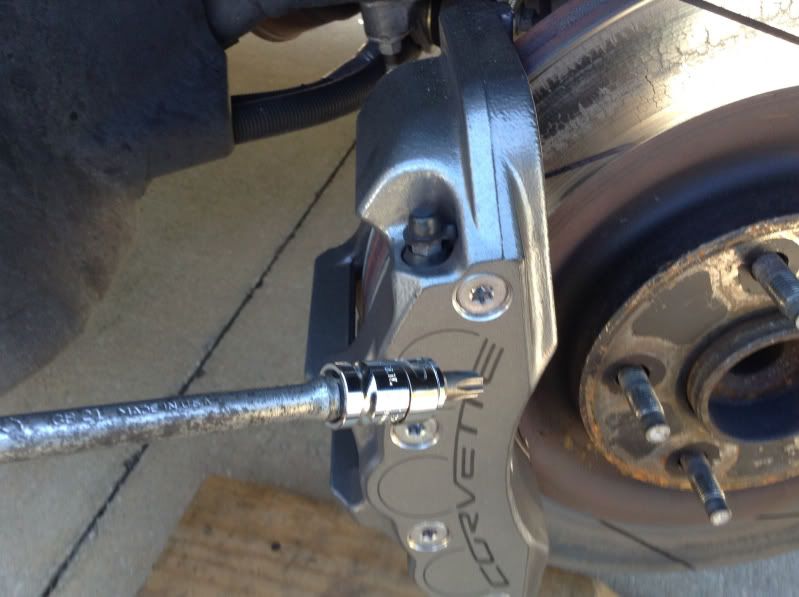
With the wheel removed you're ready to take off the caliper - the two large bolts that hold the caliper on are on the backside of the caliper:
The two large bolts are 21mm, but a 13/16" socket or wrench fits perfect as well. I've got a nice breaker bar, but unless the car is high enough in the air you don't have much room to work with. I've also got an impact wrench that works well.
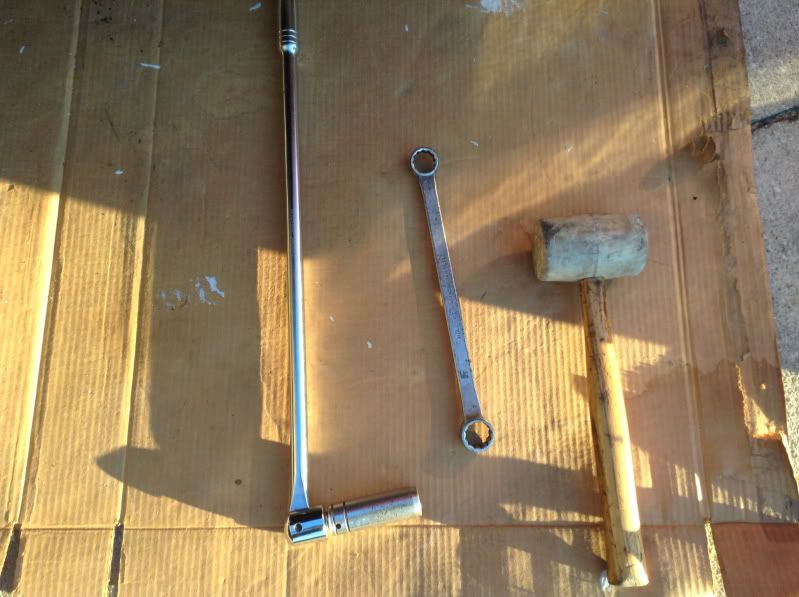
However, my tool of choice is a BFH - big friggin' hammer!! Here I've got a 13/16" box end on one of the bolts and can easily break the bolt loose with a few good whacks with my rubber dead blow mallet:
Once the bolts are removed you can slide the caliper off the rotor. Make sure you've got something to sit the caliper on so you don't put any tension on the brake hose. Here I've got a plastic bucket to sit the caliper on. In the picture below I put a couple Tinnerman nuts loosely on two of the lugs just to show what you would have the first time the rotor is worked on - they are put tight on the lugs just simply to hold the rotor on the hub as the car goes down the assembly line until the calipers get put on later in the build process. They are not needed, so first time you work on the brakes remove and discard them. They have been known to cause wheel vibrations when aftermarket wheels are installed that don't have a recessed/countersunk area on the wheel like OE wheels:
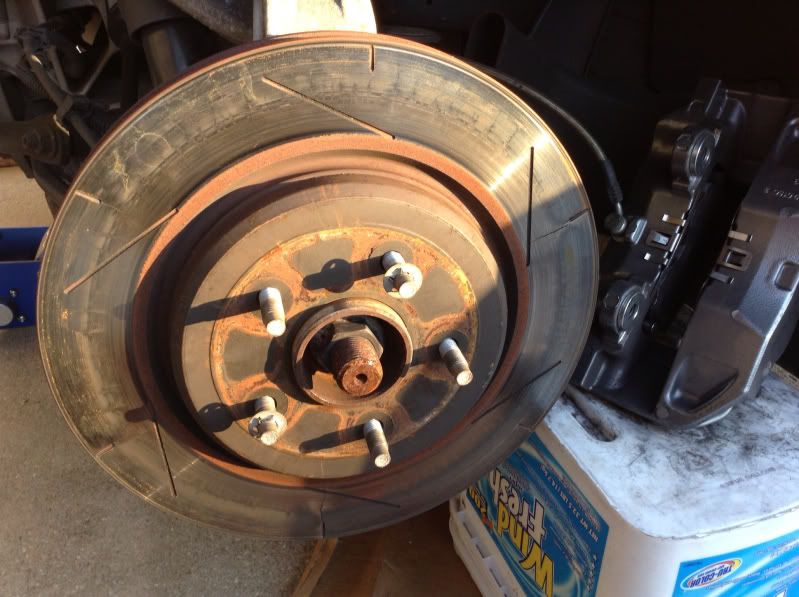
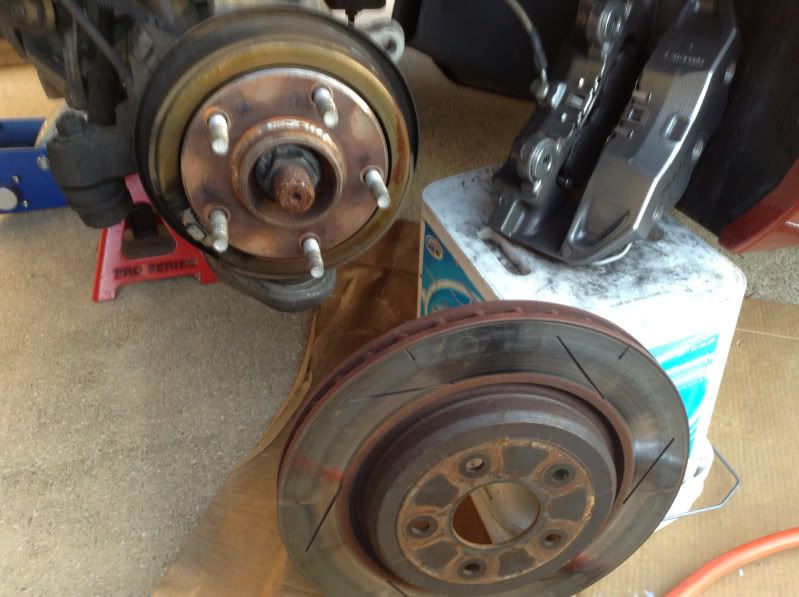
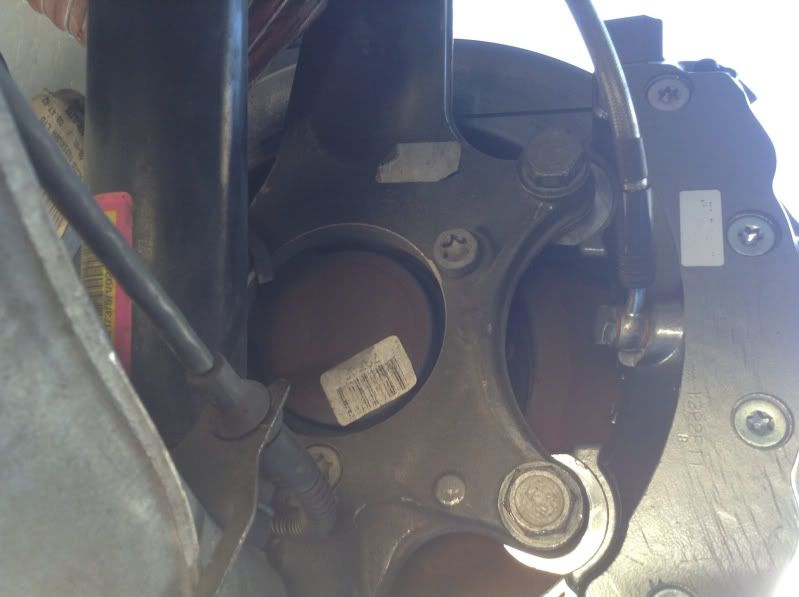
Once the caliper is removed, just pull the rotor straight off. You now have access to do a good inspection of the brake hose, the suspension components, the parking brake shoe, and you can see the axle nut:
I first raised the rear end with my jack and put jackstands under it so it's safely in the air. I have chocks on the left front wheel. DO NOT set the parking brake when working with the rear rotors!! The parking brake is a shoe/drum type brake with the drum being the rear brake rotor, so the parking brake needs to be off in order to remove the rotor:
With the wheel removed you're ready to take off the caliper - the two large bolts that hold the caliper on are on the backside of the caliper:
The two large bolts are 21mm, but a 13/16" socket or wrench fits perfect as well. I've got a nice breaker bar, but unless the car is high enough in the air you don't have much room to work with. I've also got an impact wrench that works well.
However, my tool of choice is a BFH - big friggin' hammer!! Here I've got a 13/16" box end on one of the bolts and can easily break the bolt loose with a few good whacks with my rubber dead blow mallet:
Once the bolts are removed you can slide the caliper off the rotor. Make sure you've got something to sit the caliper on so you don't put any tension on the brake hose. Here I've got a plastic bucket to sit the caliper on. In the picture below I put a couple Tinnerman nuts loosely on two of the lugs just to show what you would have the first time the rotor is worked on - they are put tight on the lugs just simply to hold the rotor on the hub as the car goes down the assembly line until the calipers get put on later in the build process. They are not needed, so first time you work on the brakes remove and discard them. They have been known to cause wheel vibrations when aftermarket wheels are installed that don't have a recessed/countersunk area on the wheel like OE wheels:
Once the caliper is removed, just pull the rotor straight off. You now have access to do a good inspection of the brake hose, the suspension components, the parking brake shoe, and you can see the axle nut:
 03-27-2013, 09:11 AM
#2
Race Director
Thread Starter
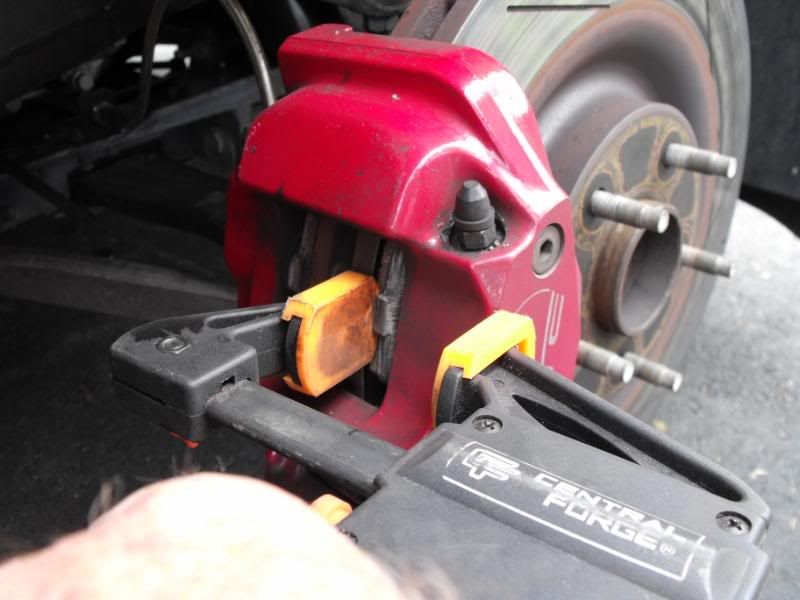
Here I'm using a clamp to push the pistons back into the caliper so I can get the pads over the rotor when reinstalling it - the paper towel is to protect the face of the caliper to keep it pretty!! In the picture below you can also see the parking brake shoe on that sort of brass colored ring around the hub. When you push the pistons in they in turn push the fluid back up into the system and if the master cylinder is pretty full it might overflow:
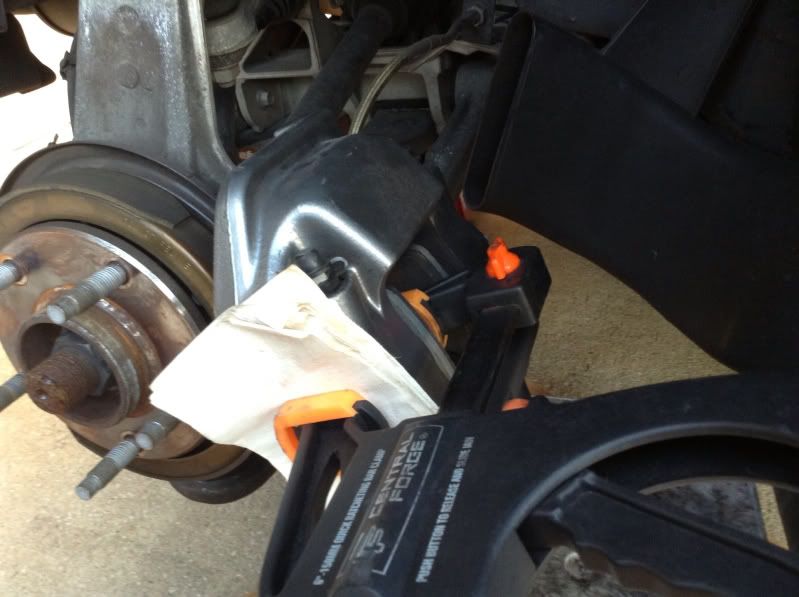
It's important to push the pistons all the way in if you're putting in new pads or padlets because the new ones will be a lot fatter than your worn ones and you'll need to get them spread as much as you can so the area between them is as wide as possible to get the caliper onto the rotor. Below you can see the bottom pistons are pretty well pushed in and the pad backing plate is pretty flush with the caliper. The top pistons are still sticking out a bit:
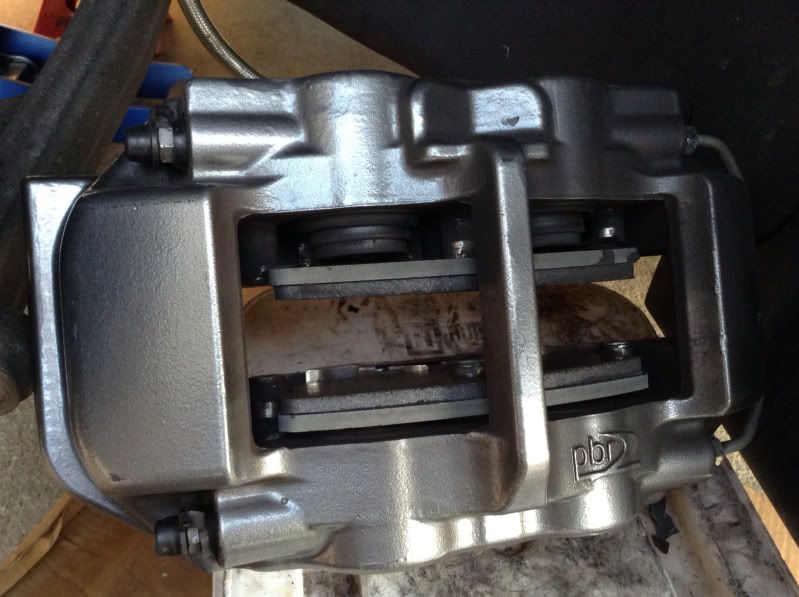
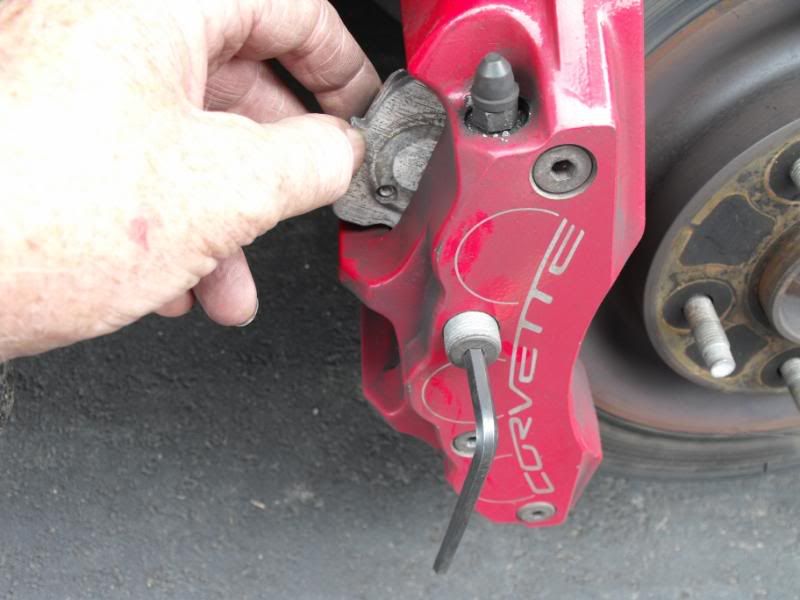
Here I've pushed the pistons in. The pad fell out and I'm ready to reinstall it. I've got one-piece pads, but if you have the OE padlets you'll have one for each piston:
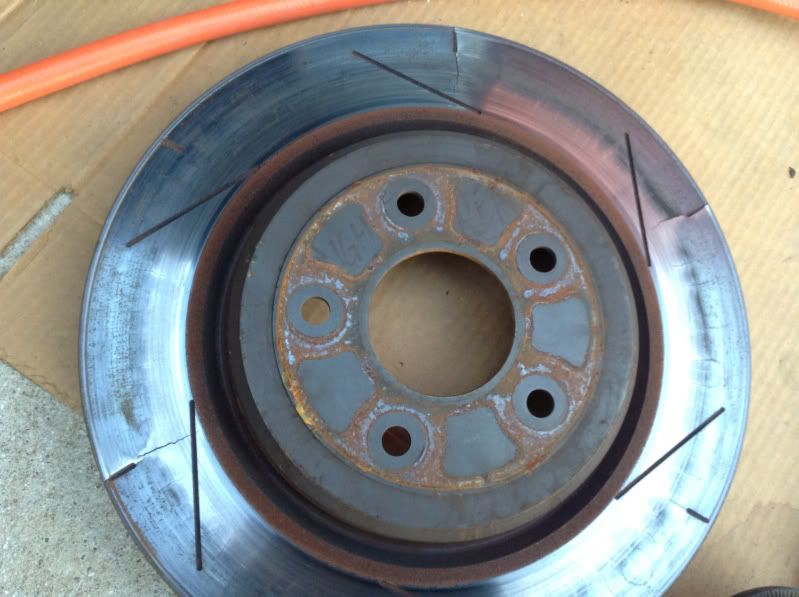
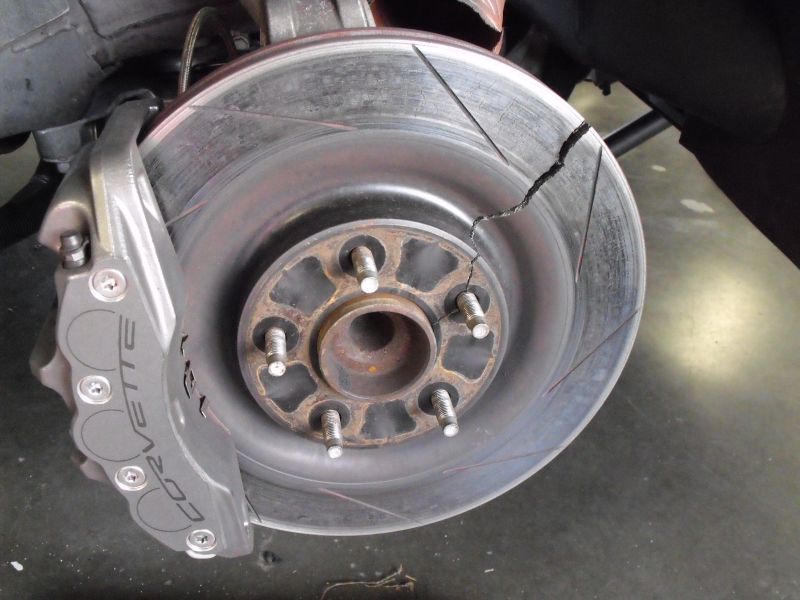
Here's why I had to replace this rotor - you can see some pretty good cracks developing:
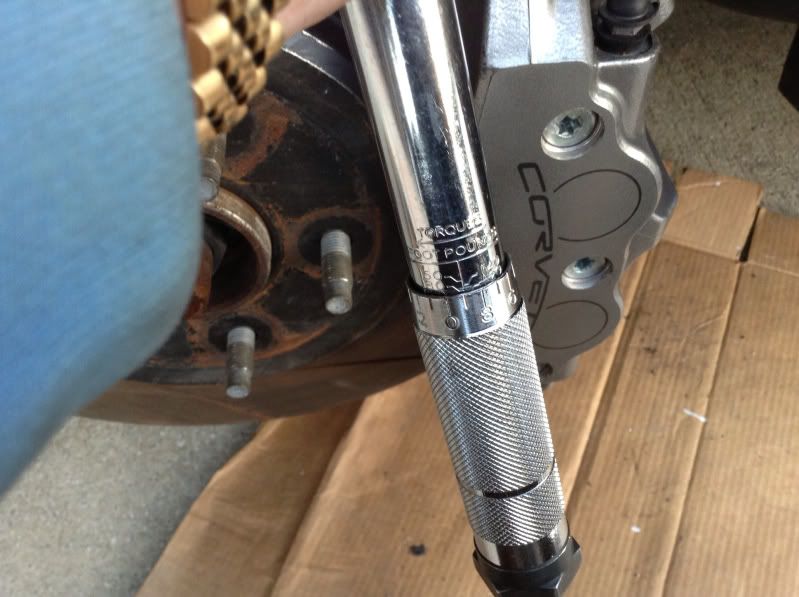
Below I've put on the new rotor, slid the caliper on, installed the two bolts that hold the caliper on, and torqued them to the spec of 129 lb ft:
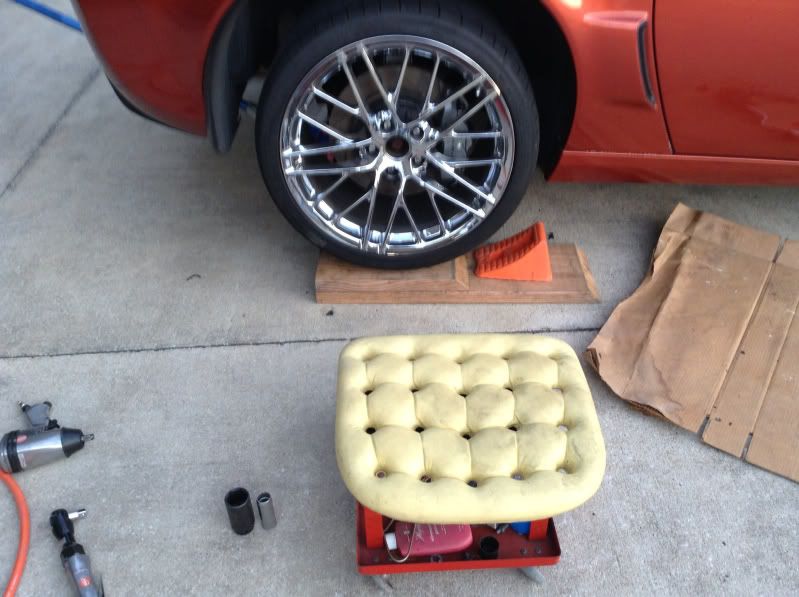
The wheel is back on and lug nuts are torqued to 100 lb ft. I removed the center caps in preparation for the track event:
I also checked the axle nuts to make sure they were torqued tight:

I did the Left Rear without taking any pictures so it went quicker. I already had the car in the air, but from removing the wheel to having it back on and torqued took 18 minutes, so swapping pads or rotors is a quick and easy DIY job that you can easily do if you have a jack, jackstands, and some basic tools.
After you work on the brakes don't just hop in and go driving off!! Set the parking brake, start the car, and pump the brakes - after most any brake work the pedal will probably go to the floor until you pump the pedal several times to seat the pads. After you have a firm pedal you can go for a test drive, but initially go slow and be ready to grab the parking brake if necessary.
Also, new pads and/or rotors need to to be bedded properly according to the pad manufacturer's recommendations in order to get a layer of pad compound transferred onto the rotor for good adhesive braking.
I've also got a lift, so anybody around Daytona who wants to DIY on a project like this (brake rotors/pads/fluid flush, oil change, exhaust install, etc.) but need a jack or some help, drive on over to my house and we'll git 'er dun!!
Bob
It's important to push the pistons all the way in if you're putting in new pads or padlets because the new ones will be a lot fatter than your worn ones and you'll need to get them spread as much as you can so the area between them is as wide as possible to get the caliper onto the rotor. Below you can see the bottom pistons are pretty well pushed in and the pad backing plate is pretty flush with the caliper. The top pistons are still sticking out a bit:
Here I've pushed the pistons in. The pad fell out and I'm ready to reinstall it. I've got one-piece pads, but if you have the OE padlets you'll have one for each piston:
Here's why I had to replace this rotor - you can see some pretty good cracks developing:
Below I've put on the new rotor, slid the caliper on, installed the two bolts that hold the caliper on, and torqued them to the spec of 129 lb ft:
The wheel is back on and lug nuts are torqued to 100 lb ft. I removed the center caps in preparation for the track event:
I also checked the axle nuts to make sure they were torqued tight:
I did the Left Rear without taking any pictures so it went quicker. I already had the car in the air, but from removing the wheel to having it back on and torqued took 18 minutes, so swapping pads or rotors is a quick and easy DIY job that you can easily do if you have a jack, jackstands, and some basic tools.
After you work on the brakes don't just hop in and go driving off!! Set the parking brake, start the car, and pump the brakes - after most any brake work the pedal will probably go to the floor until you pump the pedal several times to seat the pads. After you have a firm pedal you can go for a test drive, but initially go slow and be ready to grab the parking brake if necessary.
Also, new pads and/or rotors need to to be bedded properly according to the pad manufacturer's recommendations in order to get a layer of pad compound transferred onto the rotor for good adhesive braking.
I've also got a lift, so anybody around Daytona who wants to DIY on a project like this (brake rotors/pads/fluid flush, oil change, exhaust install, etc.) but need a jack or some help, drive on over to my house and we'll git 'er dun!!
Bob
Last edited by BEZ06; 03-27-2013 at 09:14 AM.
03-27-2013, 01:26 PM
#3
Race Director
Thread Starter
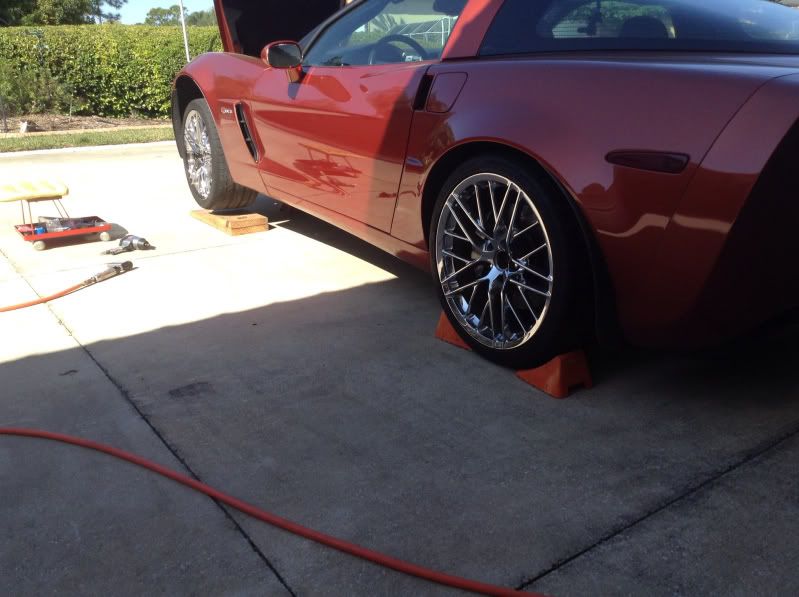
Went out this morning to take a look at the fronts - I knew the rotors were in pretty good shape (at least should be good enough for two days at Sebring Fri/Sat).
I got the front up in the air:
And to take a look at the pads and to remove the center caps for the track event (theyre hard to remove while the wheel is still on the car - I've removed them before using a thin plastic screwdriver). You can see that the pads are nice and thick:
I had put these current rotors and pads on at Daytona in December. After 2 days at Daytona the old front right rotor did this (it also had a couple days at Daytona in Nov, and 2 days at VIR in June):
So I had put on a new rotor and fresh pads, and ran them for the tird day at Daytona (about 2 hours of track time), and they're still in good shape for Sebring.
Here's the back side of the caliper that shows the two 21mm (13/16") bolts that hold the caliper on - if you have both front wheels off the ground you can turn the wheels for easier access to those bolts and inspecting all the parts of the front suspension and brakes:
Another thing I did was to check torque on all the pad pin bolts:
Those bolts are torqued to 30 lb ft, and last year about this time i put on these newer optional Dark Gray Metalic calipers that have bolts that require a T45 Torx bit.
My old original red calipers had the early 6mm Allen wrench bolts:

You can see above that the bottom bolt on the front right caliper is backed out and the rotor is gouged up. This happened at Daytona, and I was running padlets at that event. The bottom padlet came flying out at about 165-170 mph on the front straight of the tri-oval and when I applied the brakes to turn into the infield the car pulled hard left. I limped around the tack and came into the pits and saw that with the padlet gone the piston had pushed down onto the rotor and gouged it up, and the piston was damaged as well.
So, if you're tracking the car with stock Z06/GS calipers, check the pad pin bolts regularly so they hopefully won't back out. If you're running one-piece pads they shouldn't be able to fly out of the caliper like my padlet did!!
Bob
I got the front up in the air:
And to take a look at the pads and to remove the center caps for the track event (theyre hard to remove while the wheel is still on the car - I've removed them before using a thin plastic screwdriver). You can see that the pads are nice and thick:
I had put these current rotors and pads on at Daytona in December. After 2 days at Daytona the old front right rotor did this (it also had a couple days at Daytona in Nov, and 2 days at VIR in June):
So I had put on a new rotor and fresh pads, and ran them for the tird day at Daytona (about 2 hours of track time), and they're still in good shape for Sebring.
Here's the back side of the caliper that shows the two 21mm (13/16") bolts that hold the caliper on - if you have both front wheels off the ground you can turn the wheels for easier access to those bolts and inspecting all the parts of the front suspension and brakes:
Another thing I did was to check torque on all the pad pin bolts:
Those bolts are torqued to 30 lb ft, and last year about this time i put on these newer optional Dark Gray Metalic calipers that have bolts that require a T45 Torx bit.
My old original red calipers had the early 6mm Allen wrench bolts:
You can see above that the bottom bolt on the front right caliper is backed out and the rotor is gouged up. This happened at Daytona, and I was running padlets at that event. The bottom padlet came flying out at about 165-170 mph on the front straight of the tri-oval and when I applied the brakes to turn into the infield the car pulled hard left. I limped around the tack and came into the pits and saw that with the padlet gone the piston had pushed down onto the rotor and gouged it up, and the piston was damaged as well.
So, if you're tracking the car with stock Z06/GS calipers, check the pad pin bolts regularly so they hopefully won't back out. If you're running one-piece pads they shouldn't be able to fly out of the caliper like my padlet did!!
Bob
03-28-2013, 09:20 AM
#5
Race Director
Thread Starter
There are 2 ways to swap padlets - remove the caliper, or leave the calipers on and remove the pad pin bolts.
If you're going to install one-piece pads you'll need to remove the calipers.
The stock padlets have a tab on them that I can get my clamp on to pull them away from the rotor:
If you're going to install new individual padlets and leave the calipers installed, you only need to remove the 2 center pad pin bolts on each side of the front calipers, or the 1 center pad pin bolt on each side of the rear calipers - i.e., you don't need to remove the end bolts. You can see on the front caliper below that I have loosened one of the center bolts and can take out the top padlet. I can also remove the center padlet, but to remove the lower padlet I'll need to remove the other center pin:
HOWEVER - often times its very difficult to loosen those pad pin bolts. Having tried it both ways, I always remove the calipers in order to install new pads - whether one-piece or padlets.
Bob
05-02-2014, 08:50 PM
#6

Great post!
It can save our bacon at the track!
I'm changing my OEM padlets to the one piece design and the info was very welcome, because the shop where I service my Corvette ( Brazil ) is in fact a Porsche Authorized Center and didn't knew those.
I'll attend at the end of may a top speed event ( 3 KM ) and although there are no turns this time, it's not ok to jump on the brakes at 190+ mph and fail.
Thanks again, Bob!
 08-01-2014, 12:25 PM
#8
Melting Slicks


Member Since: May 2006
Location: Williamsburg VA
Posts: 3,491
Received 514 Likes
on
300 Posts
St. Jude Donor '08-'09-'10-'11-'12-'13-'14-'15-'16

It's an easy job. If you jack under the side of the car at the jack points on the frame, you can raise both the front and rear wheel to do one side at a time.
There are 2 ways to swap padlets - remove the caliper, or leave the calipers on and remove the pad pin bolts.
If you're going to install one-piece pads you'll need to remove the calipers.
The stock padlets have a tab on them that I can get my clamp on to pull them away from the rotor:
If you're going to install new individual padlets and leave the calipers installed, you only need to remove the 2 center pad pin bolts on each side of the front calipers, or the 1 center pad pin bolt on each side of the rear calipers - i.e., you don't need to remove the end bolts. You can see on the front caliper below that I have loosened one of the center bolts and can take out the top padlet. I can also remove the center padlet, but to remove the lower padlet I'll need to remove the other center pin:
HOWEVER - often times its very difficult to loosen those pad pin bolts. Having tried it both ways, I always remove the calipers in order to install new pads - whether one-piece or padlets.
Bob
08-01-2014, 04:56 PM
#9

FYI, when installing new rear rotors, take the time to adjust the E Brake shoe as well (for DD/street cars). The E brake pads should be adjusted so the rotor is very snug going over them. On a racer, go for a looser fit since you don't want any friction, and are never going to use it anyway.
This will firm up the E brakes if you are having problem with the E brake not holding/having to pull the handle all the way to the very top back to get it to hold the car still.
This will firm up the E brakes if you are having problem with the E brake not holding/having to pull the handle all the way to the very top back to get it to hold the car still.
10-24-2014, 07:55 PM
#10
Melting Slicks

I have a quick question on this Thread that is kinda changing the subject a bit but not to bad. Of the various Rotors available for the rear C6 Brakes are they all interchangeable ? Yes I realize there are many options as far as Rotors go, but are they all physically the same dementions ? I have a cheapo that I am using to mock something up, I just don't want to find out I have one of odd ball size.
10-24-2014, 09:08 PM
#11
Team Owner

I have a quick question on this Thread that is kinda changing the subject a bit but not to bad. Of the various Rotors available for the rear C6 Brakes are they all interchangeable ? Yes I realize there are many options as far as Rotors go, but are they all physically the same dementions ? I have a cheapo that I am using to mock something up, I just don't want to find out I have one of odd ball size.
Base C6 rear rotors are 12"x1"
Z51 C6 rear rotors are 13"x1"
Z06/GS rear rotors are 13.4"x1"
Is that what you want?
10-24-2014, 10:46 PM
#12
Melting Slicks
That is exactly what I want. Thanx... This just leads me into another question, I know all the early Z06 calipers were Red in color, but that must of ended at some Point. I have 2013 Grey Calipers, 4 Piston Rear, 6 Piston Fronts. That makes them Z06 and they should be using the 13.4's right ?
10-25-2014, 07:48 AM
#13
Team Owner
Member Since: Jun 2005
Location: Northern, VA
Posts: 46,100
Received 2,478 Likes
on
1,941 Posts
St. Jude Donor '15
"In honor of jpee"
Grand Sports brakes, possibly?
10-25-2014, 10:54 AM
#15
Melting Slicks
I have a quick question on this Thread that is kinda changing the subject a bit but not to bad. Of the various Rotors available for the rear C6 Brakes are they all interchangeable ? Yes I realize there are many options as far as Rotors go, but are they all physically the same dementions ? I have a cheapo that I am using to mock something up, I just don't want to find out I have one of odd ball size.
Dark Grey Metallic Calipers requires J55 cross drilled Rotors , 13.4 front 12.8 rear.
So basically I have the Z06 Brake option in Grey.
10-25-2014, 01:44 PM
#16
Race Director
Member Since: Sep 2007
Location: Peoria/Phoenix AZ
Posts: 16,555
Received 2,060 Likes
on
1,505 Posts
C6 of Year Finalist (performance mods) 2019
JL9 rotors are F 12.8 x 1.26 & R 12 x 1 and are OEM on non-optioned C6 Vettes (aka base)
J55 rotors are F 13.4 x 1.26 & R 13 x 1 and are OEM on Z51 optioned '05-'09, F55 optioned '07-up, and as a stand-alone option on C6 Vettes (aka base)
J56 rotors are F 14 x 1.3 & R 13.4 x 1 and are OEM on all Z06 and GS models
The J6(A-F) option is only for caliper color. It doesn't define the car model or brake rotors, although the car model and/or options may limit the color choices.
Look on the option code sticker on your glovebox door to see how your car was configured.
 10-28-2014, 05:03 PM
#18
Safety Car

AND, you do NOT want to have your fluid reservoir full, when you have worn pads on your car, because you will overflow the reservoir when you compress the pistons. It pushes fluid back into the reservoir, and if there is no room, it goes out of the system, onto the floor, etc.
10-28-2014, 10:40 PM
#19
Heel & Toe


Member Since: Feb 2013
Location: New River, AZ
Posts: 21
Likes: 0
Received 0 Likes
on
0 Posts

I changed the padlets to one piece for our former club president. Getting the caliper bolts off wasn't too bad, but, I had difficulty pulling 125 ft lbs of torque when I put the calipers back on. There wasn't a lot of room to pull that hard. Going to try the pin bolts on another member's 2013 with 8k miles on it. He wants ceramic padlets. His car appears to have the T-45 torx pins.