
Headlight lenses replaced...what a facelift
 09-17-2013, 05:55 AM
#1
Cruising

Thread Starter

Member Since: Jan 2013
Location: Ume�
Posts: 14
Likes: 0
Received 0 Likes
on
0 Posts
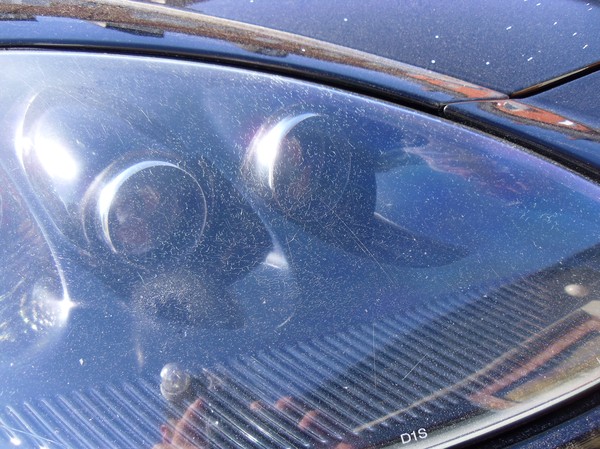
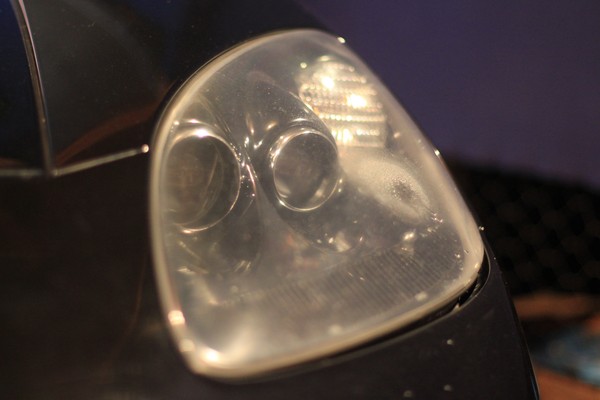
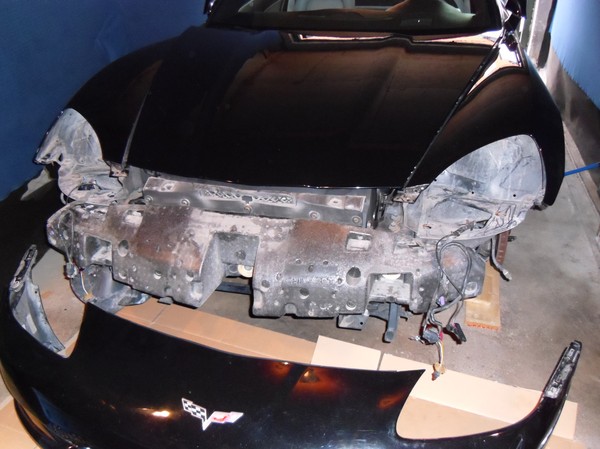
Did a lens replacement this weekend. Can highly recommend that you do the same if you have crazed or scratched lenses.
Some pictures.
Before:
After:
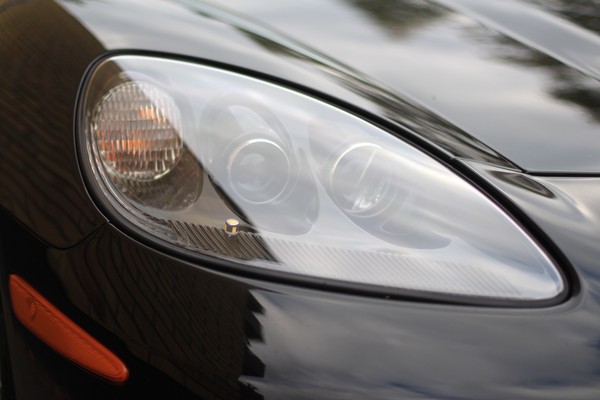
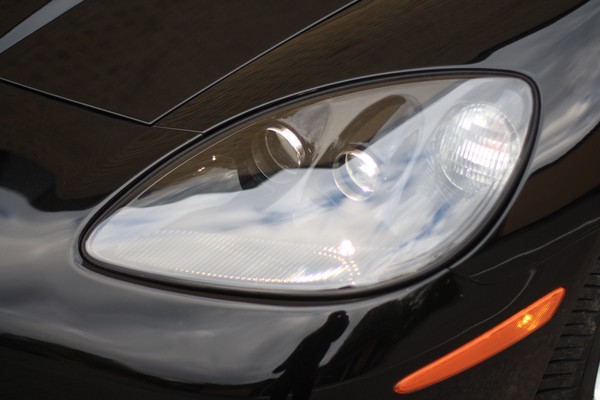
Thank you RLSebring for providing me with new lenses.
Some pictures.
Before:
After:
Thank you RLSebring for providing me with new lenses.

 09-17-2013, 07:14 AM
#3
Cruising
Thread Starter
Member Since: Jan 2013
Location: Ume�
Posts: 14
Likes: 0
Received 0 Likes
on
0 Posts
Taking the the bumper off, loosening the fenders and getting the headlight out is no real issue if you take your time work smart.
The more room you have the better. And if you have the opportunity to take both wheels of.... plenty of space to work. I could only get enough room in my narrow "storage" garage to take one wheel of.
When it comes to taking apart the HL assys... It gets trickier.
It�s a matter of getting the right temperature for the glue to "soften up". Only went up to about 120 degrees C (250 F) on the first one I did and had to struggle a fair bit to get the assembly apart. Went up to 150 C (300F) on the second one....much better. Then pry the lens apart from the housing with two flathead screwdrivers.
Then just remove the glue from the "channel" (a real pita). I used pliers and a hairdryer and rolled up the rubbery glue.
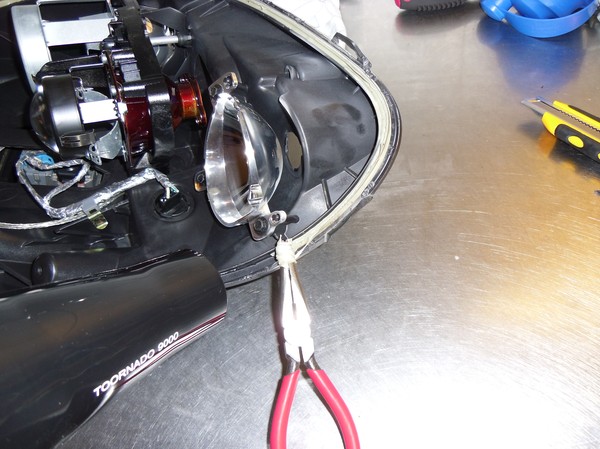
Clean everything really good...double check. Blow everything clean and glue + clamp the parts together again.
It�s probably not a job for everyone. But a experienced DIYer could pull it of no doubt.
The more room you have the better. And if you have the opportunity to take both wheels of.... plenty of space to work. I could only get enough room in my narrow "storage" garage to take one wheel of.
When it comes to taking apart the HL assys... It gets trickier.
It�s a matter of getting the right temperature for the glue to "soften up". Only went up to about 120 degrees C (250 F) on the first one I did and had to struggle a fair bit to get the assembly apart. Went up to 150 C (300F) on the second one....much better. Then pry the lens apart from the housing with two flathead screwdrivers.
Then just remove the glue from the "channel" (a real pita). I used pliers and a hairdryer and rolled up the rubbery glue.
Clean everything really good...double check. Blow everything clean and glue + clamp the parts together again.
It�s probably not a job for everyone. But a experienced DIYer could pull it of no doubt.
09-17-2013, 04:56 PM
#6
Cruising
Thread Starter
Member Since: Jan 2013
Location: Ume�
Posts: 14
Likes: 0
Received 0 Likes
on
0 Posts
 09-17-2013, 05:13 PM
#7
Cruising
Thread Starter
Member Since: Jan 2013
Location: Ume�
Posts: 14
Likes: 0
Received 0 Likes
on
0 Posts
The "heatgun" you see in the picture is actually a hairdryer....If you use a heatgun, It�s harder to get the adhesive out in larger pieces (tried a heatgun also). Too hot and it will crumble and tear off, to cold and it won�t come out at all. My experience is that a hairdryer in the hottest setting is closer to the "golden" temperature than a heatgun in the coldest setting.... (all depending on what kinds of guns you have obviously).
09-26-2013, 10:33 AM
#11
Cruising
Thread Starter
Member Since: Jan 2013
Location: Ume�
Posts: 14
Likes: 0
Received 0 Likes
on
0 Posts
09-27-2013, 09:38 AM
#12
Burning Brakes

Why not avoid all of this by initially putting on the XPEL lense covers.
Put them on my 08 and after 5 years absolutely still perfect.
This case was after the fact I understand. I would suggest lense protection on the new beauties. Have no afiliation with XPEL
Put them on my 08 and after 5 years absolutely still perfect.
This case was after the fact I understand. I would suggest lense protection on the new beauties. Have no afiliation with XPEL
09-27-2013, 11:10 AM
#13
Cruising
Thread Starter
Member Since: Jan 2013
Location: Ume�
Posts: 14
Likes: 0
Received 0 Likes
on
0 Posts
Will definitely have a look at those XPEL covers though...to protect my new ones from scratching. Thanks for the tip!!!
And maybe the Crazing is mostly the cause of Euro-type parking light bulbs sitting to close to the lens heating it up to much...some believe that might be the case?
Last edited by Wetterflod; 09-27-2013 at 11:15 AM.
09-27-2013, 11:27 AM
#14
Melting Slicks

Isn't there some kind of "aerospace" coating on the lense that will be removed along with the haze during wet sanding? I did this to a Sebring, turned out great, but the lense is cloudy again after only a year.
09-27-2013, 11:40 AM
#15
Team Owner


Member Since: May 2000
Location: Plantation Florida USAF(Retired) 1966-1990
Posts: 47,848
Received 4,499 Likes
on
3,586 Posts
U.S. Air Force
St. Jude Donor '05-'06-'07-'08-'09-'10-'11-'12-'13-'14-'15-'16-'17-'18-'19-'20-'21-'22-'23-'24
NCM Sinkhole Donor


 Looks great!
09-27-2013, 12:40 PM
Looks great!
09-27-2013, 12:40 PM
#16
Cruising
Thread Starter
Member Since: Jan 2013
Location: Ume�
Posts: 14
Likes: 0
Received 0 Likes
on
0 Posts

But if that coating doesn�t hold the lens clear for more than one year..... sure hope they don�t use it for the aerospace industry
Too bad about your lenses, that�s not a good report at all. Hopefully mine will hold up longer....but who knows....
09-27-2013, 05:23 PM
#17
Tolero Apto Victum

 09-27-2013, 05:57 PM
#18
Supporting Vendor

Member Since: Sep 2007
Location: Pensacola Florida GO GATORS!!! www.rlsebring.com www.c6c7vette.com
Posts: 11,216
Received 174 Likes
on
92 Posts
St. Jude Donor '17

Actually you might be right, and If so, wet sanding would not be such a great idea
But if that coating doesn�t hold the lens clear for more than one year..... sure hope they don�t use it for the aerospace industry
Too bad about your lenses, that�s not a good report at all. Hopefully mine will hold up longer....but who knows....
But if that coating doesn�t hold the lens clear for more than one year..... sure hope they don�t use it for the aerospace industry
Too bad about your lenses, that�s not a good report at all. Hopefully mine will hold up longer....but who knows....
I put one of the first sets of lens on mine back in 08 when I did the carbon lights. They are starting to show some crazing now. I think 5 years is going to be a norm, so longer some shorter.


