
Changing fluid and filter on my A6, few questions
 03-01-2014, 12:50 AM
#1
Le Mans Master

Thread Starter
I have 7 quarts of Penzoil Dexron VI and a Purolator P1284 filter and I'm going to change the fluid and filter on my 2006 C6 A6. I have a few questions.
1. Is the Purolator filter good enough? Most people on this site uses oem filters. Anybody have experience with Purolator trains filters?
2. A Holden forum recommends to overfill by a little. Might be because of their pan design. I figured I'd top off near the bottom range of fluid temps. This will put a little more fluid in but I really don't want to overfill.
3. The Holden forum shows the fill port up high and it's just a rubber plug. Where is the fill port on the Vette?
4. Are there 2 drain plugs on the pan? One to drain and one that has the stand pipe for setting the fill level?
5. Any tricks to getting the rear pan bolts out without raising the tranny?
Thanks
 03-01-2014, 07:37 AM
#2
Race Director

Member Since: Aug 2005
Location: Hudson WI
Posts: 13,598
Received 181 Likes
on
162 Posts
NCM Sinkhole Donor

I have to admit that I am biased, but I changed the fluid in my two daily drivers last year to Red Line trans fluid, and my wife commented on how much smoother her car shifted. I would spend a little extra on fluid and use Red Line.
I use it in the Corvette as well, but my car is a manual, but it more difference than my MGW shifter.
I use it in the Corvette as well, but my car is a manual, but it more difference than my MGW shifter.
03-01-2014, 10:35 AM
#3
Le Mans Master

The fill plug on the vette is also a rubber plug near the top of the trans. Personally, I use whats called a Jumbo filter which is a larger filter with a larger opening to for less restriction.
6L80E Jumbo Filter. This filter has a 50% larger intake port opening than the factory units found on Corvettes and Camaros. Plus the filter is 50% larger for less restriction at higher RPM's.
6L80E Jumbo Filter. This filter has a 50% larger intake port opening than the factory units found on Corvettes and Camaros. Plus the filter is 50% larger for less restriction at higher RPM's.
03-01-2014, 10:53 AM
#4
Le Mans Master
Thread Starter
Thanks for the replies, both are excellent comments. My son uses redline in his tranny and it works great. I'm just a little reluctant to use something not on the Dexron VI list.
Also, that's the first I've heard there is a jumbo filter. Either way, I've decided to return the Purolator and stick with AC Delco.
Also, that's the first I've heard there is a jumbo filter. Either way, I've decided to return the Purolator and stick with AC Delco.
03-01-2014, 12:07 PM
#5
Race Director
Member Since: Aug 2005
Location: Hudson WI
Posts: 13,598
Received 181 Likes
on
162 Posts
NCM Sinkhole Donor
Thanks for the replies, both are excellent comments. My son uses redline in his tranny and it works great. I'm just a little reluctant to use something not on the Dexron VI list.
Also, that's the first I've heard there is a jumbo filter. Either way, I've decided to return the Purolator and stick with AC Delco.
Also, that's the first I've heard there is a jumbo filter. Either way, I've decided to return the Purolator and stick with AC Delco.
03-01-2014, 12:13 PM
#6
Safety Car

3)The rubber fill plug is on the passenger side of the trans near the rear, the rubber plug has a pop up cap/top inside the top of the plug that needs to be popped up first before you pull the rubber seal plug out. Use a flat screw driver, your thumb nail or a pair of 90 degree needle nose pliers to pop it up.
4) One, just the stand pipe.
I went though all the steps for everything. This is all you really have to do to do it right. First just to be on the safe side use OEM fluid (to mix with oem fluid) and OEM filter along with a new factory pan gasket just to give yourself the best chance at sealing the "first time".
I did not have to lift a thing but to get some of the rear/corner pan bolts out I had to use some odd-ball open end/boxed wrench's.
See how the old fluid/filter looks, clean the pan and the magnetic, replace with the new stuff and use a inch pound torque wrench if you have one on the bolts you can get to and I would torque it up to spec. in three steps and just go by feel on the few bolts that you can't get the torque wrench on. There is a tightening sequence and the final torque is 80 inch pounds or 9 Nm for the pan bolts.
ADD 6 1/2 QTS OF TRANS FLUID AND YOUR DONE!! AT 6 1/2 QTS YOU ARE FULL AND IF ANYTHING OTHER THAN FULL IT MAY BE JUST SLIGHTLY OVER FULL WHICH IS BETTER THAN BEING UNDER FULL.
I did check mine when I got done which was a mistake. With the car level and running and at the proper temp I pulled the pan plug and some fluid ran out and it continued to drip/runout due to the car shaking, well after awhile I wised up and put the plug back in. Checked the amount that had come out and put that amount back in with fresh fluid I had left over and called it a day. Car shifts fine & is dry as a bone!
Note: Mine is a 2010, most likely the fill amount is the same for your year.
Last edited by C7/Z06 Man; 03-01-2014 at 06:46 PM.

 03-01-2014, 10:29 PM
#8
Race Director
Member Since: Sep 2007
Location: Peoria/Phoenix AZ
Posts: 16,555
Received 2,061 Likes
on
1,505 Posts
C6 of Year Finalist (performance mods) 2019
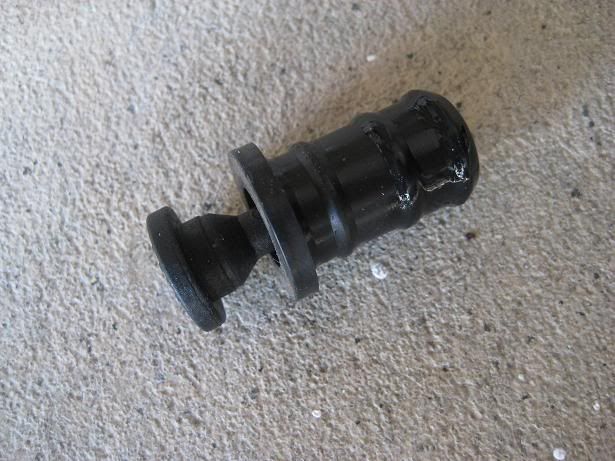
The fill port plug expands when the center "pin" is pushed in similar to a body push pin. Be sure to raise the pin before removal and push it back down after reinserting.
I also prefer to use the OEM fluid, since you only get to change about half the fluid at a time and I never mix brands when given a choice.
It's a lot easier to siphon all you can instead of just pulling the plug. It'll get more out of the pan before you unbolt and attempt to lower it without spilling any.
Be sure the car is absolutely level, or a little butt high, if you check the fluid level at any time. I once had mine level in relation to the garage floor, but failed to remember that garage floors usually have about a 1/8" or greater per foot slope. It cost me 4 quarts before I recognized the error.
Drive it several miles and let it cool below the 86* before you prepare to check the level. Then follow the prescribed procedure. The transmission will operate normally even when it's 2 quarts over or under, assuming you drive reasonably. i.e. no WOT. So even if it feels right, it could be wrong.
I have a really cool trick to fill the trans, but I need to check some dimensions and take a photo first. I'll try to do that tomorrow and post it here.
03-01-2014, 11:34 PM
#9
Le Mans Master
Thread Starter
Again, great information, thanks guys. As far as mixing, I would figure one of the requirements of Dexron VI is that they can mix.
I'm also going to do a similar fluid change out on my wife's 2010 Mercedes C300 auto. I actually bought a tool that hooks to the plug with the stand pipe. I put a globe valve on the adapter along with a few feet of clear tygon tubing. I will actually fill the tranny from the bottom through the stand pipe plug adapter. Then after getting 9 quarts in it (the Mercedes has a torque converter drain plug), I close the valve, start the car and heat it to 35C, then open the valve and let it drain and then replace the plug with the car still running. So it's basically the same procedure as with the Vette.
I'm wondering if I can use the same adapter and fill the A6 through the bottom, it may be easier than filling through the rubber plug port. The adapter has a 14mm thread, does anyone know the thread size of the A6 pan plug?
03-02-2014, 11:44 AM
#10
Le Mans Master
Thread Starter
Found a decent youtube video of how to get the pan off by raising the tranny up some.
And I found an illustration showing the fill and drain plug locations:

Here's the fill rubber plug:
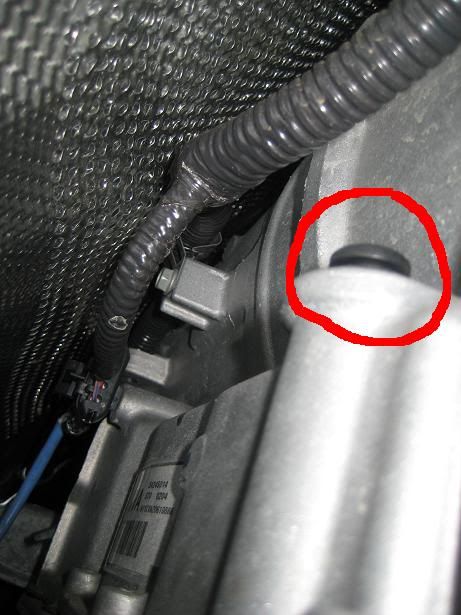
And here is what HOXXOH referred to, pulling the center part up like a body plug.
I posted this to help people in the future. I'm waiting for my OEM filter and will be changing the fluid out the end of this month when I hit 50,000 and I'll post the results. Again, thanks to everyone for their help, this is a GREAT FORUM!!!
And I found an illustration showing the fill and drain plug locations:
Here's the fill rubber plug:
And here is what HOXXOH referred to, pulling the center part up like a body plug.
I posted this to help people in the future. I'm waiting for my OEM filter and will be changing the fluid out the end of this month when I hit 50,000 and I'll post the results. Again, thanks to everyone for their help, this is a GREAT FORUM!!!
03-02-2014, 02:00 PM
#11
Safety Car
Three points for your consideration:
1) Per "glennhi" Holden recommends to overfill by a little.
2) GM instructions say to install 6 1/2 qts. ^^
3) From what I have gathered the whole system takes 13.24 qts.
Taking the above to be true? than an extra 1/2 qt. won't hurt a thing, may even be a plus as per Holden. Like I said: I think between the two it would be better to be "slightly" over than under filled. 6 1/2 qts. works fine in mine.

OH, and what is this "GM" BS about putting in a extra Qt. of motor oil if you're going to be pressing your car hard i.e. "Racing".
1) Per "glennhi" Holden recommends to overfill by a little.
2) GM instructions say to install 6 1/2 qts. ^^
3) From what I have gathered the whole system takes 13.24 qts.
Taking the above to be true? than an extra 1/2 qt. won't hurt a thing, may even be a plus as per Holden. Like I said: I think between the two it would be better to be "slightly" over than under filled. 6 1/2 qts. works fine in mine.
OH, and what is this "GM" BS about putting in a extra Qt. of motor oil if you're going to be pressing your car hard i.e. "Racing".
Last edited by C7/Z06 Man; 03-02-2014 at 02:26 PM.
03-22-2014, 08:10 PM
#12

Do you know if ACDelco 24236933 is the part number you used? I've seen it used in other A6s but not specifically in the Corvettes.
03-22-2014, 08:21 PM
#13
Le Mans Master
I really don't know if it's a delco part or not. I ordered it from PATC along with other upgrade parts I used. You can find it on their website.
07-07-2014, 12:06 AM
#14
Tech Contributor
I had my 2008 A6 fluid serviced but noticed afterward fluid dripping on the garage floor that appeared to be coming out the vent tube.
I jacked the car up level and followed the GM check fill level procedure below and almost 4 qts came out ...
What kind of symptoms/damage can an overfill cause?
. . .
2008 Chevrolet Corvette | Corvette (VIN Y) Service Manual | Transmission/Transaxle | Automatic Transmission - 6L50/6L80/6L90 | Repair Instructions - On Vehicle | Document ID: 1593625
--------------------------------------------------------------------------------
Transmission Fluid Check
This procedure checks both the transmission fluid level, as well as the condition of the fluid itself. Since the transmission on this vehicle is not equipped with a fill tube and dipstick, a tube in the bottom pan is used to set the fluid level.
Notice: The transmission fluid level must be checked when the transmission fluid temperature (TFT) is between 30-50�C (86-122�F). If the TFT is not within this range, operate the vehicle or allow the fluid to cool as required. Setting the fluid level with a TFT outside this range will result in either an under or over-filled transmission. TFT>50�C=under-filled, TFT<30�C=over-filled. An under-filled transmission will cause premature component wear or damage. An over-filled transmission will cause fluid to discharge out the vent tube, fluid foaming, or pump cavitation.
Observe the TFT using the driver information center (DIC) or a scan tool.
Start and idle the engine.
Depress the brake pedal and move the shift lever through each gear range. Pause for at least 3 seconds in each range. Move the shift lever back to PARK. Ensure the engine RPM is low (500-800 RPM).
Allow the engine to idle for at least 1 minute.
Raise the vehicle on a hoist. The vehicle must be level, with the engine running and the shift lever in the PARK range.
Notice: THE ENGINE MUST BE RUNNING when the trans oil level check plug is removed or excessive fluid loss will occur, resulting in an under-filled condition. An under-filled transmission will cause premature component wear or damage.
Important: Continue to monitor the TFT. If the TFT is not within the specified values, reinstall the trans oil level check plug and repeat the previous steps.
Remove the trans oil level check plug (1) from the transmission fluid pan. Allow any fluid (2) to drain.
� If the fluid is flowing as a steady stream, wait until the fluid begins to drip.
� If no fluid comes out, add fluid until fluid drips out. Refer to Transmission Fluid Fill Procedure .
Inspect the fluid color. The fluid should be red or dark brown.
� If the fluid color is very dark or black and has a burnt odor, inspect the fluid and inside of the bottom pan for excessive metal particles or other debris. A small amount of "friction" material in the bottom pan is a "normal" condition. If large pieces and/or metal particles are noted in the fluid or bottom pan, flush the oil cooler and cooler lines and overhaul the transmission. If there are no signs of transmission internal damage noted, replace the fluid filter assembly, repair the oil cooler, and flush the cooler lines.
� Fluid that is cloudy or milky or appears to be contaminated with water indicates engine coolant or water contamination. Refer to Engine Coolant/Water in Transmission .
Notice: Refer to Fastener Notice in the Preface section.
Replace the trans oil level check plug and tighten to 25 N�m (18 lb ft).
Inspect for external leaks. Refer to Fluid Leak Diagnosis .
Reset the oil life monitor only if the fluid was changed.
� 2009 General Motors Corporation. All rights reserved.
07-08-2014, 09:52 PM
#15
Tech Contributor
Just as a follow up, all is well after a few days driving.
It also appears overfilling is not much of a risk for a short period so if you wanted a little more complete flush when refilling after changing the fluid, you could put an extra 4 qts in, drive it gently 15 min for more dilution of the old fluid and then drain to set the level.
I plan to try using a MityVac next time for a fluid exchange.