When you click on links to various merchants on this site and make a purchase, this can result in this site earning a commission. Affiliate programs and affiliations include, but are not limited to, the eBay Partner Network.
[DIY WRITEUP] Does your automatic c6 ever get stuck in park? Here's how to fix it
This DIY is going to be focusing on those who have a Lock out solenoid which is on the way to failing. If you want to just replace parts, it is going to cost you around $700 because you cannot just buy the solenoid, you would have to buy an entirely new shifter. I am going to show you a way to fix it by spending less than $10 (or possibly nothing if you have some metal wire laying around)
If your c6 gets stuck in park it is not always the lock out solenoid. When I was first trying to diagnose this issue, I found a thread by zap_1961, who provided a very detailed way to diagnose what is actually keeping your c6 from getting out of park. The thread is here: ( https://www.corvetteforum.com/forums...with-pics.html )
If your problem is, in fact, the lock out solenoid, then read on and I will show you how to remove the center console and pin back the troublesome part.
Disclaimer: This method of fixing the problem will cause the LED light on the shifter to stop functioning, and will also allow the car to be shifted while it is turned off and while you are driving. Proceed at your own risk. I would not want anyone to be hurt by accidentally bumping the shifter into reverse while on the highway.
If after all that, you still want to proceed, read on.
Some metal wire. I used kanthal because I use it to wrap coils on my e-cig and had it laying around. I used 28AWG kanthal. Nearly any metal wire will work, just make sure its relatively small. You could possibly get away with string, but I used wire to know it will last
Now, to be clear, we are not trying to actually fix the solenoid, we are only going to bypass it. When the solenoid is activated by depressing the brake pedal, it moves a plastic tab away from the shifter, allowing you to shift it. If the solenoid fails or is on the way to failing, it will not be able to move this plastic tab and you wont be able to shift the car. We are going to simply pin back the tab so it is constantly pulled back. This requires removing the plastic cover that surrounds the radio and goes down to the cupholders.
Open your center console and start by removing these two T15 screws, they will be covered up by plastic circles which can easily be pulled out
After that, you will need to remove your console lid, it is held in by 4 T15 screws
Now head over to the passenger side and lift up the e-brake boot. You may need to pull up the e-brake. I could not detach the rear clips and for fear of breaking them I just held it up after detaching the front ones.
Look underneath it and you will see two 7mm bolts. Remove both of them
With those removed you can detach the plastic panel running alongside the passenger center console. It is held in by two metal clips near the glovebox. Make sure the passenger seat is moved all the way back or you may have some trouble clearing it
Showing the location of the two clips on the panel
With this removed you can start unclipping the plastic cover surrounding the radio. Start from the top. I took pictures of where I pried at it so you dont have to worry about breaking anything. The clips are metal and should not snap off anyway
Once it's mostly detached you just need to jimmie it around until all of the clips are undone. Start the car, move the shifter back into D or S and keep your foot on the brake pedal, its the only way to remove it as the shifter will get in the way in any other position
With the shifter pulled back, you will need to reach behind the plastic cover and detach the cables leading to both heated seat buttons, the cigarette lighter, and the flasher button between the air vents. You will also need to detach the cables leading to the traction control button and the cigarette lighter inside the console storage area (under the lid you removed). This can be a pain, just take your time and make sure you dont let the car lurch forward since you're going to be in Drive and most likely in your garage.
This picture shows the two seat heater cables and the cigarette lighter cable
Here you can see the connectors for the TC button and the other cigarette lighter
And here is the flasher cable
Alright, with that cover completely removed and probably sitting on your floorboard, you'll want to remove the upper portion of the shifter. You DO NOT need to remove the four 10MM bolts surrounding it, but it may help. There will be two clips on the front and back of the shifter. I jimmied them up with two flathead screwdrivers. It can be a bit of a pain, but just take your time. If you want to, you can remove the 10MM bolts, lift up the entire shifter, and unhook them from underneath, but it is not necessary
Here is the front clip in question. (the leg with the hole in the center) The rear one is identical
You then should be able to lift up the upper portion of the shifter. You will need to disconnect a few wires and possibly cut a zip-tie to get it all the way up.
First, unhook this one
Then cut that black ziptie and disconnect this harness
Vuala!
Were almost done, now that green and black cable needs to be turned in order to disconnect it, this is the light that illuminates the letters on the shifter.
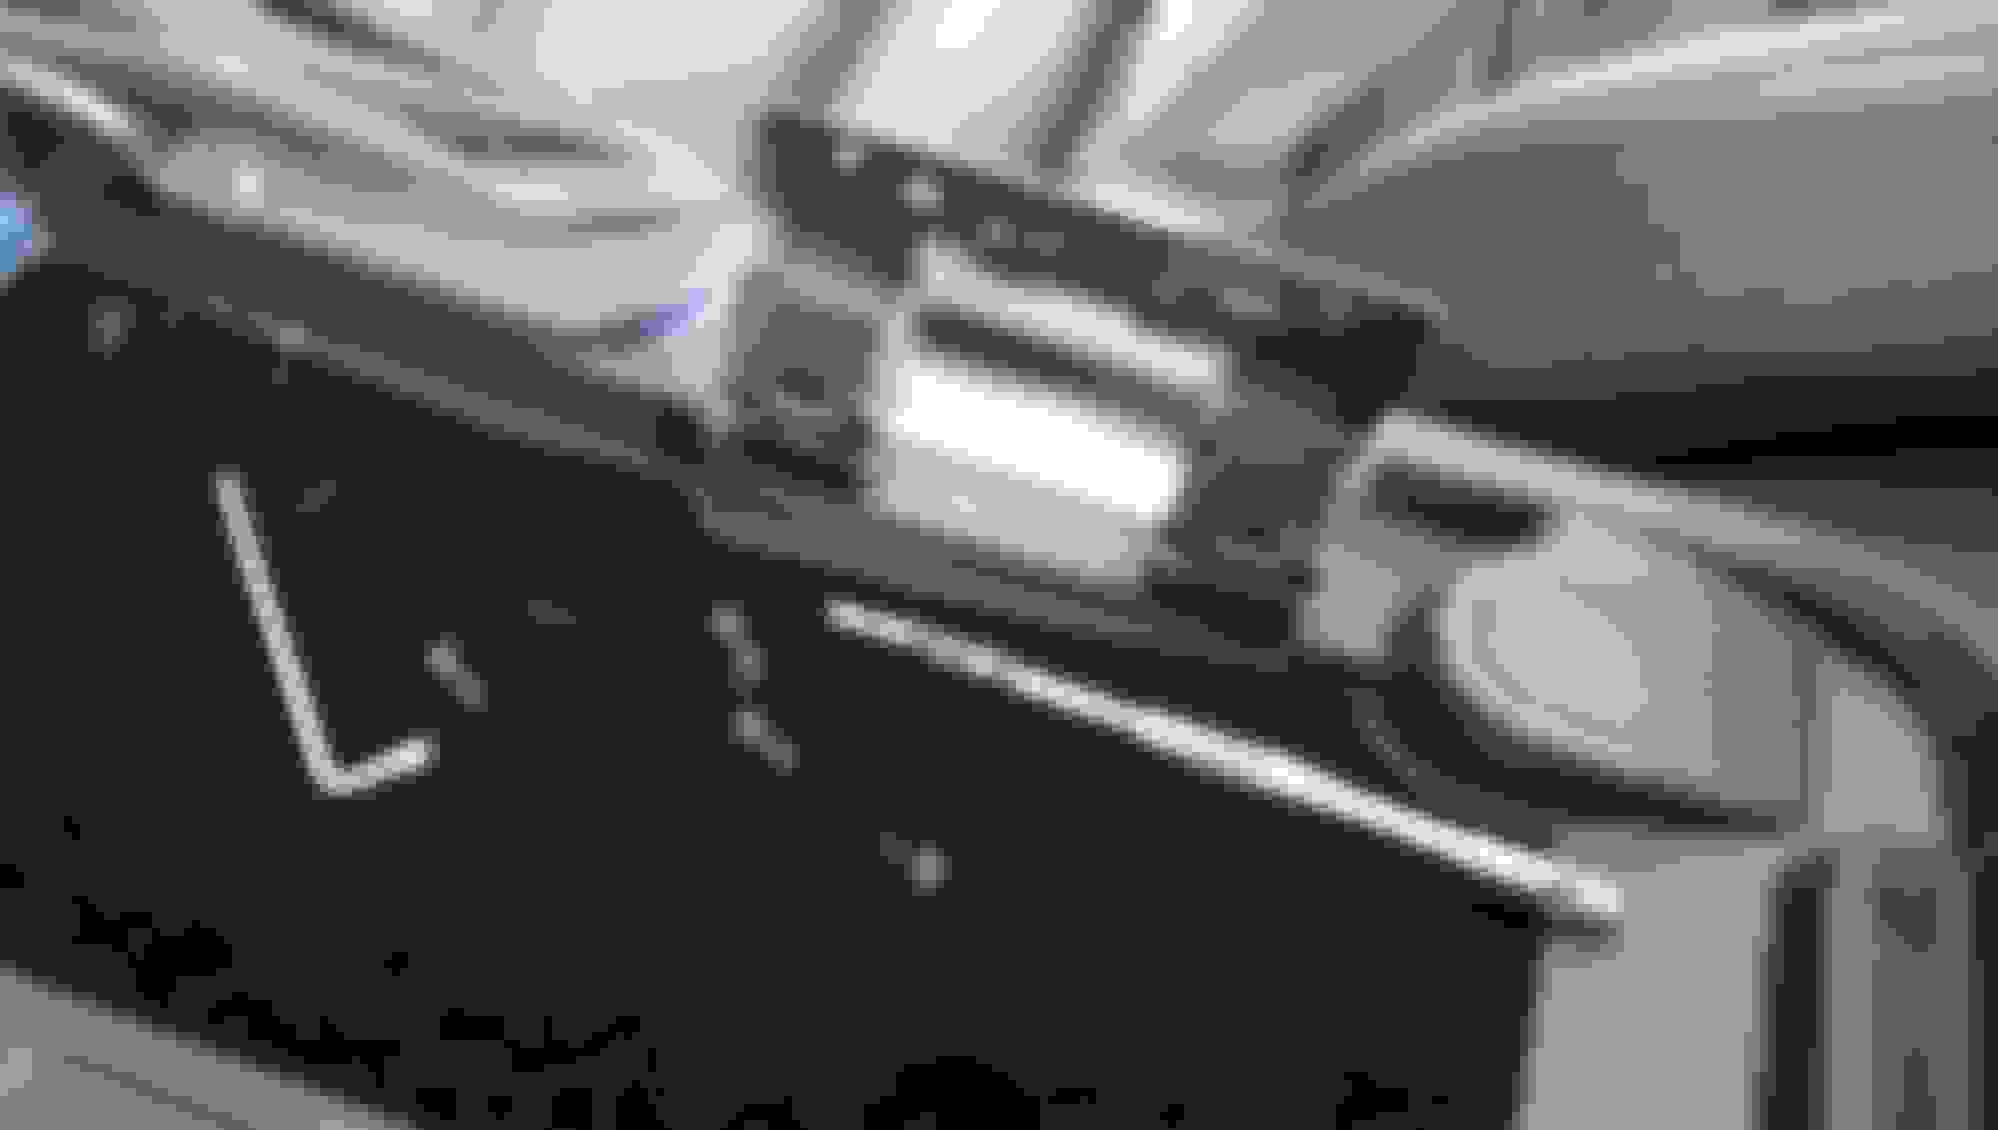
With all that done, we can finally get at the bastard causing us all this trouble. (technically its actually the solenoid, but whatever)
The tab I'm pointing at is what were going to be pinning back. As you can see it blocks the shifter from moving. (although in this picture I'm pulling it back)
Drill a hole through it (Only the tab, NOT the plastic bits on the right of it)
Now get your wire or string or whatever you chose and simply tie it back so it is constantly clear of the shifter
And that's that. Just follow this tutorial in reverse to get it all put back together.
Last edited by invadermoose; 01-24-2015 at 05:19 PM.
I just did this myself, and made a PDF file of the same steps you took. The hardest part of the whole thing is getting the gear selector pointer assembly off without breaking the tab. Have to be very careful.
It snaps back in no problem after the pointer is put in place.
You can actually do this without entirely removing the console or unplugging any connectors. Just prop it up along with the shifter boot brace and do the fix. Thats how I did it last year.
You can actually do this without entirely removing the console or unplugging any connectors. Just prop it up along with the shifter boot brace and do the fix. Thats how I did it last year.
You can actually do this without entirely removing the console or unplugging any connectors. Just prop it up along with the shifter boot brace and do the fix. Thats how I did it last year.
I tried changing the relay that controls th. solenoid worked for a short time. This is my wifes car and she said sell it if I can't drive it without getting stuck somewhere.she refused to drive it. So I finally wired back the locking pawl with some wire. I didnt have to remove the console completely ,just propped it up after I released the lower half of the console. Since I finished wiring the shift pawl back, it has worked perfectly. Wife loves the car again. You still have to step on the brake to start the car.it just shifts into gear without beating the shifter until you get cramps and want to destroy some part of your car interior! Life's to short to let a poorly designed shift mechanism keep you from enjoying your otherwise great car. WIRE IT BACK!
regards, Outagas

 01-24-2015, 05:13 PM


 and just in time as I'm installing an a6 shifter in my 05 today.


 doing it your way should take ~20 min tops.

