When you click on links to various merchants on this site and make a purchase, this can result in this site earning a commission. Affiliate programs and affiliations include, but are not limited to, the eBay Partner Network.
Pictures - External Oil Cooler Install on C6, retaining the Brake ducting.
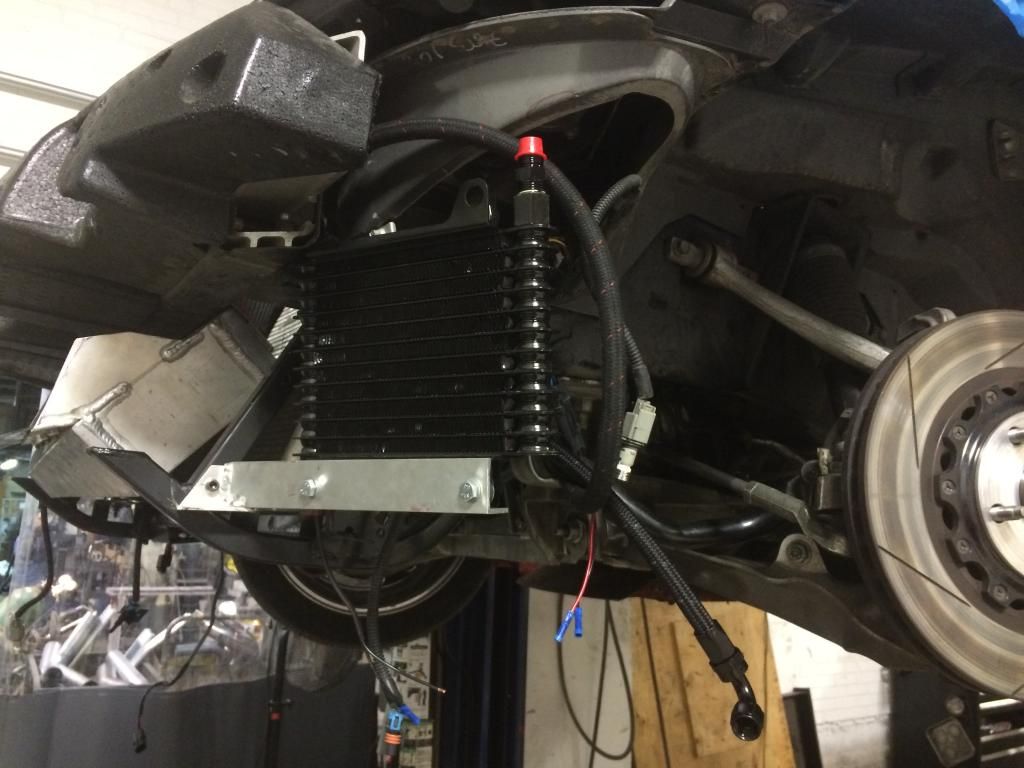
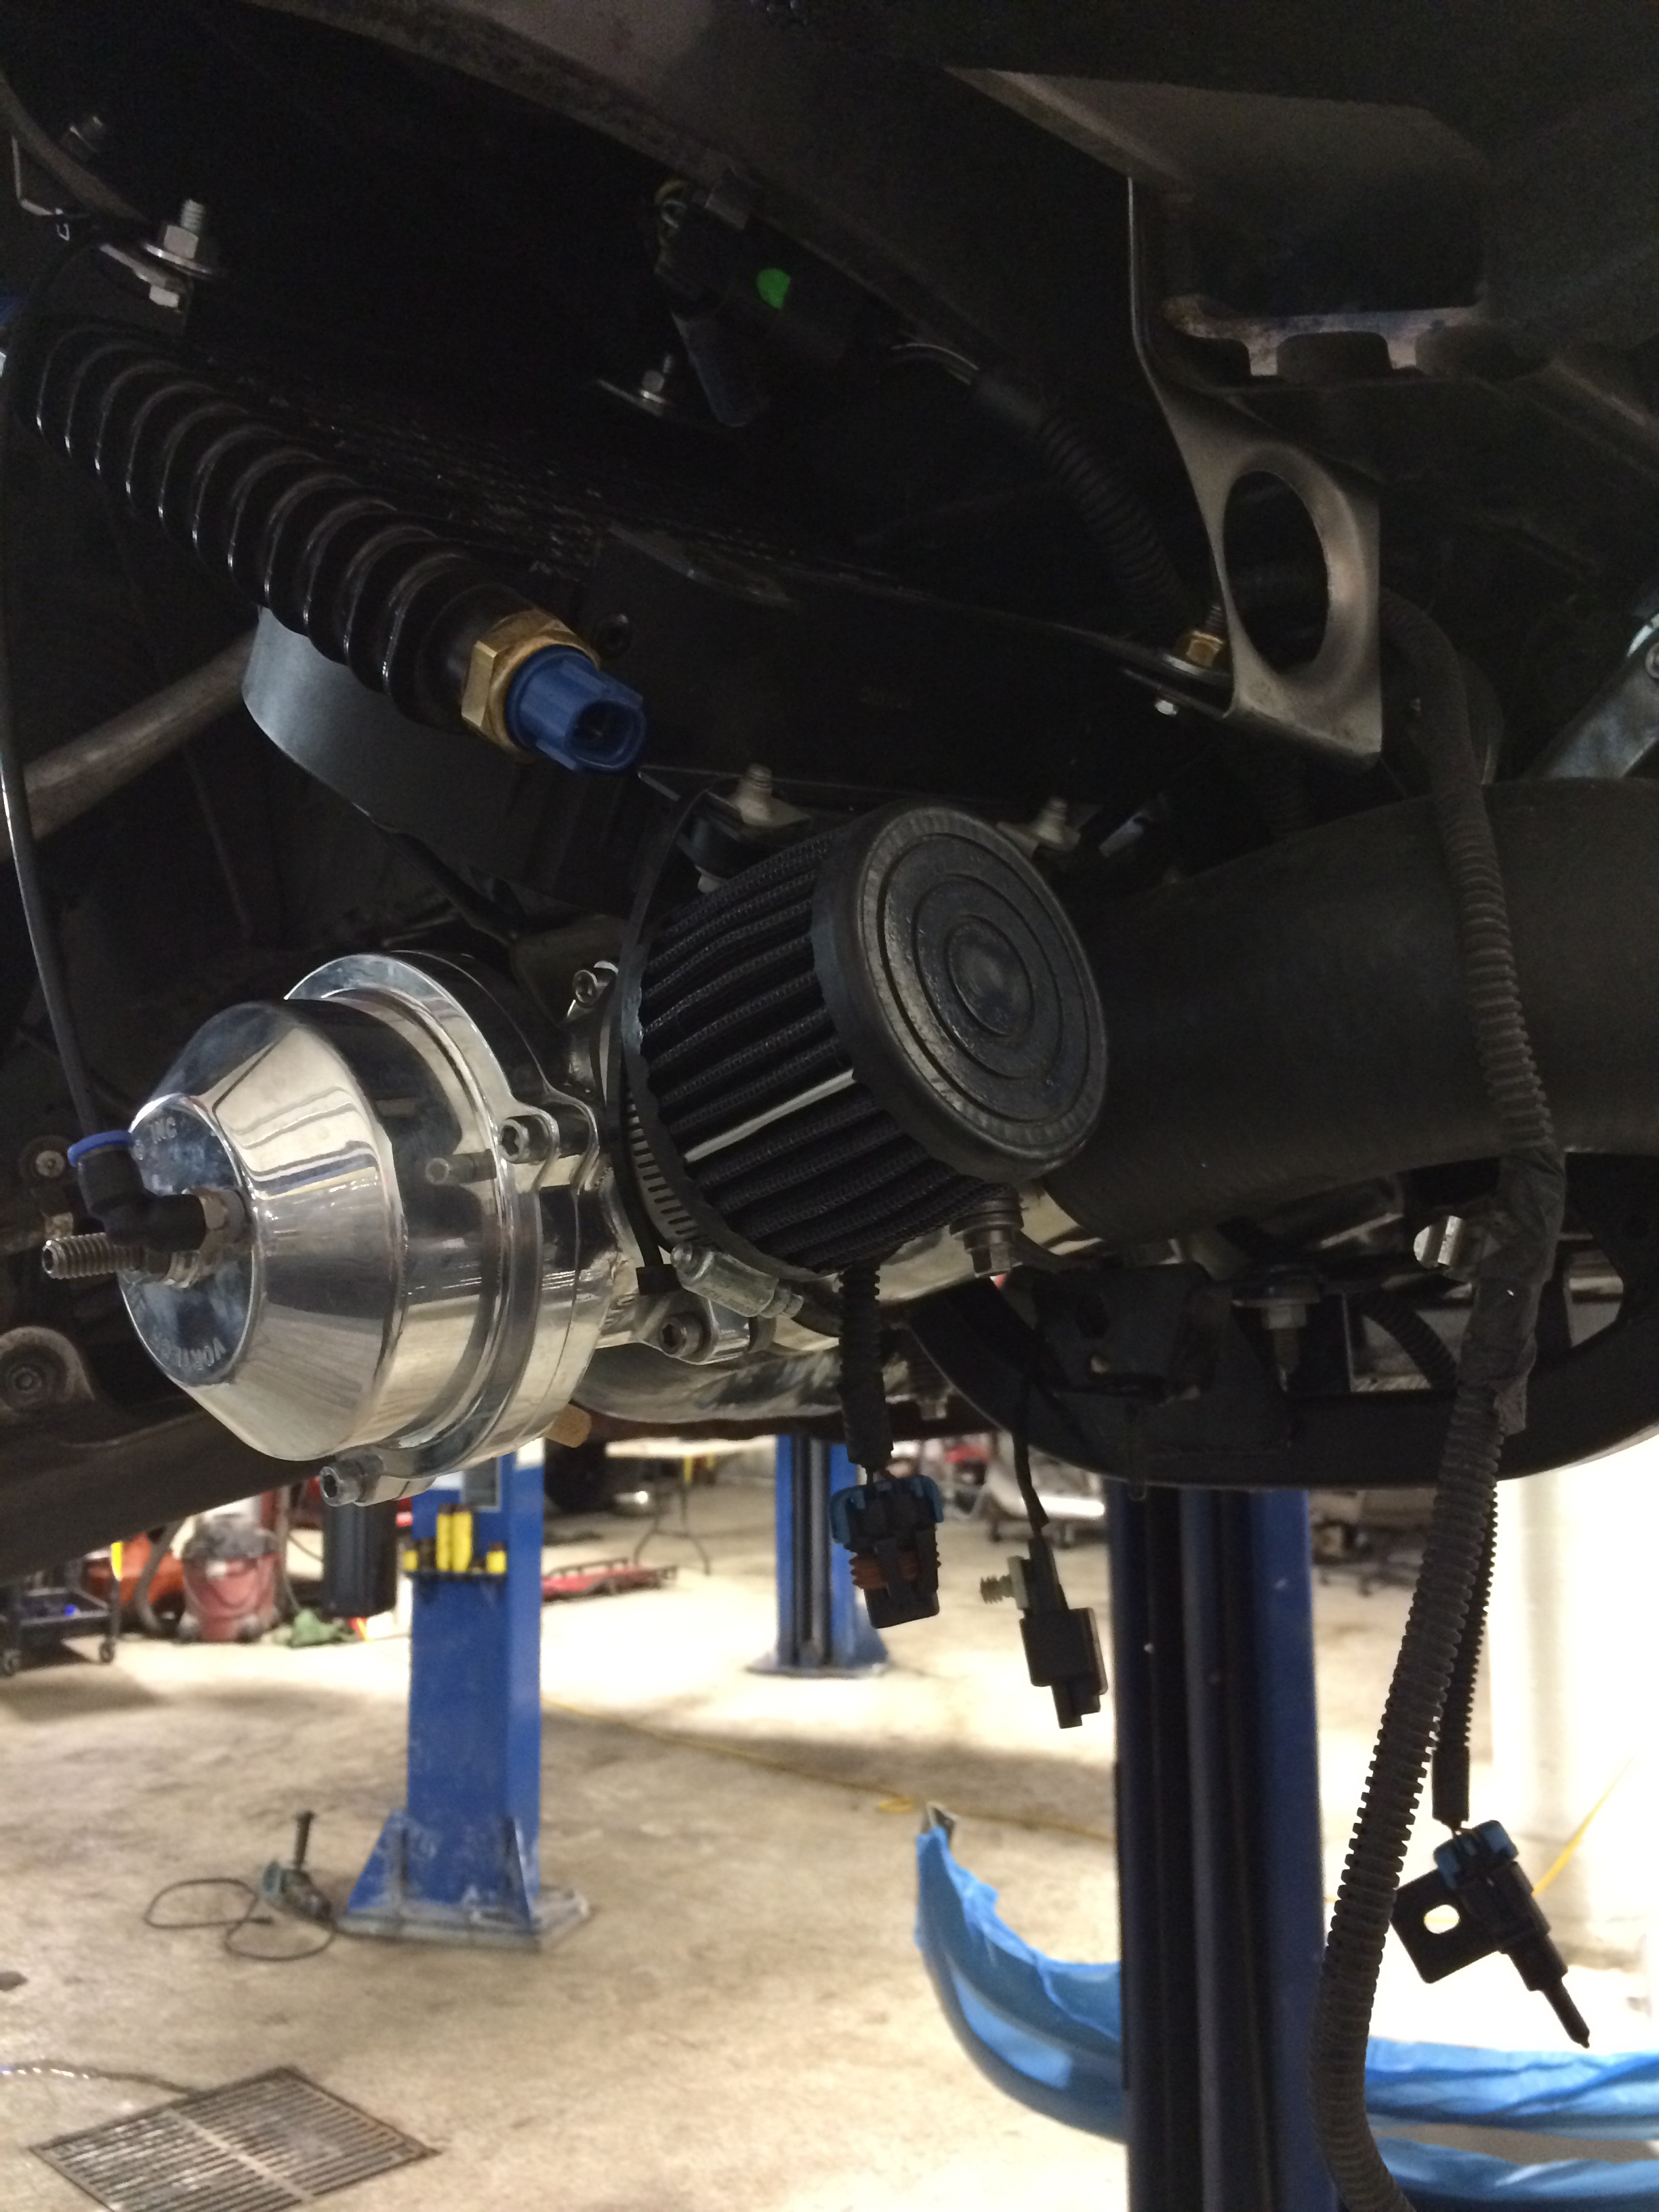
I want to thank realcanuk for some of his pictures on the thread https://www.corvetteforum.com/forums...placement.html. It helped a lot. A&A's instructions on removing the front bumper cover made that a less than 2 hour task https://www.aacorvette.com/pdf/aa_c6_fascia_removal.pdf. I was concerned that the Setrab 625 may not fit, but it fit's with room to spare. Recapping my issue, I swapped out the motor a couple of years ago. The new motor is a bored & stroked all Forged LS3 with a cam upgrade, an A&A supercharger upgrade, LG superpro Headers to a 3" exhaust all the way to the 3" Billy Boat dual mode exhaust. Last time on the dyno, it was putting about 685 to the rear wheels (with a bad plug wire). After this work, I had some cooling issues. First thing was the the fan wiring melted at a connection block. My fix for that was to replace the cooling fan with a dual SPAL setup that though flowing more air, uses less amps. In Texas heat and stop and go traffic that did not prove enough and I also saw oil temperatures climb in stop and go to 265 degrees. Next stop was a Dewitt Dual thickness radiator with an integrated Oil cooler and plumbing and an oil thermostat from Improved Racing to keep the oil from being "too cool to boil out impurities". http://www.improvedracing.com/oil-co...12f-p-435.html. The engine coolant was never an issue after that, but the Oil Temperature still was a lot higher then I liked (250+) and the oil pressure was getting low as the temperature rose. I am told that is OK, but I wanted a bit better because I want to autocross the car. I then decided to add a Setrab 625 Oil cooler with a SPAL fan and a Setrab oil temperature relay for the fan. When I finally got around to starting the project I found that the Setrab would not fit in front of the Air conditioning condenser due to the supercharger plumbing. That is when I opened a thread looking for ideas. I mostly drove off realcanuck's pictures, but with a few modifications. I used #8 stainless mesh for a wheel well vent and my mounts are different. I did not remove the fog light cover for ventilation, but thought about that a bit. With the fan in place, I seem to get plenty of air flowing and the oil temp runs between 220 degrees and 229 now. Exactly where I wanted it. Bracketing was constructed from 1" Aluminum bar stock and 3/4" Aluminum angle stock.
One more thing... My builder had removed (and discarded) my right brake cooling duct. I was determined to retain this functionality. That was pretty simple, I got 4" flex ducting and notched the cooling ducts around both sides to clear all the plumbing.
Missing brake cooling duct. (Thanks Builder)..
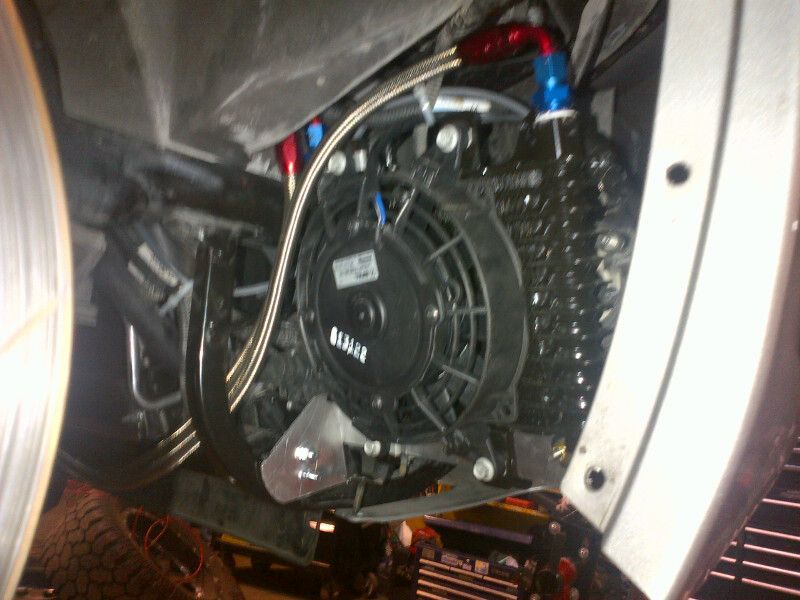
Looking for a mount spot. There is a bolt above the far left side of the cooler that I can mount a bracket to. Ont e left upper side, and out of view is a structure I can bolt to, but since it is plastic, I added a plate above to distribute the load. (The cooler is mounted with the mount point above that spot. I mounted the lower bracket to the radiator bracketing assembly, and the SPAL fan mounts to the 3/4 inch aluminum angle. .
There was not a lot of room left on this side, so I had to completely chop off much of the original duct and replace it with flex ducting. I know this is not as good as what chevy designed, but it is a lot better than removing the ducting.
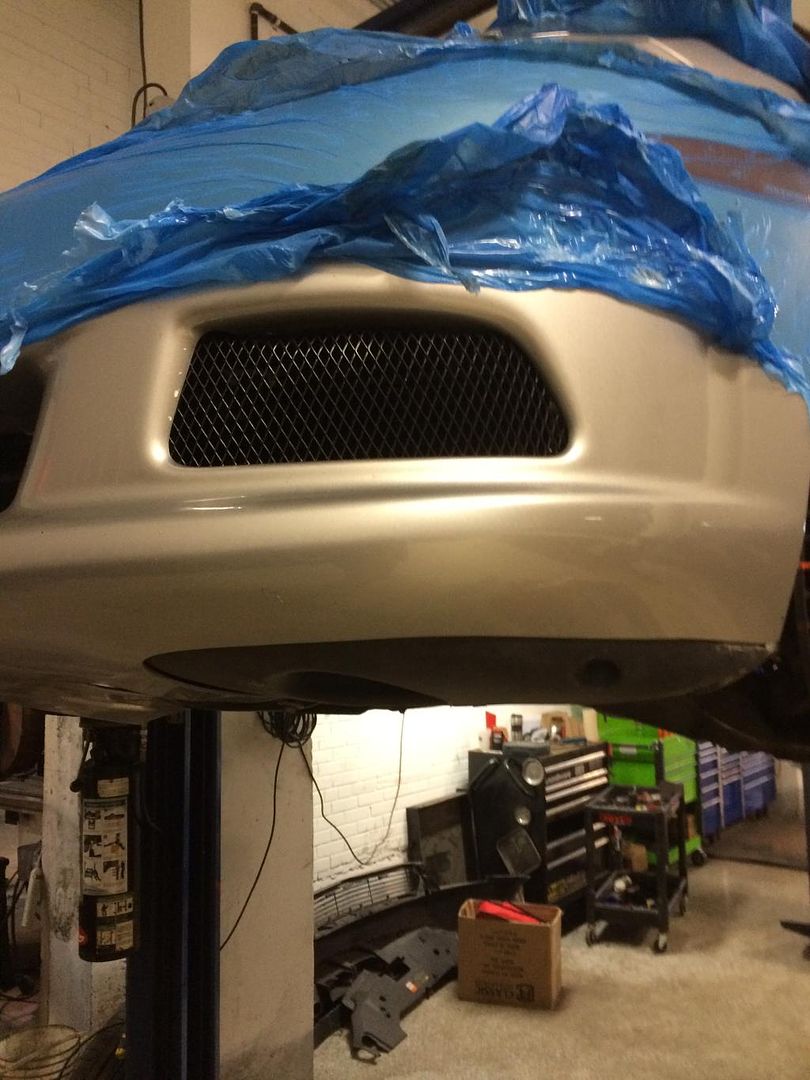
Wheel well view of vent. I hate sharp edges, so the screen was plasti-dipped on the edges and then a bit of electrical tape over that. If I did this again, I would have used a thicker plasti-dip and no tape.
And after checking functionality and checking for oil leaks, it is back together. I had only one issue. The Setrab Oil temperature switch was dripping oil. Upon inspection, it looked like there should have been teflon tape on the insertion fitting, but that was an easy fix.
Thanks Timd38, It was more work than I thought getting the cooler situated, but actual project hours was probably about 12. The rest of the time, I chased down parts or sat there scratching my head trying to figure out how to mount it and run the cooling / plumbing / wiring.. One detail I left out is that the oil lines need to enter the Dewitt's radiator on the bottom and exit the top. The line then goes through the external cooler and to the oil temperature switch before returning to the engine to the (return) upper fitting on the Improved Racing thermostat. Direction is important.
Hi. I have the exact same A&A kit that you are running, and similar engine rebuild. I track my car regularly and need lower oil temps. I have a few questions:
-Did you install the oil cooler only on the driver side due to the blow off valve plumbing on the passenger side?
-Are you also using the Dewitts radiator integrated oil cooler in series with the new oil cooler, or are you only running to the new oil cooler?
-Do you feel the brake cooling duct modifications are still effective? I run a brake cooling kit that uses the stock setup, but additionally extends flexible hose directly to the rotor hub. I must keep the functionality of the brake cooling ducts.
Hi, sorry for not noticing the question until now.
- Yes the blow off valve uses a lot of space, but I am pretty sure there is enough left for a tranny cooler.
- I have the Dewitt's eoc, but that was not enough, so now I use both. 1st the Dewitt, and then it goes to the Setrab 625, and finally though the fan temperature switch and back to the engine.
- Chevy's is better, but still that narrows down to pretty small at the end. Mine narrows down sooner, but is still wider than the point it goes beside the wheel. Also, I am sure mine has more turbulence. If I had to guess, I would guess I lost 10-15% of the flow. A person might do better with a heat gun and trying to form the stock ducts to
accommodate. Also, the blow off valve could have been better positioned, but I just went with it the way it was.
- I would like to see pictures of your setup. If I like it, I will redo mine at some point.
The blow off valve is in the same position in both of our setups, I think that's just the basic position it ends up in. My shop is considering putting 1 Setrab cooler in the space between the Dewitts radiator and the intercooler (air would flow in, be forced down, then out the bottom of the car). What are your thoughts on doing that, then having a second cooler in a spot other than the fender well; possibly mounted in an area with some free space around the bottom space of the engine bay positioned horizontally if needed. This would avoid cramming it in the tight fenderwell and keep the brake ducts in tact. Could I have the Dewitts oil cooler section, radiator mounted Setrab cooler, and 2nd Setrab Cooler connected? What are your thoughts?
The blow off valve is in the same position in both of our setups, I think that's just the basic position it ends up in. My shop is considering putting 1 Setrab cooler in the space between the Dewitts radiator and the intercooler (air would flow in, be forced down, then out the bottom of the car). What are your thoughts on doing that, then having a second cooler in a spot other than the fender well; possibly mounted in an area with some free space around the bottom space of the engine bay positioned horizontally if needed. This would avoid cramming it in the tight fenderwell and keep the brake ducts in tact. Could I have the Dewitts oil cooler section, radiator mounted Setrab cooler, and 2nd Setrab Cooler connected? What are your thoughts?
I looked at that. I was not sure if it would fit with the Spal Fan on it. I was also not sure how many heat producing devices I wanted in front of my Radiator (intercooler, Oil Cooler and Condenser.) I am pretty comfortable with notching the ducting and repairing it as I did, but if I was to do it again, I would try to re-position the blow off slightly, use a heat gun to get the ducts to fit and move the Setrab an inch or 2 out from where it is to get more room for the ducting. I did consider adding a small lip on the intakes for the ducts to force more air through.
Great craft going on here, just finished installing two coolers on my '11 torch red GS in the same area 11" x 11" about the biggest I could fit in there, I removed the two fog lights and use the openings for forced air, covered the opening with a SS mesh painted transparent gloss black I think it looks and works well, I was seen up to 249 on engine oil is down bellow 200 and same for trannie fluid.
I have no force induction so I was able to stay in front of the brake air ducts.
The blow off valve is in the same position in both of our setups, I think that's just the basic position it ends up in. My shop is considering putting 1 Setrab cooler in the space between the Dewitts radiator and the intercooler (air would flow in, be forced down, then out the bottom of the car). What are your thoughts on doing that, then having a second cooler in a spot other than the fender well; possibly mounted in an area with some free space around the bottom space of the engine bay positioned horizontally if needed. This would avoid cramming it in the tight fenderwell and keep the brake ducts in tact. Could I have the Dewitts oil cooler section, radiator mounted Setrab cooler, and 2nd Setrab Cooler connected? What are your thoughts?
I have no intercooler and I put two coolers in front of my Dewiits rad and it didn't like it one bit, it blocked al the area between the bumper and the condenser so not much air could flow up to the greater area of the rad.
Thanks everyone for the input on oil cooler placement. I think mounting in front of the radiator may be a bad idea from your previous post. I actually am discussing options with xplosive performance. They have done setrab coolers behind the fog lamps on zr1 cars with success. Id imagine they were able to get the coolers to work around the cooling ducts on those cars. I may only be able to make the driver's side work due to the blow off valve, but running the dewitts oil cooler section with one setrab may be all i need. Im currently hitting 250 deg oil after 10 to 15 minutes running a road course in 90 + ambient temperatures. If i can keep it between 235 to 245 deg oil for a full 20 minute session in the summer that would be perfect. Fall winter and spring here in Florida wouldn't even be an issue temp wise if that setup works.
The key is to use a cooler size you can fit in place with the room you have it doesn't have to be big, when the car is moving lots of air moves true the fog lamps openings at great pressure, another good trick is to use an extra quart of oil and the oil level still be way below the crank reach.
A fix can also be a cooler integrated higher capacity oil pan as those with pipes running true them (yours can be modify) to route air true the pipes length wise.
A couple of quarts of oil extra means oil sees less friction per quart thereby allowing it to remain within acceptable temps.
Thanks everyone for the input on oil cooler placement. I think mounting in front of the radiator may be a bad idea from your previous post. I actually am discussing options with xplosive performance. They have done setrab coolers behind the fog lamps on zr1 cars with success. Id imagine they were able to get the coolers to work around the cooling ducts on those cars. I may only be able to make the driver's side work due to the blow off valve, but running the dewitts oil cooler section with one setrab may be all i need. Im currently hitting 250 deg oil after 10 to 15 minutes running a road course in 90 + ambient temperatures. If i can keep it between 235 to 245 deg oil for a full 20 minute session in the summer that would be perfect. Fall winter and spring here in Florida wouldn't even be an issue temp wise if that setup works.
One other possibility I considered was mounting the cooler behind the front left wheel and the windshield washer reservoir. I don't know how that would fit though. The vent would hopefully move enough air to do the job?
You really don't want to mount anything in front or under the rad / intercooler. We need all the airflow we can get there. There is room for a cooler on each side as mounted by the op. I have a trans cooler on the passenger side, and oil cooler on drivers side. Both do the job great with the fans and vents behind. I removed the foglights for more flow ( I never use them anyways ) but you can manage with leaving them if you prefer.
I had the trans cooler before the YSI and had to move it a little for the blowoff valve but there is plenty of room. I used the B&M 70298 for both which is the smaller model. 10 in. x 7.5 in. x 4 in. They work great.
Oil on driver side....
Trans on passenger side....I don't have a pic with the blowoff valve in it but it fits fine.
Grills replacing fog lights..... more air the better.....
so does the 1 oil cooler do the job well for you? And good to hear the blow off valve fits in there. Is the trans cooler much smaller than the oil cooler on the driver's side? Also, im just worried about the brake cooling plastic ducts. I really need them to work efficiently since i am pretty hard on the brakes at the track. I guess worst case i can use flexible tubing like the op did and have faith that's enough airflow, and that the srf brake fluid holds up
so does the 1 oil cooler do the job well for you? And good to hear the blow off valve fits in there. Is the trans cooler much smaller than the oil cooler on the driver's side? Also, im just worried about the brake cooling plastic ducts. I really need them to work efficiently since i am pretty hard on the brakes at the track. I guess worst case i can use flexible tubing like the op did and have faith that's enough airflow, and that the srf brake fluid holds up
1 oil collier does the job fine. The 2 coolers are identical and both bypass the radiator. My car is a base C6 and all it had for brakes ducts is a very short tube aiming towards the brakes. I did. Alter them a bit and the basically direct air to the coolers now.
BTW, I used cheap 4" generic ducting. I see that there is flexible ducting available specifically for brake ducting. Next time I have it apart, I will change to that and that should flow better since the Allstar ALL42154 has a smooth interior.
BTW, I used cheap 4" generic ducting. I see that there is flexible ducting available specifically for brake ducting. Next time I have it apart, I will change to that and that should flow better since the Allstar ALL42154 has a smooth interior.
The ducting you speak is available in at least two different grades that I've used. In general the orange hose is the most durable, I've had some black hose that was good but not up to the level the orange that I have now.

 07-02-2015, 11:08 AM