When you click on links to various merchants on this site and make a purchase, this can result in this site earning a commission. Affiliate programs and affiliations include, but are not limited to, the eBay Partner Network.
Replace or adjust parking brake when doing brake job?
Hello
My 08 z51 base has original (I think) brake fluid and I'm finally planning to change to DOT4. I wish I did this earlier. It is black. Then, when all wheels are off, I'll probably do the rotors/pads. I have 60,000 miles now, but I'll take a look to see how much life is left.
So, the emergency brake barely works. It certainly won't slow the car down much when you are under way. When you do brakes, do you replace or adjust the parking brake? I assume the brake "drum" is the inside of the rear caliper?
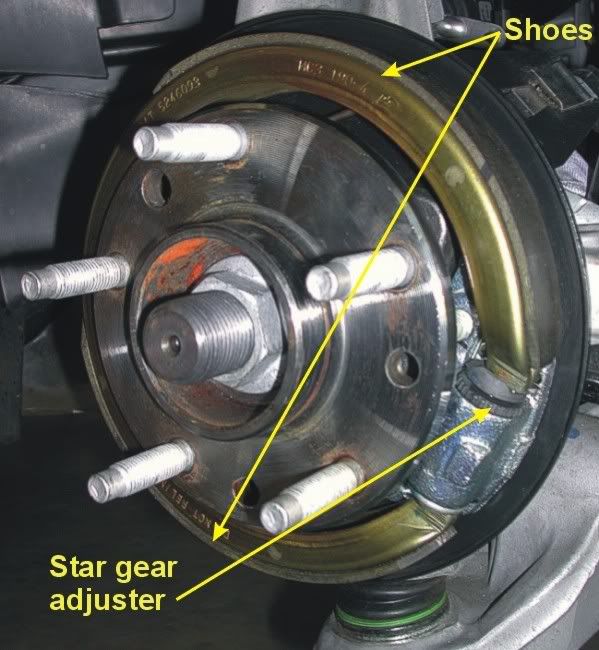
Both rear rotors on the car, rotate one rotor and listen for any contact of the shoe to drum. Pop the rotor off, adjust the star gear adjuster to expand the U shoe, install the rotor again and rotate it for a full turn again. When the shoe just starts to make contact to the drum when it spun (very light hiss in a spot of two), pull the rotor again, and adjust the star adjuster back in a notch or two and put the rotor back on.
Get in the car, pull the E brake handle to center the shoe in the drum, release the E brake handle and double check to make sure that the shoe is still not rubbing the drum when the rotor is spun for a full rotation. One side down and the drill is the same for the other side.
With both sides adjusted, get back in the car, and count the clicks up on the e Brake handle off the bottom pulling it up slowly. Should be only 12 or 13 clicks, and anything past that should feel like your about to dislocate your shoulder if you pull any harder to get more clicks with the shoes adjusted correctly.
And no, the E brake shoe/star adjuster is not self adjusting, so you have to manual adjust it when doing the brakes.
Note, if you are not starting with new rotors, double check the outer surface of the Drums for non wear lips that may been to be turned off instead. Again the drum has to be pulled to get to the Star adjuster, and if the drum has a none wear lip on it outer edge, your never going to get the shoes adjusted correctly since at some point, your going to have the shoe adjusted so you can't get the rotor on due to the lip, but the shoe still adjusted well off the drum surface instead.
As for the factory method, they use a big measuring caliper to measure the inside of the drums ID, and use that measurement with the tool to set the shoe one time instead. It works, but you get better results (less clicks up on the E handle) by adjusting the shoes my way instead.
And don't freak out when you see the old shoes and think that you have to replace them, since they are not thick to begin with when new. The Shoe in the above photo is pretty much as thick as the shoes are when brand new, and if you still have at least half that amount of shoe left, the shoes are fine and don't need to be replace.
As for older rotors that may need the lips turned off to adjust the shoes, just have them turn the drums just enough to remove the lip, and not try to go buck wild by taking a deep cut in the entire drum surface instead.
As for the cable tension itself, it's semi self adjusting for stretch in the cables, and if you need to replace one of the 3 cables, or the entire lever, then three handle pulls will adjust the slack of the cables (lever housing will adjust the slack out of the main cable, and the shortest of less rear stretched cable to the back of the system, but will not self adjust the rear shoes to drums, and these gaps have to be adjusted by hand using the star gears).
it also can be adjusted by pulling the hand brake 3 times with everything assembled. but if u have everything off....it's a great time to service it like Dano showed
Well Sorry Dano for trying to help. As I mentioned, if the brakes are off, it the easiest and best time to adjust. However, what I stated earlier was pulled right out of the GM SERVICE MANUAL.
No worries (my foul), and agree that the lever housing will adjust the slack out of the main cable back, and the least stretched rear cable of the two on the back of the system.
Using the E brake's itself normally does this automatically to take up the slack in the cables as they all stretch, and the three pulls is for when you replace the handle housing or one off the cables, and need to readjust the cable slack the first time with the new housing or cable in play.
So on a car that is being driven, and someone is using the E brakes, then the cable tension itself is self adjusting to remove the unneeded slack in the cables automatically, and its just the shoes to the drums that have to be adjusted manually by hand for any wear in them instead.
Hence, the shoes will not self adjust to the drums via the cable slack take up, or the star gear that will self adjust outwards like other E brake system on other cars, since there is no lever system to click the star gear out as the shoes/drum surfaces wear as the E brake levers travels too far instead).
As for the link you posted and the op there, at most, all the lever pulls did is remove a slight amount of cable slack that he might of had by pulling the lever hard to over stretch the cables and allow the lever system to take up that extra slack now created, but still back at the main problem, being that in his case that he as using the E brake and the lever is coming all the way up to max up in the upwards postion and the E brake may not be fully engages, still needs to manual adjust the E shoes to the drums to remove the normal wear of the two that will not self adjust out instead.
To sum it up, we all see the write up on how to replace the pads, but when you have the rear pad and rotors off, double check the shoes to the drum gaps as well. It only take a few mins, and with the rear E brakes adjusted correctly, the E brakes work very well without the lever having to be over pulled straight up like a flag pole instead!
the rear shoes shouldn't wear unless they were rubbing, or you're pulling the handbrake while in motion. That being said, I agree with you 100%, if you are replacing the brakes, or have them off, service them. Even though in theory it should be the same, a new rotor may create more or less clearance to the shoes and should be adjusted accordingly. It would really suck to have it all done and the handbrake barely grabs.
The OP asked if he should adjust while they are off.....And you answered his question straight on. Yes you should adjust while off For those who experience poor handbrake performance, the 3x on the lever thing would be the first thing I'd try......but that wasn't he question lol. So my bad
Both rear rotors on the car, rotate one rotor and listen for any contact of the shoe to drum. Pop the rotor off, adjust the star gear adjuster to expand the U shoe, install the rotor again and rotate it for a full turn again. When the shoe just starts to make contact to the drum when it spun (very light hiss in a spot of two), pull the rotor again, and adjust the star adjuster back in a notch or two and put the rotor back on.
Get in the car, pull the E brake handle to center the shoe in the drum, release the E brake handle and double check to make sure that the shoe is still not rubbing the drum when the rotor is spun for a full rotation. One side down and the drill is the same for the other side.
With both sides adjusted, get back in the car, and count the clicks up on the e Brake handle off the bottom pulling it up slowly. Should be only 12 or 13 clicks, and anything past that should feel like your about to dislocate your shoulder if you pull any harder to get more clicks with the shoes adjusted correctly.
And no, the E brake shoe/star adjuster is not self adjusting, so you have to manual adjust it when doing the brakes.
Note, if you are not starting with new rotors, double check the outer surface of the Drums for non wear lips that may been to be turned off instead. Again the drum has to be pulled to get to the Star adjuster, and if the drum has a none wear lip on it outer edge, your never going to get the shoes adjusted correctly since at some point, your going to have the shoe adjusted so you can't get the rotor on due to the lip, but the shoe still adjusted well off the drum surface instead.
As for the factory method, they use a big measuring caliper to measure the inside of the drums ID, and use that measurement with the tool to set the shoe one time instead. It works, but you get better results (less clicks up on the E handle) by adjusting the shoes my way instead.
And don't freak out when you see the old shoes and think that you have to replace them, since they are not thick to begin with when new. The Shoe in the above photo is pretty much as thick as the shoes are when brand new, and if you still have at least half that amount of shoe left, the shoes are fine and don't need to be replace.
As for older rotors that may need the lips turned off to adjust the shoes, just have them turn the drums just enough to remove the lip, and not try to go buck wild by taking a deep cut in the entire drum surface instead.
As for the cable tension itself, it's semi self adjusting for stretch in the cables, and if you need to replace one of the 3 cables, or the entire lever, then three handle pulls will adjust the slack of the cables (lever housing will adjust the slack out of the main cable, and the shortest of less rear stretched cable to the back of the system, but will not self adjust the rear shoes to drums, and these gaps have to be adjusted by hand using the star gears).
The non wear lip as Dano mentions can be a problem. Especially, when first removing the rear rotors if they have been untouched for a lot of years and miles. The lip may not just be from a lack of wear in that area it could also be a build up of dirt and corrosion that will catch the parking brake shoes as you try and pull the rotor off. To reduce the chance of that happening make sure the rotor comes off as straight as you can possible make it come off. If the rotor does catch the brake shoe you stand a chance of dislodging the spring that holds the parking brake shoe to the backing plate. There are some people who swear they can get that ###!!!@@ spring back on without removing the hub but I have never been able to do it.
I did this today....PITA....
Had to get my car inspected and they failed it on the parking brake...so....
Hardest part actually was toqueing the 129 FT/LB on the caliper bolts....in the confined space available.
I had the tool so I measured it because the other two methods for me didn't work....
1. The "listen for the rubbing method" ...hard to distinguish the rubbing noise from other rubbing noises going on.
2. The "rotate until it gets hard to turn method" and then back off the adjuster...for me the problem is when you turn the wheel/rotor it sometimes is not as easy to turn (even before I adjusted the parking brake at times It felt harder) ...confusing an idiot like me...
3. I ended up using the measuring device...bought it for 50 bucks. Measured it like a hundred times... because the OEM spec of .38 MM is virtually impossible to confirm at that minuscule a gap. So I measured and then used a combination of the other methods to confirm...
In the end I get about 6 maybe 7 clicks and holds on the 5th or 6th...much much better than before.
By the way on my car the expansion of the inner drum brakes was completed by turning the adjustment wheel counter clockwise...not clockwise. I had read a couple places the opposite but in my case it was definitely counter clock wise. I also only needed to adjust the passengers side wheel. The drivers side wheel was fine...the passenger side was probably never adjusted from the factory...original owner told me it always held like crap...
Parking brake should be simple but it was time consuming and a PITA...Good luck everyone!!
Last edited by Cor430vette; 09-13-2015 at 12:13 AM.
Both rear caliper get removed so there is no shoe on rotor making noises, the trans is in neutral, and the only thing that you should be hearing is just E brake shoe on drum or not.
If you have other noises as your rotating each rotor one at a time as you are doing one side at a time, then these are coming from either the wheel hub bearing, or up in the CV joints/diff and not a good sign.
I decided to go back in and see if I could hear something when everything was removed including rotor and just turn it without the rotor and sounds smooth as glass....so thats good. However, I found out that the drivers side seems to have its problem in the spring or the star adjuster or something.....going to start a new thread....with pics to help explain ....THANKS Dano!
works perfectly on any late model GM vehicle. The e-brake is the same on a bunch of GM stuff including trucks. For $25 shipped, you cad have one for the cost to have the dealer adjust.
Bill, regarding the %$#&ing coil spring, if you pull it back and hold it with some small vise grips you can get it on the pawl fairly easy. BTW, We missed you at VIR this last weekend . perfect weather and loads of fun.

 08-27-2015, 08:57 AM


 For those who experience poor handbrake performance, the 3x on the lever thing would be the first thing I'd try......but that wasn't he question lol. So my bad


