
[Z06] DIY: Foglite Brake Duct fabrication
 05-02-2010, 07:11 PM
#1
Melting Slicks

Thread Starter

Well I got a little antsy a few weeks back and decided to move ahead with my foglite brake duct system to help keep my new planned AP Caliper; Performance AFX/Coleman rotor; Cobalt Pad braking system cool.
This kit had been in development by Quantum motorsports but had hit some snags and at the time I fabricated the following...it was not available.
I had several goals in developing this duct system..
1) I wanted a Foglight brake duct kit that would keep the brakes cool during track season feeding from a know high pressure area of the car
2) I wanted to be able to swap in my stock foglight assemblies at will ( A.K.A. return them to stock).
3) I also plan on running an MTI "chin spiler" with a self fabricated carbn fiber under-tray for improved aero in the near future. This would block off the " bottom feeder " design from GM. stay tuned for that post...
4) I wanted it to look nice when completed, as close to factory as possible.
5) I did NOT want to take any air away from the feed into the oil cooler, A/C condensor or Radiator
Step #1
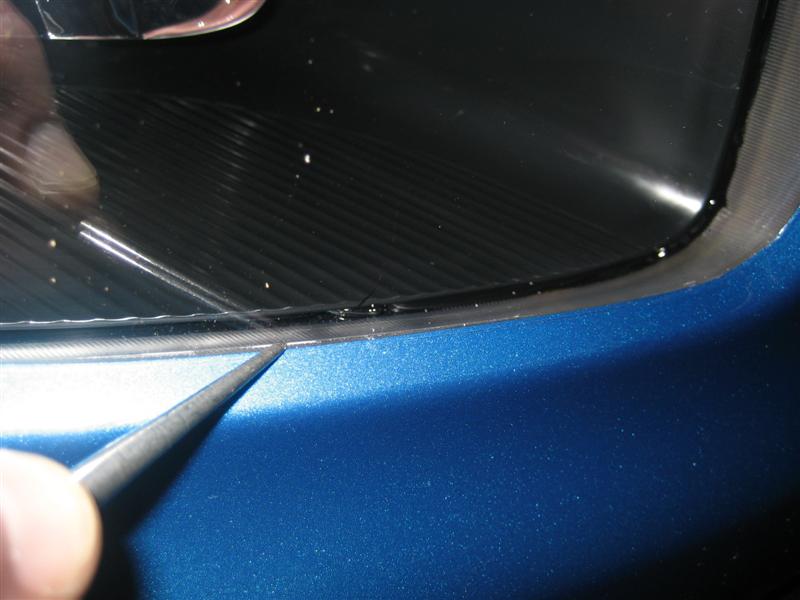
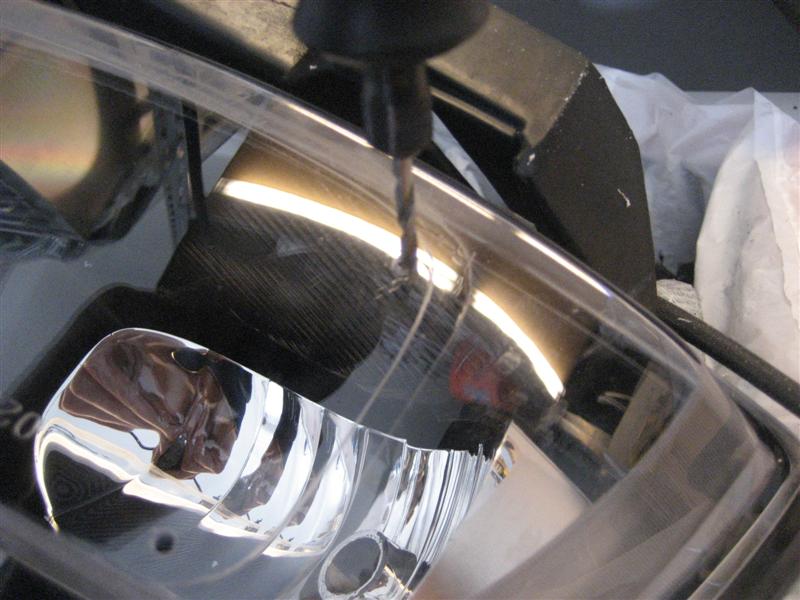
Etch the surface of my stock foglite assemblies with a scratch awl so the center sections could be cut out upon their removal.
Step #2
Pre-drill the lens once the foglight assemblies were removed
Step #3
Use a tile "diamond burr" and a hand file to smooth out the lines of the new opening
Step #4
Mock-up and cut the adjustment portion of the foglight assembly off to make room for the hand formed NACA duct with 3" output
This kit had been in development by Quantum motorsports but had hit some snags and at the time I fabricated the following...it was not available.
I had several goals in developing this duct system..
1) I wanted a Foglight brake duct kit that would keep the brakes cool during track season feeding from a know high pressure area of the car
2) I wanted to be able to swap in my stock foglight assemblies at will ( A.K.A. return them to stock).
3) I also plan on running an MTI "chin spiler" with a self fabricated carbn fiber under-tray for improved aero in the near future. This would block off the " bottom feeder " design from GM. stay tuned for that post...
4) I wanted it to look nice when completed, as close to factory as possible.
5) I did NOT want to take any air away from the feed into the oil cooler, A/C condensor or Radiator
Step #1
Etch the surface of my stock foglite assemblies with a scratch awl so the center sections could be cut out upon their removal.
Step #2
Pre-drill the lens once the foglight assemblies were removed
Step #3
Use a tile "diamond burr" and a hand file to smooth out the lines of the new opening
Step #4
Mock-up and cut the adjustment portion of the foglight assembly off to make room for the hand formed NACA duct with 3" output
Last edited by bowtiguy; 11-23-2010 at 11:44 AM.

The following users liked this post:
Aardwolf (05-22-2023)
05-02-2010, 07:13 PM
#2
Melting Slicks
Thread Starter
Step #5
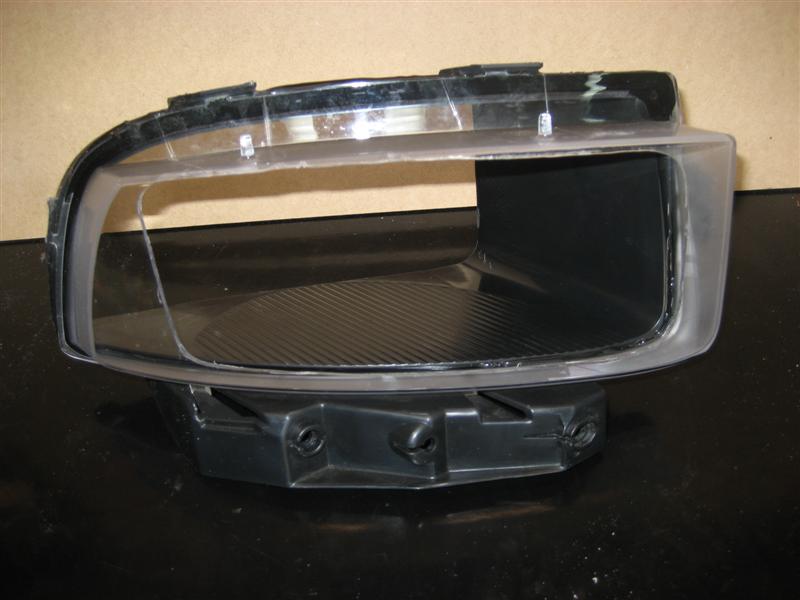
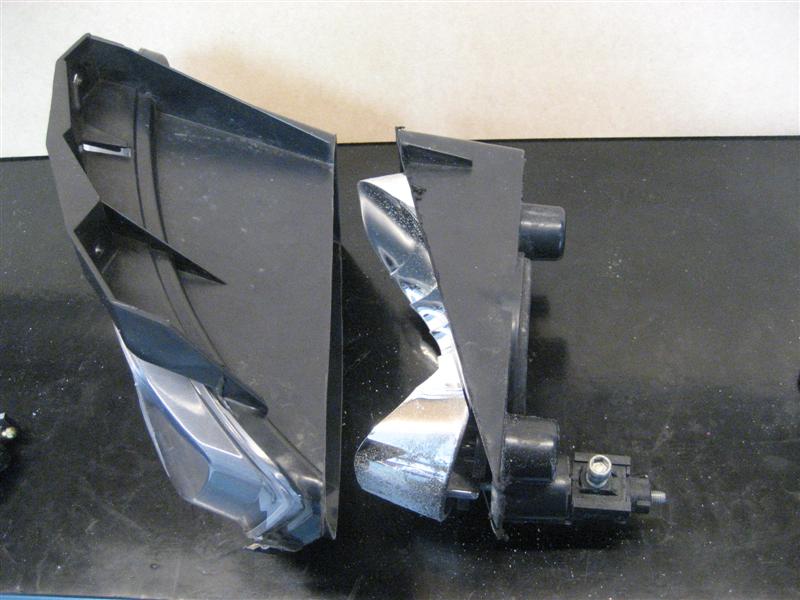
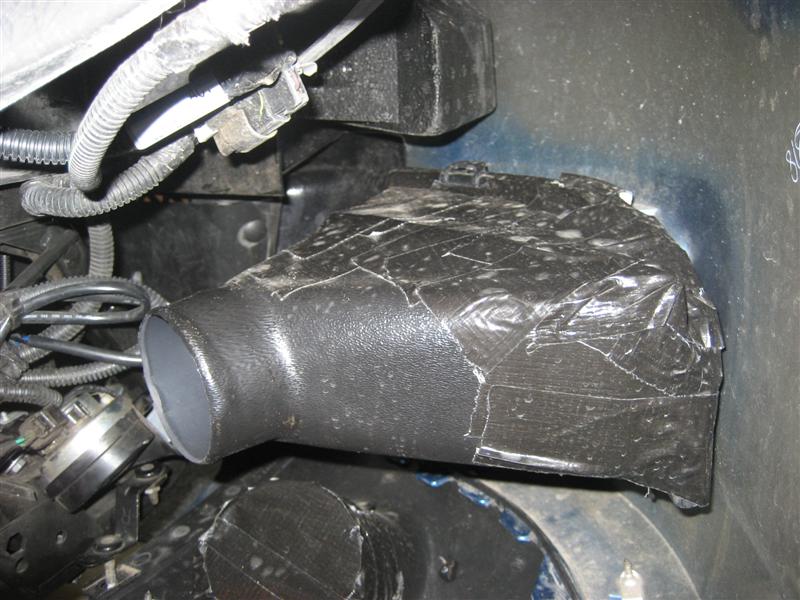
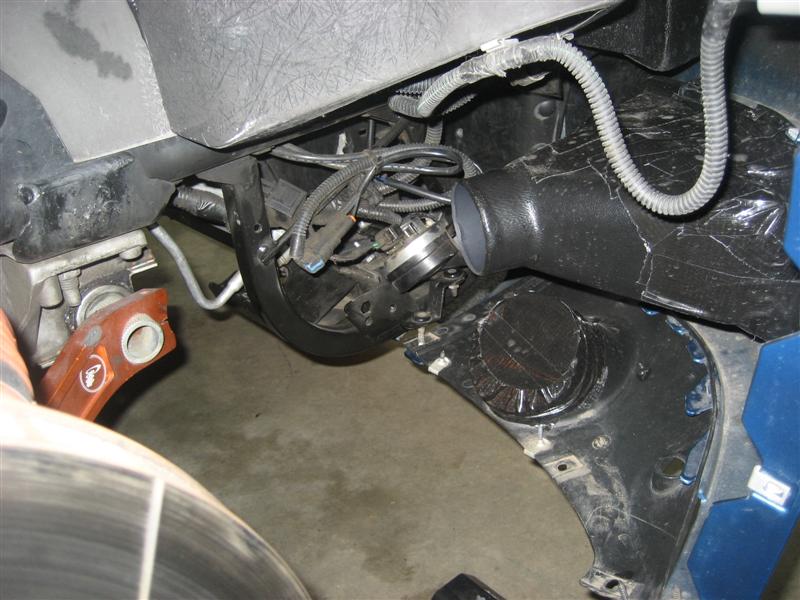
With the aid of a heat gun, some wood blocks, and a pair of gloves ( to protect my hands) I carefully cut the extra trim off the NACA duct and hand formed it around the modified fog-light assembly( sorry I was to focused at this stage to take pics before covering it up). I secured it in place using 2-part epoxy and sealed everything of with Black duct tape for a cleaner look and to insure no leaks.
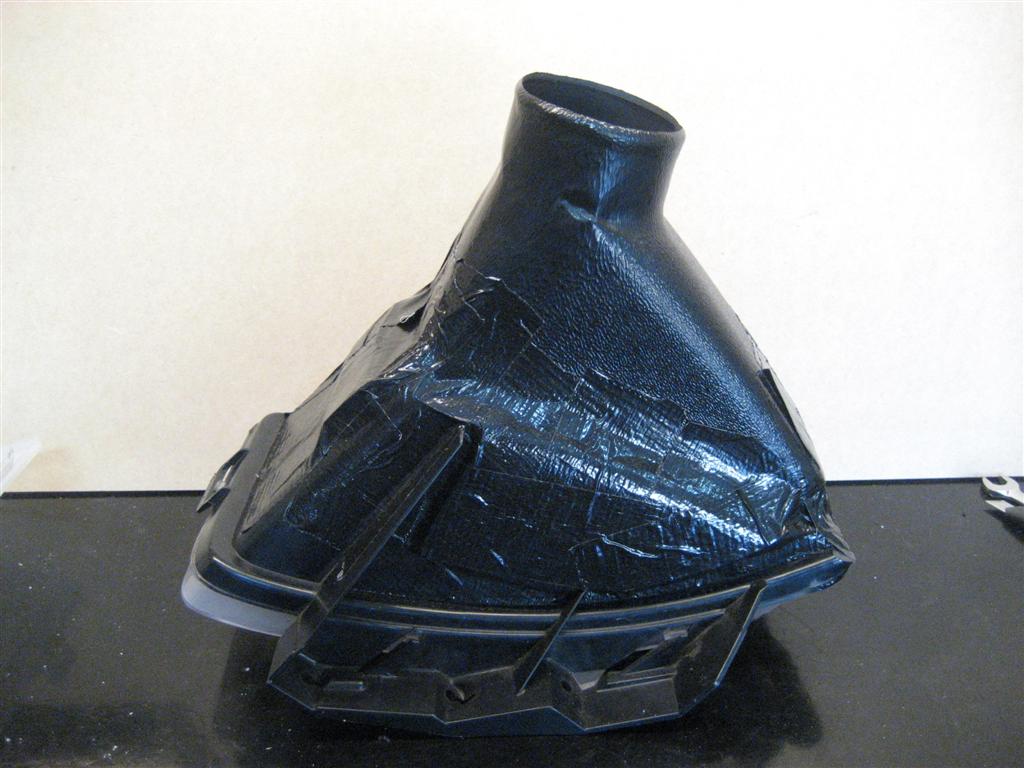
Step #6
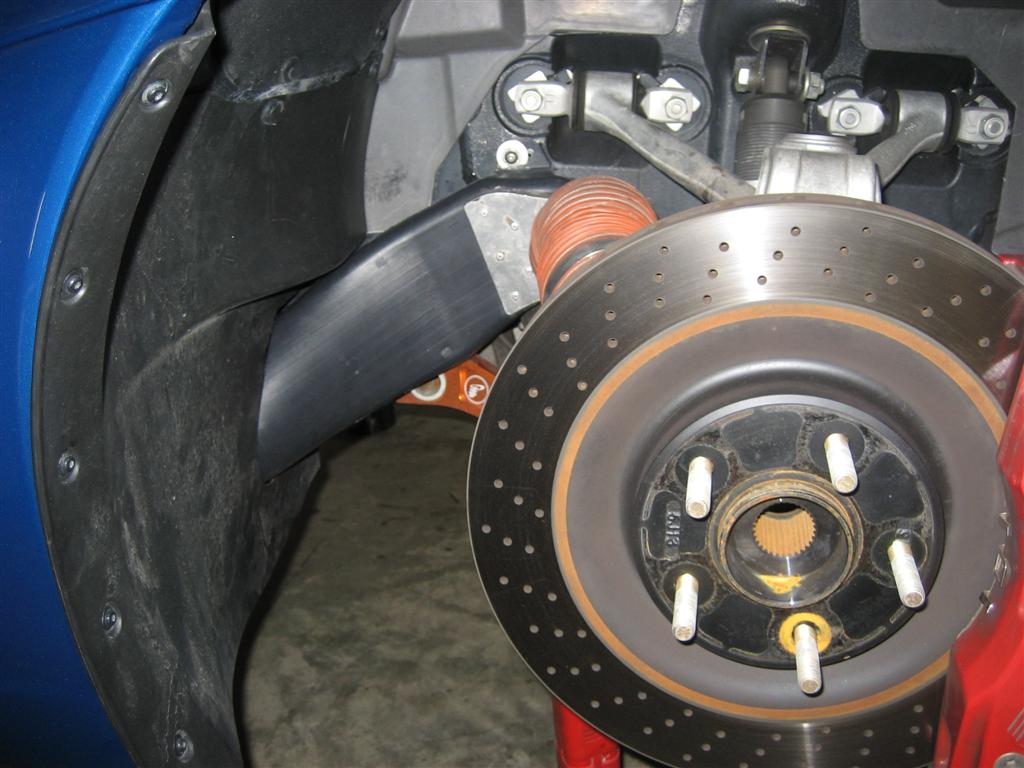
I marked the factory brake ducts as the extend "into" the front inner spalsh sheild. I cut them off approximately 1" into the front facia area and proceeded to run 3" silicone hose into that duct being carefull to conform the wire supported hose to fit as closely to the oval I.D. of the factory duct. ( I later sealed this off with black duct tape)
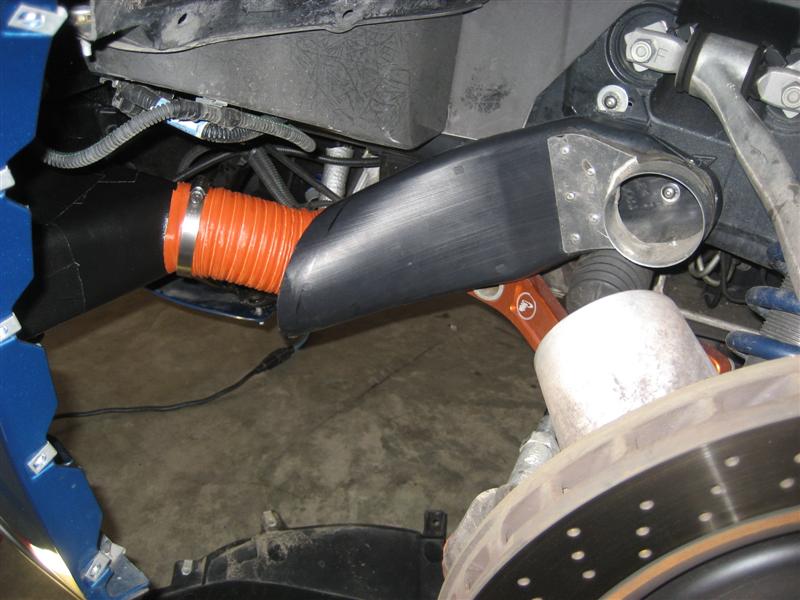
Step #7
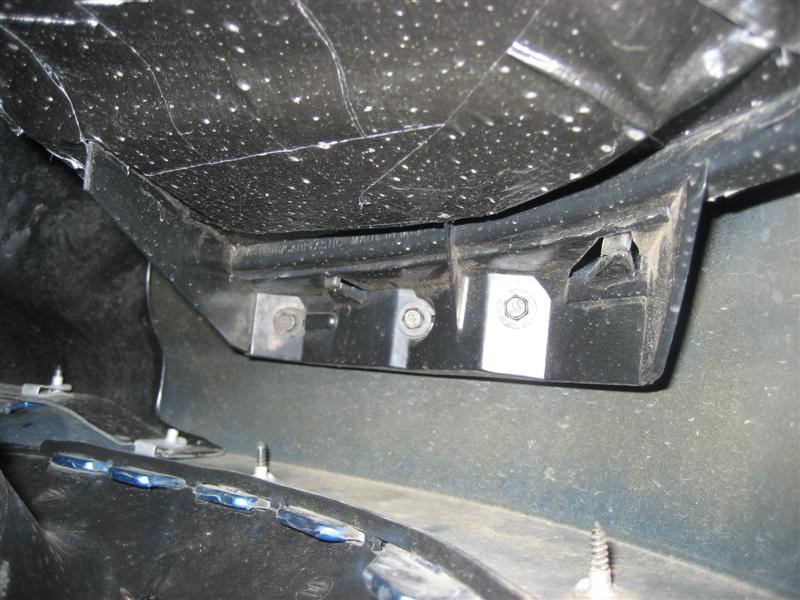
from here, I just put everything back together as stock. with NO clearance issues because I had already modified my stock brake ducts mounting position to clear both my stock wheels and my wider CCW front race wheels and 295 tires.
The Final Product
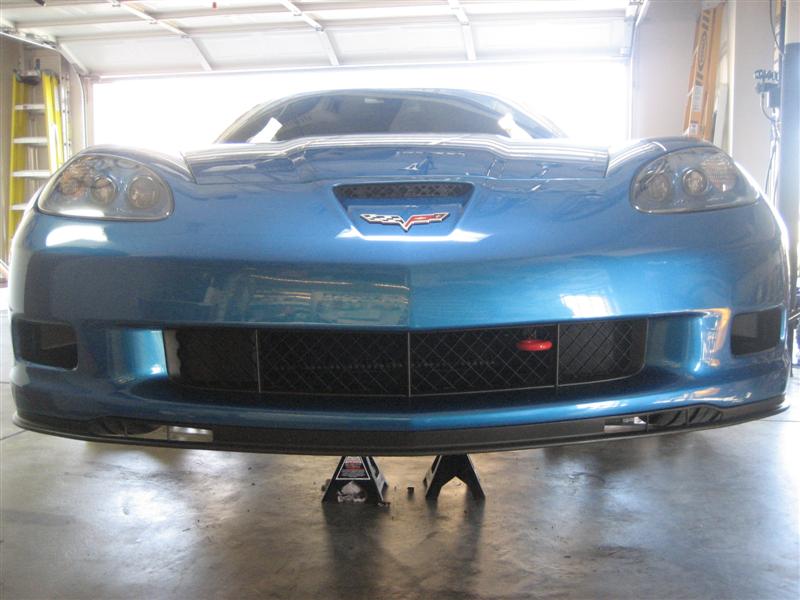

Did they work???
you bet! almost too well as I had a hard time getting the pads up to temp in low 40 degree weather as we hit the track in the morning at PPIR with NASA a couple of weekends ago.
- I had MORE brake than the GT3 porsche in our group
- I experienced NO fade running group 3 ( w/in .5 sec of fastest TT cars)
- I did NOT have to bleed the system , NOT even once!( castrol fluid)
- I ran (7) 35 minute sessions ( 4 of which pretty much all out)
I can not wait to try this set-up once the Temps get warmer, maybe I'll add fans next and control them with my foglite switch as Quantum had proposed. I hit 140-150 mph on the front straight at HighPlanesRaceway so I may not need that.
With the aid of a heat gun, some wood blocks, and a pair of gloves ( to protect my hands) I carefully cut the extra trim off the NACA duct and hand formed it around the modified fog-light assembly( sorry I was to focused at this stage to take pics before covering it up). I secured it in place using 2-part epoxy and sealed everything of with Black duct tape for a cleaner look and to insure no leaks.
Step #6
I marked the factory brake ducts as the extend "into" the front inner spalsh sheild. I cut them off approximately 1" into the front facia area and proceeded to run 3" silicone hose into that duct being carefull to conform the wire supported hose to fit as closely to the oval I.D. of the factory duct. ( I later sealed this off with black duct tape)
Step #7
from here, I just put everything back together as stock. with NO clearance issues because I had already modified my stock brake ducts mounting position to clear both my stock wheels and my wider CCW front race wheels and 295 tires.
The Final Product
Did they work???
you bet! almost too well as I had a hard time getting the pads up to temp in low 40 degree weather as we hit the track in the morning at PPIR with NASA a couple of weekends ago.
- I had MORE brake than the GT3 porsche in our group
- I experienced NO fade running group 3 ( w/in .5 sec of fastest TT cars)
- I did NOT have to bleed the system , NOT even once!( castrol fluid)
- I ran (7) 35 minute sessions ( 4 of which pretty much all out)
I can not wait to try this set-up once the Temps get warmer, maybe I'll add fans next and control them with my foglite switch as Quantum had proposed. I hit 140-150 mph on the front straight at HighPlanesRaceway so I may not need that.
Last edited by bowtiguy; 11-23-2010 at 11:06 AM.
The following users liked this post:
Aardwolf (05-22-2023)

 05-02-2010, 08:10 PM
#5
Melting Slicks
Thread Starter

Parts came form Racer Parts Wholesale
(2) # SPA-D100 NACA ducts
(1) # THE-SS300 3" silicone hose ( I have an extra 9' if anyone needs some, make you a deal
 )
)I also bought SS mesh but I'm not sure If I'm going to install it or not.
Racer
 05-03-2010, 08:49 AM
#7
Burning Brakes

Member Since: Feb 2006
Location: Ex BX... Ex NJ... Hello CT!!! CT
Posts: 899
Likes: 0
Received 2 Likes
on
2 Posts
Nice DIY write up.... Very well done
I do have a question though.... With so much work you put into it and attention to detail, why didn't you mount some kind of mesh grill on the front of the duct opening? I wouldn't feel comfortable driving "all out" around a track "all out" fully exposed openings, going almost straight to my front brakes..... That's road debris, waiting for a place to happen.
I dunno.... maybe I'm paranoid?!?!?
I do have a question though.... With so much work you put into it and attention to detail, why didn't you mount some kind of mesh grill on the front of the duct opening? I wouldn't feel comfortable driving "all out" around a track "all out" fully exposed openings, going almost straight to my front brakes.....
That's road debris, waiting for a place to happen.I dunno.... maybe I'm paranoid?!?!?
05-03-2010, 09:02 AM
#8
Melting Slicks
Thread Starter
Thanks Jim! I liked you install too and almost considered pulling from that area, but I would have had to relocated the horn assembly on the passenger side and I wanted to get as much air into the coolers as possible with an additional 150hp/125trq at the wheels.
Nice DIY write up.... Very well done
I do have a question though.... With so much work you put into it and attention to detail, why didn't you mount some kind of mesh grill on the front of the duct opening? I wouldn't feel comfortable driving "all out" around a track "all out" fully exposed openings, going almost straight to my front brakes..... That's road debris, waiting for a place to happen.
I dunno.... maybe I'm paranoid?!?!?
I do have a question though.... With so much work you put into it and attention to detail, why didn't you mount some kind of mesh grill on the front of the duct opening? I wouldn't feel comfortable driving "all out" around a track "all out" fully exposed openings, going almost straight to my front brakes.....
That's road debris, waiting for a place to happen.I dunno.... maybe I'm paranoid?!?!?
The cocky answer would have been:" I'm always in front so it does not matter" but in reality I like to lead a few laps and if someone is behind, let them by and follow their line even if I'm the faster car.
Based on the amount of sand, pebbles, bugs that came out of my radiator when I pulled it a couple of weeks back, I think I will implement SS mesh at the fog-lite inlets and behind the front "grill". I'm not a big fan of the " mesh inserts look" but they will serve a purpose.
I may try and black them out with some paint, but it may end up looking worse once it gets hit with track rash.
Last edited by bowtiguy; 05-10-2010 at 12:29 PM. Reason: spelling
 05-08-2010, 10:04 AM
#11
Melting Slicks
Thread Starter
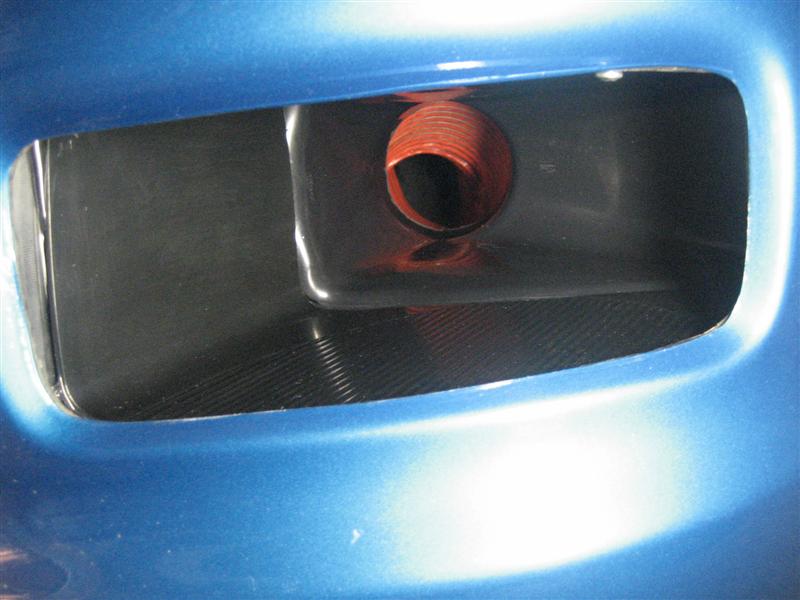
The top of the factory foglite is held in place by two tabs molded into the clear lens ( thats why you can not cut the entire thing off.
The Bottom is held in by 3 screws that are very short so as not to penetrate the outside of the facia. That would be....
This shots shows how everything is angles towards the factory bract ducting for a more ven flow and no "bending around corners"
Finally, what the passenger side looks like from the outside. I gotta find some little black foam ***** to stuff into these when I'm not at the track..too much cooling on a DD basis. Guess my nearly 4 old won't mind a trip to Toys R us..we need more nerf gundarts anyhow.
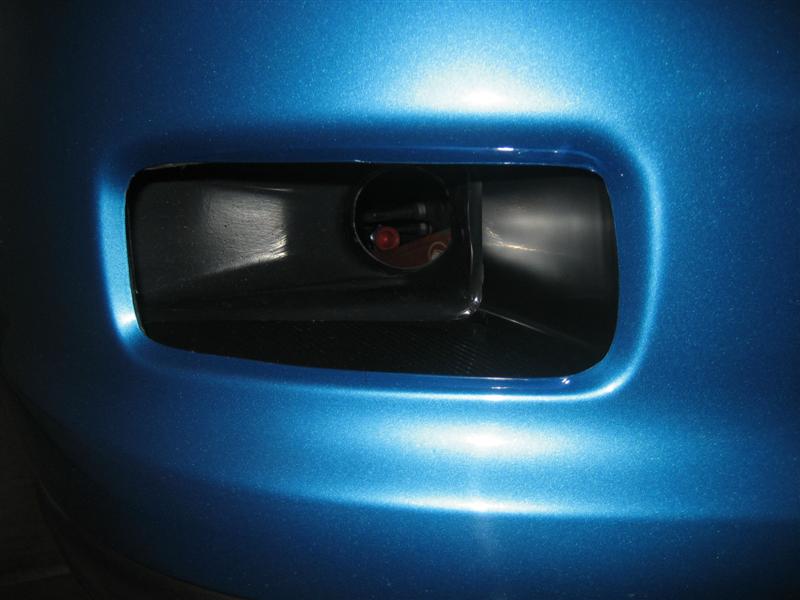
Last edited by bowtiguy; 05-08-2010 at 10:09 AM.
05-10-2010, 11:55 AM
#14
Race Director


I was going to do a similar mod, but was going to fabricate bracket as not to destroy the fog lights. However, that is certainly a good option. I personally NEVER ran screen on brack ducts, and never had problems with debris in the brakes. Most of what you get is rubber with melts away, or tiny rocks that would go through the mesh anyway. And if you've ever put a tight mesh in front of the radiator on a track car you realize that it does cause a pretty severe restriction in cooling.
I've decided to go another route, and tie-in the OEM duct pickup into a more sealed design. Hopefully I'll get it on the car this weekend, then I plan on building a real splitter for the car following. I was trying to find a way to seal off the bottom without sealing off the ducts, and I'm hoping my system works out. I'll obviously post photos as I progress.
I've decided to go another route, and tie-in the OEM duct pickup into a more sealed design. Hopefully I'll get it on the car this weekend, then I plan on building a real splitter for the car following. I was trying to find a way to seal off the bottom without sealing off the ducts, and I'm hoping my system works out. I'll obviously post photos as I progress.
10-15-2010, 11:23 AM
#15
Melting Slicks
Thread Starter
I installed these in-line cooling fans late last June, but never posted it up here o the forum. I ran it all season on track with ambient temps over 95. Pictures show it all.
I usually get 2-3 laps in to warm up my XR-2 pads on all 4 corners, then I reach over and turn my foglites on...bam! 145 CFM through a 3" hose for the entire track time regardless of speed.
They worked great. NEVER had ANY type of fade the rest of the season. I'm going to try and help out a vendor/member here on the forum get these integrated into his new mold foglite brake duct system as an upgrade!
Best part is, they come out and the foglites bolt right back in place and everything fits under the factory inner wheel well splash guards!
Last edited by bowtiguy; 10-15-2010 at 11:28 AM.

 11-09-2010, 12:31 PM
#18
Melting Slicks
Thread Starter
There is a vendor here on the forum that will be releasing a completely moulded version of this duct system that is a direct fit, looks cleaner than my R&D set-up, and doesn't require cutting of fog lite assemblies.
I'll wait for him to anounce availability once he is happy with the final product.
I'm going to try and work with him to get the fan option in there for fellow hard core track guys!
This set-up WORKS!! I've run 95 dgree air temp in Colorado 45minutes all out at High Planes Raceway reaching top speeds of 155 on the front straight with no brake fade...which I could say the same about the tires..
11-09-2010, 02:35 PM
#19


How do you think the cooling mod would work if the fans were mounted in the stock ducting? Leaving the fogs stock, and using the stock intake under the nose. Could run a switch into the cabin to turn them on.
Rule makes a 4 inch fan that is rated at 240 cfm. The stock ducting inside the nose looks like a perfect match for the 4" fan. We could just put the fans in the stock ducting, run power from the under hood fuse panel to a relay, switch in the cabin for the relay on/off, power the switch from a switched power source so that it turns the fans off when the ingition is turned off.
Think 240 cfm is too much flow?
Awesome project btw. Got me thinking about a way to put smaller fog lights inside the housing and letting the air flow around them to the brakes. Also maybe combining the air flow from the stock intake and the modified fog housing with a Y adapter....
Last edited by CGZO6; 11-09-2010 at 03:01 PM.
11-09-2010, 03:06 PM
#20
Former Vendor
One question if I may. Does the fog light area produce more airflow then the factory location? When they switched over from the C5 design the air flow numbers were greater. Just curious is all.
Randy
Randy